Hi everyone! Slaughter League is over. I’ve witnessed too many painful decapitations to carry on… Well, not quite. We’re beyond excited to announce that Slaughter League will now become Against All Odds and I want to discuss today what this means for the game!
You might be asking yourself “why the rebrand?” While the game itself isn’t changing one bit, there’ll still be all the gorey humorous deaths as before but, unfortunately, the word “slaughter” got caught in profanity filters a lot. For those of you in the community last year may remember our alpha playtest and how awkward it was to name streams and content. Twitch out-right didn’t allow streams to be named “Slaughter League”. We view Against All Odds as a social, community-driven multiplayer game, and we want everyone to have fun with it. We felt that the name hampered its potential so changed it up. For a game like this to thrive we need to ensure that there are as few barriers as possible for our community to grow!
As we were deciding how to handle the name change I really hated the idea of completely ditching the name Slaughter League as I’ve worked on this project for over two and a half years now and it's like a child to me… A very strange twisted child, but a child nonetheless. For this reason, Slaughter League will remain the in-game name of the sports game show in which players participate. Announcers will still refer to it as Slaughter League and visuals in the game world will still champion the traditional SL logo. The only major change here is anything non-diegetic in the game such as menu logos and external store branding will show Against All Odds.
Thank you all for your support so far through development, it has been one hell of a journey. We have more exciting announcements coming soon so definitely join our Discord so get hear all of these announcements first!
Dev Update #8 - Creative Tools Part 2
Hey everyone! Hope you all are having a wonderful week! Before we get into everything, we will be having a very exciting announcement later today during IGNs Summer of Gaming showcase! Make sure to tune in at 4pm ET to catch the Freedom Games showcase where we will be featured!
Today I’m going to discuss part two of the SL Creative Tool’s development progress. The focus today is all about the power and speed of object parenting and duplication.
What is parenting? For those not familiar with 3D software or common game development practices, parenting is the concept of objects you see in game can have a parent object and/or children objects. Once parented, any child object will move and rotate with the parent object’s movement. In SL, deleting an object with children will also delete all of the children and duplicating an object with children will duplicate the entire chain on objects including their individual properties (color, settings etc.) So why is this useful? Well to be honest, it is more than useful, it is essential. Parenting objects allows builders to create crazy obstacles using the vast array of individual pieces found within the object browser. Parenting objects in SL is easy, simply select the object you wish to become a child, press Select Parent and then choose the parent object.
Supports Once parented, most objects will automatically create support beams to connect the parented objects. When selecting the child object, builders can individually edit the Support component properties to achieve the look they desire. The Support component has four properties to edit: • Enabled – to completely hide all supports from the object. This means the object is parented and will act accordingly but is not visually connected. • Start Point % – decides where the support should start on the selected object. • End Point % - decides where the support should end on the parent object. • Preferred Surface – attempts to select the nearest surface to your preference to start the supports on the selected object. Using these options, builders can achieve their desired support look quickly and efficiently. https://gfycat.com/circularashamedduck Power of Parenting Let’s take a look at how parenting can be used to create some more advanced structures (and these still aren’t really scratching the surface on what is possible). Below, we can see a larger chain of parented objects (3 platforms with a set of spikes and spiked hurdle). Notice as we rotate and move the root object, all of the other objects and supports seamlessly track. This can be used as a gameplay mechanic or to speed up stage creation. https://gfycat.com/madeupuglycockroach It is also worth noting that a parent object can hold unlimited (for now) children objects. In the time-lapse below, you can see how quickly it is to setup a bespoke obstacle made from multiple obstacle objects. We can also see how helpful parent duplication is as we can spawn multiple of the same bespoke obstacle with just the click of a button. https://gfycat.com/snivelinggargantuanclam That’s all for today! Thanks for reading and as always, any questions on what you have read today, fire them away in general
Have a good one, Adam
Dev Update #7 - Creative Tools
Hello everyone, hope you’re all having a great start to the week!
This week we’re going to begin showing off our Creative tools that will be available day one of Slaughter League’s launch. As writing these blog posts and creating the material for them takes time away from development I’m going to be splitting these into chunks over the coming weeks and discussing each core feature and design decision in as much detail as possible.
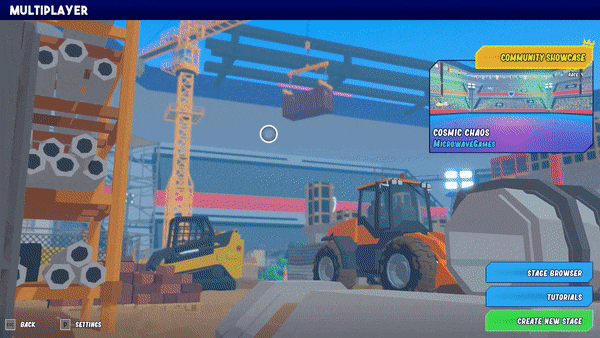
With that said, it makes sense to start from the very beginning of the Creative experience in Slaughter League. From the main menu, Creative will have its own space to dive into others’ user-built stages, tutorials, and the tools as a whole. When creating a new stage, you are immediately hit with two options: Location and Mode template. Want to build a stage inside a volcano? Space? Jungle? Go for it. Locations do not affect the gameplay in any crazy way, so it is more about aesthetics. The main difference between the locations is how the players will die from falling beneath “ground level”, whether that be falling (space), getting eaten by sharks (default) or slowly descending into lava (volcano). Mode templates are a very important decision when going to Creative with an idea in mind. As many of you saw in the demo, Slaughter League has a huge array of unique game modes. And as many of you are aware, Slaughter Leaguer will feature tools to build your very own game modes too. So why does this matter? To keep things simple for newbie creators, selecting a mode template will ready the stage builder with everything you will need for that mode to work, so focus can be spent on the levels instead. For example, the Race mode template will start with a Start Line object and a Finish Line object as these are essential to the Race game mode. The Zombie mode template will start with at least one Zombie Spawn Point object and one Survivor Spawn Point object. The Custom mode template allows advanced users to start with a complete blank canvas to build anything they like (stage and mode).
Once the player has loaded the stage they are free to begin forging their ideas. By default, players can pan the camera (left, right, up and down) to navigate their world in a 2D plane. As the gameplay of Slaughter League is a 2.5D platformer, the main focus is 2D, but players can easily place objects in the foreground and background which I will demonstrate in a future post. To begin spawning new objects, players can head to the Object Browser to look at the selection of objects on offer. Each item has an associated cost and stage has a set budget which must be adhered to. As much as we’d love to offer unlimited of any type of object, we don’t want to obliterate our servers or everybody’s computers. Additionally, for the more intensive objects (such as cannons, tesla coils, flamethrowers etc.) there is hard caps on a per object basis which we will be monitoring and adjusting as we head to launch. After an object is selected and browser is allowed to spawn it, we can then begin placing our new item in the world. Placing objects is super simple, especially with the many snapping features available (which we’ll also go into more detail in a future post).
Every object from the demo (and many many more) will be available in the Object Browser so you will be able to create anything we made, but even better! Every single stage in Slaughter League will be made using the in-game tools, and our stages will all be editable too. This means players will be able to see what techniques we use to build our stages to learn from. To close this blog post, I’d just like to show you the small, limited selection of items we have available in our current build. This is just the beginning.
That’s all today, thank you for reading and I hope you’re looking forward to more Creative updates. Any questions, fire away in general.