SPOILER ALERT: This introduction continues the story of Call of Duty®: Modern Warfare® II to set the stage for Season 05. Commander Phillip Graves was presumed KIA during a ferocious tank battle during the Modern Warfare II Campaign, after turning on members of Task Force 141.
Graves is alive.
Even if Task Force 141 successfully secured the warhead as part of their RAID, Farah lost her brother — and AQ asset — Hadir . . . but not before he revealed that a greater threat is on the horizon.
Unbeknownst to Price, Gaz, and the rest of 141, Farah and Alex head back into Urzikstan. A meeting has been set up with a former enemy who apparently wasn’t incinerated in his tank at the Fuerzas Especiales Headquarters in South America.
Three elite leaders pore over a map of Al Mazrah, where Graves has intel on a new ultranationalist threat now present in the AO, the same group Hadir could not speak of in his dying breaths:
The Konni Group.
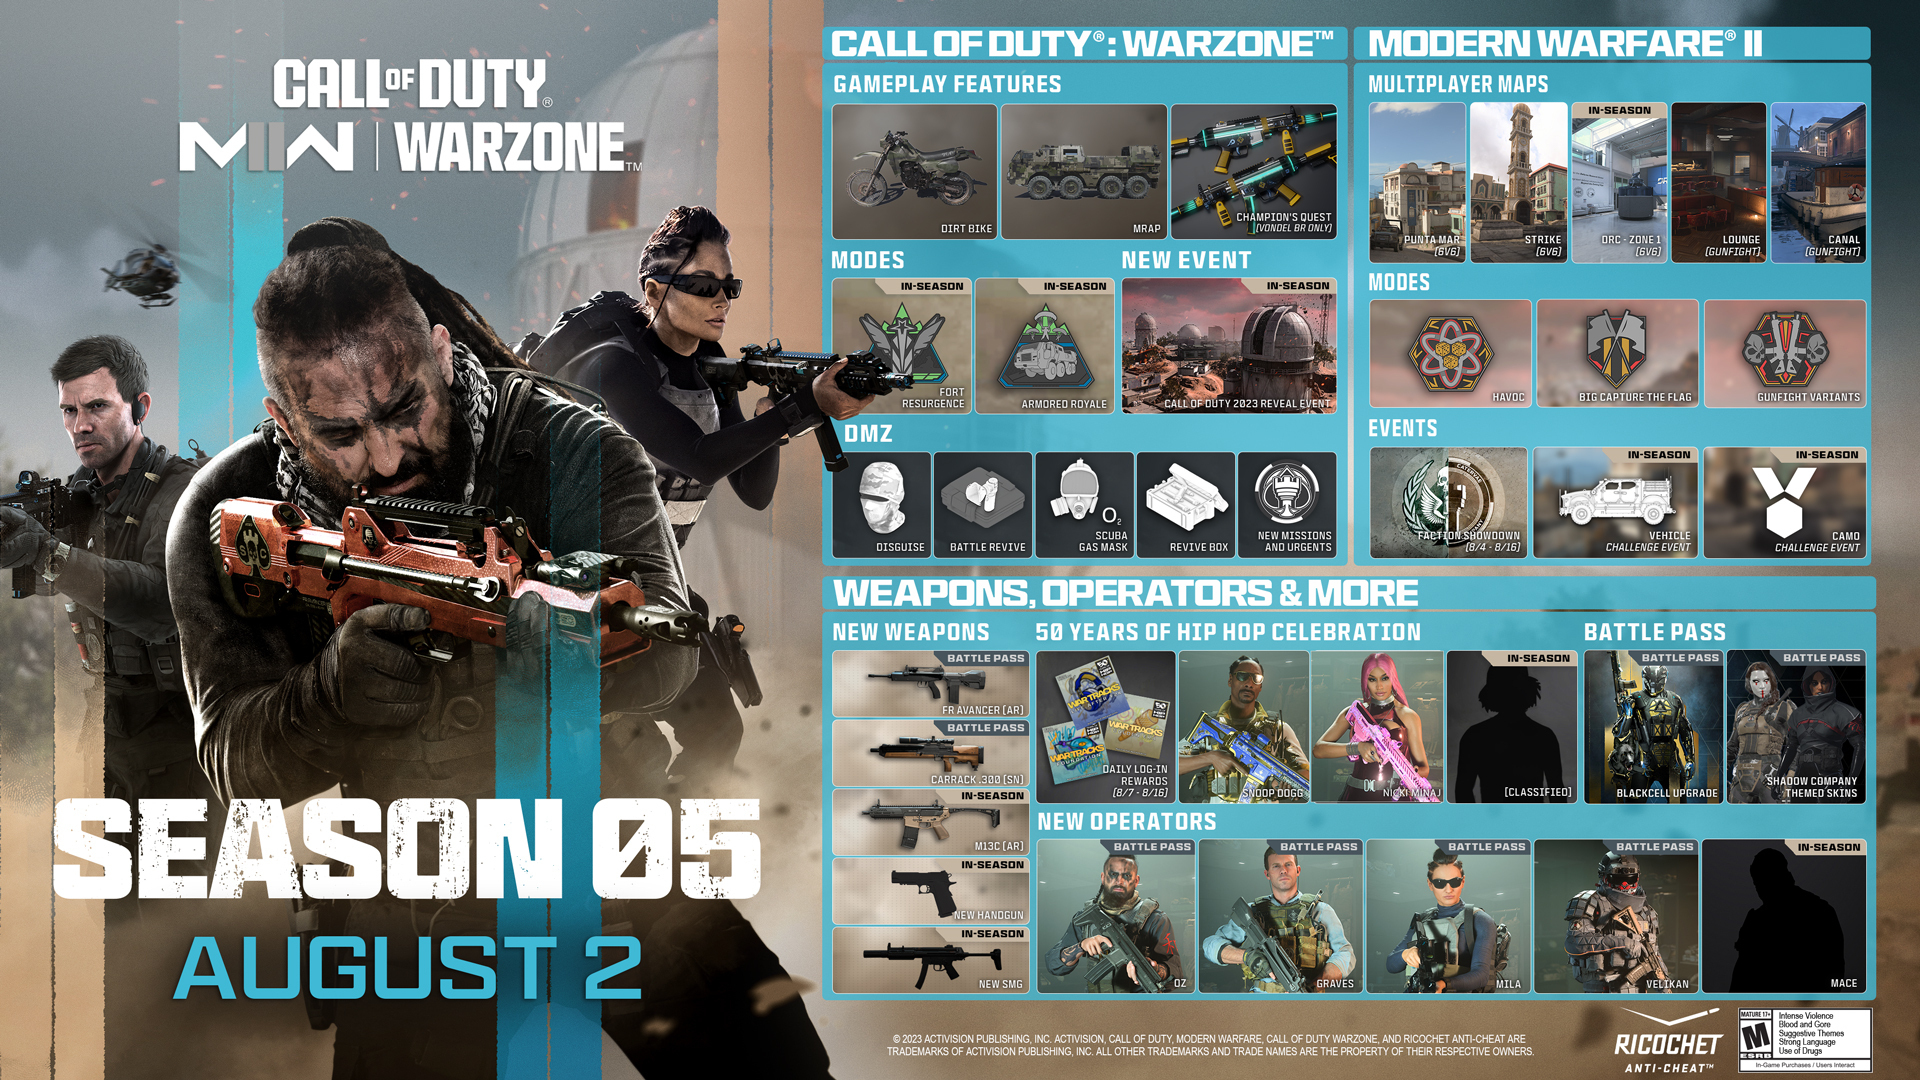
This is Season 05 Call of Duty: Modern Warfare II and Call of Duty®: Warzone™, launching on August 2 at 9 AM PT.
Season 05 Patch Notes
Season 05 is here, bringing a fresh twist of the knife in the Call of Duty: Modern Warfare story, impressive free content drops across both Modern Warfare II and Call of Duty: Warzone, to celebrating the 50th anniversary of hip hop, and much, much more.
Content Drop: Season 05 BlackCell, Battle Pass, and Bundles
Announcing the Season 05 Battle Pass
Commander Graves (very much alive) and Oz, one of Shadow Company’s finest leaders in cyber warfare, are about to launch a counterattack against the greatest threat to Modern Warfare® in Season 05.
The Season 05 Battle Pass features 100+ rewards, including two new functional weapons, Commander Graves, and a ton more content that will prepare you for a critical season of Call of Duty®: Warzone™ and Call of Duty®: Modern Warfare® II.
In fact, for the first time in Call of Duty® history, there will be five total Operators offered across the Battle Pass and BlackCell, an unprecedented value for those looking to reinforce their roster with Shadow Company’s finest.
Like prior seasons, purchasing the Battle Pass for 1,100 COD Points grants access to all 100 Tiers, while the BlackCell — available for $29.99 USD (or regional equivalent — offers even more rewards on top of everything in the standard Battle Pass.
BlackCell Season 05
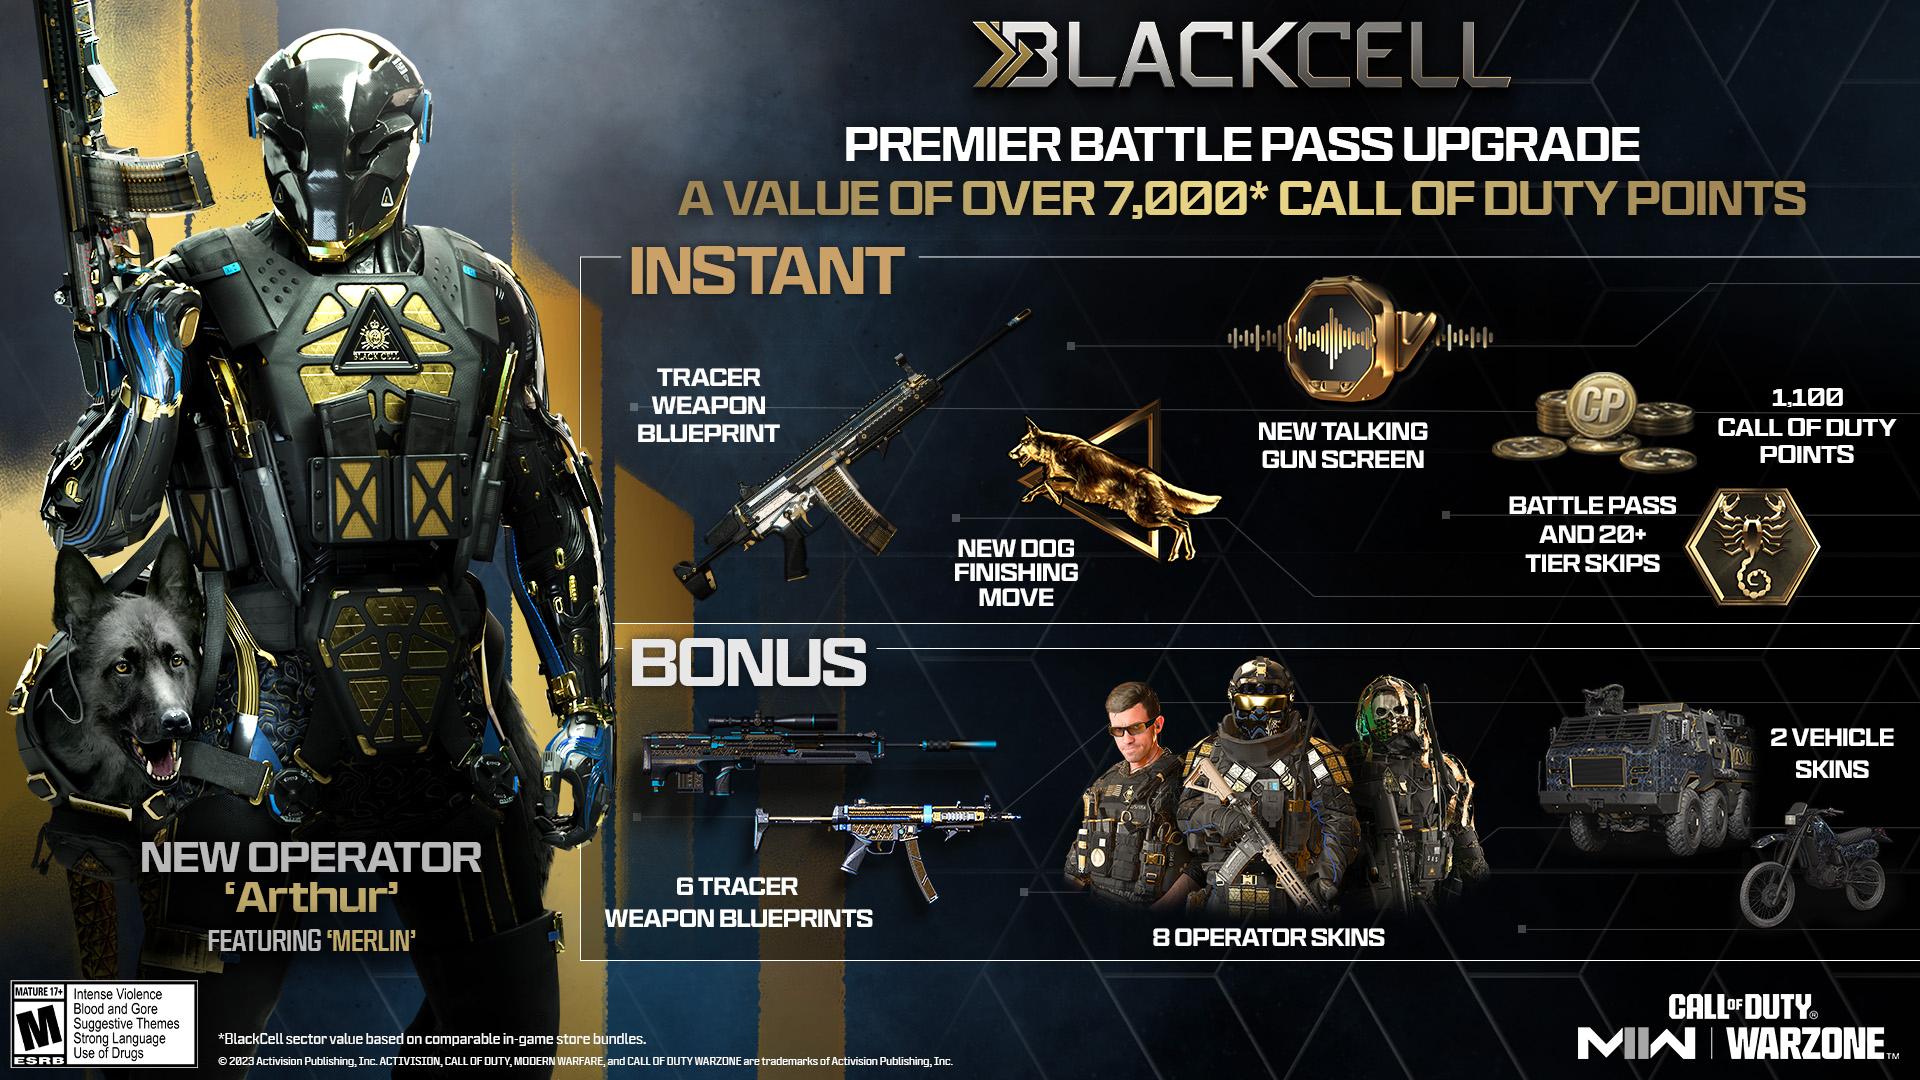
In summary, the BlackCell offering for Season 05 includes the following:
Full access to the Season 05 Battle Pass, plus 20 Battle Token Tier Skips. The full Battle Pass includes 1,400 COD Points within 100 Tiers of unlockable content from Battle Pass progress.
The BlackCell Sector, including 1,100 COD Points; the new BlackCell Operator Arthur and his Tactical Pet Merlin; the “Caliburn” Tracer Weapon Blueprint; and Gwen, a Battle Buddy Gun Screen.
An exclusive BlackCell Sector within the Battle Pass AO serving as an alternative starting location.
Additional BlackCell-only Battle Pass content: eight BlackCell Operator Skins – one for Ghost, Alex, Roze, and new Operator Velikan, and two for new Operators Oz and Graves – six Tracer Weapon Blueprints, and two Vehicle Skins.
Players who upgrade to BlackCell after purchasing the Battle Pass will also receive 1,100 COD Points back.
One of Shadow Company’s best, Arthur is [[REDACTED]].
All we know is that he is a warrior to the core. No face, only a callsign; he is apparently a legend, but no legible records were found.
And the only companion he associates with his second-in-command, a K9 Unit in Merlin.
New Tactical Pets Companion Feature
New to Modern Warfare® II, Operators will have the option to bring companions alongside them in Multiplayer, Battle Royale, and DMZ modes. This provides the unparalleled benefit of companionship along with a devastating Finishing Move.
Merlin — and other Tactical Pets— cannot be harmed in any way and play a role in Finishing Moves. . . . Just remember to equip the Finishing Move separate from the companion when editing your chosen Operator.
New: Battle Buddy
Another new addition to Modern Warfare II is a Battle Buddy – virtual “assistants” who act as a mini-announcer with some additional personality.
“Gwen” is the first, as her Gun Screen – what she prefers as opposed to “Battle Buddy” – is packaged with Arthur and his K9 unit Merlin. Just perform well with her equipped, because she has no time to assist with anything but a successful mission.
She will callout Killstreak activations, kills – including with specific weapons or equipment – and other in-game personal events, especially when you win or perform well in a match.
Purchase the Battle Pass to Unlock Graves, Oz
As mentioned, the BlackCell offering includes everything in the Battle Pass. However, whether you are BlackCell or just picking up the standard Battle Pass for 1,100 COD Points, everyone gets two Operators in the instantly unlocked Bonus Sector: Oz and Graves.
Yes, Phillip Graves is back alongside a new Shadow Company leader in Oz. They co-headline Battle Pass for Season 05, and their biographical information is here.
The instant reward Sector for the Season 05 Battle Pass will include both Graves and Oz as Operators with their default Skins. It also will award the blue and silver “Take Point” Assault Rifle Weapon Blueprint, meant for midrange engagements; the “Lucena” Shotgun Weapon Blueprint, perfect for close-quarters situations; and a 10% Battle Pass boost.
BlackCell owners will also unlock two alternate black and gold Operator skins – one for Oz and another for Graves – as part of the instant reward sector.
Velikan Returns in Battle Pass, Additional Operator Also Included
The fourth new Operator in the Battle Pass and BlackCell offering is a familiar face whether you played Modern Warfare (2019) or ventured into Building 21.
Available as the HVT of Sector 19 in the Season 05 Battle Pass, Velikan is a giant in terms of his legacy. Not many people know of this Shadow Company mercenary’s past, but they do know of his current assignments . . . by way of facing him down on the wrong side of the fight.
Battle Pass Skin: The former Shadow Company warden of Building 21 deploys with a painted helmet and orange trim accentuating his gray heavy armor.
BlackCell Additional Skin: Velikan’s enhanced BlackCell Skin variant adds gold embellishments and a darker shade of armor embellished by electric-blue trim.
Mila Also Joins the Fight Via Battle Pass
Although her bio is [[REDACTED]], Mila is a powerful warrior who fights for KORTAC across Multiplayer, Special Ops, and any Call of Duty: Warzone modes.
She is available as the HVT of Sector 6, and has the following Skin at launch:
Battle Pass Skin: Simple yet effective, Mila is prepared for combat with a tactical (non-functional) armor vest and standard-issue blue-and-black gear. She also comes with some sweet shades to protect her from the desert sun in Al Mazrah.
New HVT Operator Skins
Operators on both factions are in place for the next game across new battlegrounds.
BlackCell owners get eight additional Operator Skins with enhanced black-and-gold aesthetics when completing certain HVT Sectors across the AO.
These Operators are no pawns; they are ready to pull double duty to stop Konni, regardless of their allegiance.
“The Bishop” Skins for Alex (Sector E13, HVT)
Battle Pass Skin: Alex prepares for heavy fighting in a helmet and fatigues, sturdy boots, and a beige vest topped off with ammo and gear.
BlackCell Additional Skin: Heavy armor with big style. This black and gold set means business, his prosthetic leg reinforced and recolored to match.
“Bad Bishop” Skins for Roze (Sector E14, HVT)
Battle Pass Skin: Equipped in medium armor balancing mobility and defense, Roze additionally conceals her identity behind a mask, preserving anonymity in the field.
BlackCell Additional Skin: To match her tricked out armor, Roze opts for a golden mask and emits a green and blue hue in her animated BlackCell alternate Skin.
“The Rook” Skins for Ghost (Sector E17, HVT)
Battle Pass Skin: The perfect gear for the desert landscape of Fort Resurgence, “The Rook” finds Ghost in a cape and his signature mask, exchanging his typical dark colors for a more muted beige, brown, and white.
BlackCell Additional Skin: Trade the muted look for a striking black and gold variant, featuring topographical designs over the pants and jacket, as well as gilded strips along his hood and cape.
New Weapon HVTs in Sectors E7, E8
Season 05 brings two new, free functional weapons to unlock in the Battle Pass: the long-distance Carrack .300 and the rapid-fire FR Avancer.
Carrack .300 Sniper Rifle (Sector E7, HVT, Free)
This semi-auto bullpup sniper rifle features an exceptionally high fire rate and is capable of putting multiple rounds into targets at long distances.
Operators seeking a fast-firing yet accurate Sniper Rifle should look no further than the Carrack .300.
While it may not possess the power-per-bullet of its harder-hitting companions, this weapon is still capable of inflicting heavy damage from a distance with proper shot placement to the head down to the upper chest. In fact, its strength lies in its ability to deliver quick follow-up shots so long as the Operator behind it handles its high vertical recoil.
Use the Gunsmith to fashion the Carrack .300 into a highly mobile and fast-handling weapon for aggressive play. Alternatively, with the right attachments, an Operator can lean into its strengths by extending its damage range and stabilizing its recoil for sturdy longshots.
Find your preferred balance and reap the rewards in long-range fights no matter the operation.
FR Avancer Assault Rifle (Sector E8, HVT, Free)
With a blinding fire rate and exceptional maneuverability, in the right hands, this aggressive bullpup rifle can dominate the battlefield.
Shred enemies with this midrange bullpup rifle that features a rapid-fire rate and a strong vertical recoil to match.
Its solid hip-fire spread and high damage per minute make it a phenomenal weapon up close in addition to its “category standard” range for all Assault Rifles. And with a recoil pattern that’s easy to learn, an Operator with a steady hand or trigger discipline can make this tool a devastating Primary Weapon in any operation that calls for close- to midrange combat.
The Gunsmith allows Operators to maximize efficiency with the FR Avancer. Equip it with an extended magazine, or a Laser for improved aiming capabilities, an Underbarrel for recoil control, a Stock to counter mobility penalties from other attachments, and a red dot Optic for better visibility. . . .
Or do all of the above in a well-balanced yet powerful combination fit for fighting entire squads.
New Weapon Blueprints, Vehicle Skins
A larger game is looming over the Battle Pass. . . . The Weapon Blueprints on offer give you plenty of moves to make no matter the mode, allowing you to put even the most worthy of opponents in serious checkmate.
King Hunter — Assault Rifle (Sector E1, HVT)
Cool off with this cobalt-blue Assault Rifle Blueprint unlockable right at the normal starting position in the Battle Pass.
The “King Hunter” outfits this staple weapon with an extended damage range, a holographic sight, and recoil stabilizers for a cleaner shot.
Also available for BlackCell owners is the “King Hunter BlackCell” Weapon Blueprint. Offering a similar attachment setup to the standard “King Hunter” Assault Rifle but with a sleek black-and-gold finish and Tracer Rounds, this is one of the six additional Weapon Blueprints BlackCell owners can receive as part of the full Season 05 Battle Pass.
Banneret — SMG (Sector E12, HVT)
Based off the SMG introduced in Season 04, the “Banneret” is a Shadow Company–themed weapon featuring a bloodred skull design and a balanced attachment setup.
Customized with an extended damage range plus improved recoil control and stability, the “Banneret” is a capable tool against enemies up close and at midrange.
Raider — Battle Rifle (Sector E14, Non-HVT)
For Shadow Company Operators, the “Raider” Weapon Blueprint features a precision sight picture along with improvements to aiming stability and recoil control.
It is a Battle Rifle meant for midrange combat, harmonizing precision and power to grant an accurate and well-positioned Operator a commanding presence in their engagements.
New Vehicle Skins
Several new Vehicle Skins are here for those designated drivers around Ground War and other modes across Call of Duty: Warzone and Modern Warfare II.
Get the “Magnitude” Heavy Tank Skin in Sector E15; if its skull-inlaid, white paint job doesn’t scare off the enemy, it’s black and gold cannon and turret sure will.
In Sector E2, access the “Wheeled Steed” Dirt Bike, which includes an additional BlackCell Skin variant.
Remember: BlackCell owners get that variant Skin as well as another Vehicle Skin variant as part of the full BlackCell offering in Season 05.
Complete the Map for Victory Sector Tier 100 Rewards
Conquer all Sectors to access the final Victory Sector:
“Grandmaster” Assault Rifle Blueprint
This five-attachment build highlights the versatility of the new Assault Rifle in the Battle Pass.
In this configuration, a 45-Round Mag helps offset the weapon’s high fire rate, with other attachments improving its Aim Down Sight speed and flinch resistance for a snappy and sturdy weapon that’s as effective as it looks.
Also available to BlackCell owners is the “Grandmaster BlackCell” Weapon Blueprint. This variant dips the whole weapon in a black-and-gold aesthetic with Tracer Rounds, making this Primary Weapon serious royalty when it comes to any loadout.
“Shadow 0-1” Tier 100 Skin for Graves
Commander Graves deploys in his classic all-black Shadow Company gear, featuring a tool for every possible scenario.
BlackCell owners also get a variant for this Skin, which adds gold leaf to some of Graves’ practical body armor.
“Onslaught” Tier 100 Skin for Oz
Break their will to fight with this red, black, and brown Tier 100 Skin featuring a terrifying helmet and twin machetes at his sides, both hooked at the end and appearing well-worn with the blood of enemies.
The third BlackCell addition makes this tier an incredible value for owners. The “Onslaught BlackCell” Skin makes Oz a true gilded menace with his long braids flowing over his glitzy gold and black attire.
300 COD Points, Emblem
Players who reach Tier 100 will also unlock the “Knight 5” Emblem and 300 COD Points to put toward their next regular Battle Pass or Store Bundle purchase.
Store Highlights: Call of Duty Celebrates 50 Years of Hip Hop
Celebrate 50 years of hip hop with two new Operators who are synonymous with the culture and are innovators within the genre, both available at launch. 21 Savage will be available at mid-season; his bundle details will be revealed closer to that launch date.
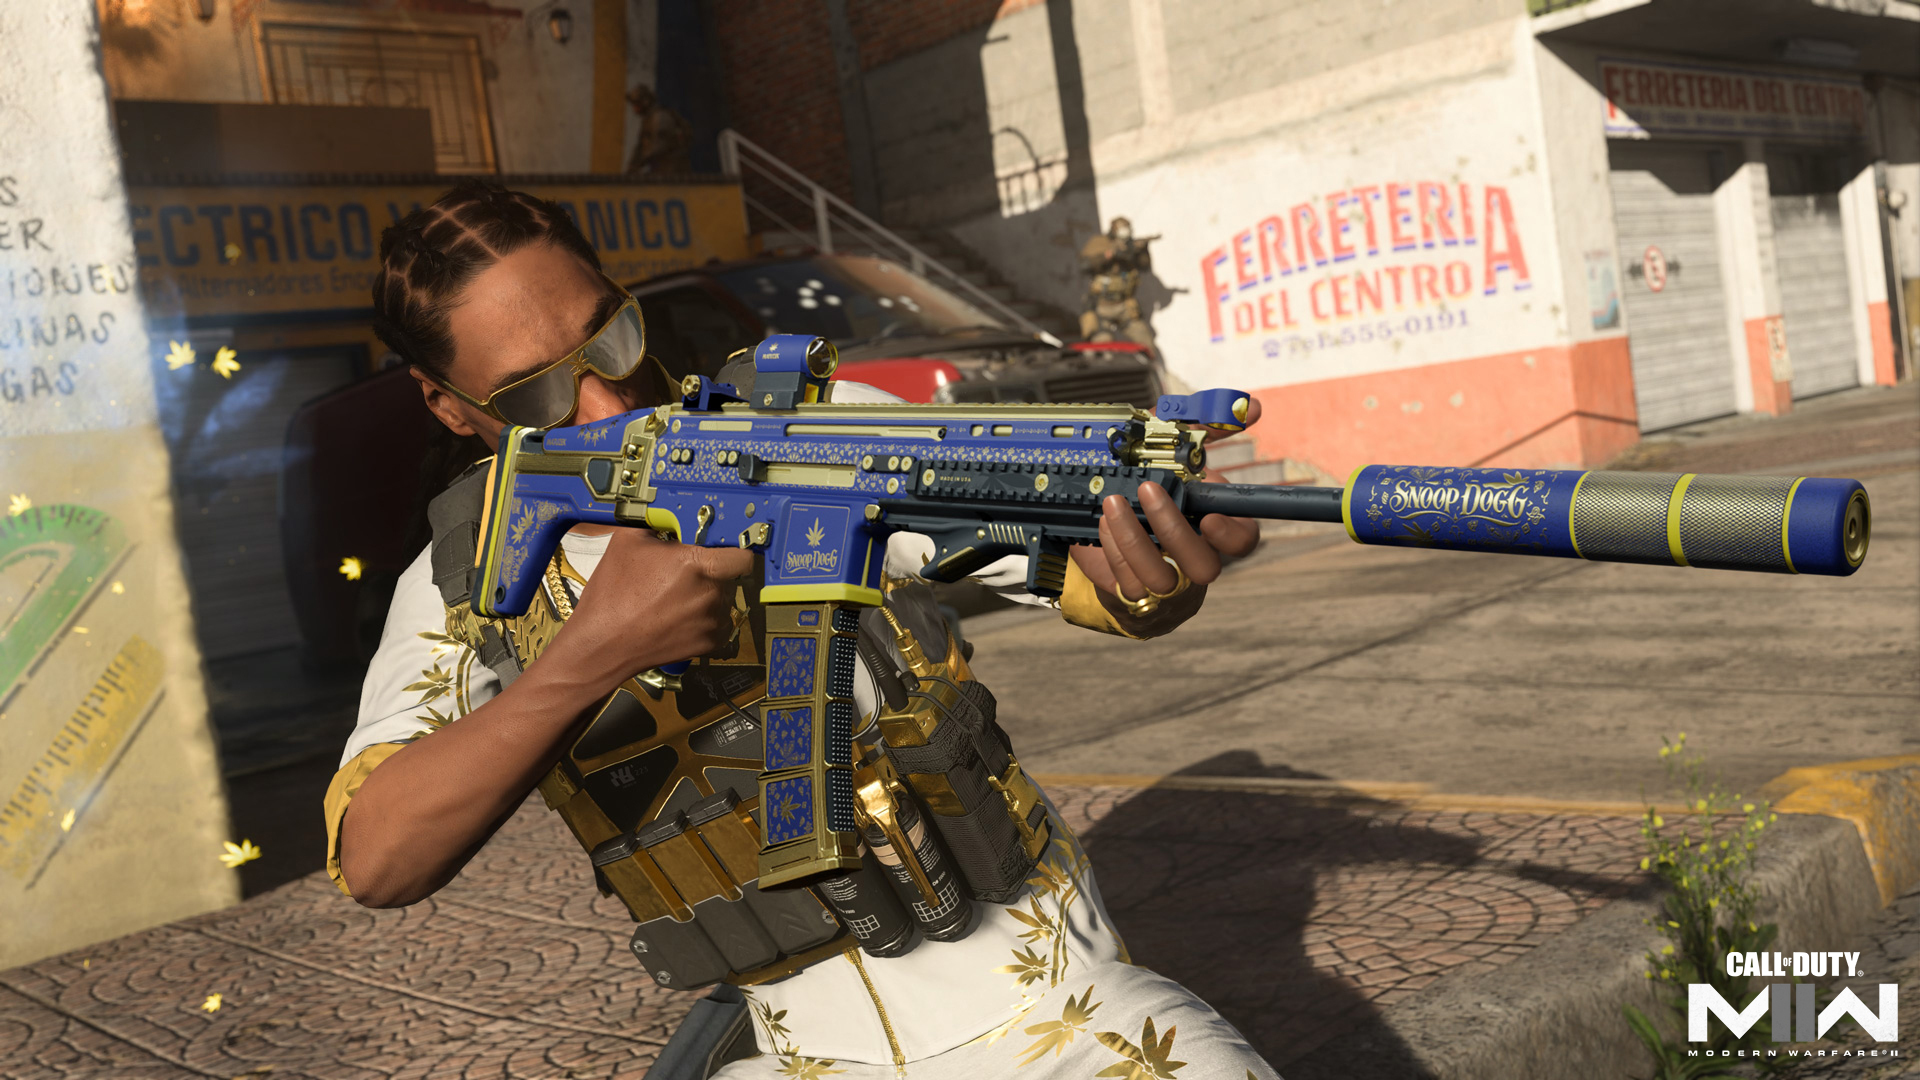
Tracer Pack: Snoop Dogg — Return of the Shizzle
Snoop Dogg returns to the series in a Bundle featuring two Operator Skins: the default “Snoop Dogg” and the “D-O-Double G” alternate Skin. Blaze up the competition with the “Life of Da Party” Assault Rifle, the “Toke Force 141” SMG, and the “Wild and Free” Sidearm Weapon Blueprints. And take out enemies from behind with the “Snoop Hustle” Finishing Move.
Ride around in style with the “High Rider” Hatchback Vehicle Skin, represent his label with the “Death Row Records” Weapon Charm, roll in with “A Snoop Thang” Loading Screen, and show your fandom off with the “Snoop” Emblem on your Player Profile.
Pro Pack: Gunslinger Ghost
Saddle up to the fight with the Pro Pack: Gunslinger Ghost Bundle, available in Season 05 for $19.99 or your regional equivalent.
This pack includes the “The Marshal” Operator Skin, which has Ghost looking like he is ready to lay down the law whether it’s out in the Wild West or in Al Mazrah. Take control of the lobby with “The Bandit” Assault Rifle and “ Gallows Call” Sidearm Weapon Blueprints, or ride into the sunset with the “Saddle Up” Vehicle Skin.
Additional customization options include the “Wall Mounted” Sticker, “Grave Marker” Weapon Charm, and the “Rounds and Roses” Emblem.
The Pro Pack: Gunslinger Ghost Bundle also comes with 2,400 CP to put toward your next Store or regular Battle Pass purchase.
Tracer Pack: Elementals: Iceflow
Send shivers down their spine with the “Dead Winter” Operator Skin for Valeria, outfitted with the “Snowfall” Assault Rifle and “Cold Wind” LMG Weapon Blueprints, plus the “Polar Vortex” Vehicle Skin for the ATV.
When you need to get stealthy, freeze their hearts with the “Ice Spike” Melee and Throwing Knife variant.
Other cosmetic items include the “Deep Freeze” Weapon Charm, “Electric Ice” Loading Screen, “Cold Heart” Sticker, and the “Deadly Lead” Emblem.
Tracer Pack: Dark Rituals III
The Dark Rituals series continues with its third installation offering the “Possessed” Operator Skin and three Weapon Blueprints: the “To Dust” Assault Rifle, the “Death’s Door” Battle Rifle, and the “Necrotic” Sniper Rifle.
Equip the “Grave Digger” Frag Grenade variant, and further the reaper’s cause with the “Death’s Harbinger” Loading Screen and “Just Ghostly” Emblem. This Bundle also features a one-hour Double Player XP and one-hour Double Weapon XP token.
Tracer Pack: Penumbra + Universal Wrap
Equip Shadow Company’s “Onyx Pitch” Assault Rifle Blueprint and outfit it with the “Vault Keeper” Sticker and “cubic Weapon Charm. Complete your Shadow Company allegiance with the “Destination: Chaos” Loading Screen and “Shadow Company” Emblem.
All of these offerings are just some of what is on offer as part of Season 05, with more Bundles to be released as part of the Reloaded update.
Strike Urzikstan Day 278, 11:00 Factions Deployed: SpecGru / KorTac
In this sprawling urban center, there’s danger at every corner and enough traversable buildings to make you check both high and low when approaching the next objective.
The map’s larger size provides ample opportunity to get into position before the fight begins. Will you move up in haste to bring the battle to the enemy right away, or melt into one of many power positions, waiting for the enemy to come stumbling into your line of sight?
In this iconic 6v6 Core Multiplayer map – first released in the original Call of Duty® 4: Modern Warfare® and re-released in Modern Warfare 2 (2009) – launching with Season 05 in Call of Duty®: Modern Warfare® II, the possibilities are endless.
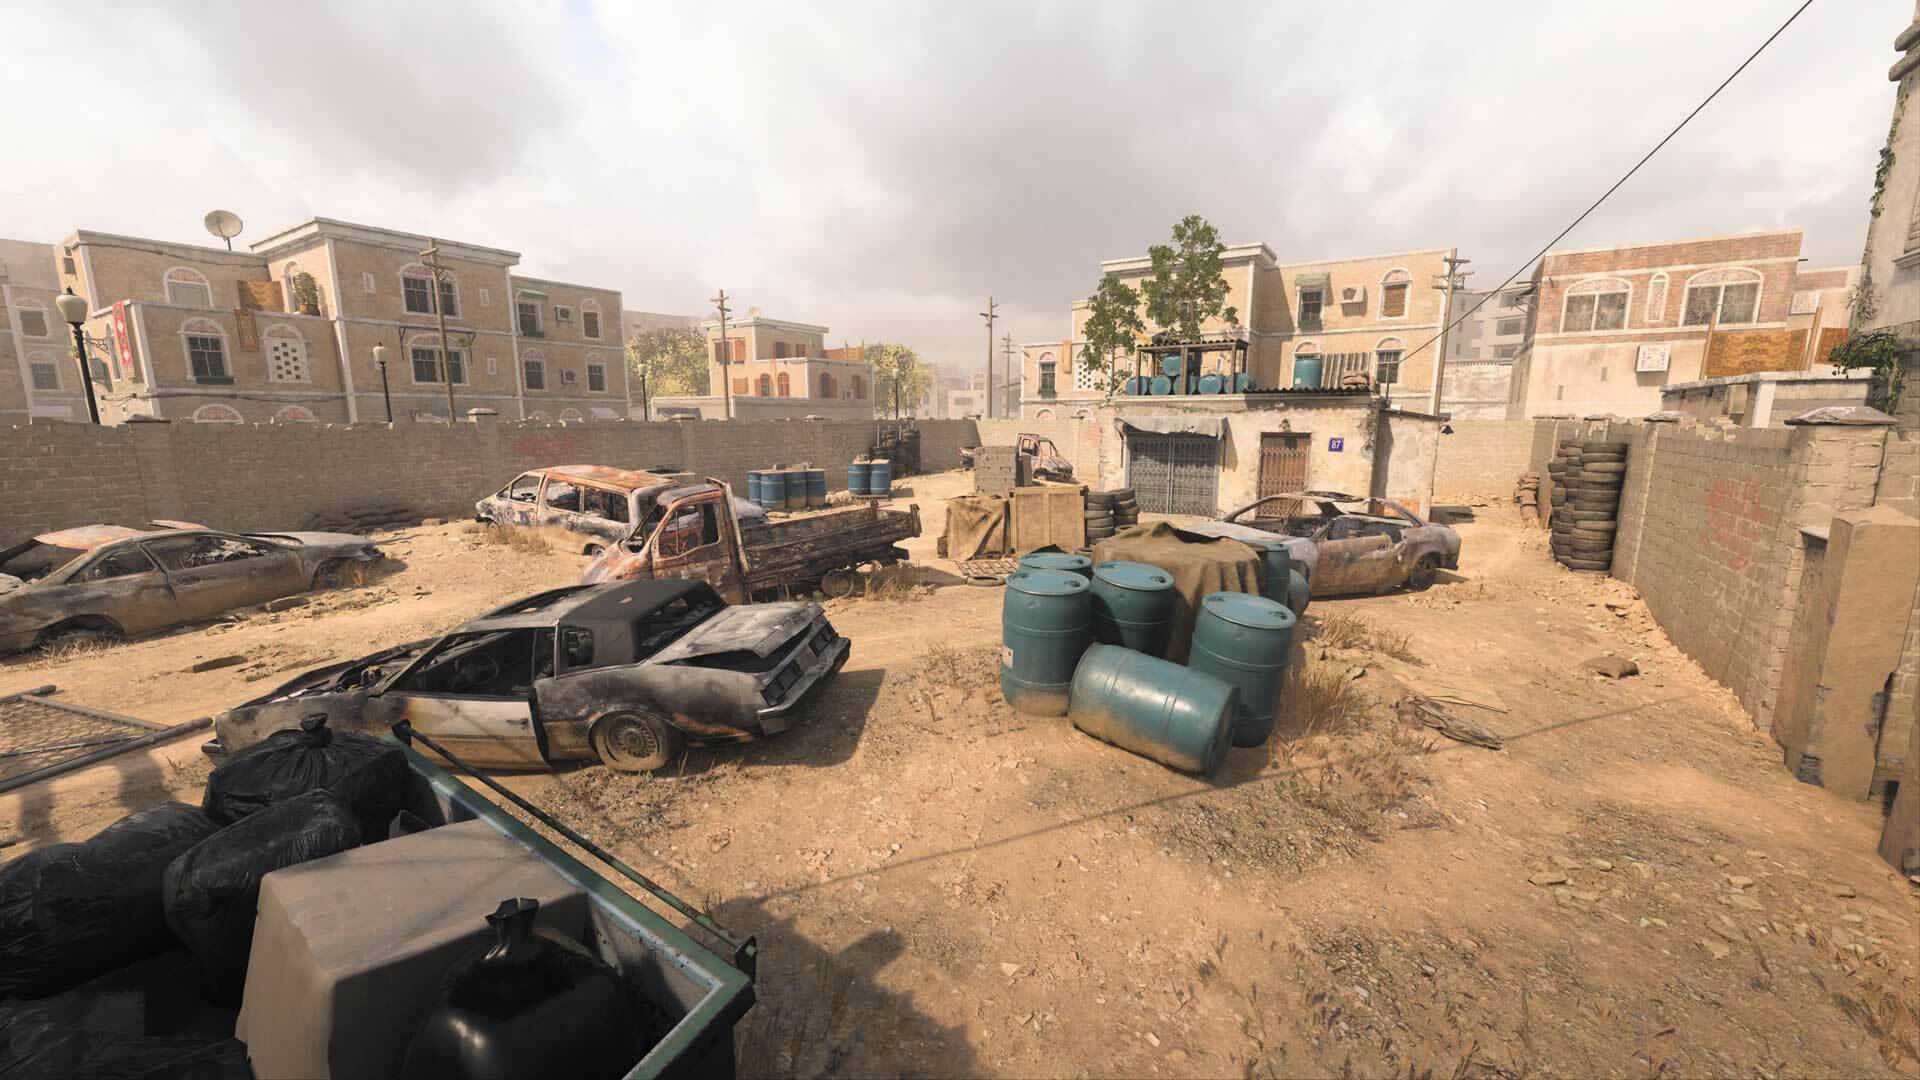
KorTac Spawn Zone (Northeast) — Junkyard
Starting from the Junkyard, KorTac forces have several options at the start of the match, with each path catering somewhat to a certain type of Loadout.
Midranged Loadouts perform well through the southern Market route; prepare to engage at the dividing wall. Those with closer-ranged Loadouts may prefer to book it toward the western Clock Tower, using its pedestal and the surrounding buildings to cut sightlines short.
For snipers, the real prize is found along the central Main Street, a long route with little visual obstruction down the length of it. A two-story building is essentially the “hero” of the map for these sharpshooters, as it will become a power position and focal point for combat early and often during a match.
Spawn Point: SpecGru
SpecGru Spawn Zone (South) — Hill
From the southern Hill location, fast SpecGru Operators can get the advantage over the Clock Tower by rushing north to the second story of the Main Store. From here, you’ll have a powerful vantage point over the eastern half of the tower.
You might also head east and up the Flower Shop stairs for a vantage point over enemies coming through the Market. For snipers and other long-ranged Loadouts, consider booking it to the west end of Main Street, where you’re likely to encounter enemy snipers on the other side, so be ready to engage.
Map Maneuvers: Route Planning
For the purposes of this guide, we’re dividing Strike into seven main sections:
Junkyard and Market
Apartment
Clock Tower
Shops
Main Street
Hill
Flower Shop
Junkyard and Market
Starting in the northeast and running south through the Market, this section offers a great means of moving up and down the map without being exposed to the central Main Street. Its narrow layout and plentiful cover pieces allow close- and midranged Loadouts to shine in a map where long distances are the mainstay.
There’s also easy access to the Apartment and Electronics Store for making a push west, both offering valuable cover when combat gets heated.
Apartment
Easy to spot by the big “Laundry” sign hanging out front, the Apartment marks a critical point in the northeast section of the map, standing guard over the Junkyard, Market, Crashed Car, and the roads leading toward the Clock Tower and Main Street. Its two levels offer multiple points from which to launch an attack, so an active player can attack on all sides.
Clock Tower
Surrounded by high walls, the Clock Tower and Culture Center behind it mark another point where shorter-ranged Loadouts can perform well. The entry points from the Café to the west, Main Street to the south, and Apartment to the east present some risk when holding these positions, but the area’s central location gives Operators a chance to cut off a major thoroughfare through the map. Lock down this spot and enemies will be forced into crossing Main Street.
Shops
The Shops form a key area around the western section of Main Street, providing access to several interior spaces. The Café and Main Store are great starting points for an attack toward the Clock Tower, with the upper Main Store additionally looking deep into Hill. The Restaurant on the area’s southern border offers a large ground-floor interior; hop onto the walls surrounding its outdoor seating for a raised view over the Shops.
Main Street
A sniper’s paradise, Main Street stretches nearly all the way across the map. Located in the center, it’s also a major crossing point. If you need to get through, take a moment to read the area and then race across using Tactical Sprint.
Expect Operators to occupy the buildings on its perimeter, namely the Main Store on its west end, the Electronics Store on its east end, and the Hotel along the bottom. Expect fighting from building to building, with Operators in the street getting caught in the middle. Sandbags, barricades, and other obstacles offer some cover in the street, but you’ll still be highly exposed from multiple angles.
Hill
While not quite as concealed as the Junkyard main spawn, the Hill sits relatively apart from the rest of the map, at least when pulling back behind Thorley’s Supermarket. Note that, for this version of Strike, a new hallway was added for better combat flow, ensuring that an Operator that holes up in the Supermarket can still be smoked out through this hallway.
When looking north, long-ranged Loadouts can get some shots on enemies in the Main Store and even out to the Shops.
Note the balcony of the orange building here — this provides a good vantage point against enemies moving between Hill and the Flower Shop just east. And watch for Shotguns when traversing the tight staircase connecting Hill and Restaurant.
Flower Shop
The Flower Shop provides a strong power position over activity in the southeast, with its upper level offering views toward Hill, over the Market, and a small section of the eastern Main Street. From the ground floor, its single front entrance provides a more concealed view against enemies coming in from the north. The gas station just east is also worth mentioning; while you can’t get inside of it, the low stone wall and barricade offer solid protection when skirmishing in the area.
Objective Routes and Rotations
Mode Intel: Domination
Main Street heats up even more in Domination, with all three flags positioned just out of sight of the main drag. In the west, the A flag sits within the Restaurant’s outdoor seating area, surrounded by high walls. It’s a short trek from here to the B flag at the base of the Clock Tower, but the deadly Main Street separates the two.
Positioned in the eastern Market, the C flag presents a longer travel time to B, but it’s possible to move between the two flags without crossing Main Street. The team that can hold down the Clock Tower is in the best position to win, even if that means swapping between A and C as your second flag; because the area is relatively protected, it’s not as difficult a task as capturing B in other maps.
Mode Intel: Search & Destroy
It’s a long route to the bomb sites on this large map, with the attacking team starting in the southern Hill, the A site positioned by the Cultural Center behind the Clock Tower, and the B site in the eastern Market just behind the Apartment. The defending team therefore has ample time to get into position, so take it slow and communicate. Thankfully, because both sites are north of Main Street, attackers can avoid the danger there by quickly crossing over at the start of the match. Moving east from Shops is also a solid strategy, as well as booking it to the Flower Shop and then working your way up to the B site.
On defense, the Apartment offers an obvious power position over B, so it may be wise to send the bulk of your forces to the A site until you have a better idea of where the attackers are heading. And don’t hesitate to fan out, as this provides the team a greater overall field of view.
Mode Intel: Hardpoint
There are six total Hardpoints on Strike, making this a great mode for learning all the ins and outs of the map. Teams will first rush to the center with the initial Hardpoint appearing inside the Hotel before moving just west outside the Restaurant; bulk up your forces between these two areas to increase your chances of getting the most points out of both objectives.
From the Restaurant, the objective moves to the Electronics Store on the other side of Main Street, then south to the Flower Shop. As with the first two Hardpoints, sending the bulk of your forces between the third and fourth objectives can help you form an early lead in the match. From the Flower Shop, teams will need to cross the map for the fifth Hardpoint by the Cultural Center; get some Operators there early since it’s a long trip. The final Hardpoint appears in the primary room of the upstairs Apartment. On a larger map like this, early rotations are crucial, so play aggressively.
Top Tips
1. Learn the layout. With large buildings around every corner, you might at first feel like you can’t move a step without being spotted from some balcony. That’s not the case, however, as many of the buildings are closed off or only accessible on the ground floor. Take your time learning where the real threats are so you can ignore the rest.
2. Know your power positions. Once you’ve identified the traversable buildings, it’s time to lock in on the major power positions so that you know where to look when passing through. Get to know the Flower Shop, Apartment, and Main Store, and don’t neglect power positions located on the ground floor in places like the Hotel and Electronics Store.
3. Up in smoke. Enemy snipers clogging up Main Street? Equip a Smoke Grenade so you can obstruct their view when you need to pass. Pair it with the Drill Charge to blast enemies inside buildings and behind the walls by the Clock Tower and Restaurant.
4. Found you. On larger maps like Strike, it can be more difficult to pinpoint the enemy’s location. Use the Spotter Bonus Perk to check for fortified positions around the map, particularly within and around the main traversable buildings.
5. Special delivery. Can’t seem to dislodge the enemy Operator holed up in the Apartment or get close to that deadly sniper on Main Street? Use the Bomb Drone Killstreak to send them an explosive gift. It’s cheap and it gets the job done.
6. Pick up weapons. On bigger maps, there’s often a greater chance of running through your ammo reserves. Expand your supply by picking up weapons on the ground as you move through the map.
7. Easy Care Packages. Fall back to the Junkyard or Hill for an easy Care Package deployment. While the enemy is fighting for control over Main Street, you’ll be safely acquiring your next streak.
8. Birdseye. Use the Birdseye Ultimate Perk for a better view of the minimap, making it more difficult for enemies to catch you unaware on a flank. Pair it with the UAV and/or Portable Radar Field Upgrade to reveal the enemy’s direction on each ping.
9. Tactical Insertion. Take control of your next spawn by placing a Tactical Insertion, an especially useful item when you need to hold down a specific area of the map.
10. Buddy system. Traverse the map with a friend to better your odds against enemy encounters. The loser of each skirmish has quite a trek back to their position.
Call of Duty: Modern Warfare II Punta Mar Map Intel
Punta Mar is ready to skirmish.
In this small 6v6 Core Multiplayer map launching with Season 05 for Call of Duty®: Modern Warfare® II, teams will fight across the streets and over the rooftops of a tight arena with little time between engagements. Watch the shop windows for enemy Operators, use the side streets and alleyways to your advantage, and keep pressing for the win.
Spawn Point: KorTac
KorTac Spawn Zone (East) — Backlot
It won’t take long for the fighting to begin on this small map, but KorTac forces still have a few options in the match’s opening seconds, namely whether they opt for sticking to ground level or climbing to the Rooftops.
On the ground, take the middle path to get right into the thick of the battle on the main road, or head through the northern alley or southern Underpass for tighter, closer-quarters combat. There are several easily accessible ladders leading to the Rooftops of the nearby buildings for those looking to get above the action.
Spawn Point: SpecGru
SpecGru Spawn Zone (West) – Construction
While the SpecGru starting spawn lacks the verticality available to KorTac, the Construction area is also closer to the main road compared to the Backlot. Head north to access the top of the road, with an even better view obtainable by climbing to the Shootout balcony via the dumpster on the building’s south side.
Take the southern path toward the Intersection to avoid the main road, instead focusing on short- to mid-ranged battles; watch for enemies firing from the second floor of Stores or rushing in from the Underpass.
Map Maneuvers: Route Planning
For the purposes of this guide, we’re breaking up Punta Mar into five main sections:
Construction
Center
Intersection
Rooftops
Shrine
Construction
The open Construction area features stacked supplies and large vehicles for cover when passing through. Of particular interest are the stacked paving stones; hop onto the barrel beside them for a fortified view of all three entry points. Prepare to encounter enemies doing the same when breaching the area. A sticky grenade thrown just behind their position should convince them to move.
Note the southern path leading in and out of Construction; the garage here makes for the perfect ambush point against passing enemies. Use it to cut down traffic in the area and look out for opponents inside when moving through.
Center
Including the tourist information center and the buildings around it, Center marks a natural hotbed of activity between the two major spawn points. Climb onto the tourist building for a commanding view over the main road, or fight for a spot on the upper levels of Stores, Shootout, and Hotel.
On the ground, watch for enemies coming from the Underpass or firing from Groceries. With many available points of contact surrounding it, Center is likely to be in the thick of battle for much of the match.
Intersection
At the southern point of the map, Intersection finds Operators battling across storefronts. With Intersection being located about equidistant from the two main spawn points, there will be a lot of clashes here. Fights are bound to break out between Groceries and Stores, and anyone moving through the Intersection additionally becomes exposed to the Center. Move quickly and be ready to engage; in a pinch, the blue truck offers solid cover against attacks from the north.
Rooftops
Punta Mar features several ladders and other means of accessing the Rooftops of the eastern buildings, providing Operators with the ability to get high above the competition. From here, players can easily get a full view of the main road, though watch your six as enemies around the Backlot and Shrine can land shots from behind. Also be prepared to fight off intruders joining you here, so swap to your Handgun if your Primary Weapon struggles in close quarters.
Shrine
The Shrine and the Backlot behind it sit in a fairly open area, so be mindful when moving around here. The nearby Green Building and Fire both face the Shrine, with the upper level of Fire providing another access point to the Rooftops. When capturing objectives in this area, move into one of these two buildings afterward to defend the point; otherwise you’re a sitting duck to anyone on the Rooftops or coming through the narrow passage.
Objective Routes and Rotations
Mode Intel: Domination
Flags can change hands fast on a small map like this, so stay focused on the objective and strive to lock down two flags and hold them. The A and C flags are both near the starting spawns, though these points may change throughout the match if the enemy team’s spawn flag is captured.
The Intersection gains extra prominence here as the location for the B flag, so expect heavy bouts of fighting coming from all sides. Try holding down Groceries and Stores to either side of it to cut down on the incoming crossfire. When attacking the C flag in Construction, head in through Shootout to cut off overhead cover for the defenders and let them have it with an air-to-ground streak.
On A, use the Shrine for cover against the Rooftops, then set up in Fire or the Green Building to defend it. You’ve likely picked up on a theme here: Grab the flag, then fan out to cover positions around it so you’re not an easy target sitting out in the open.
Mode Intel: Search & Destroy
While Search & Destroy tends to slow things down, you can still expect a lot of fast-paced rounds here as teams go for the elimination win. With the defenders starting in the Backlot, the attacking team should be ready for Operators to appear on the Rooftops, hoping to use their height advantage to get early eliminations. Consider hoofing it through the Hotel to meet them there or taking the south path toward the B bomb site behind the blue truck in Intersection.
With the A bomb site located on the second floor of Fire, it’s a good bet that the attackers will often favor the B site, which isn’t as deep in the enemy starting spawn. The defending team may therefore want to push toward B for a strong early defense. Even if the attackers expect it, it can’t hurt to send your best sharpshooter(s) to the Rooftops, so long as they can fend off early counterattacks.
Mode Intel: Hardpoint
Prepare to explore every corner of the map with a total of eight Hardpoints, starting in the Center and then moving north to the Green Building in the Backlot. From there, head south to the first floor of Shootout, then northeast to the bottom of Stores, and then back west to the Hotel lobby. Return to the Intersection for the sixth Hardpoint in Groceries; then fight for control of both starting spawns, beginning with Construction and ending on the first floor of Fire.
That’s a lot of Hardpoints to get through, but the map’s small size makes travel fast. With the ability to see large sections of the map at a time via the Rooftops, it’s possible to shut down enemies en route before they even get to the objective, so long as you can defend your position.
Top Tips
1. Stay on the move. The danger of the main road combined with the proliferation of traversable buildings may encourage you to find an interior you like and stick to it, but you’ll be more successful if you move aggressively and keep to the front lines of the fight.
2. Battle for the Rooftops. The Rooftops over the eastern buildings are a highlight of the map. There’s sure to be many skirmishes for control over the sights they provide. Learn all the routes leading up here so you can get there fast and know where to look for incoming attacks.
3. Keep your feet on the ground. Even if you are the ruler of the Rooftops, there’s a time and place for everything. If your team needs you elsewhere, get down and fight on the ground.
4. Overclock your Field Upgrade. Field Upgrades like the Trophy System and Portable Radar are invaluable on a small map like Punta Mar, upping your defense against the constant stream of incoming enemies. Consider the Overclock Ultimate Perk to earn them even faster in addition to storing an extra use for times of great need.
5. Double the fun. With traversable buildings lining the main road, you’ll often move from exterior midrange engagements to interior close-quarters fighting. Consider equipping the Overkill Base Perk so you can switch to the best weapon possible in both scenarios.
6. Flash the Garage. When heading to or from Construction along the south path, don’t hesitate to throw a grenade — Flashbang, Stun, or any kind — into the Garage on your way. It’s better to throw it and discover nobody’s there than attempt to defend yourself when it’s too late.
7. Trap the narrow passage. The narrow passage leading to the main road from Shrine is the perfect spot to lay down a Proximity Mine or Claymore. There’s little room to move, so an inattentive Operator will surely cross its path.
8. Van to vet. On the main road and you need to get up to the Rooftops fast? Climb onto the van in front of the veterinary clinic and hop onto the building’s roof to get up high in a jiff.
9. Sights up. A little preparation can go a long way. Raise those sights when turning a corner toward the main road or toward any major new location. On a map this small, there’s a good chance there’ll be an enemy on the other side.
10. No easy retreat. As idyllic as the surroundings may appear, Operators aren’t here to relax. This is an intense, close-range map with little downtime between engagements. That’s not to say you won’t have fun; in fact, it’s a never-ending blast. Head in ready for the fight.
Modern Warfare II and Warzone Season 05: What You Need to Know
Additional Limited-Time Operators During Season 05
These headliners deserve more than a passing mention, especially because they are here in celebration of five decades of hip hop culture: Nicki Minaj, Snoop Dogg and 21 Savage.
Call of Duty Celebrates 50 Years of Hip Hop with Snoop Dogg and 21 Savage
In celebration of 50 years of hip hop, Modern Warfare II and Call of Duty: Warzone will have free content and special Bundles available in the season launch window.
Before getting into the special guest Operators coming out during Season 05, here is something for everyone:
Free War Track Packs
Since War Tracks debuted in 2019, Call of Duty put some of hip hop’s seminal tracks for everyone to hear in the game.
As part of Call of Duty celebrating 50 years of Hip Hop, everyone will receive free hip hop War Tracks for logging in between August 7 and August 16. Simply go online in Modern Warfare II and Call of Duty: Warzone on four separate days within that time period – an easy task for those that play daily or even only on weekends – to receive a free gift.
The first three days will grant a War Track from the ’80s (Foundation), ’90s (Golden Era), or 2000s (Life After Y2K). On the fourth day of logging in, you will receive a special Weapon Blueprint that can be used in any online mode.
Players will automatically be granted these items upon log-in – check your inventory after logging in to see your new gifts. For any issues in terms of receiving these gifts, contact Activision Support.
In addition, three more Operators are arriving during Season 05 to celebrate over five decades of hip hop culture:
Snoop Dogg (Launch Window)
Please take a step back for the owner of Death Row Records.
Now for Modern Warfare II and Call of Duty: Warzone, Snoop Dogg returns once more. He is ready for any operation, whether it’s going under Deep Cover or going in guns blazin’. . . .
Don’t make any bad decisions; the Snoop Dogg Operator Bundle will be here as part of Call of Duty’s celebration of 50 years of Hip Hop. More information is to come in the Battle Pass, Bundles and BlackCell blog, which will post prior to launch.
Remember: At the end of the day, it’s a Doggy Dogg World, and we’re living in it.
Nicki Minaj (In-Season)
Playtime is over; this is not “Chill Nicki”; this is Red Ruby Da Sleeze.
Nicki Minaj first teamed up with Call of Duty earlier in 2022, because yes, she holds the control like the gamers . . . do we have a problem with that?
Now in Modern Warfare II and Call of Duty: Warzone, she’s ready to make all rival Operators pound the alarm, as Nicki Minaj has her own Store Bundle, perfect for those who think they have good form across Battle Royale, DMZ, Multiplayer, and Special Ops.
Nicki is known to break barriers in hip hop, and this is no different; come Season 05, she will be Call of Duty’s first-ever self-named female Operator.
Get ready to run and hide come Season 05.
21 Savage (Mid-Season)
Call him a rockstar or Mr. Right Now, no matter what, he’s 21 Savage.
Born in London and raised in Atlanta, a community he continues to give back to through philanthropic efforts, the Slaughter King went from underground hero to award-winning rapper.
Now, without warning, it’s time for him to go Savage Mode in Call of Duty – expect an Operator Bundle featuring 21 Savage to drop as part of the Reloaded offerings.
Perfect Timing – Time for Prestige 21 (21) – New Challenges and Reward Available
21 is a popular number for Season 05.
When Season 05 launches, the Prestige Rank cap is set to increase from 17 to 21, with a new maximum level cap of 1,050. Each of the four new Prestige Ranks and 200 levels come with a new icon besides the number, as follows:
Prestige 18: Unlocked at Level 900.
Prestige 19: Unlocked at Level 950.
Prestige 20: Unlocked at Level 1000.
Prestige 21: Unlocked at Level 1050 — this is the maximum level that can be achieved in Season 05.
For reaching Prestige 21, you will receive an exclusive Kastov-74u Weapon Blueprint: “No Warning" (shown above). This Weapon Blueprint is built for aggressive Operators. Whether it's laying down hip-fire up-close or aiming down its red dot sight for those mid-range targets, this versatile Blueprint has got you covered.
As before, all progress will not reset at the beginning of each Season. You can continue ranking up at the level at which you ended Season 04, whether it was before the Prestige Ranks (1–55) or within the Prestige Ranks (56–1050). For more intel, see our Season 04 breakdown of Prestige here.
OUT OF COMBAT OVERVIEW
Call of Duty’s World Series of Warzone Global Final Is Almost Here. The Copper Box Arena is where this all goes down on September 16. Be there in London or watch online.
Upgrade Now, Get Rewarded. Owners can reap the rewards outside of Modern Warfare II, as well as play everything in Season 05 and in every content drop, including at launch.
Call of Duty’s World Series of Warzone Tickets on Sale Now
Ready to see the best Call of Duty: Warzone players clash in one of the most electrifying environments in Call of Duty esports history?
On September 16, the best 50 trios will lay it all on the line in the last few drops, fighting for their share of the $600k prize pool until one is crowned the Global Champion. Plus, witness the iconic #SOLOYOLO where 150 Call of Duty: Warzone demons go rogue in solos, with $100K awarded to the last player standing. If you're not first, you're last.
Tickets are still on sale here — grab them now while supplies last, or look forward to watching it on the official Call of Duty Twitch and Call of Duty Esports YouTube.
Upgrade with Modern Warfare II, Get Rewarded in Call of Duty: Warzone
Haven’t experienced Modern Warfare II yet?
You are missing out on Premium XP while playing Call of Duty: Warzone, as well as quick ways to level up over 60 weapons through Multiplayer and Special Ops, Multiplayer Ranked Play and its exclusive rewards, and the ability to unlock 14 exclusive Operators to use across both games.
Plus, those who own Modern Warfare II can access content coming as part of Season 05: four new maps, including the return of the legendary locale Strike, as well as the brand-new mode Havoc.
Modern Warfare II and Warzone Season 05: Content Drop
“Let’s unleash the beast, shall we?”
SPOILER ALERT: This introduction continues the story of Call of Duty®: Modern Warfare® II to set the stage for Season 05. Commander Phillip Graves was presumed KIA during a ferocious tank battle during the Modern Warfare II Campaign, after turning on members of Task Force 141.
Graves is alive.
Even if Task Force 141 successfully secured the warhead as part of their RAID, Farah lost her brother — and AQ asset — Hadir . . . but not before he revealed that a greater threat is on the horizon.
Unbeknownst to Price, Gaz, and the rest of 141, Farah and Alex head back into Urzikstan. A meeting has been set up with a former enemy who apparently wasn’t incinerated in his tank at the Fuerzas Especiales Headquarters in South America.
Three elite leaders pore over a map of Al Mazrah, where Graves has intel on a new ultranationalist threat now present in the AO, the same group Hadir could not speak of in his dying breaths:
The Konni Group.
This is Season 05 Call of Duty: Modern Warfare II and Call of Duty®: Warzone™, launching on August 2 at 9 AM PT.
Expect Patch Notes from Infinity Ward and Raven Software to be available prior to the release of Season 05. Additional development support is provided by (in alphabetical order) Activision Central Design, Activision Localization Dublin, Activision QA, Activision Shanghai, Beenox, Demonware, High Moon Studios, Raven Software, Sledgehammer Games, Team Ricochet, Toys for Bob, and Treyarch.
Here is what you need to know:
MODERN WARFARE II OVERVIEW
A Strike from the Past; Punta Mar Steps into the Present. A returning Call of Duty® 4: Modern Warfare® map and a brand-new location are the two Core maps at launch. Plus: two additional gunfight maps.
New Core Map In-Season. Small, built for fast-flowing action, and based near Building 21, visit the DRC – Zone 1 research campus for rapid-paced chaotic core combat, coming mid-season.
Wreak Havoc, grab the flag and Armor Up in three new Modes. A Multiplayer arena-style game mode arrives in Modern Warfare® II. Battle Maps get a Capture the Flag mode. Plus, it’s time to bring your Armor Plates, Loadouts, and Sniper Rifles to the Gunfight.
Four New Maps at Launch: Two Core, Two Gunfight, One Core Map Mid-Season
From battle-tested classics to new favorites, Modern Warfare II’s map rotation is about to expand well past three-dozen locations combined across all modes with these Core and Gunfight additions: Punta Mar, Strike, Lounge, and Canal.
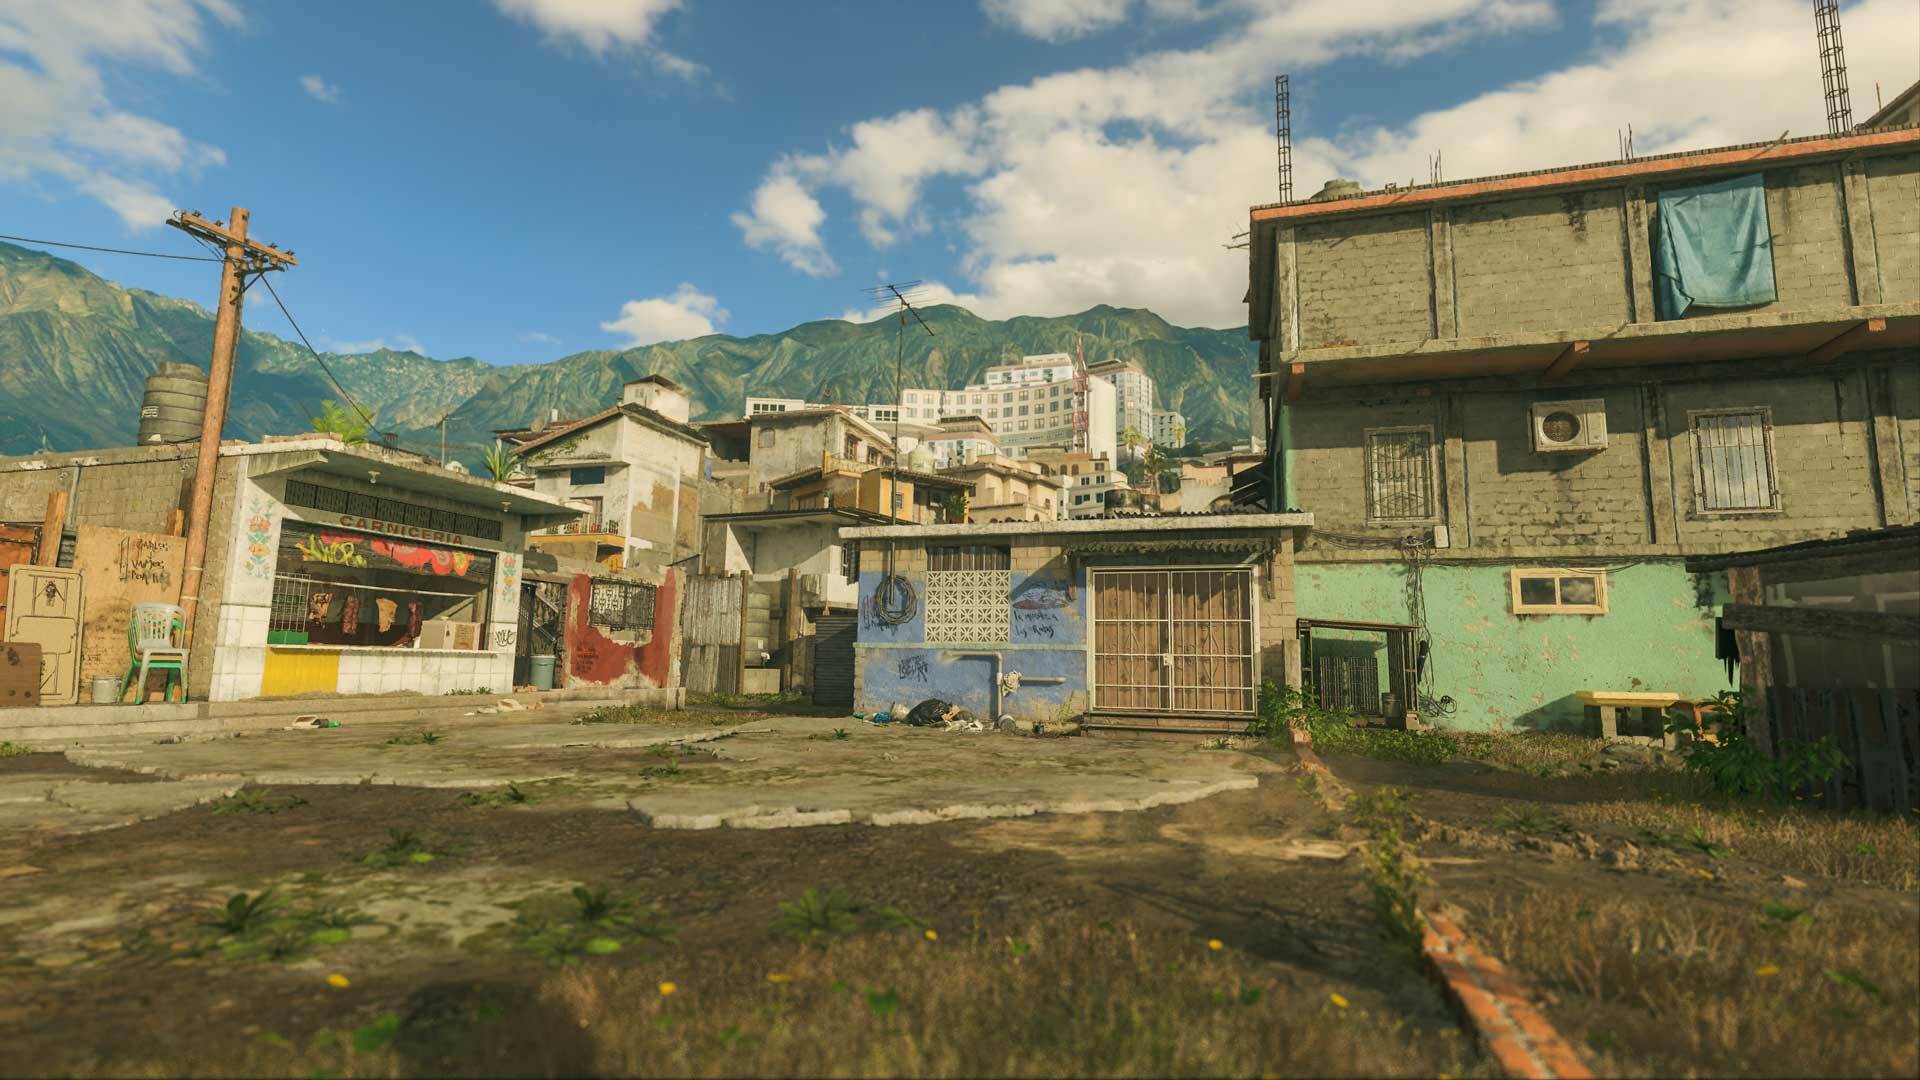
Punta Mar (Core, Launch)
Get ready to infiltrate a brand-new map from Infinity Ward. Punta Mar is a recently evacuated tourist attraction in Las Almas — once a bustling town on a hill overlooking a beautiful South American beach.
Prepare to fight up and down that hill, maneuvering through shops, across rooftops, and through abandoned residences to take control of an area centered around a cobblestone street.
There’s little time between engagements. Watch the shop windows for enemy Operators and use the side streets and alleys to your advantage in this small map geared toward all playstyles.
Strike (Core, Launch)
Turn the clock back 15 years to one of the core maps of Call of Duty 4: Modern Warfare.
Alongside its brethren in Shipment and Showdown, Strike will be restored to its full glory in Season 05, thanks to the latest Infinity Ward engine and technology.
This version of Strike is how veterans likely remember it, albeit with some slight adjustments to make it fit in Modern Warfare II. Does that include the back door near one of the spawn areas and B Bomb Site in Search & Destroy? You’ll find out at Season 05’s launch!
Lounge (Gunfight, Launch)
No time to kick back and relax here: This compact map for Gunfight and other small-squad modes takes place in a high-scale, high-octane club. Take the stairs or climb to a balcony for a view across the main chamber, and when the center gets too hot, try your luck in the game room or under the spotlights of the stage behind the grand piano. On this tiny map, there’s danger at every turn, so stay active, use cover, and be ready to put on a showstopping performance.
Canal (Gunfight, Launch)
Situated in the vicinity of Vondel, this new Gunfight map takes place in and around a brewery and a canal thoroughfare. Offering some verticality, Canal features cellars below the cobblestone streets above, with the action occurring between the canal bridges where the water or a moored boat are useful in your tactical planning. Be ready for close quarters combat while weaving through the brewery and restaurant. Canal is frenetic, with a bit more room to move than other Gunfight maps, so think tactically and keep pressing the fight.
DRC – Zone 1 (Core, Mid-Season)
Building 21 already had some spectacularly memorable moments in Call of Duty: Warzone. Now an area within the vicinity of this clandestine location will be revealed for Modern Warfare II Multiplayer. Prepare to enter a new Zone in the DRC research campus.
This map is located around the Visitor Center in the shadow of Building 21. Many of the technological triumphs that the DRC have gifted the world are on display here. Players are also allowed behind the curtain to view some of the inner workings of the facility, from Research and Development to the shipping and receiving areas, to a few of the laboratories.
This small-sized map is focused on fast-paced combat, where shortcuts, outflanking, and consistent action is to be expected. Look for a full tactical overview of this map at mid-season.
New Modes: Introducing Havoc, Big Capture the Flag, and Armored Gunfight
Expect three new Modern Warfare II Modes as Season 05 launches and progresses, along with a variety of returning Gunfight variants, and Faceoff with even more Operators for those seeking the ultimate in Cage Match experiences:
Havoc (Launch)
In Season 05, one thing is for certain: It’s time to wreak some Havoc.
Havoc is a brand-new Core Multiplayer mode inspired by classic arena-shooter gameplay, then further enhanced with the injection of a random selection of frenzy-inducing modifiers. Infinity Ward specifically designed this as a “rogue” like mode, where each time a game is played, you receive enhancement modifiers that changes the gameplay in new and interesting (and not to mention, chaotic) ways. Don’t expect two games of Havoc to play out identically. But do expect a whole lot of fast-paced combat with the emphasis on entertaining takedowns.
The match starts in a similar manner to a Team Deathmatch. However, you should forget about Perk Packages, Killstreaks, or Field Upgrades: They don’t exist in Havoc. Instead, prepare to embrace the match-changing modifiers!
Once a squad is the first to reach a multiple of 12 kills – 12, 24, 36, 48, and 60 – the game adds a new modifier to the match for both teams, from a pool of 14 available modifiers. Here are examples of just five of them:
Ammo Feeder: Auto reloads a weapon (from stock ammo) upon elimination.
Boots Off the Ground: Moon gravity. Affects only player jump heights, not thrown equipment or ballistics.
Flameshot: Flame-tipped Crossbows and Molotovs only. All Loadouts change immediately to this upon modifier activation.
Hero Landing: Landing from a big drop causes a frag-grenade-like explosion around you.
Perspective Shift: Everyone swaps to a third-person camera view.
The modifiers stack as the match progresses, so by the end of a match you could have, for example, a third-person, moon gravity, hero-landing-enabled, auto-reloading flame-tipped Crossbow and Molotovs-only Deathmatch, once one team reaches 60 kills.
Bring the squad to Havoc, and prepare for some frenetic fun.
Big Capture the Flag (Launch)
Want to go bigger? Then the Battle Maps are ready for some classic Capture the Flag matches in Season 05.
Whether it is on the streets of Guijarro or in the waterlogged Mawizeh Marshlands, Big Capture the Flag on a 20v20 scale is a recipe for some epic matches.
Will a lone hero go behind enemy lines, beating the odds across hundreds of meters, all to ultimately make a decisive capture? Or will several squads armed with tanks, helicopters, and launchers fight to secure or reset a dropped flag out in the open?
That all depends on how you and your squad tackle this new mode coming within the launch window.
Step into the 2v2 Gunfight arena with three different variants available throughout Season 05. Look for the following:
Gunfight Custom (Launch): Featuring standard Gunfight rules, but the weaponry you bring is taken from your favorite Loadouts.
Gunfight Snipers (Mid-Season): Tool up with your favorite sniper or marksman rifle, and leave the Secondary, Tacticals, and Lethals at home.
Armored Gunfight (In-Season): Need more protection during your 2v2 skirmishes? Then welcome to Armored Gunfight, a variation on the fan-favorite mode, featuring standard Gunfight rules with one distinct difference; armor is enabled! Each squadmate comes to the fight with 150 HP of Armor, 100 Health, and no replacement plates or health regeneration. All other Gunfight rules apply (win conditions, overtime, capturing the overtime flag), but your takedown tactics should be adjusted accordingly.
Faceoff (4v4) (Mid-Season)
For those seeking the fast-action gameplay of small-team cage matches, the ultimate compliment to Gunfight is back! Use your own Loadouts, forget Killstreaks, and play modes like Team Deathmatch and Kill Confirmed on all the Modern Warfare II Gunfight maps. However, in Season 05 the action is even more frenzied, as the player count is upped by one Operator per team: This is 4v4 Faceoff. Fans of Shipment 24v7 take note!
CALL OF DUTY: WARZONE OVERVIEW
Calling All Champions. The Vondel Champions Quest will begin in Season 05. Assemble the squad and prepare to put together a new plan for victory in Vondel.
New Free Features in BR and DMZ. Two new vehicles across both modes; several new DMZ features, and the first details on the Reveal Event for Call of Duty 2023.
Arriving at Reloaded: Hold Down the Fort, Prepared for Armored Royale. A section of Al Mazrah adds to the available Resurgence maps, and will be added to the existing rotation. That and the return of Armored Royale earmark the Season 05 midseason updates.
Vondel Champion’s Quest (Launch Window)
Champions of Call of Duty: Warzone: Heed the call of this new quest.
Just like the Traditional Battle Royale Champion’s Quest for Al Mazrah, a squad that is on a winning streak — five in a row in Mini Battle Royale matches — will have the opportunity to take on the Champion’s Quest in Vondel.
Although the Vondel’s quest will be similar to Al Mazrah’s quest in that you will build the M.G.B., there are a couple key differences:
First, all elements must be held and never dropped (a prerequisite that also now applies to any Champion’s Quest you undertake). That means an element can’t be dropped in the water and saved for the end. If an element is dropped, it must be recaptured to continue the quest.
Second, there are three brand-new elements — or elemental compounds — to capture as part of this quest:
Gallium: Holding Gallium reveals all nearby team members who held it previously, as if you were affected by a Snapshot Grenade.
Deuterium: This fatigues any Operator, which includes causing them to cough if they try sprinting.
Neptunium: This periodically electrocutes all nearby Operators as well as hay-wiring vehicles, with similar effects as the Shock Stick.
The Champion’s Quest in Vondel will be ready for all challengers starting at season launch.
New Vehicles: MRAP and Dirt Bike
Two familiar vehicles are here across Call of Duty: Warzone maps; consult your Tac Map in-game for locations and availability.
MRAP
Mine Resistant Ambush Protected — it does what it says in its name.
A vehicle roughly the size and shape of the Cargo Truck, the MRAP is equipped for heavy combat with additional armor plating and turrets, making it a slower, yet effective, vehicle for attack or defense.
The MRAP will not appear often — in fact, it is mostly available at the start of a mode coming out at mid-season — but whenever an Operator sees it being used, it’s time to either head inside or come at it head-on with Launchers, LMGs, and Killstreaks . . . and plenty of them.
Dirt Bike
A nimble and rapid form of transportation in Call of Duty: Warzone, the Dirt Bike is ready for Operators to lose enemies through tight alleys, perform hairpin turns on a dime, and get across any map without much cover but with plenty of style.
In other words, yes, you can catch sick air and pop wheelies on this whenever the operation calls for it.
Note that only two Operators can technically fit on the Dirt Bike at a time, so a full squad of four should either partner up or get enough rides for everyone.
DMZ: The Conflict Intensifies
Al Mazrah, Ashika Island, and Vondel are all under attack.
Battles rage between the existing factions and a new threat, Konni.
Both sides will be fighting with everything they’ve got, calling in Killstreaks in what is known as Active Combat Zones. Intel suggests that higher-quality supplies and gear are more present in Active Combat Zones compared to single-faction areas.
In Al Mazrah, all Cartel are killed in action within the Koschei Complex. Konni found it, completely gutted it, and found some additional hidden tunnels under the city.
We have also lost Building 21 to the Konni Group. With your help, we can get it back.
To all Operators: Shadow Company are your family now. We will not take the first shot on any Operator in any DMZ Exclusion Zone, and fight arm-in-arm with you in our battle against Konni.
However, know this:
Friendly fire will not be tolerated.
In addition to the new features mentioned in the above note, expect new Missions, including Urgent Missions, to be made available in your Forward Operating Base menu, as well as the following:
Disguise Field Upgrade (Launch Window)
Built for pure stealth engagements, the Disguised Field Upgrade allows you to appear as a member of a DMZ Combatant (AI) Faction. Equip the Disguise and DMZ Combatants of the same faction will not attack unless you blow your cover and act aggressively towards them.
Battle Revive (Launch Window)
An experimental stimulant offering an adrenaline rush as you complete a self-revive: A Self-Revive mixed with pure Battle Rage! After using it to get up from Last Stand, it immediately activates Battle Rage’s effects, allowing you to heal more quickly. The Tactical Sprint is also constantly refreshed for a short period of time.
Self-Revive Box (Launch Window)
Much like an Armor Box, this Field Upgrade holds multiple Self-Revive Kits. Perfect for squad-based infiltrations.
Scuba Gas Mask (Launch Window)
This is a Gas Mask that also acts as a Rebreather, providing protection from radioactive winds, gas, and allows for underwater breathing for an extended period of time.
Call of Duty 2023 Reveal Event
Drop into Call of Duty: Warzone to experience the worldwide reveal for Call of Duty 2023 in a limited-time event. Join the ranks of Shadow Company to take on Konni forces and secure the chemical weapon threat before it’s too late. Stay tuned to Call of Duty channels for more details about the upcoming reveal.
Fort Resurgence and Armored Royale (In-Season)
The MRAP’s return means one thing: Armored Royale is coming back. Reinforce your squad in this Battle Royale with a big difference — you’re dropping onto your own MRAP, and it’s up to you to use, fortify, and repair this hulking vehicle with its turret, protective shielding, and mobile Buy Station, while cutting through rivals operating their own behemoth trucks.
Expect this mode to be available during Season 05, as well as a new one: Fort Resurgence.
A slice of Al Mazrah, specifically the Al Bagra Fortress and its greater surroundings, will be added to the Resurgence map rotation in Season 05. No matter how you spent time in Al Mazrah across Call of Duty: Warzone and Modern Warfare II, this map will slot in alongside Ashika Island and Vondel for Resurgence Rotation Playlists.
GENERAL OVERVIEW
Task Force 141 and Shadow Company: Faction Showdown. Do your part to help TF141 or Shadow Company control the AO. Your efforts will reward you with exclusive items, including a Weapon Blueprint for challenge completion and a new Operator Skin for the winning side.
Gear Up with Modern Weaponry. A fast-firing Assault Rifle and semi-auto Sniper Rifle sure to put a frown on the enemy’s face will be available in the Battle Pass. Plus, four more armaments throughout the season.
Call of Duty celebrates 50 years of Hip Hop with Special Guests Snoop Dogg and 21 Savage. Get ready to light it up and get some free War Tracks spanning three decades of a culture that transcends music and gaming.
The return of Graves and Shadow Company means one thing: Task Force 141 is ready to finish the job.
This intense battle is set to begin on August 4 with a cease-fire between both factions set for August 16. Before then, both sides want you to join them. No matter which side you pick, the main challenge to complete is the same:
Earn 50 Operator Kills.
Access the Events tab of the in-game menu to access the Faction you wish to join. Then complete the challenge, and other faction-specific challenges (detailed below) to earn all the Event rewards. Thinking about switching sides during this Event? Mercenary activities are encouraged: Feel free to join Task Force 141 or Shadow Company as many times as you wish, earning some or all the Operator kills for the faction you’ve chosen, until you complete the Event for both sides.
Once the main challenge has been completed, you earn a Calling Card and an Emblem just for participating. But that’s not all. Let’s dive a little deeper into the other available challenges, which are related to each faction’s preferred operational tactics:
Task Force 141 likes to go in close with Finishing Moves and melee weapons, or they use whatever it takes to go long with Battle Rifle longshots.
Shadow Company, meanwhile, prefers stealth with SMG eliminations from behind, or they use everything in their Loadout to their advantage, like Launchers and Lethal Equipment.
Completing the challenges for either faction rewards you with items such as Tier Skips, Vehicle Skins, and a Weapon Blueprint for completing all the challenges for a faction.
All community Operator eliminations will be tracked during this event as combat between Task Force 141 and Shadow Company continues. Only elite Operators who complete all five of a faction’s challenges will be eligible for the following rewards:
The faction (Task Force 141 or Shadow Company) that wins this event by having the highest number of community Operation eliminations – the main Challenge for this Event that you can contribute up to 50 kills per faction towards – will unlock another reward. This is a free Operator Skin — either one for Soap or one for Horangi, depending on who wins — as well as a universal weapon camouflage and a one-hour Double Battle Pass XP Token.
Choose a side, fight until the last minute, get rewarded, and await further orders as the event concludes, prior to mid-season.
Vehicle and Camo Challenge Events (In-Season)
Players of both Modern Warfare II and Call of Duty: Warzone should expect further unlock challenges as Season 05 continues, not least a series of tasks related to expertise with vehicles, as well as an in-depth Camo Challenge with suitably impressive rewards.
Shadow Company Takes Over BlackCell
As well as appearing as part of the Faction Showdown Launch Window Event, the Shadow Company will make their presence felt across BlackCell, especially with their new Operator Arthur and his faithful companion Merlin.
Those who purchase the BlackCell — available for $29.99 — will get access to Arthur, 1,100 COD Points, an advanced starting position in the Battle Pass AO, and even more content in the Season 05 Battle Pass . . . in addition to 20 Tier Skips.
Arthur doesn’t usually fight alone; he sometimes brings his dog Merlin along with him, as well as “Gwen,” both additions as part of the full BlackCell offering. Merlin is an extremely good boy; pouncing on and savaging Arthur’s opponents (when equipped as a Finishing Move). Gwen meanwhile, is a talking Gunscreen attachment incorporating a small speaker announcing specific in-game events.
More intel will be dropped on this offering in the designated Battle Pass, Bundles, and BlackCell blog post, which will be online prior to Season 05’s launch.
Two New Weapons at Launch, Four Additional Weapons During Season
FR Avancer (Assault Rifle – Launch, Battle Pass)
With a blinding fire rate and exceptional maneuverability, in the right hands, this aggressive bullpup rifle can dominate the battlefield.
This fast-firing bullpup rifle is a midrange behemoth that can neutralize targets quickly within a few dozen meters.
Trained Operators will know how to master the recoil pattern and tame its high fire rate. That may involve a trip to the Gunsmith, but no matter what, it is a solid Battle Pass addition that is free for all those who earn this HVT in a Battle Pass Sector.
It will put it in competition with other fast-firing Assault Rifles in its category, so Operators that appreciate those should give the FR Avancer a test in the Firing Range (at the very least) in Season 05.
Carrack .300 (Sniper Rifle – Launch, Battle Pass)
This semi-auto bullpup sniper rifle features an exceptionally high fire rate and a unique design for best-in-class handling and stability when on the move.
Built for the Operator that claims they are a sharpshooter – it’s free for everyone in Season 05 through the Battle Pass, so time to see if the skill matches the talk.
The Carrack .300 is a true Sniper Rifle with a semi-automatic, bullpup design. Effective even at the longest ranges, all it requires is an Operator who can take a deep breath, keep calm under pressure, and line up a shot to the head or upper chest.
This rifle may not be the first choice for certain playstyles, but for those wanting semi-automatic takedown prowess over longer ranges, this is well worth taking into bigger maps once Season 05 launches.
Four New In-Season Weapons
M13C (Assault Rifle – In-Season)
The .300 BLK counterpart to the M13B, this full-auto Assault Rifle is versatile and hard-hitting as a main weapon or sniper support secondary.
Unlock Requirements: [[REDACTED]]
New SMG, Sidearm, and Melee Weapon (In-Season)
In addition to the two free Battle Pass weapons, and the M13C Assault Rifle, three more weapons are being released during Season 05.
Ready yourself for a new SMG, which is ready to offer another silent close-range solution thanks to its integrated suppressor.
A new sidearm is ready to be added to the deep pool of Secondary Weapons for Operators wanting more flexibility and stopping power at mid-range.
Speaking of Secondaries, the Pickaxe will be a simple, yet effective tool added to the melee category.
Six New Operators Arrive Before Mid-Season
At launch and throughout the beginning of Season 05, six Operators can be added to your roster. More Operators will come out this season, but these six are the ones ready for immediate combat activities when this season launches:
Oz
Born in Central Florida, Oz overcame adversity even at a young age to become a great Operator, finding a fatal security flaw in a U.S. military system before he graduated high school.
He enlisted in a sister program to Hutch’s branch, becoming a highly decorated cyber soldier running top-secret ops, all while creating a family of his own with his brothers in arms. But when General Shepherd asked him to take the lead in a cyber defense division of a new PMC group, Oz was ready to join Shadow Company…
Except he heard one leader, Commander Graves, was reported in an incident against an C.I.A.-affiliated Operator on South American soil.
Shepherd closed the deal with tasking Oz at being Shadow Company’s “de facto leader.” Using both his elite special operations toolset on the ground as well as his skills in cyberwarfare, Oz’s mission is not only to lead Shadow Company’s global presence… But manage the narratives around that incident with Graves.
Graves (Battle Pass)
He’s back.
You probably have questions. Graves does not have time for answers. He says he was never in that tank that exploded at the hands of the 141, and now it’s back to business.
If you want his history, the Modern Warfare II Campaign speaks for itself. But also, know that he is a proud American, former Special Ops Team Chief, and the founder and current CEO of Shadow Company, a global risk management, protection, and private military firm specializing in troop, air, and maritime capabilities anywhere in the world.
In team modes, he and other Shadow Company Operators will side with KORTAC.
Arthur
Aside from being one of Shadow Company’s best, biographical intel for this Operator has been [[REDACTED]].
Mila
Biographical intel for this Operator has been [[REDACTED]].
Velikan
The Shadow Company warden of Building 21 just got ousted by Konni Group, so now this “giant” is ready for new operations.
During initial encounters with Task Force 141, Velikan was a shadow of a shadow. Tales of his exploits are written off as fairytales at best and gross exaggerations at worst. Those who know him never speak ill of him. Whether it’s due to fear or respect, no one knows.
Since then, this Shadow Company mercenary was assigned to defend Building 21 from any elite Operators who managed to access this clandestine facility. But now that his job there is done — perhaps — he seems ready to work for SpecGru across all online operations.
Mace (Mid-Season)
Another returning face — or mask, if you will — the mercenary Mace will be called in during Season 05 Reloaded to assist Shadow Company with clean-up duties.
Season 05 Launch Trailer | Call of Duty: Modern Warfare II & Warzone
When darkness falls, the shadows will rise 🌑
Shadow Company and Task Force 141 face off in Season 05 of Call of Duty #Warzone and #MWII Which side will you choose?
Call of Duty World Series of Warzone
Call of Duty World Series of Warzone: Regional Finals
Live Now!
Call of Duty World Series of Warzone
Call of Duty World Series of Warzone: Regional Finals