Season 01 Reloaded: What to Know About Call of Duty®: Warzone™ Cup
During Season 01 Reloaded, Call of Duty®: Warzone™ 2.0 will have a limited-time Call of Duty®: Warzone™ Cup mode from December 14 at 10 a.m. PT to December 23 at 10 a.m. PT to close out its Modern Warfare® FC event.
Free for all players, this limited-time mode is a complete change of pace from traditional Call of Duty® modes, as it brings Operators together onto a virtual pitch for some sporting fun. Those who are skilled in vehicular combat will be more than prepared when this mode kicks off, so long as they have a few reliable teammates to help them reach those #SquadGoals.
Read on to learn what you need to know about the Warzone™ Cup.
Warzone Cup Mode Intel
Warzone Cup pits two teams of three Operators against each other at Al Easima Field, a modern sports stadium within the greater Call of Duty®: Modern Warfare® II universe.
Each Operator will drive an ATV as they attempt to knock a massive soccer ball (football) into the other team’s goal within an eight-minute time limit. After each goal, the ball and all Operators are reset to their starting positions to resume play. The first team to reach five goals, or the team that gets the most goals within eight minutes, wins the match.
Unlike other Call of Duty modes, there are no Loadouts or traditional weaponry in this mode. Instead, each ATV is equipped with a pulse ability that sends a powerful burst of energy toward the ball or other ATVs. Combined with simply ramming objects with the ATV, this energy pulse can help redirect the ball toward fellow squadmates or away from your goal.
Operators also have one of two ways to disrupt their opponents:
- If an Operator rams into an enemy player at top speed, they destroy that Operator’s ATV, temporarily removing them from the pitch and forcing a respawn. - Operators can pick up Shock Sticks around the stadium, which can be thrown at enemy ATVs to temporarily disable their movement.
Winning a game of Warzone Cup not only requires aggressively taking out the enemy team, but also coordinating with squadmates to score goals and prevent the enemy team from gaining possession of the ball. These strategies may involve taking tactics from more traditional versions of this classic game or combining “violence and timing” to render the enemy defenses immobile and out of competition before racking up those #SquadGoals.
While the Warzone Cup Playlist includes a squad fill option, we highly recommend bringing your own Trio to this mode to maximize communication and coordination.
Modern Warfare FC Limited-Time Operator Bundles Still Available
What better way to score in the Warzone Cup than with an Operator known for sending accurate shots on target?
All three Modern Warfare FC Limited-Time Bundles — the Neymar Jr Operator Bundle (Tracer Pack), Tracer Pack: Paul Pogba Operator Bundle, and Tracer Pack: Messi Operator Bundle — are still available for purchase within the in-game store. And each one comes with its star Operator along with other items to complete a kit fit for Warzone Cup or elsewhere in Modern Warfare® II or Warzone™ 2.0:
The Neymar Jr Operator Bundle (Tracer Pack) includes the fearless Neymar Jr. Operator, as well as the stealthy “The Feared” Weapon Blueprint and the “Longball” Weapon Blueprint.
The Tracer Pack: Paul Pogba Operator Bundle has the French midfielder Paul Pogba as a playable Operator, as well as the “Series A” Weapon Blueprint meant for silent support and the “Counter Attack” Weapon Blueprint for getting high shots on target.
Finally, the Tracer Pack: Messi Operator Bundle gives you the legendary Leo Messi as an Operator, along with the sleek “Atomic Flea” Weapon Blueprint and the all-around solid “Blue Thunder” Weapon Blueprint.
All of these Bundles come with additional cosmetic items, such as Weapon Charms and Vehicle Skins, for a complete package worthy of athletes who can dominate the Warzone Cup.
Get one of these Bundles — or get the full hat trick — before diving into the Warzone Cup mode, which will be launched within Season 01 Reloaded.
For more information, please visit www.callofduty.com and www.youtube.com/callofduty, and follow @Activision and @CallofDuty on Twitter, Instagram, and Facebook.
Season 01 Midseason Update — Shipment Map Intel
Operation Shipment International Waters Day 47, 00:32 Factions Deployed: SpecGru / KorTac
A little chaos is good for the soul, not to mention the beauty of XP gains on a tiny map like Shipment. In this iteration of the fan-favorite classic, the scene of battle moves to the high seas as SpecGru and KorTac forces face off against each other among stacked containers and crates filled with cash and illicit goods.
No plan survives contact with the enemy, yet even on this compact field there are tactics and strategies worth considering when fighting for that victory screen. Let’s dive in and perfect the fundamentals.
Spawn Point: KorTac
KorTac Spawn Zone (North) — Bridge Side
While there are designated starting spawns for both teams, expect those spawns to change up quickly once the match commences. KorTac forces begin on the Bridge Side in the northeast section, ready to break south, west, or straight into the middle. Whichever direction you choose, be ready to engage in seconds.
Defensive-minded players may choose to hang back and wait for the enemy, using the crates as cover. You can also set up camp in the eastern red container to ambush enemy Operators coming off the break, though we suggest a more active start: there’s room for defensive measures later in the match.
Spawn Point: SpecGru
SpecGru Spawn Zone (South) – Drug Stash
SpecGru forces begin the match in the southwest corner of the map, also positioned near an open crate providing west-east passage and a nearby half-open crate open only toward the starting spawn. The strategy for the break is largely the same: there are two main paths leading north and east, or you can book it for the center straight into the mayhem.
Map Maneuvers: Route Planning
Shipment consists of four named areas: - Bridge Side - Center - Drug Stash and Container Stack
Northern Route — Bridge Side
From Bridge Side, Operators must hold their position against the onslaught of enemies rushing in from Center and the opposite side of the map. Use the cash crates and the open northern container for cover. Shipment veterans will notice a key difference compared to the Call of Duty®: Modern Warfare® iteration of the map: there’s no climbing up into a higher container from this point; in this Shipment, the battle remains on the ground floor.
Bridge Side’s west end offers more cash crates for cover, but that’s it. Still, even in Shipment’s constant chaos, these cover pieces can mean the difference between survival and defeat; in objective modes, they conceal you when capturing the objective, not to mention providing decent cover with just enough room to make slight adjustments to your position.
Lastly, make use of the two blue barrels and the silver crate extending the cover line toward Center. These offer vital protection when peeking around either corner; this allows you to stay and fight or avoid taking too much damage before sidestepping back behind larger cover.
Center Route — Center
The eye of the storm. Center is a veritable madhouse, the area of the map where the most constant fighting occurs. In several modes, it’s the site of an objective, forcing Operators to take their chances. It also provides quick access across the map if you can survive the journey.
Unless there is an objective there, get out of dead center as soon as possible, as you’re exposed on all four cardinal directions; instead, hang back to protect your sides and catch enemies rushing through the middle. Watch for the half-open ground-floor container in Center’s northeast corner, a favorite hiding spot for those unwilling to brave the greater battle. Toss a grenade inside if you think there might be an enemy within.
The half-open containers on the map’s western and eastern boundaries offer ambush points in addition to emergency shelter against explosives and streaks. Don’t linger for too long, or that shelter will become a dead end.
Southern Route — Drug Stash, Container Stack
The southern route nearly mirrors the north, though with some slight differences. Here, too, a container open on both ends provides west-east passage. Expect a lot of activity around the crates on either side of it as well as the nearby half-open container, which, while technically designated as part of Center, is often utilized by players in this section of the map.
Recruit Tactics
Watch My Six!
In all maps and modes, keeping an eye on the minimap vastly improves your situational awareness. On Shipment, it can help focus your split-second decision-making in terms of where to move next.
Keep an eye on your teammates in particular. Their positions indicate buffers in the environment, positions that are — at least for the moment — likely safer to travel through compared to other sections of the map. When you’re rushing through an area like Center, even the slightest advantage is worth grasping on to.
Up and at ’Em
Getting constantly eliminated? Don’t worry, so is everyone else. On a map this small, it’s going to happen. Thankfully, with some patience and perseverance, the tide will often turn so that you’re the one doing the eliminating. The key here is to keep a cool head, to start each spawn fresh and ready to engage.
Remember that you don’t have to approach the match like a chicken with its head cut off; you can still be tactical, balancing when to move and attack and when to get behind cover for an advantageous position. It’s still chaos, albeit controlled chaos.
Veteran Tactics
Play the Objective
Yes, even you Call of Duty® veterans need the occasional reminder.
On Shipment, it’s easy to get caught up in the whirlwind of battle, especially when you’re slaying. The highest kill count won’t impress your teammates, however, if you’ve got a measly objective score and end up losing the match.
When playing objective modes, keep your eye on the score, watch the objective position, and ask yourself — at least every now and then — am I doing my part? Your team will appreciate it, and trust us, you’ll still have plenty of opportunities to slay.
Bomb Drone Incoming
The Bomb Drone streak can do a lot of damage on Shipment, allowing you to fly toward and detonate over tightly packed groups of enemies, a common sight here. It’s also a useful means for dislodging enemies hiding out in containers.
Requiring only four eliminations (or 500 Score when using Scorestreaks), it’s a very achievable streak for all skill levels. If you’re aiming for higher streaks, however, you may want to use it after your next spawn: your Operator will be highly exposed while piloting the drone.
Prestige Tactics
Drill Those Containers
Having a rough time against enemy Operators ambushing your team from within the map’s open containers? Equip the Drill Charge and toss it into the side of the container; it’ll easily blast through the thin walls. Keep an eye on the opening in case they try to escape the incoming explosion. Either way, they’re out of luck.
Pair your Drill Charge with the Snapshot Grenade or Heartbeat Sensor to better anticipate when a container needs to be drilled through. Soon enough those campers are bound to see the folly of their ways, forcing them to join the battle out in the open.
Just a Scrape
In Shipment, you’ll be fighting one Operator after the next, and often you’ll go up against several. Equip Quick Fix as your Ultimate Perk to immediately trigger health regeneration whenever you eliminate an enemy, keeping you in strong fighting form even throughout intense skirmishes. Throw down a Trophy System next to your position for added defense against incoming equipment and projectiles, forcing them to battle you straight on.
Remember that you’ll also benefit from a faster health-regeneration rate when capturing and holding objectives, so get on the point and don’t let up.
Objective Routes and Rotations
Mode Intel: Domination
And you thought capturing the B flag was hard before. Located smack dab in the middle of the map, the flag is likely to change hands multiple times throughout the match. Often, Operators will crouch or lie prone at the edges of the capture zone, attempting to lower their profile as much as possible. Don’t let them go unnoticed.
Due to the map’s small size, you might choose to ignore the B flag when the enemy is throwing all they have at it. Instead, focus on taking the A and C flags. They’re more easily accessible, if even only by a little, and it’ll take the pressure off Center. When capturing A and C, use the available cover, going prone if needed to make the capture. If you’ve got one, throw down a Trophy System.
Keep in mind that you only need two flags at a time to gain the point advantage. Because the flags are positioned so closely to one another, stay flexible in terms of which flag you’re focused on. If you keep getting eliminated going after one, skip it in favor of the other flags.
Aerial streaks are incredibly powerful on Shipment Domination. Even if the enemy runs for cover into an open container, you’ll force them off the flag, leaving it for the taking. Patience is encouraged when you access one of your aerial streaks; while it’s tempting to call it in right away, it’s wiser to hold on to it until you need to get to a flag, especially when the score is close.
Mode Intel: Search & Destroy
It’s a whole different game in modes like Search & Destroy, where there are no respawns. Though it’s a more tactical, slower paced affair, it still helps to be fast off the break, as even the slightest hesitation can leave you exposed to better-prepared Operators.
On the attacking side, starting in the southwest corner, you can go north to the A Bomb Site or east to the B Bomb Site. Note that both sites are easily viewed from the defenders’ starting position in the northeast — in this case, the bomb carrier may not want to immediately approach a Bomb Site, instead focusing on eliminating some of the enemy team before going in for the plant.
Remember that though it may be tempting to forgo the bomb plant in favor of a total elimination, planting the bomb is still a valid tactic. While the others are busy blasting away, the bomb carrier can take cover behind one of the sites and get to work. Once the bomb is set, it focuses the match on that one point, forcing the enemy to come to you. Spread out, take up defensive positions, and let them have it.
As a defender, get creative with the map’s several ambush points, attacking the enemy team where they least expect it. In the next round, stay in the open and flank them when they stick their heads in your old hiding spot. Soon they won’t know where to look, giving you the advantage.
For either side, it’s not a bad idea to lead battles with any grenades on hand. With a little luck, there’s a good chance you’ll connect, providing a strong opening to the round.
Mode Intel: Hardpoint
Shipment hosts five Hardpoints: one in the middle plus all four corners of the map.
The break for the first Hardpoint is the toughest. Try to get to the edge of the zone without positioning yourself right in the middle. If your teammates are throwing themselves onto the point, take an outside position and flank. If your teammates are objective shy, get in there.
Watch for the indicator of the next Hardpoint in the final ten seconds of the current point so you can position yourself accordingly. The early rotation is crucial in any Hardpoint match, but due to the ease of traversal here, it’s doubly so.
Pair the Battle Hardened and Bomb Squad Base Perks along with the Trophy System Field Upgrade to up your defense on the point, complemented by the Quick Fix Ultimate Perk to speed up your health-regeneration rate while holding the objective. For support-minded players, choose Overclock instead, improving your Trophy System’s recharge rate and capacity.
As with Domination, aerial streaks make a big impact here. Just check the Hardpoint timer before calling it in, lest you attempt to blast enemies in scrap time when the effect is minimal.
Top Tips
1. Go, go, go! Yes, there are times when it makes sense to hold back and wait for the enemy to come to you, but don’t overdo it. Shipment exemplifies the adage that the best defense is a good offense. The less predictable your actions, the harder it will be to counter them.
2. Desperate? Wedge in. The open crates along the north and south boundaries each create a wedge that can be used to get out of sight and to ambush enemies moving through these areas. Think before taking up the position, however, as you’ve got no cover and nowhere to go but forward. Use it, land an elimination or two, then move on.
3. Long range works, too. While Shotguns, SMGs, and Assault Rifles are often the most used weapons in Shipment, it doesn’t mean that long-ranged Loadouts won’t be effective. With proper positioning and timing, you can absolutely get the advantage over close-ranged players; move as far back as possible so that they struggle to land their shots.
4. Notorious…but alive. Listen, sometimes you’ve got to do what it takes to survive. If you’re getting annihilated, equip the Overkill Base Perk and pick the Riot Shield along with your Primary Weapon of choice. The shield will help protect your back against attacks, along with providing essential cover when approaching objectives. Just watch those rockets and Drill Charges; riot shields have a way of attracting them.
5. I do this for a living. On this tiny map, you want to avoid downtime as much as possible. Equip the Fast Hands Bonus Perk to speed up your reloads, equipment use, and weapon swapping, so that once you get access to the Perk, you’ll be moving through your actions at lightning speed.
6. Not so safe and sound. Is an enemy Operator hogging up the containers, staying out of view to ambush you and your teammates? Remember that in addition to the Drill Charge, armor-piercing rounds can penetrate these materials, so upset their camping routine by eliminating them without ever showing your face.
7. Scrap their intel. Equip the Counter-UAV for a low-cost streak that scrambles the enemy minimap. Better yet, deploy it after an opponent has sent out their UAV, thereby frustrating their efforts to gain valuable intel. It’s also a solid asset in objective modes prior to a big push or defense.
8. Launchers still appreciated. Though the chaos on the ground is ever constant, it’s still worth striking down enemy aerial streaks. Consider taking a Launcher into the map and utilizing the few brief moments of downtime between engagements to knock out enemy UAVs and other threats. Against ground forces, the RPG-7 can do some good work here, too.
9. Get mad. Consider using the Battle Rage Field Upgrade, providing fast health regeneration and resistance to Tactical Equipment. It’s already a reckless map, and with this Field Upgrade, there’s no downtime placing an object in the environment. Get at ’em.
10. Now do it again. Besides enjoying Shipment purely for its frenetic gameplay, it’s also a great map for raking in Weapon XP and finishing up those camo challenges. Take advantage of the bounty and your Gunsmith options will skyrocket.
For more information, please visit www.callofduty.com and www.youtube.com/callofduty, and follow @Activision and @CallofDuty on Twitter, Instagram, and Facebook.
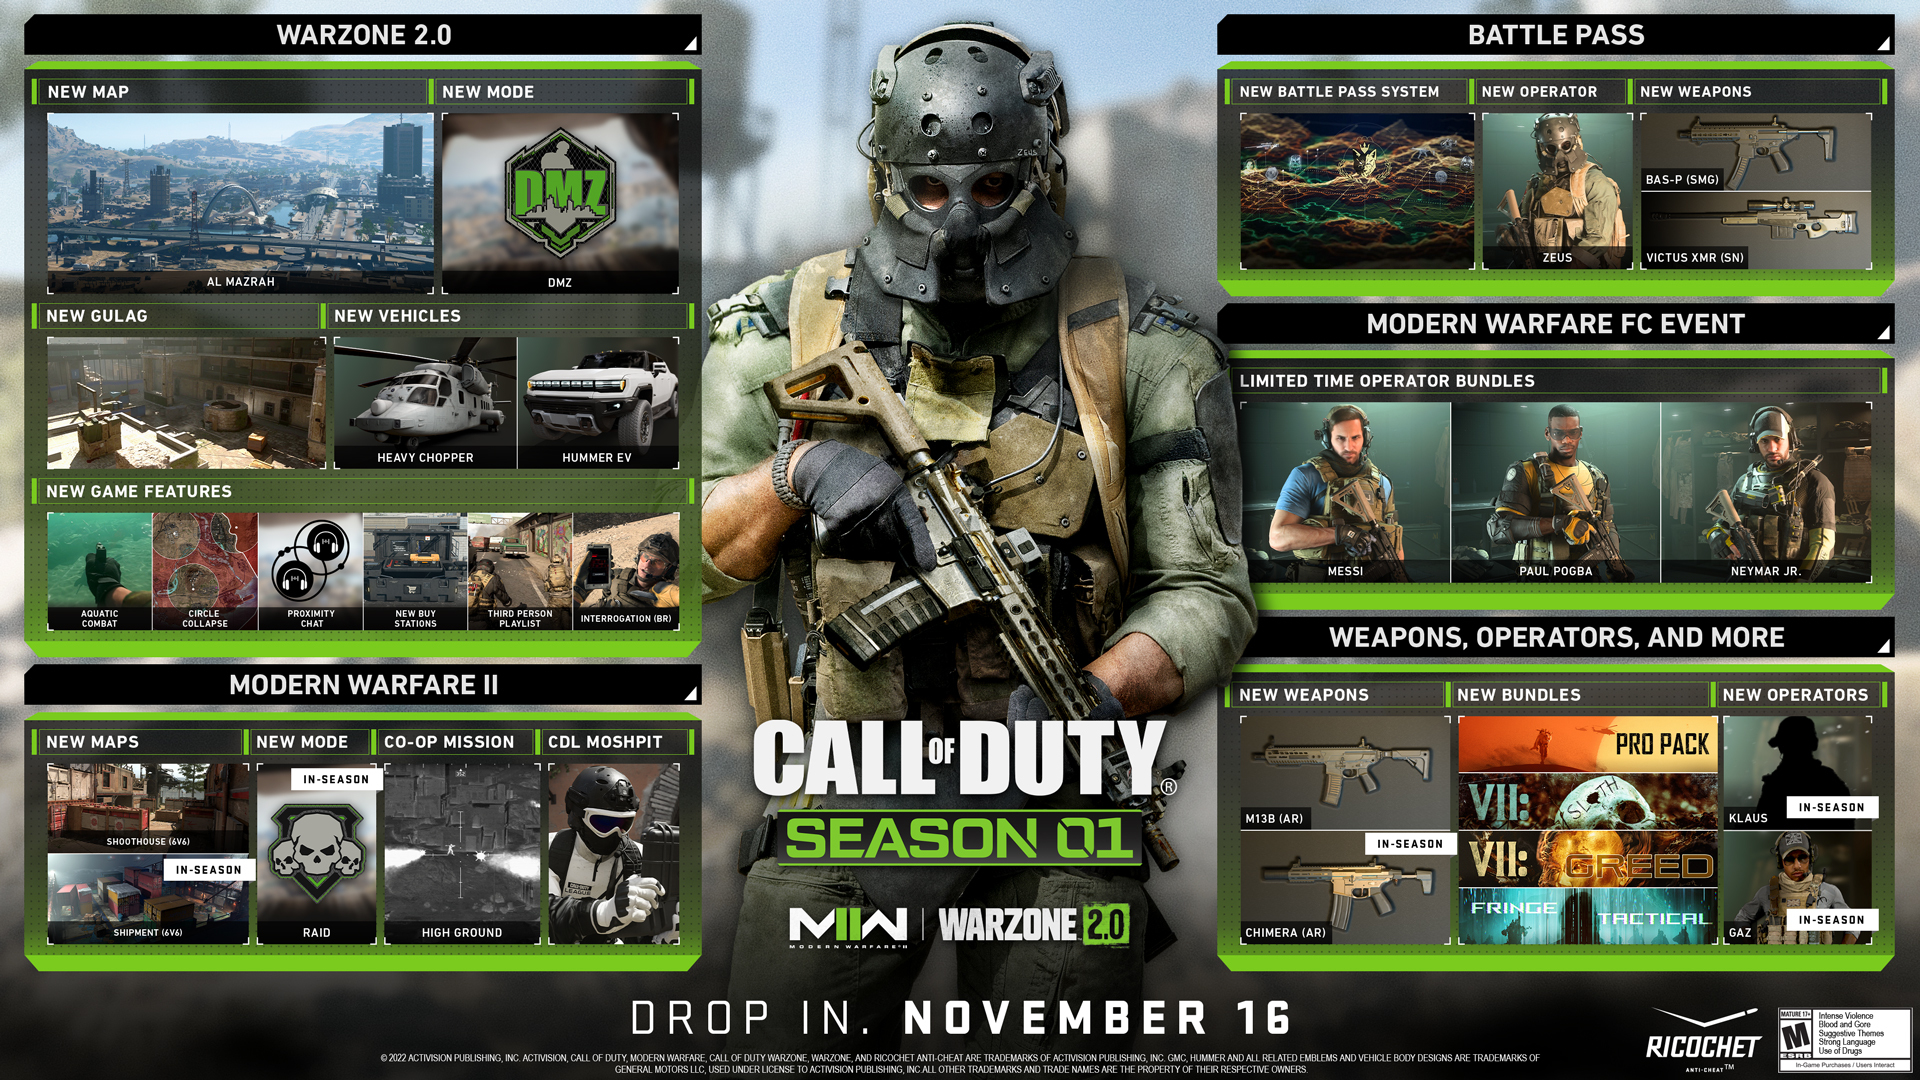
Season 01 Reloaded: Everything You Need to Know, Including DMZ Building 21
Round up the squad or prepare to infiltrate solo — Season 01 Reloaded, the midseason update for Call of Duty®: Warzone™ 2.0 and Call of Duty®: Modern Warfare® II, will arrive on December 14 at 10 a.m. PT, following a patch to both games.
Prior to the launch of Season 01 Reloaded, expect patch notes with details on all technical changes, including major fixes and balance tuning. Raven Software will handle Warzone 2.0 Battle Royale updates, and Infinity Ward will detail changes to Modern Warfare® II and the Warzone 2.0 DMZ Beta. Major Patch Notes updates can be found here.
https://www.youtube.com/watch?v=xjWamUBup7M As for the highlights, Season 01 Reloaded brings action on all fronts. In Warzone 2.0, expect a brand-new tactical experience for DMZ and a limited-time mode built for Modern Warfare® FC fans. Modern Warfare II will challenge trios with the first-ever Raid and will bring chaos with the debut of a reimagined Shipment. And across both games, there will be two new Operators, a new Primary Weapon to unlock, and more.
MODERN WARFARE II OVERVIEW
• This is Atomgrad, the first Special Ops Raid. Grab two of your best squadmates and help Price, Farah, and Gaz uncover the secrets held within a highly fortified enemy facility. • Shipment incoming! Now on the high seas, get ready to complete the rest of those Camo challenges or cause general chaos in this frenetic favorite for core Multiplayer modes.
Introducing the First Special Ops Raid: Atomgrad
Captain Price, Farah, and Gaz are ready to infiltrate deep behind enemy lines to a hidden submarine dock on the border of Urzikstan and Al Mazrah. Is your trio ready to step in their shoes and take on Atomgrad?
Continuing from the events of the Modern Warfare II Campaign, the first Special Ops Raid is something that will take, in the words of the captain himself, “violence and timing.”
Those who successfully complete this Raid will unlock a familiar face as a brand-new Operator to use in Multiplayer and Special Ops, as well as in Warzone 2.0. It will also unlock a harder difficulty Playlist that will test even veteran Operators. You can expect to find plenty of Intel that awards additional cosmetic items, in addition to some intriguing data it provides about the Modern Warfare II universe.
Preparing for the Raid
Accessing a Raid requires a Raid Key, which can be earned through the following method(s):
- Complete a specific Daily Challenge either in Multiplayer or Special Ops. - Place within the top 20 in any Warzone 2.0 Battle Royale Playlist. - In DMZ, use the final extract helicopter with at least $30,000 in Cash.
Once a Raid Key is earned, that player — and whatever squadmates they choose to bring in — can access the Raid for a full week.
Although there is only one mandatory requirement for Raid access — the Raid Key — we have a couple of additional tips prior to infiltration:
1. Warm up with Special Ops missions. Get familiar with how agents fight against you, how Special Ops Kits work, and the general strategies for completing a Special Ops run through its shorter missions. Completing them and earning Stars give you some permanent rewards as well, making this practice worth your time.
2. Tier up those Kits. Because Raids are part of Special Ops, it uses the Kit system. Having a high-Tier Kit means accessing those additional passive and active benefits during a Raid, increasing your options for survival and progression through it.
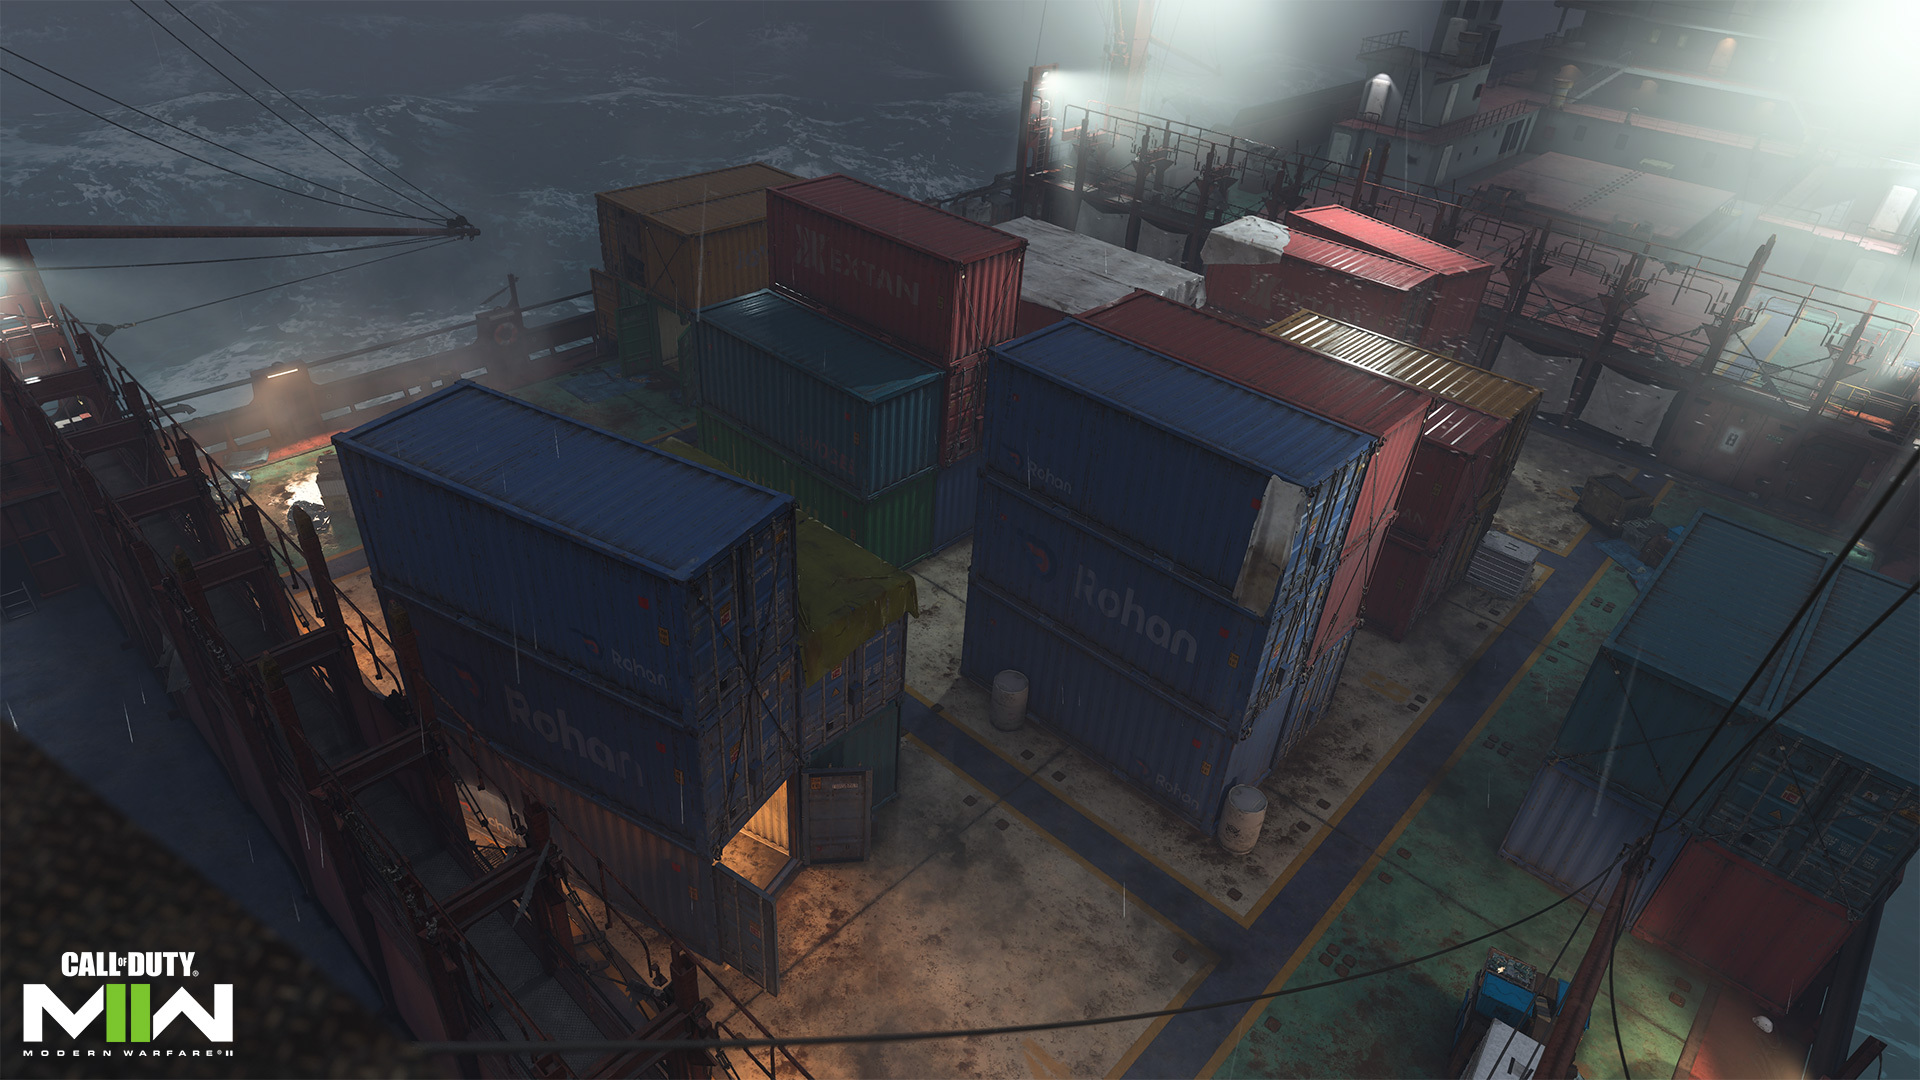
Shipment to Arrive in Multiplayer
One of the most iconic maps in Call of Duty history is reimagined for Modern Warfare II Multiplayer.
Set on a cargo ship taking on water in a storm-ridden part of the Atlantic Ocean, a new Shipment is ready to bring back the chaos that only an ultracompact map can provide. If you’re thinking about working around and off the map’s boundaries, which was possible in previous versions, then you might find yourself at sea…
Expect this map to be in featured Playlists throughout the rest of Season 01. Whether you are ready to grind out the rest of those Orion Camo challenges or just embrace chaos, prepare for Shipment’s arrival with the Season 01 Reloaded update.
Holiday Shipment Available for a Limited Time
Decorated in the holiday spirit across its main deck, Shipment will receive a temporary festive visual overhaul from December 21, 2022 though the new year to January 4, 2023.
Those on the naughty list won’t have to fret over any mythological creatures during this holiday season; the only threats here are your fellow Operators looking to get Camos that shine brighter than tinsel.
WARZONE 2.0 OVERVIEW
• Building 21. Find a way into this restricted [REDACTED] and [REDACTED]! • Warzone Cup, Mini Royale available for a limited time. Get those #SquadGoals in on a virtual pitch or feel the intensity of a more condensed Battle Royale in these limited-time Playlist offerings.
New Area in DMZ: Building 21
New keys have appeared in Al Mazrah… but where do they lead?
Its location is classified. Its benefactors are unknown. But one thing is for certain about the clandestine biological laboratory codenamed Building 21: only the strongest Operators may survive, let alone access one of the deadliest areas of DMZ. Players will need [REDACTED] to access [REDACTED].
With this great risk comes great reward: high-tier Contraband found throughout the building, especially in safes and special areas that require keycard access. What other secrets await you in this facility?
Limited-Time Playlists: Warzone Cup, Mini Royale
Following the Modern Warfare FC Support a Team Feature and the release of three limited-time Operator Bundles, Season 01 Reloaded will complete the hat trick of football festivities — or soccer special features — with Warzone Cup.
This limited-time mode brings two teams of three Operators to the Al Easima Field, home of one of the league rivals to Al Mazrah’s football club. Here, they will have special ATVs with a pulse ability to push a massive football into the other team’s goal. Collect and toss Shock Sticks to stall your opponents or boost through enemy vehicles to ram them out of the way!
The first team to score five goals, or the team with the most goals at the end of the five-minute time limit, wins the match.
Play this mode as any Operators, as well as the fearless Neymar Jr, Paul Pogba, or Leo Messi — all of whom are available in their limited-time Operator Bundles in the Store.
For more traditional Battle Royale fans, Season 01 Reloaded also sees the return of Mini Royale.
A tactical, condensed variant of a standard Battle Royale, expect fewer players but more compact safe zones in Al Mazrah right from the drop. Perfect for those looking to drop in and win within minutes, or who want to test their abilities in closer quarters, Mini Royales are planned to be included as part of scheduled Playlist updates.
GENERAL OVERVIEW
• Gaz and Klaus are coming to town. Task Force 141’s Gaz and a living legend in Klaus are set to bolster the already-deep Operator roster. • Make it a silent night. The new Chimera weapon, available during the mid-season, is custom-built for stealth operations. • Don’t just squad up, group up. New Social Feature allows you to meet fellow community members with similar interests both in and out of game.
Two New Operators: Gaz and Klaus
Kyle “Gaz” Garrick
Price’s right-hand man, Gaz became legend in 2019 when his valor during an attack on Piccadilly Circus grabbed the attention of the formidable SAS Bravo Team captain. He ultimately joined Price’s elite unit, known as Task Force 141.
During the events of the Modern Warfare II Campaign, Gaz was pivotal in saving CIA officer Kate Laswell from Al Qatala. Now he will join Price, Ghost, and Soap, as well as ally Farah — all of whom make up Red Team 141 — to help SpecGru maintain peace around the world.
How to unlock: Complete the Atomgrad Special Ops Raid to unlock Gaz and his “Convoy” Skin. Also available in Store Bundle with “Aquatic” Skin. Those who complete the Raid and purchase the Bundle will unlock the “Grass Ops” Skin as a bonus reward.
Klaus Fisker
A member of Denmark’s Elite Special Forces, Klaus Fisker can almost be considered a living legend among Operators.
Some say his scotopic vision — his natural night vision — was powerful enough to help him navigate a mile in pitch-black darkness before he was old enough to read. Others witnessed his exceptional training record, leading his peers with unbridled optimism through exercises.
But his legacy was cemented one night on the Urzikstan border, where he carried a wounded comrade 18 miles to the nearest base using the lessons taught by his father . . . and with the help of an unusual amount of chocolate that wounded solder carried with him.
How to unlock: Available in the in-game Store via the Klaus Operator Bundle.
New Weapon: Chimera
A new Assault Rifle, part of the Bruen Ops Platform, offers Operators a formidable Primary Weapon for stealth engagements.
“With an integrated suppressor and slow, high-energy subsonic .300 BLK rounds, the Chimera is adept at close-quarters combat. Subsonic Ammo hides kill skulls from the enemy team.”
This weapon is built for keeping Operators completely off the grid. Given the lack of visible tracers, hidden skull indicators and suppressed fire, the Chimera is useful against both enemy Operators and agents, the latter of which are less aware and coordinated when it comes to silent attacks.
As the description suggests, the Chimera’s effective range is shorter than most Assault Rifles, making it a more powerful and silent alternative to the faster-firing M13B from the same platform. So long as the Operator behind it can stay on target, the Chimera can be a versatile force in most short- to mid-range engagements, potentially making it a good complement to a rifle or LMG suited for longer ranges in an Overkill Loadout.
How to unlock: Weapon Challenge or via Store Bundle.
What’s In-Store: Featured Bundles
In addition to the TRACER PACK: Klaus Operator Bundle — featuring the new Operator, two Weapon Blueprints, and other festive items — as well as the three limited-time Operator Bundles for Modern Warfare FC, the Store will be packed with new Bundles, including the Dune Stalker Starter Pack and Year of the Rabbit Bundle.
Pro Pack: Dune Stalker
Available for $9.99 MSRP (or your regional equivalent), the Dune Stalker Starter Pack is a great all-around entry point for building up an arsenal following the midseason update.
It includes two Weapon Blueprints — the “Scarab” SMG based on the M4’s high-capacity, close-range option and the “Duster” Sniper Rifle — along with the “Muddled Up” APC Vehicle Skin, the “Golden Beetle” Weapon Charm, and the “Desert Starter Pack” Animated Emblem.
It also comes with 1,100 Call Of Duty® Points, enough for one season of access to a full Battle Pass.
Year of the Rabbit
Celebrate the Chinese New Year with this Bundle themed on the fourth zodiac symbol of the 12-year cycle.
Highlighting this Bundle is the “Zodiac Rabbit” Operator Skin for Zimo, as well as two Weapon Blueprints: the “Dash of Luck” high-capacity SMG and the “Tokki,” which is based off the new weapon available within this midseason update. It also comes with two Weapon Charms — the “Year of the Rabbit” and “Fortune Punch” — and two Animated Emblems.
New Social Feature: Groups
Whether you’re wanting to make new friends or find squadmates for DMZ and Special Ops missions, the new Groups social feature, launching as part of this update across both Modern Warfare II and Warzone 2.0, can help make those connections.
Accessible via the Social menu, Groups allows you to find or create communities of fellow Call of Duty players — up to 5,000 in a single Group — based on similar interests. These can range from the following labels:
- Call of Duty–based: Preferences on Call of Duty modes, including Battle Royale, DMZ, and Multiplayer, or player experience, such as “Veterans Only” or “New Player Friendly.” - Vibe-based: Out-of-game interests, such as Entertainment, Gaming, or Sports. - Community-based: Defining the tone of the group — such as how they play the game (e.g., competitive play or solely for fun) or when they play (e.g., weekend warriors or active daily). - Other categories: Defining their Group outside of the game, including if the Group is affiliated with a streamer or is part of a Call of Duty League team.
Groups are also defined by their main language and their privacy settings. These, as well as the above labels, are used to help define Groups within the in-game browser for other players to find them.
Once a Group is made, its members can use its dedicated text channels to converse, look up fellow members, and create parties for squadding up within Modern Warfare II or Warzone 2.0.
Essentially, this new feature can expand your network far beyond a friends list and gives you more options for connections within the greater Call of Duty community. Whether you have a ton of friends and colleagues or are a content team or creator who wants to have an in-game hub for connecting with fans, Groups are another way to get a squad going for that next Modern Warfare II or Warzone 2.0 session.
Combat Record, Update
Warzone 2.0 Combat Records will come online with Season 01 Reloaded. The statistics present in the Warzone 2.0 Combat Record will only be from the activation date forward, and will not include statistics from Season 01 launch through Season 01 Reloaded (November 16 to December 14).
OUT OF COMBAT OVERVIEW
- Time to Raleigh. The Call of Duty League Major I, which will also host C.O.D.E. Bowl III and the Call of Duty®: Mobile 2022 World Championship Finals, will take place December 15 through 18. Tune in at Twitch.tv/CallofDuty. - Get Your Glow Up. Get the official Call of Duty League Team Pack and League Pack and rock your team’s colors across Warzone 2.0 and Modern Warfare II. - Did Someone Say Co-Streaming? Apply to be part of the official CDL Watch Party Program! The first chance host a Watch Party will be during Major I going live Dec. 15–18. - Get into Call of Duty GearFest! Whether it’s for friends, family, or a self-gift, the Call of Duty Store is stocked for the holiday season.
Call of Duty League Major I, Call of Duty Endowment (C.O.D.E.) Bowl, and More in Raleigh
Four events, one weekend in Raleigh — welcome to Call of Duty League Major I.
Major I will be hosted live by the Call of Duty League at the Raleigh Convention Center in Raleigh, North Carolina, from December 15 through December 18. The event will be in a Pro-Am format, with qualified Call of Duty Challengers teams battling pros and $500,000 of prizing on the line and CDL Points for the Call of Duty League teams. Challengers teams who don’t make the Pro-Am will still be able to battle in the Open and make a name for themselves.
In addition, the Call of Duty: Mobile 2022 World Championship Finals will be hosted at this major, marking the first-ever in-person Call of Duty: Mobile World Championship Finals.
The best teams from North America, Latin America, Europe, India, Japan, China, and Southeast Asia are scheduled to compete head-to-head for the honor of bringing home the 2022 World Championship trophy and cash prize. For those who can’t make it to Raleigh, we will be streaming the entire event in-game with free rewards and on the CODM Esports YouTube channel.
Plus, the Call of Duty Endowment (C.O.D.E.) Bowl III presented by USAA is back on December 16, 2022, on the official Call of Duty Twitch, YouTube, and Facebook channels!
Watch as US and UK military esports teams battle it out alongside top Call of Duty® streamers to become the C.O.D.E. Bowl III champion.
This year, the Call of Duty Endowment reached an amazing milestone of placing 100,000 veterans back into high-quality jobs after their service and USAA is celebrating 100 years of serving the military community. To celebrate these incredible achievements, the C.O.D.E. Bowl will be bigger and better than ever. The trophy won by the U.S. Space Force during C.O.D.E. Bowl II was even sent into space to challenge the other branches to “Come & Get It.”
Don’t miss all these thrilling events under one roof at Call of Duty League Major I, and be sure to grab your Call of Duty League Team Pack and League Pack to support your squad across Warzone 2.0 and Modern Warfare II. Rather Raleigh your community to watch this event together? Applications for the official CDL Watch Party Program are now live; submit an application now before the first chance to host a Watch Party from Dec. 15–18.
Call of Duty GearFest Is Here
The holiday season is fast approaching, and Activision has curated a selection of the hottest collectibles, apparel, and other exclusive items in the Call Of Duty Shop.
In November and through December, players are being treated with new merch drops with plenty of gift options to celebrate the festivities with friends and family.
Among the initial big highlights dropping today are a Black Task Force 141 Jersey T-Shirt, a Cover Art Poster, Otaku Gaming Desk Lamps, and several items designed with some of Call of Duty’s most prized completionist camouflages.
Purchase Modern Warfare II to get access to a ton of content across three modes, including the ability to unlock 14 exclusive Operators to use across both games, as well as other ways to quickly level up the available 30 Weapon Platforms and over 50 Weapons through Multiplayer and Special Ops.
Modern Warfare II owners also get Premium XP while playing Warzone 2.0 — at the end of each match, owners will receive additional XP on top of any XP that can be earned by all players.
Plus, as already mentioned, those who own Modern Warfare II will have access to all the content coming as part of the Season 01 Reloaded update, including the first Special Ops Raid Atomgrad.
Those who want even more benefits should consider upgrading to the Vault Edition, which grants four additional Operators — Ghost, Farah, Price, and Soap — as Red Team 141; the FJX Cinder Weapon Vault; an ultimate version of a Weapon Blueprint with 50+ attachments; the Season 01 Battle Pass, along with 50 Battle Token Tier Skips; and more.
For more information, please visit www.callofduty.com and www.youtube.com/callofduty, and follow @Activision and @CallofDuty on Twitter, Instagram, and Facebook.
Wednesday, November 30th - Patch Notes
Hello everyone! We've just deployed a new client update that addresses the following issues:
PC
- Fixed an issue causing multiple PC crashes - Fixed an issue that resulted in the game FPS dropping for a moment when mousing over a locked Operator
Hello everyone! A new update has just gone live on Steam, see below for the patch notes accompanying it.
GLOBAL
GENERAL
Improvements made to help better navigate Camos
Added controller bumper navigation to jump between categories
Added a toggle option to show/hide locked Camos
- Increased audio notification for when The Jailer enters the Gulag.
ATTACHMENTS
Armor Piercing Ammunition
Removed damage multiplier against armored opponents
BUG FIXES
Fixed collision issues with various elements across the game that allowed players to exploit/peek/shoot through them.
Fixed an issue with audio occlusion and directional audio.
Fixed an issue causing some unlocks in the Gunsmith to not track Weapon progression.
Fixed an issue causing Overkill to allow players to equip the same Weapon as both a Primary and a Secondary.
Fixed an issue that was preventing the correct number of Battle Pass Tokens from appearing on the Battle Pass Menu.
Fixed an issue causing the Season Countdown Timer on the Battle Pass Menu to not indicate the correct amount of time remaining.
Fixed various incorrect texts in the in-game interface.
Fixed various issues resulting in incorrect controller input while navigating menus.
Fixed an issue that caused players looking down to appear erratic to others.
Fixed an issue that prevented some players from launching the game due to GPU compatibility.
Fixed an issue that was causing Focused Mode to crash the client while the Display Mode was set to Windowed.
Fixed an issue on PlayStation that caused the PlayStation Store icon to remain stuck on screen after experiencing a network error.
Fixed an issue causing progression for the “Dragon in Downtown” Calling Card to not track.
Fixed an issue causing the incorrect Operator icon to appear while navigating to select a custom skin for Kleo.
Fixed an issue causing players to get kicked back to the main menu when navigating to select the PDSW 528 Armory while customizing a Loadout.
Fixed an issue causing an incorrect progression requirement to appear in the Prestige menu.
Fixed various audio related issues causing players to hear notifications at times when they should not.
Fixed an issue causing Platinum Camo unlock requirements to display incorrectly after having unlocked it.
Fixed various issues causing the camera to shake while spectating another player.
Fixed an issue causing Operator model hands to appear invisible while ledge hanging.
Fixed an issue causing the incorrect Weapon to appear in the player Showcase.
MULTIPLAYER
BUG FIXES
Fixed an issue that caused the Spotter Scope to continuously highlight enemy positions.
Addressed a dev error in private matches, and will continue to improve stability.
Addressed an issue that allowed Private Match stats to be included in the Combat Record.
WARZONE 2.0
GAMEPLAY
Buy Station inventory has been slightly adjusted:
Removed Counter UAV
Removed Tactical Camera
- Visual upgrade to Contract activation phone in Battle Royale.
BUG FIXES
Fixed an issue preventing some players from hearing others via Proximity Chat.
Fixed an issue preventing Stickers earned via DMZ Extractions from appearing on Weapons.
Fixed an issue on PlayStation that caused players to not see Sony profile usernames.
Fixed an issue causing parachute deployment to crash the game.
Fixed an issue causing players to lose all control of mouse movement if interacting with a container with Mixed Backpack behavior.
Battle Royale
Fixed an issue that caused players eliminated in the Gulag to either spectate the enemy team or spectate from underneath the playable area.
Fixed an issue that caused players eliminated in the Gulag to not appear in the Buy Station for squad members to buy back.
Fixed an issue causing players to skip the downed state and immediately perish despite having an assimilated squad member still alive.
Fixed an issue preventing players from jumping out of the plane during Infil.
Fixed an issue causing the After Action Report from appearing correctly after a match.
DMZ
Fixed an issue that was causing players to get kicked out of the Backpack interface if looting an eliminated player opponent that disconnected during the interaction.
Fixed an issue preventing players from equipping Lethal and Tactical equipment.
Fixed an issue that caused players to encounter the “Failed to Connect to Datacenters” error while extracting.
Fixed an issue that caused lobby-wide microphone input during matchmaking.
Fixed an issue allowing players to keep Armor Plate Carrier upgrades between matches despite having been eliminated.
Fixed an issue causing players to lose their Backpack upgrade when extracting after having been revived.
Fixed an issue causing players to incorrectly extract their insured Weapon as a contraband Weapon.
Modern Warfare II Season 01 Patch Notes and Warzone 2.0 Launch
Hello MWII and WZ2 Players!
Season 01 marks the launch of the free-to-play Call of Duty: Warzone 2.0 and the much-anticipated DMZ experience. We hope you’re ready to dive into new maps, modes, missions, and more.
In addition to all of the new content, we also want to provide more information on updates to MWII in patch notes. We’ve also included critical intel on WZ2 and DMZ below.
Going forward, expect additional Warzone 2.0 community updates from our partners at Raven Software while we focus on new content and support for Modern Warfare II. We’ll be working together to make sure key information is available for all players across modes and titles.
RICOCHET ANTI-CHEAT
With the launch of Season 01, RICOCHET Anti-Cheat™ will be live, globally, across Warzone 2.0 Battle Royale and Warzone 2.0 DMZ. RICOCHET Anti-Cheat is currently live in Call of Duty: Modern Warfare II. Learn more about #TeamRICOCHET here.
BATTLE PASS
Season 01 marks the launch of our all new Battle Pass, in which players are able to choose the rewards they want as they progress. While there are 100+ tiers, this new map format allows for personalized progression with unlocks. Players can also progress with Battle Tokens Tier Skips. Take a deeper dive into the Battle Pass on the Call of Duty Blog.
WEAPONS
Our Season 01 weapons drop runs the gamut of playstyles, from the high speed BAS-P Submachine Gun, to the hard-hitting Victus XMR Sniper Rifle. Mid-range combat is always an option with the super stable and high rate of fire M13B… if you are up to the challenge of unlocking it. These new Weapons will expand Loadout capabilities to cover all the exciting new modes Season 01 has to offer. Head to the Battle Pass to see where you can unlock these weapons and more.
PROGRESSION
Players can now progress beyond level 55 and earn Prestige rewards. Seasonal progression will not reset.
BUNDLES
Here’s what will be live in the store on Day 1 of Season 01:
Executive Warfighter
Violent Embrace
Atomic Sunrise
Tactical Human
CDL Launch Pack
Introducing a New Battle Pass System in Season 01, plus Bundle Highlights
The Battle Pass enters a whole new era.
https://youtu.be/N3QHb-202gg
Introducing the all-new Battle Pass, where player choice leads to complete domination over the Area of Operations. Using Battle Token Tier Skips, choose the rewards you want to earn first each season, from free Functional Weapons to Weapon Blueprints, Operator Skins, and more.
The base Battle Pass includes 20 free items. Upgrade to receive access to all 100+ items, or get the Battle Pass Bundle to get an instant 20 Battle Token Tier Skips and a head start on unlocking those rewards. Those who have the Vault Edition of Call of Duty®: Modern Warfare® II can also use their free Battle Pass and Battle Token Tier Skips as well.
Along with detailing some of the Store Bundles to look out for during Season 01, here’s what you need to know about conquering the Battle Pass:
Explaining the Battle Pass: Initial Overview
Your mission has expanded to a full combat map!
When you access the Battle Pass menu within Modern Warfare® II or WarzoneTM 2.0, instead of seeing the familiar, long horizontal strip of Tiered content to unlock, you’re greeted with an impressive, large-scale map. This is the Battle Pass Area of Operations (AO). The Season 01 Battle Pass AO is divided into 21 different “Combat Sectors,” from A0 (Bonus Combat Sector) to A20.
Combat Sectors A1 to A20 are all connected to each other. Looking at the Sectors that are adjacent (and therefore connected) to the Sector you are currently unlocking is the key to progressing through this new Battle Pass.
Once you’ve unlocked all the rewards in all Combat Sectors from A0 to A20, expect to unlock a Victory Sector and earn valuable bonus rewards for total victory! See below for more specifics.
Also note that the Sectors within this Battle Pass AO contain 1,400 Total Call of Duty® Points (CP). Earn 400 free CP within the Battle Pass System, plus 1,000 more if you unlock across the full Battle Pass and Bonus Sector, allowing you to earn back the CP you spent purchasing the Battle Pass if you unlock all the CP within each Sector!
Explaining the Battle Pass with the First Sector: Sector A1
The new Battle Pass is a bit easier to understand once you walk through your first Sector. Whether you decide to stick to the free version or upgrade to get access to all content, everyone will start the Season 01 Battle Pass at Sector A1. Click on any Sector, and you’ll see there are up to five different items to unlock.
On the Battle Pass Area of Operations (AO), or the onscreen map, you will see “The Orbiter” Weapon Blueprint over Sector A1 — this is called the High Value Target (HVT). Think of it as the main item of interest within a Sector. You will also see the HVTs of all other Sectors shown across the Battle Pass screen. Now for a closer inspection: Select Sector A1, and you will see four other items underneath the HVT: the “Aerial Entrance” Calling Card, a Double Weapon XP Token, the “Aerial Entrance” Emblem, and the “Paying Rent” Weapon Charm.
All these items require a Battle Token Tier Skip to unlock. Battle Token Tier Skips are earned simply by playing the game, like Tiers in the old system. “Tier Skips” from the Vault Edition of Modern Warfare II will be converted into an equivalent number of Battle Token Tier Skips (50 Tier Skips, 50 Battle Token Tier Skips).
Earn a maximum of 100 Battle Token Tier Skips within a Season, which will be automatically spent at the end of the season if you don’t designate Sector items you wish to unlock. If you have more Vault Edition Battle Token Tier Skips than rewards remaining in the Battle Pass, any surplus will carry over to the following season.
Using a Battle Token Tier Skip “unlocks” an item for access. Items tagged with “Free” are available for all players. Get the full Battle Pass to get every item available.
In each Sector, the four items need to be unlocked with Battle Token Tier Skips before the HVT is available to unlock with another Battle Token Tier Skip. In the case of Sector A1, four Battle Token Tier Skips are needed to unlock the “Aerial Entrance” Calling Card, a Double Weapon XP Token, the “Aerial Entrance” Emblem, and the “Paying Rent” Weapon Charm, so that you can then use a fifth Battle Token Tier Skip to get “The Orbiter” Weapon Blueprint.
After getting the HVT item, the Sector is complete and you are free to advance to any adjacent Sector. In our example, once you get “The Orbiter,” you can move on to Sectors A2 and A3.
So, to recap, five Battle Token Tier Skips are needed to unlock everything in a Sector and to move on to another Sector. And 100 Battle Token Tier Skips are required to complete the Battle Pass.
By the way, “The Orbiter” Weapon Blueprint is not a bad way to start the Battle Pass. This variant of the Kastovia weapon platform’s midcaliber Assault Rifle makes it a more consistent and accurate primary option down-range. There is also no issue finding enemies with this weapon given the included magnified thermal sight, which allows you to see heat signatures and get a closer look at distant targets.
Purchase the Battle Pass to Unlock Bonus Sector A0, Zeus
Any purchase of the Battle Pass — either the upgrade to the full version or the Battle Pass Bundle — comes with this season’s first new Operator: Zeus.
Born in the South Niger Delta, Zosar Kalu is the eldest of three children. He helped raise his younger siblings while his parents pursued political aspirations. His nickname comes from his youngest brother, who was born with dysarthria (a speech disorder) and would pronounce his name “Zeus.”
Following his year of military service shadowing a Nigerian Army Special Forces Battalion, he enlisted and rose through the ranks of those same Special Forces. At the same time, his family became involved in a high-profile state election but was tragically killed by a local Al Qatala cell.
Orphaned, and now the last of his name, Zeus established the “Thunder” Corps, a counterterrorism group dedicated to hunting AQ wherever they hide and bringing them to true justice.
Zeus’s default Skin features his custom helmet and (nonfunctioning) battle armor, which saw many a battle against terrorist forces.
This Bonus Sector (called A0) also contains four additional items: a 10% Battle Pass Boost, the “Myth Maker” SMG Weapon Blueprint, the “Articulate Response” Sidearm Weapon Blueprint, and the “Chronophobia” Gun Screen, a new customization feature that allows you to attach a widget to your weapon, such as one that tells you the (real-world) time and date.
New Weapon HVTs in Sectors A6, A7
Those who want to unlock the two new weapons in the Battle Pass need only 15 Battle Token Tier Skips if they head straight from the first Sector toward Sectors A6 or A7, and 30 to unlock them both.
An aggressive fire rate and modular frame make the BAS-P perfect for the discerning operator who wants to customize their submachine gun. Subsonic ammo hides kill skulls from the enemy team.
Chambered with 9x19 mm subsonic ammo, the BAS-P was featured as one of the weapons that could be used within the Campaign’s final missions by picking it up off Shadow Company Operators.
At launch, the weapon will clock in at a solid 870 rounds per minute, putting it just below the PSDW 528. However, its ammo is the same as the MX9, making it a potential powerhouse at closer ranges.
Hard hitting, bolt action sniper rifle with .50 cal BMG ammunition. Its tungsten sabot tipped bullets are fast and powerful, but require precise shots over long distances.
Another weapon featured in the Campaign’s later missions, the Victus XMR is a powerful long-range weapon in the same caliber as the Signal 50.
Its bolt-action nature gives you time to handle its recoil before delivering follow-up shots when dealing with hostile groups. The most elite accurate snipers will be able to place lethal shots down-range with ease, with a variety of attachments to either help its slow Aim Down Sight time or keep it extremely steady for lining up the perfect collateral.
New HVT Operator Skins at Sectors A9, A11, A18
Want to get some new gear for the next operation? The HVTs in the AO’s deeper Sectors are tactical fits for both KorTac and SpecGru Operators.
“The Unseen” KorTac Mil-Sim Operator Skin (Sector A9, HVT)
Go undercover by looking like one of the DZ’s most fearsome marksmen, ready for combat in even the harshest desert conditions.
“Ursidae” Zero Operator Skin (Sector A11, HVT)
The valiant Zero readies up for the most dangerous operations in Al Mazrah with this sand-and-black bomb squad rig.
“Blackout” Roze Operator Skin (Sector A18, HVT)
They couldn’t keep the Shadow Company’s threads off her for too long; while new materials increase its visibility, it still is sleek enough for those looking to drop in with an all-black attire.
Complete the Map for Golden Zeus, White-Hot Weapon Blueprint
Those who reach 100% completion on the map by conquering all 20 Sectors (excluding the Bonus Sector) gain access to the Victory Sector, which contains the following five items:
“Olympus King” Zeus Operator Skin
Featuring a gold-plated variant of Zeus’s signature helmet and multiple golden accessories, this kit for Zeus subtly flaunts your completionism of the Battle Pass while still keeping you grounded for the Operations in Al Mazrah.
“Mortal’s Bane” Weapon Blueprint
The custom-built weapon for Zeus, the “Mortal’s Bane” Weapon Blueprint features five attachments that combine for a mobile midrange build. Get that weapon up quick around corners or other cover with a lighter stock and barrel, acquiring targets quickly with a miniature red dot optic.
300 COD Points
Get a head start on saving up for the next Battle Pass, or use these towards one of the Bundles to be released in season.
Bundle Highlight: Pro Pack
The Battle Pass is not the only place to find new Operator Skins, Weapon Blueprints, and other items to make you look the part of an elite Operator.
Those wanting to tackle Al Mazrah like a true professional should look no further than the Desert Rogue Pro Pack, available in-season for $19.99 or your regional equivalent.
This pack contains the “The Rogue” Operator Skin for Reyes, which is perfect for the most arid conditions out in the field. It also contains two Weapon Blueprints — the “Dust Devil” Rifle and the “Sandstorm” SMG, the latter of which comes with an extended drum magazine for clearing out squads at close range. For additional customization, feel free to slap on the “Desert Death” Sticker, “Red Camel” Weapon Charm, and “Desert Pro” Emblem from this pack.
Like previous Pro Packs, the Desert Rogue Pro Pack also comes with 2,400 CP, enough to purchase another Bundle or get the Battle Pass Bundle for this season.
Bundle Highlight: Modern Warfare II FC Stars
Ready to kick off the Modern Warfare® II FC event during Season 01?
Later in November, you can add three new Operators to your roster: the soccer stars of Modern Warfare II FC.
First up is the fearless Neymar Jr., who will debut on November 21. The Neymar Jr Operator Bundle (Tracer Pack) will include this new Operator in addition to a stealth-minded “The Feared” Weapon Blueprint and the “Longball” Weapon Blueprint, the latter of which is a Battle Rifle meant to lay down some serious fire support.
Next is Paul Pogba, arriving on November 25 in the Tracer Pack: Paul Pogba Operator Bundle. It will unlock the French midfielder as a new playable Operator, as well as grant a “Atomic Flea” Weapon Blueprint meant for silent support and a “Blue Thunder” Weapon Blueprint for getting high shots on target.
Last but not least is the legendary Leo Messi, heading into the Store on November 29 in the Tracer Pack: Messi Operator Bundle. In addition to the Argentine striker as a playable Operator, the Bundle contains two Weapon Blueprints designed for close shots: the sleek “Series A” and the all-around solid “Counter Attack.”
All above Bundles also include a Charm, Vehicle Skin, Sticker, Emblem, and a Finishing Move for each Operator that would be far from class on the real pitch.
Bundle Highlight: CDL Launch, Team Packs
We’re celebrating an early return to the Call of Duty League™ with a special Launch Pack for the 2023 season, as well as the release of Team Packs for all 12 Call of Duty League franchises.
The official Call of Duty League Pack drops on November 16. Drop in and run the map with these refreshed At Home and On the Road Operator skins, a Weapon Camo, Weapon Charms, and more!
You can also show your support for any one of the 12 Call of Duty League teams — or all 12, if you want to be the ultimate bandwagoner — by picking up this year’s CDL Team Packs. These contain the following items all themed to the CDL Team you choose: a Weapon Camo, Male and Female Home and Away Operator Skins, a Vinyl Sticker and a regular Weapon Sticker, an Animated Calling Card, and an Emblem.
Pick these up before the first Major of the season, taking place in Raleigh, North Carolina, on December 15 through December 18.
Additional Bundle Highlights
There is plenty more in (the) Store for Season 01:
Executive Warfighter
Keeping in theme with some of the other tactical and sleek gear found in the Battle Pass, the Executive Warfighter Bundle is highlighted by a “Carbon Shadow” Operator Skin for Horangi and two Weapon Blueprints.
One of them is the “Short Fuse,” based on the new SMG found in the Battle Pass, and the other is the “Blissful Ignorance,” a silenced Sniper Rifle with serious stopping power.
VII: Sloth
This year, a new set of Bundles to look out for is based on seven devious vices.
The first is the VII: Sloth Bundle, which contains the “Folivora” Weapon Blueprint based on the new Sniper Rifle found in the Battle Pass. It also contains the “Desidia” Operator Skin for König, as well as the “Deep Sleep” Weapon Blueprint — a Shotgun that will help put those enemies down for a dirt nap.
Also look for the VII: Greed Bundle during the season.
Prepare to Drop In, Ready Up with Modern Warfare II
https://www.youtube.com/watch?v=uXNOOHvTqgA
Now is a great time to pick up Modern Warfare II before Season 01 kicks off.
Purchase Modern Warfare II to get a premium Warzone 2.0 experience - access to 14 additional Operators to use across both games, as well as accelerated Weapon and Level Progression. As a Modern Warfare II owner, receive bonus XP at the end of each match when you play Warzone 2.0, ensuring that you level just as quickly in both titles.
Plus, as already mentioned, those who own Modern Warfare II will have access to all the content coming in Season 01, including the first ever Raid, arriving mid-season.
Those who want even more benefits should consider upgrading to the Vault Edition, which grants four additional Operators — Ghost, Farah, Price, and Soap — as Red Team 141, the FJX Cinder Weapon Vault, an ultimate version of a Weapon Blueprint with 50+ attachments included, the Season 01 Battle Pass along with 50 Battle Token Tier Skips, and more.
For more information, please visit www.callofduty.com and www.youtube.com/callofduty, and follow @Activision and @CallofDuty on Twitter, Instagram, and Facebook.
Warzone™ 2.0 Tactical Overview — New Features, DMZ, and More
Get ready to drop in.
Call of Duty®: Warzone™ 2.0 will redefine the franchise’s free-to-play experience with an all-new way to play: DMZ, which Infinity Ward gave an overview of here. Its Battle Royale mode will also get some incredible new features in addition to fan-favorite returning concepts based on community feedback. And across all game modes, expect new strategies to attain victory through retooled vehicle mechanics, aquatic combat, and more.
All of this is set to take place in Al Mazrah, a battleground from the Call of Duty®: Modern Warfare® II universe. Need a full and annotated tour of the entire map? We cover that in depth here.
https://www.youtube.com/watch?v=oJca6zoI50E
Direct Developer Comms: Trello Board Coming Online
To support WarzoneTM 2.0, Raven Software is set to launch a Trello Board, which will track and provide updates on live issues players may have or may encounter while playing the game. It will also include Patch Notes, Playlist updates, and XP event information. You can visit that Trello Board for these direct communications from the developer here. In addition, bookmark the following page and expect Warzone 2.0 (and Modern Warfare® II) Patch Notes to be available here.
In terms of general tactics, however, here’s what you need to know:
BATTLE ROYALE OVERVIEW
- Loadout, Circle Collapse, and Gulag Updates. Know how to get those precious Loadouts, what happens when a circle collapse splits up, and tips for surviving the new Gulag. - Interrogate Your Enemies. If an enemy is downed and nobody seems to be around, try interrogating them to gain intel.
Loadouts, Custom Weapons, Streamlined Backpack
Welcome to Warzone!
At the start of all Battle Royale matches, when Operators drop from a cargo plane somewhere over Al Mazrah, expect to have only an X12 Handgun, two Armor Plates, and a pair of fists to your name. Everything else must be collected within the map, including a proper Loadout.
Returning from the original Warzone, a Loadout in Battle Royale contains the following:
- Primary and Secondary Weapon - Lethal and Tactical Equipment - Perk Package — A premade set of four Perks containing Modern Warfare II Base, Bonus, and Ultimate Perks.
Loadouts arrive in Loadout Drops, which can descend at any time between the second and sixth circle collapses through an in-game event.
Loadouts can also be earned earlier in match by clearing out a Stronghold, once those are available (see Stronghold section for more details). If a Loadout it lost, or if you want to have elements from multiple Loadouts on your Operator, you can earn additional Loadouts by clearing another Stronghold or picking up another Loadout Drop.
Custom Weapons
Instead of buying Loadouts from a Buy Station, the Buy Station contains only Custom Primary Weapons from your Loadouts.
This allows you to spend that earned Cash on a weapon that fits your personal meta, but those other Loadout items are only earned by risking the trip to a Loadout Drop or by clearing out a Stronghold.
See the Buy Station section for more info.
Streamlined Backpack
As opposed to DMZ, Battle Royale features a Backpack that works in a more passive way — as an extra place for equipment, Armor Plates, and other small items if those spaces are occupied on your Loadout or Operator. At any time, you can switch out active Loadout Items with whatever is in the Backpack.
In terms of item gathering, there is no menu navigating outside of these containers: Duffel Bags, Cash Registers, Weapon Lockers, and Medicine Cabinets. By default, Cash, Armor, and any items that you already have in your Loadout or Backpack (e.g. a specific ammo type) are automatically picked up.
Interrogation
After successfully downing an enemy player in a squad-based mode, you can either go for the coup de grâce or, more strategically, interrogate them.
By interacting with a downed enemy player, you will learn the locations of all their allies, via red dot pings on the minimap, as well as outlines in the environment (like a Snapshot Grenade), for a short period of time. You will also see the locations of any placed equipment they may have. This effect also dissipates once the interrogatee dies or is revived.
Of course, this tactic should only be done if the enemy squad is nowhere to be found after one of their allies is downed. The person being interrogated can also call for help, which marks the interrogator on the map.
Essentially, this new mechanic offers an incredible amount of intel for taking a few seconds to interact with a downed Operator. We do not recommend doing this during an active gunfight, but if a takedown happens in a large building and nobody else seems to be around, shake down that injured Operator and learn where their friends are.
Circle Collapse
In some games, the circle collapse will behave as normal: one circle that closes in several stages. All previous tactics for outrunning the collapse and fighting within it apply.
In other games, the circle collapse can split into multiple circles, up to three in some cases. This can happen at any time in between the first and final two collapses.
When this happens, you should keep the following in mind:
1. Smaller Circles, More CQB
Split circles will inheritably be smaller than a “normal” circle collapse. Their size also depends on how early or late a circle split happens in the match.
Regardless of the exact size of these split circles, weapons that are better for end-game close-combat — SMGs especially — will typically have increased value.
Note any large buildings or clusters of smaller structures to sweep through while in one of these smaller circles, and mind any open spaces that can create mid- to long-range engagement opportunities.
2. Cross-Circle Engagements
While difficult, it is possible to engage with enemies in other circle collapses during a split collapse.
One strategy is for expert snipers: those who account for bullet drop and can roughly see through the hazy collapse can make out enemies in other circles. Especially when you are in a circle on high ground, such as at the Observatory, consider looking across the collapse and try to hit an unexpected elimination.
The other, though riskier, strategy is using a combination of Gas Masks and Stims to “will your way” between circles. In total desperation situations, like when a squad has you pinned up against the collapse itself, it may be worth burning those items to a potentially safer circle.
3. The Merge
Those who know about “rotating,” or positioning yourself toward the next circle, will need to account for all circles coming back together as one after a split collapse.
Individual circles will ultimately meet in the middle, Venn diagram style. Checking the larger Tac Map is crucial for planning next steps, as it is often best to be toward the direction of the future safe area to get ahead of the pack.
Guide to the New Gulag
The Gulag has some new rules, starting with a new arena.
The new Gulag arena is a roughly symmetrical, small-scale arena meant for 2v2 combat. In between the two spawn areas is a raised courtyard on one wall and an open courtyard with a circular platform on the other. The middle lane is completely open, besides a set of gallows on one side and a platform on the other.
Operators who are sent to the Gulag — upon first death in a Battle Royale before the final circle collapses — will be randomly paired up with another fallen Operator. All players will receive a predefined Loadout — at launch, this will be a Pistol or Shotgun, a Lethal Grenade, and a Tactical Grenade — with highly effective weaponry and gear placed toward the center.
Within the Gulag, there is a Jailer who jumps down onto the circular platform during the duel. The Jailer has increased health compared to a normal Operator, as well as a Minigun, which takes a second to wind up before unleashing a storm of bullets. Eliminating the Jailer instead of the opposition returns all four Gulag entrants back into the game, while just eliminating the opposition just brings one duo back into the match.
In other words, if all four Operators want to survive, they can agree to a cease-fire and focus on eliminating the Jailer. Doing so may require Proximity Chat (more details later in the overview) and putting trust in the other Duo…
Otherwise, it’s business as usual: eliminate the opposition, and you will return to the match with the Gulag Loadout as a parting gift.
GENERAL OVERVIEW (ALL MODES)
- Sweep Out Strongholds, Black Sites. AI combatants are found in these marked buildings around Al Mazrah. Clear them out for in-match items, Loadouts, and permanent rewards. - Vehicles Rebuilt. From new modes of transportation to techniques and a fuel system, take those boots off the ground and use these machines to help drive the squad to victory. - Proximity Chat, Aquatic Combat Offer New Strategies. One is built for stealth, the other for social deception. Use them to craft new paths to victory.
Looking for Party and Ping Features
Find players who match your playstyle and communicate using an expanded in-match Ping system, available in both Modern Warfare II and Warzone 2.0.
Looking for Party
To access Looking for Party, click “Find A Party.” After selecting a mode and entering the lobby, find your party based on preferences, and drop into the match.
Expanded from the previous Warzone, this feature now includes the following preference filters:
• In-Game Communication Style: Voice Chat, Text Chat, Ping • Main Language: Select up to 3 language preferences • Playstyle (Primary, Secondary): Competitive, Casual, Objectives, High Kills
This system will be available in Battle Royale modes, as well as in Featured Multiplayer modes during Season 01.
In-Match Ping System
Another expanded feature, the Ping system will include a Tactical Ping Wheel.
In Battle Royale and DMZ, you can hold the Ping command to communicate eight options via custom visuals and voice lines: a General Ping, Attacking Here, Watching Here, Looting Here, Regrouping Here, Stay Quiet, I Need Help, and Assimilation related. In all other modes, this wheel is streamlined to feature Going Here, Stay Quiet, Watching Here, and I Need Help commands.
Other improvements, such as Pinging in the HUD, were also made over lessons learned the past three years.
Proximity Chat
Both Battle Royale and DMZ matches will have proximity chat — also known as the ability to have voice conversations with anyone nearby — enabled.
Using this effectively depends on the mode:
In DMZ, Proximity Chat is crucial to ensuring an Assimilation goes as planned. Alternatively, it can be used as a de-escalation tactic for players who just want to complete their objectives and get out.
In Battle Royale, Proximity Chat is most useful in the Gulag, where you have a random squadmate to form a Duo. There is enough distance between the two Duos to quickly discuss strategy before the Gulag duel begins, so it is recommended that you open up comms for that.
Also, keep in mind that anti-toxicity rules will be enforced, so keep those comms clean. More details can be found here.
Strongholds and Black Sites
Another concept across both modes at launch is the presence of Strongholds and their more elite variant, the Black Site.
At the end of the first circle collapse in Battle Royale matches, three Strongholds are activated around the map and do not require a key for access. At the beginning of a DMZ match, several Strongholds will become accessible by finding a key somewhere around the map. In both modes, they are marked with large green castle icons and contain AI combatants.
In Battle Royale, the first team to reach a Stronghold must defuse a bomb before time expires. Otherwise, the objective is to clear a specific amount of enemies; both AI Combatants and rival Operators count. This is also the default objective in DMZ.
Once inside, Operators are free to take any items after clearing threats, which can include enemy Operator squads who can enter at any time. Completing a Stronghold in Battle Royale also offers a Loadout Crate and a temporary UAV effect of the surrounding area.
Black Sites, available only in Battle Royale, are a more dangerous form of Strongholds. This requires a key (Black Site Key) to access, which is given to the first Operator or squad that clears a Stronghold.
The Black Site is marked with a skull icon and contains considerably tougher enemies, including a unique Juggernaut boss. The reward for completing a Black Site is great: first, a permanent Weapon Blueprint is immediately rewarded for use in all modes. During the match itself, Operators also get tons of Legendary items, as well as a permanent UAV of the area surrounding the Black Site until it is in the circle collapse.
While the above is not necessary for success in either mode, it can certainly help you and the squad stock up on supplies and intel.
Vehicles: Roster, Techniques, and Fuel
Vehicular combat gets a serious upgrade in Warzone 2.0. To start, here’s a look at all the modes of transportation in the game:
Roster
ATV
Capacity: 1 Driver, 2 Passengers + Additional “Hop-Ons” Damage Rating: Low Take charge with rough and ready capability delivered with plenty of low-rpm torque and power. Top-tier rack capacity offers an impressive payload capacity: hold ’er wide and send it.
UTV
Capacity: 1 Driver, 3 Passengers Damage Rating: Low The pinnacle of ultralight tactical off-road vehicles, allowing for rapid personnel deployment for squads of up to four. Go deep and hard in the most rugged and austere environments with world-class mobility and versatility.
Hatchback
Capacity: 1 Driver, 3 Passengers Damage Rating: Medium A four-door civilian hatchback without armor plating or any significant protections.
Chop Top
Capacity: 1 Driver, 3 Passengers Damage Rating: Low-Medium This open-air, off-road vehicle provides little protection but can be used for rapid movement between objectives.
SUV
Capacity: 1 Driver, 3–4 Passengers Damage Rating: Medium An all-terrain civilian 4x4 that can be used for quick extraction or infiltration in battle.
Hummer EV
Capacity: 1 Driver, 4 Passengers Damage Rating: Medium Incredibly quiet and quick, the GMC Hummer EV Pickup can transport up to 4 squad members through the toughest battlefields.
Tactical Vehicle (TAC-V)
Capacity: 1 Driver, 3 Passengers Damage Rating: Medium-High A specialized light combat vehicle with (or without) a mounted .50 Cal machine gun designed to handle extreme terrain and unconventional combat.
Cargo Truck
Capacity: 1 Driver, 1 Indoor Passenger + Flat Bed — as many passengers and vehicles that can fit Damage Rating: Medium-High A large industrial vehicle. Slow moving, but may provide a small amount of protection in firefights.
Light Helo
Capacity: 1 Pilot, 4 Passengers Damage Rating: Medium-High A twin-engine light helicopter for combat support and rapid traversal of the engagement zone.
Heavy Chopper
Capacity: 1 Pilot, Cargo Bay — as many passengers and vehicles that can fit Damage Rating: High A heavily armored search and rescue helicopter. Can transport troops to the combat zone and deploy flares when targeted by anti-aircraft ordnance.
RHIB
Capacity: 1 Captain, 3 Seated Passengers + Flat Body — as many passengers that can fit Damage Rating: Low-Medium A maneuverable tactical boat designed for Special Forces.
Armored Patrol Boat
Capacity: 1 Captain, 2 Passengers/Exposed .50 Cal Gunner + Flat Body — as many passengers that can fit Damage Rating: High An armored patrol boat complete with mounted .50 Cal Machine Guns
Vehicular Techniques
As Modern Warfare II players can attest, you can do more with vehicles than just drive them across the map. Here are a few example strategies:
Got ’em Leaning: New to Modern Warfare II, passengers in contained vehicles, such as a hatchback or SUV, can lean out the window to fire their weapons. This is helpful for getting a better angle on the action in front of or behind a vehicle.
Seat-Swapping: A more advanced strategy with vehicles involves swapping seats. Those who can quickly swap to a passenger seat will make the vehicle coast for a few seconds, allowing you to heal using a Stim, throw on an Armor Plate, or potentially pick up a kill. Alternatively, switching sweats often as a passenger can throw off enemy fire.
Get on Up: Want an even riskier maneuver? You can also now climb onto the roof of some ground vehicles from the passenger or driver seat. This is great for bailing out quickly or when you want to jump on an enemy vehicle for a unique engagement starter.
There Goes a Tire!: Vehicles also have more realistic damage in Modern Warfare II compared to previous games. Try shooting out the tires of an enemy vehicle to make it harder to control, or blow off the doors to make it easier to target enemies inside.
Fuel and Health
There are two other key additions to vehicles — fuel and the ability to repair vehicle damage.
Fuel appears as a meter alongside the vehicle’s damage and passenger counter at the bottom of the HUD.
No need to worry about the cost at the pump — fuel can be refilled either with Gas Cans found around the map or at Gas Stations. Once a vehicle runs out of fuel, it no longer works, so plan trips accordingly.
The other new feature is the ability to repair vehicle damage. For land vehicles, tire damage can be fixed by manually interacting with each tire to replace it. All vehicles can also visit Gas Stations to have body damage and tires, if applicable, recovered over time.
Managing these two features will be key to survival in both modes, whether it is outrunning a circle collapse in a Battle Royale or having a better means of attacking in DMZ. All those previous strategies involving Trophy Systems and “rigging” vehicles with explosives still apply, however, so veteran drivers should use both old and new tricks to keep their squad moving toward victory.
Buy Station 2.0
The Buy Station is an interactable space where you can purchase items (or sell them, in DMZ) using Cash. The Buy Station has a few similar offerings between modes, as well as a unique offering in DMZ and Battle Royale:
- Available Gear: Gas Masks, Killstreaks, Armor, and more; this is the Buy Station content of old with a twist. There is a limited quantity of items that can be bought at each Shop before it runs out for the match, and the item list may not be the same for each Shop. - Buy Weapon: Custom Weapons, created for Custom Loadouts in Battle Royale, can be purchased for a considerable fee. - Teammate Buy Back (BR Only): As in the original Warzone, squadmates can buy back their fallen allies, including those who lose in the Gulag. - Sell (DMZ Only): From valuables like hard drives and gold bars to weapons and equipment, the Shops will happily give out Cash for anything in your Backpack.
Aquatic Combat
Whether by boat or breaststroke, Operators can navigate waterways, rivers, and the open sea as part of their overall victory strategy.
In Al Mazrah, the largest bodies of water are as follows, as shown in the map guide: - The southern sea, which stretches from the edge of the Al Safra Quarry, past the Sa’id City Port, and around Sawah Village, Sariff Bay, Al Bagra Fortress, and Al Malik Airport. - All these areas have substantial flooding: Sawah Village, Zarqwa Hydroelectric, and Mawizeh Marshlands. - The Oasis, per its name, also contains a few small pools of water. - A river stretches from the north of Taraq Village, through Al Mazrah City, down to the Mawizeh Marshlands. It then splits in two directions: One part of the river continues west through Zarqwa Hydroelectric and down past Sa’id City. The other part continues south past Ahkdar Village to the sea section above the Al Malik Airport.
These waterways are incredibly useful for stealth operations, as Operators swimming underwater are hard to track down. However, while underwater, an Operator can only use small melee weapons like the Combat Knife and Sidearms, as well as equipment pieces like Throwing Knives. Still, these weapons are lethal enough to get the job done.
Some lethal and tactical equipment pieces, along with Killstreaks, also have special properties on water. For example, Proximity Mines will float and can explode boats that bump into them. Drill Charges, meanwhile, burrow into the water and explode under the water’s surface.
There are two major drawbacks to swimming: oxygen needs and boats. The former prevents you from swimming underwater indefinitely; the latter is instant death if they ram into you. So long as those are kept in check, feel free to use the water to your advantage.
Prepare to Drop In, Ready Up with Modern Warfare II
https://www.youtube.com/watch?v=uXNOOHvTqgA
There’s a massive amount of content both at the launch of Warzone 2.0 and planned for the Seasons to come. However, to gain a full tactical advantage and a large amount of additional content, it would be wise to fully experience Modern Warfare II:
Purchase Modern Warfare II to get access to a ton of content across three modes, including the ability to unlock 14 Operators to use across both games, as well as other ways to quickly level up the available 30 Weapon Platforms and over 50 Weapons through Multiplayer and Special Ops.
Modern Warfare II owners also get MWII XP while playing Warzone 2.0 — at the end of each match, owners will receive additional XP on top of any XP that can be earned by all players.
That is all in addition to the content coming in Season 01, including the first ever Raid, arriving mid-season.
Those who want even more benefits should consider upgrading to the Vault Edition, which grants four additional Operators — Ghost, Farah, Price, and Soap — as Red Team 141; the FJX Cinder Weapon Vault; an ultimate version of a Weapon Blueprint with 50+ attachments included; the Season 01 Battle Pass; 50 Battle Pass Tier Tokens; and more.
For more information, please visit www.callofduty.com and www.youtube.com/callofduty, and follow @Activision and @CallofDuty on Twitter, Instagram, and Facebook.
PLAY // Map Intel // Shoot House
Operation/ SHOOT HOUSE Las Almas Day 13, 13:00 Factions Deployed: SpecGru / KorTac
Needing a geographically diverse and hidden location out of which to conduct training operations, the Cartel La Red – at the time, the dominant cartel in Las Almas – constructed a place where men and women learned to become killers.
Under the direction of a mysterious military and security advisor known as “El Sin Nombre”, Sicarios were sent to the mountains to receive the same training in urban, mountain, jungle and close quarter combat as elite Mexican Special Forces operators. Utilizing the jungle and mountain coverage to hide their elaborate training facilities, the sicarios of La Red were transformed into a veritable army of assassins. Learning everything from rock wall rappelling to HALO jumping to room clearing in a PLAZA-SIZED SHOOTHOUSE, they were taught war effectively and methodically.
With secure access to the snaking Rio de Almas providing a direct route from the Gulf ports to the northern border, and the nearby mountains serving as an ideal location for overwatch, the area would have been perfect for continuing Narco operations.
If it wasn’t haunted.
Shoot House provides the ideal setup for SpecGru and KorTac forces to exercise their combat and movement abilities in an intimate, remote tactical environment. Operators who perform well here will be more than prepared for the further challenges ahead, having proven their skills in every kind of fierce engagement.
Kortac Operators arrive on the western side of the map at the Alpha Gate, while KorTac Operators deploy on the eastern side of the map at the Bravo Gate.
MAP VIEWS
Spawn Point: Kortac Kortac Spawn Zone (West) – Alpha Gate, Forklift, and Courtyard
Shoot House employs a classic three-lane, near symmetrical design, so that the forces on both sides of the map at match start must determine whether to head straight toward the center lane, north toward Containers, or south toward the Junkyard.
From the Alpha Gate, snipers often rush straight to the sturdy center wooden wall, mantling up onto the worktables for a clear line of sight down the middle. The stairs leading up into the Office offer another good route, though an SMG or Assault Rifle will suit you better when encountering enemy Operators on the other side of the building.
Head north to the Forklift — offering excellent defensive cover against enemies rushing into this area — to make your way to the Containers. Look for enemies racing to the stairway leading up to the Office just to the left of the stack of cement bags and wooden boards, and be ready for an engagement from either side when moving forward out of the starting area.
When navigating to the southern Courtyard, use the large cover pieces to defend against attackers rushing in from the Junkyard. Consider tossing a Tactical and/or Lethal Equipment piece amongst the scattered vehicles when pushing into the Junkyard. At the initial break, toss it over the parked SUV where you’re likely to catch incoming Operators; be prepared for them to attempt the same against you. The SUV in Courtyard is also able to be detonated, so access the violence and timing needed to prevent you being caught in a possible explosion.
Spawn Point: Specgru Specgru Spawn Zone (East) – Bravo Gate, Back Alley, and Shanty Town
The Specgru forces begin at Bravo Gate with a similar initial layout, though there are some important differences here.
As with the Alpha Gate spawn, there’s a good chance that a sniper or two will head straight forward, mantling up for a view down the center, often initiating the match with its first battle as each side vies for dominance over the middle lane. You can also run straight into the center lane — called Main Street on this side of the map — though you’d better cross your fingers and use your Tactical Sprint to get out of view fast.
The north route leads to the Back Alley, featuring the remains of a stone archway and training obstacle much like the Forklift on the opposite side of the map. The view into Containers is much different, however, providing a more open view of the area with the added danger of enemy Operators firing down at you from the Office windows and stairwell. Approach cautiously.
To the south, the Shanty Town offers an interior and exterior path to the Junkyard. Head through the interior shooting range for close-quarters combat and remain outside for mid- to long-ranged encounters. Pay careful attention to the Junkyard when taking the outside path to prevent getting eliminated before you even have the chance to get there. Snipers and other long-ranged Loadouts should stick back and cover their forward moving teammates here when needed.
If you’d rather, you can avoid the Junkyard altogether on the initial break, instead mantling up the wall to the right for a view into the center lane and across to the shipping crates lining southern edge of Containers.
Map Maneuvers: Route Planning
Northern Route — Forklift, Office, Containers, and Back Alley
Shoot House’s northern route includes the aforementioned Forklift and Back Alley areas leading into Containers and Office.
Arriving from the Back Alley, it’s best to avoid the middle of Containers where you’re a sitting duck against Operators firing from the Office and streaming in from Forklift, Center, and Main Street. Instead, head right and use the center “EDEMX” container for cover as you move toward the stairwell or through to Forklift, tossing grenades as needed into the Office windows to dissuade enemies posted up there.
You can also head left to climb up for a better view by the two red containers and smaller crates stacked on top of them. From up here you can more easily engage enemies firing from the Office and get the advantage over Operators down below, so long as you watch your back against enemies climbing up to your level from Main Street.
Largely situated in the northern route, the Office may be the most contested area of the map with its advantageous view over Containers, Center, and even a bit of the Junkyard. As a power position, it’s tempting to remain here to rack up eliminations, but it’s perhaps best to take out some enemies and then move on, as company is only ever a few moments away. You might even get some eliminations and then hang back from the windows, surprising anyone who comes in thinking the route is clear.
As for Forklift and Back Alley, use the cover objects provided when swinging around toward Alpha and Bravo Gate, revealing only as much of your Operator as needed to get a read on what’s ahead.
Center Route — Alpha Gate, Underpass, Center, Main Street, and Bravo Gate
Though divided into three distinct sections, the Underpass, Center, and Main Street are all parts of the middle lane running from Alpha to Bravo Gate.
From Alpha Gate, take the southern opening or vault over the wall to make your way to the Underpass. Unless you’re sure that the lane is clear, take a moment to check the sight line before rushing straight through the Underpass; there’s always that threat of a sniper on the other end, or a camper in the central wooden tire container. Check your minimap for activity in Center, as well.
Center includes four access points, from either end of the middle lane as well as coming in north from the Containers and south from the Junkyard. As a major thoroughfare, expect a lot of cross traffic. If you need to get in for an objective, spread out from any teammates to better cover its multiple entrances. If you’re alone and have a mine equipped, toss it down near one of the pathways for added protection. Watch for crouched or prone foes hiding behind the low tire container in the middle of the Center junction.
Main Street, toward Bravo Gate, opens up some interesting pathways. Objects to either side allow mantling up either on top of the red crates abutting Containers, or up and over into the Junkyard. This a great way to get out of the center lane fast, or even to set up an ambush by getting the height advantage over enemies racing through below.
Southern Route — Courtyard, Junkyard, and Shanty Town
The Junkyard and Shanty Town are the two hotbeds of the southern path, with Junkyard’s central position often making it the most contested of the two. The vehicle wrecks obscure sight and offer partial cover, making it a prime space for ambushes. The tactical Snapshot Grenade can do wonders for you and any nearby teammates here, as well as any other tool utilizing a blast radius to catch hidden enemies.
The base of the tower (with the helicopter chassis hanging from it) in the northeastern corner is particularly dangerous, a tight shadowed narrow L-shape from which enemies can appear in an instant. Approach cautiously and utilize it yourself to surprise enemies.
If you’re defending the area against intruders from the Courtyard or Shanty Town, throw them off balance by waiting for them just to the side of the entrance, taking them out as they enter the Junkyard before they know what hit them.
When approaching either the Courtyard or Shanty Town in a skirmish, use the van with the wooden slats leaning against it for better cover than the pickup or car, as well as a means to more easily drop out of sight in a pinch. Stay alert for incoming grenades and, when the crossfire becomes too intense, book it between the tire walls and into Center for a brief reprieve.
When taking the fight to Shanty Town, utilize the inaccessible wood and corrugated warehouse along the southern edge of the map to obscure the enemy’s line of sight, popping out only when you’re ready to engage. The white plastic reinforced water container on the west side and the stack of wood beams with paint pots on the east side both provide good defensive cover for your lower body when engaging down the line.
In the Courtyard, in addition to using the available objects for cover, you can also mantle up on top of the vehicle, though you are prevented from jumping or climbing atop the security container hut due to the barbed wire at the top. Drop to prone for a low-profile sight toward Alpha Gate or the Junkyard.
Flyswatter
As chaotic as things may be on the ground, it’s clear, blue skies overhead. That paired with the fact that the Alpha and Bravo Gate spawns both provide good cover gives support minded Operators the chance to knock out enemy aerial streaks with a Launcher.
Shooting down enemy UAVs, Counter-UAVs, and higher-tier aerial streaks is incredibly useful. If you’ve got a knack for it, consider enabling Scorestreaks over Killstreaks, as you’ll be racking up points every time you swat an enemy vehicle out of the sky.
Control Your Sightlines
Many of the different areas in Shoot House connect to each other via large square openings. Your survivability will greatly improve by approaching these thresholds tactically.
Avoid racing straight through them, as doing this exposes you to multiple angles of attack. Instead, approach from one side, using the corner or another nearby object to provide cover as you scan the upcoming environment for enemy targets. This way, if you start taking fire, you can easily sidestep back behind the wall or object for protection.
The more you do this, the faster you’ll get, so you won’t have to choose between entering an area safely and getting to the objective in time.
A Hop and a Skip Away
From the top of the shipping crates in the northern Containers area, it’s possible to run and jump onto the shipping crate closest to the office and stairwell, and from there to the righthand Office window. It works the other way around, too, offering a quick route through Containers that can be used for a tactical getaway or to chase down a target going the slow way on ground level.
Shoot House is full of mantling opportunities, from its many vehicles to the various crates and other climbable objects. While in some respects you are more exposed up high, you often gain the advantage by throwing your opponents off course as they re-adjust from engaging on the ground level. That second of confusion is often all you need to open the attack and land the elimination.
Keep Your Senses
Areas like the Junkyard, Office, Center, and Containers are ripe for destabilizing attacks from Tactical Equipment like Flash, Stun, Gas, and Snapshot Grenades. If the enemy is using these to dislodge you from objective and power positions, consider equipping the Battle Hardened Base Perk to limit their effectiveness, and in the case of the Snapshot Grenade to completely nullify it.
Pair Battle Hardened with the E.O.D. Base Perk to additionally gain resistance against non-Killstreaks explosives. Through combining the two, you’ll be better prepared to take and defend objectives, hold power positions, and otherwise remain a thorn in the enemy’s side as their tactics fail to defeat you.
Nice Try, Camper
Is the enemy holding up tight in the Office, using Equipment, Field Upgrades, and streaks to solidify their position? Equip the Spotter Bonus Perk and, once earned in the match, you’ll be able to spot and highlight these items through the Office walls, sending a signal that there’s trouble inside. Communicate with your team for those who don’t notice the highlighted items and the grenades are sure to come raining in after them, clearing the Office for your own use.
With some practice, it’s also possible to lob grenades into the Office from the Junkyard by hopping up onto the car nearest the Center tire stacks for added elevation. Get this trick shot down to clear out any campers without exposing yourself to return fire. Or throw out a Drill Charge so it clamps and burrows through the exterior wall, catching foes in the Office interior.
Adapt and Thrive
Due to Shoot House’s compact layout, the focus of battle can quickly shift from one side of the map to the other. While in one moment you might be pushing the attack, in the next you may need to hold back and defend your position.
Adapt to the flow of the match by preparing at least two Loadout styles, one for offense and the other for defense. On defense, Base Perks like Battle Hardened and E.O.D. will help keep you in fighting form against incoming grenades, while on offense you may prefer Tracker and Pitcher, helping you to hunt down enemies and more easily dislodge them with your grenades.
Consider the Battle Rage Field Upgrade for use in both situations. Your boosted health regeneration is helpful in any fight, along with a constantly refreshed Tactical Sprint for racing after fleeing enemies, or escaping from imminent danger.
Mode Intel: Domination
With the A and C flags positioned right at Alpha and Bravo Gate, they’re easy to capture right off the spawn, turning the teams’ attention on the coveted B flag situated in Center.
With entrances on all four sides and snipers often zooming in from the west and east walls, Center is a veritable madhouse. The team who throws more players at B can brute force their way to a capture, but that method comes with its own risks. For one, this gives the other team an opportunity to forgo the B flag and head straight for the A or C flag; after all, Shoot House is a fairly small map, so capping the flag at the enemy’s spawn gate isn’t too tall an order.
Play smart and spread out more evenly, covering a wider portion of the map. Those gunning for the B flag should equip Battle Hardened, E.O.D., and the Trophy System Field Upgrade for maximum defensive capabilities.
If the B flag role is already being fulfilled, consider taking Double Time to double the duration of your Tactical Sprint. This allows you to keep up the pressure on the enemy spawn flag, thereby forcing the opposition into falling back into a defensive posture, easing up their attack on the B flag. You can additionally flank enemy snipers sticking to either of the outer walls.
Watch for the Office, where players can hop onto the window ledge for a full view of Center, and don’t neglect the Junkyard and Containers as viable areas of B flag defense; by eliminating enemies before they can even get to the flag, you’re taking a lot of pressure off any defenders in the area.
Mode Intel: Search & Destroy
Showing map with S&D Bomb sites at: A – Courtyard. B – Containers.
Slow down, Operator. In Search & Destroy, speed is certainly still an important factor in winning the rounds, but it’s tactics that will decide the ultimate victor.
As the Attackers, either bomb site is fair game, but you’ll likely encounter stiffer resistance at the B Bomb site where the Defenders have access to the Office windows and one of the shipping crates blocks your line of sight against enemies coming in from Forklift. You can mitigate the danger by rushing Main Street in the center lane, then hopping up onto the crates overlooking the area, thus providing cover fire for your teammates on the ground.
The attacking team can also find success by sending in a handful of teammates to the B Bomb site, going loud with grenades and pushing aggressively into Containers as the bomb carrier and some backup swing around to the A Bomb site in the Courtyard.
When approaching the A Bomb site, expect resistance partway through the Junkyard as the Defenders can get to this area much more quickly than the attacking team. If the situation is right, send someone through Center and Underpass to flank them.
For this reason, it’s helpful for someone on the defending team to stick back by Alpha Gate when defending the A Bomb site, using the stack of containers to block lines of sight. You might also consider mantling on top of the concrete block near the bomb site for the advantage over enemy Operators approaching from the Junkyard.
On a smaller map like Shoot House, many rounds will find teams rushing straight into combat, but don’t let that discourage you from rotating as needed, whether on offense or defense. There are several available routes between the A and B Bomb sites, whether you hoof it through Center and Underpass or stick to the Alpha Gate spawning area for quick access to both sites.
Most importantly, communicate with your team. Things move quickly here, but not so much that you can’t turn the tide with some fast thinking.
Mode Intel: Hardpoint
Of Shoot House’s five Hardpoints, three are chaotic battle zones while two give the advantage to defenders with their placement in the map’s corners.
Right off the break both teams are assigned with capturing the first Hardpoint located dead center of the map. This is a great opportunity to get a feel for the enemy team, to see whether they rush in guns blazing or play more tactically with snipers and flank attacks. Unless you’re sniping, lead in with grenades and consider holding back for a moment so that the enemy is forced to make the first move.
It's worth fighting like hell for control of the first point, setting the tone of the match, but keep your eyes on that Hardpoint countdown. If you’re still not control in scrap time — the Hardpoint’s final moments before it changes — start moving toward Hardpoint 2 in Shanty Town. As a corner placement, you can set up a strong defense here, only needing to watch north and west. If an aerial streak comes in, head for shelter in the wooden shooting range.
Hardpoint 3 and 4, in Containers and Junkyard respectively, are much more difficult to defend, open as they are to multiple angles of attack. Remember that only one teammate has to be in the Hardpoint to capture it; it may be wiser for others to spread out in the area for better coverage against incoming enemies.
Hardpoint 5, like 2, gives the advantage to the defending team, so it’s worth rotating here early even if you have to give up some points in the preceding Junkyard. Use the Forklift and surrounding walls for cover as you hold the area.
All the Hardpoints are in the open, so aerial streaks like the Precision Airstrike, Cruise Missile, and S.A.E. can do a lot of damage here; use them accordingly when you need to clear out a new point.
Top Tips
1. The More the Merrier. It’s worth sticking near teammates when moving throughout the map, as you’ll often suddenly engage with two or more enemy Operators at a time. Use the minimap to see where your allies are located and move in for support; just don’t get too close or an enemy grenade might eliminate the lot of you.
2. Double Time. Shoot House is a great map for the Double Time Base Perk, as doubling the duration of your Tactical Sprint lets you cross over danger zones with a much greater chance of survival. You’ll also discover how quickly you can cover a lot of ground here. Considering the map’s many mid-height cover options, the increased crouch movement speed doesn’t hurt, either.
3. Take Your Chances. Even if you’re not sure whether there are enemies on the other side, it’s often worth tossing a grenade across Junkyard, from Containers into Back Alley, into the Office, and anywhere else where there are cover objects blocking your line of site into a large area. Due to Shoot House’s compact size, there’s a good chance you’ll catch someone in the blast.
4. Make it a Private Affair. As with many Multiplayer maps, it’s a great idea to load up a solo private match with an infinite time limit. Without the threat of attack, you can really focus on movement, transitioning between areas, and discovering uncommon lines of sight. Now head back into a public match and get blasting.
5. It’s Not Always Sniper Alley. Okay, there aren’t always snipers ready to fire down the center. Though it certainly happens often, it’s a detriment to think of the middle lane as a no man’s zone. If passing through Center or Main Street will help you get to your target more efficiently, it’s worth the risk; you can always toss down a Smoke Grenade first. If you do get taken out, you know where to find them.
6. Take Control of Your Future. The Tactical Insertion can be put to great use here, especially in elevated areas like on top of the red crates in Containers, the wall between Main Street and Junkyard, and atop the concrete storage in Courtyard. The next time you spawn, you’ll start with a height advantage.
7. Use Your Equipment! We’ve said it before and we’ll say it again: your Equipment is invaluable here, especially considering the distinctly compact areas filling the map. It’s good practice to lead in with grenades and any other tools on hand; you’ll get them back on the respawn anyway.
8. In Fact, Rain it Down. Getting a hang of your timing and angles for the most optimum grenade tosses? Take it up a notch with the Resupply Bonus Perk, granting an additional Lethal on spawn in addition to recharging Equipment over 25 seconds. Having a blast? Throw on the Extra Tactical Base Perk, too.
9. This Your First Rodeo? If you’re new to the map, not having played it’s 2019 iteration in Call of Duty®: Modern Warfare®, don’t fret. It’s not about how often you’ve played the map, but how smart you play. In no time you’ll have every nook and cranny at your fingertips and the old vets will feel like they’re playing against one of their own.
10. No Such Thing as Too Much Training. It may be a training facility, but there’s always more to learn here, no matter your Operator’s combat experience. Once you’ve got a handle on the map, experiment with new playstyles and Loadouts to further improve your skillset. There’s always room to improve.
Season 01: Everything You Need to Know, Including DMZ
Ready up and prepare to drop in.
Starting on November 16, Season 01 Call of Duty®: Modern Warfare® II and Call of Duty®: Warzone™ 2.0 will deliver action on all fronts: the next iteration of the massive free-to-play Battle Royale experience featuring the much-anticipated DMZ mode, reimagined maps in Multiplayer, and an additional Special Ops mission prior to the first Raid Episode. There will be plenty of content across both games through all-new Battle Pass, football-themed event, and more.
Season 01 for Modern Warfare® II and Warzone™ 2.0 goes live on November 16 at 10 AM PT. Modern Warfare II will receive its Season 01 update on November 14 at 10 AM PT. All platforms can preload Warzone 2.0 starting on November 14 at 10 AM PT.
WARZONE 2.0 OVERVIEW
- Al Mazrah, Home of Warzone 2.0: Use 18 major points of interest to plot out your victory in Battle Royale or explore them en route to extraction in the brand-new DMZ experience. - Ready for the New Era: Masses of gameplay innovations and new features make Warzone 2.0 an incredible experience, built on community learnings since Call of Duty®: Next. - A Shift in Perspective: Third-Person Playlists Coming In-Season to Warzone 2.0: For the first time in Warzone history, we welcome fans of third-person Battle Royale action during Season 01.
Welcome to Al Mazrah — New Big Map
Central to the Modern Warfare II universe, the city of Al Mazrah within the United Republic of Adal is your first battleground for Warzone 2.0.
Those who are playing Modern Warfare II right now are getting some serious training on Al Mazrah. For example, the following Multiplayer maps are subsections of this massive region:
Warzone 2.0 Innovations, Updates Since Call of Duty: Next
Call of Duty: Warzone 2.0 is ready to make its impact as a rebuilt, free-to-play, free-for-everyone take on the Battle Royale game that has redefined the Call of Duty® franchise.
Before the Season 01 launch, an entire blog will be dedicated to diving deeper into new features and mechanics that have been updated since what was shown at Call of Duty: Next. For now, here is a taste of the biggest highlights we can share:
Loadouts Are Not Leaving
Custom Loadouts are back for Warzone 2.0.
Similar to the original Call of Duty®: Warzone™, Loadouts play a large role in what makes this game unique, and in this new era, players will have quicker access to their Loadout’s primary benefit: the Primary Weapon. There are three ways to earn a Loadout, or at least, a Primary Weapon:
- Shops – Players can use in-match Cash at the Shops (new name for the Buy Station) to purchase their Primary Weapon from their created Loadouts - Loadout Drop Public Event – Loadout Drops will drop into Al Mazrah in the middle of Battle Royale matches. However, these are not limited or assigned to individual squads, but instead can be accessed by any players. - Strongholds and Black Sites – Players can also earn their Loadout in the early game as a reward for clearing a Stronghold or a Black Site.
Additionally, in-match Cash can be used to purchase your Primary Weapon from created Loadouts.
Looting Mechanics: Battle Royale Remaining Traditional, New Backpack System in DMZ
Warzone 2.0 will implement a new Backpack system, fully integrated for DMZ and streamlined for Battle Royale modes.
In Battle Royale, like the previous Warzone, Supply Boxes will throw out items to pick up. When a player interacts with any other loot container, such as a duffel bag, medical case, they will function with a loot menu.
When a player dies, they will drop their Primary Weapon on the ground and their Backpack, which contains the rest of their content, and is accessed through a loot menu.
Defining the New Gulag
After Next, the new Gulag received some changes over the past two months while still being grounded within a traditional Warzone experience.
The Gulag will be a 2v2 environment where randomly paired Duos must coordinate to take down their opposition. All players will receive a predefined Loadout — at launch, this will be a Pistol or a Shotgun, a Lethal Grenade, and a Tactical Grenade — with highly effective weaponry and gear placed toward the map’s center.
The Gulag will also include a Jailer, who will appear in the middle of the match to help speed up combat. Defeating the Jailer will return all four Gulag prisoners back into the Battle Royale, which offers a dilemma: Do both Duos agree to wait and fight this powerful enemy together, or does one get greedy and try to go for the elimination victory?
Instead of a traditional Overtime mechanic, if neither team nor the Jailer is eliminated after a brief period of time, all four Operators lose.
AI Combatants in Battle Royale — Only at Strongholds, Black Sites, Gulag Overtime
The Gulag is just one of three places where players can fight AI combatants, as they will be restricted to guard specific locations.
The other two locations are Strongholds and Black Sites, which are clearly designated on your in-game Tac-Map to allow you to opt-into engagements with AI combatants.
During each match, several Strongholds will be activated around the map. Squads can visit these areas to fight AI combatants. The first team to complete a Stronghold must disarm a bomb and will earn a key to a Black Site and their Custom Loadout. Successive teams must eliminate a specific number of defenders (AI or players) and will earn their Custom Loadout, but not a Black Site key.
Black Sites are a more dangerous form of Strongholds, but they offer a permanent Weapon Blueprint reward and even more valuable in-match items for those who clear it out. These are available only via Black Site key, given to the first team that clears one of the active Strongholds.
Additional New Features: Aquatic Combat, New Vehicles and Fuel Mechanic, and More
Not everything will be different from what we saw at Next. In addition to some other new features, expect the following in Warzone 2.0:
Circle Collapse There may not be only one safe zone — in Battle Royale modes, there can be up to three circles within the collapse, which will ultimately remerge for the final showdown. Prepare to adjust your strategies accordingly, as this feature is randomized in each match.
Proximity Chat Got something to say? Comms are now open, so any in-game chatter can be picked up by any other squad. This can open up new ways to tackle engagements . . . or mess with enemies who are holed up inside buildings.
Assimilation In squad-based DMZ modes, as well as special Battle Royale playlists, you have the choice to join up with enemy Operators and form a larger squad.
Interrogation (Battle Royale and DMZ only) In squad-based modes, intel is everything. Reveal enemy locations by successfully shaking down player-controlled enemies while they are downed.
Heavy Chopper and Hummer EV
Two new vehicles define the refreshed vehicle roster for Warzone 2.0: an aerial powerhouse known as the Heavy Chopper, which can hover in the air without a pilot, and the GMC HUMMER EV Pickup, a versatile means to quickly cover serious ground with the whole squad in this all-electric supertruck.
Here is the full roster of vehicles you can expect to find in Al Mazrah:
ATV: Nimble three-seater with little protection UTV: All-terrain lightweight four-seater. Hatchback: Four-door civilian vehicle without any significant protection. SUV (Standard): All-terrain civilian 4x4 with a boxy frame. GMC Hummer EV: All-electric supertruck engineered for off-road. Cargo Truck: Large industrial vehicle with a flatbed. Light Helo: Twin-engine light helicopter for rapid traversal and combat support. Heavy Chopper: Heavily armored search-and-rescue helicopter. RHIB: Maneuverable tactical boat designed for Special Forces. Armored Patrol Boat: Reinforced aquatic vehicle with mounted .50 Cal machine guns.
Vehicle Fuel, Gas Station Mechanic
No more unlimited fuel sources — all vehicles (yes, including the EV) use fuel over time, and when it runs out, that vehicle is no longer usable. Vehicles can be refilled either with Gas Cans found around the map or at Gas Stations.
Gas Stations can also repair body damage and tires, thereby restoring vehicle health. However, Operators can also perform flat tire repairs anywhere in the world by interacting with individual tires.
Aquatic Combat
Whether by boat or breaststroke, Operators can navigate waterways, rivers, and the open sea as part of their overall victory strategy. Remember: only Sidearms, melee weapons, and Throwing Knives can be used while you’re submerged. Also, try using Lethal and Tactical Equipment on or underwater for a wide variety of potentially destructive effects.
The Shops: Buy Station 2.0
Each Buy Station contains a unique set of items for purchase in limited quantity, including Killstreaks, Armor Plates, and more. You can see these offerings, and can buy back fallen squadmates, within a new interface.
DMZ — Play Your Way in a Completely New Warzone Experience
In addition to traditional Warzone modes — Battle Royale Solos, Duos, Trios, and Quads — Warzone 2.0 will launch with a brand-new experience known as DMZ.
DMZ is an open-world, narrative-focused extraction mode where Operators have free rein to complete faction-based missions, take on additional side objectives, engage with enemy Operators or AI combatants, and search for valuable items, all while fighting to survive toward exfiltration.
Expect a Tactical Overview into this mode closer to its launch next week.
Coming In-Season: Third-Person Playlists
As announced at Next, Warzone 2.0 will include Third-Person Playlists.
This shift in perspective could completely change the Battle Royale fundamentals in Call of Duty, allowing for different visibility tactics and an altered, but still action-packed gameplay feel. Modern Warfare II owners can already get a taste of Third-Person now through the game’s Multiplayer.
Third-Person Playlists will be introduced into the Battle Royale weekly rotation during Season 01.
MODERN WARFARE II OVERVIEW
- Shoot House, Shipment Set for Reimagined Return. Prepare to finish out those camo challenges or just embrace the frantic chaos these action-packed maps provide. - Open the CDL Moshpit. Prior to the introduction of Modern Warfare II Ranked Mode in a future Season, practice on the official maps and ruleset with your squad. - New Special Ops Mission, Raid Episode 1 In-Season. Grab your Duo and assault the enemy on land and in the air before gearing up for the continuation of the Modern Warfare II story in a daunting Raid experience.
Shoot the Ship II — Shoot House at Launch, Shipment Mid-Season
Season 01 is bringing back two reimagined favorites from Modern Warfare (2019) — Shoot House and Shipment. These maps are hallowed ground for camo grinders and are incredibly notorious for frenetic and fun action.
Shoot House (Launch)
Situated in the jungles south of Las Almas, the Shoot House’s new home was built for training cartel hired guns with the same level of intensity as Mexican Special Forces Operators. This live-fire facility is just as deadly as you remember it — a small, three-laned map conducive to all playstyles.
Shipment (Mid-Season)
Set on a cargo ship taking on water in a storm-ridden part of the Atlantic Ocean, a new Shipment is ready to bring back the chaos that only an ultra-compact map can provide. Thinking about working around and off the map’s boundaries, which was possible in previous versions? You might find yourself all at sea…
Warm-Up for Ranked Multiplayer with CDL Moshpit
In a future Modern Warfare II season, Treyarch is teaming up with Infinity Ward and other partners to provide a Ranked Play experience in Multiplayer, modeled after the game’s highest level of competition: the Call of Duty League.
As previously announced, Modern Warfare II Ranked Play will be based off the past two years of continuous feedback and will contain, among other new features, Ranked Skill Divisions, visible Skill Ratings, a Top-250 Leaderboard, and rewards fit for our most competitive Operators.
While this mode is still being fine-tuned for that eventual seasonal update, the developers created a special CDL Moshpit Playlist for Season 01.
This Playlist will use the League’s standard rules, restrictions, and map rotation across all three of its official game modes: Hardpoint, Search & Destroy, and Control.
Grab up to three of your most competitive squadmates and get that practice in for Ranked Play; you can afford the tough losses now before it starts hurting that Skill Rating!
Special Ops — New Mission at Launch, Raid Episode 1 Mid-Season
Call up that Duo at the start of the season and prepare the Trio for the ultimate test — Special Ops is getting a new mission and the first episode of Raids during Season 01.
High Ground
Successfully find and destroy enemy communication servers to locate and extract three hard drives with vital enemy intel. One Operator will be tasked with piloting an Attack Chopper to clear out dangerous land mines, while the other works with AI allies as part of a Ground Assault Team to infiltrate the buildings that contain enemy equipment.
Be sure to replay this mission to get those three weekly Stars, and tackle those Daily Challenges for additional Stars.
Coming Mid-Season: Raid Episode 1
Continuing the story of the Modern Warfare II Campaign, Raids will be the ultimate challenge for Trios with a mix of stealth, all-out action, and puzzle-solving objectives.
Expect a full Tactical Overview and additional Raids intel at mid-season.
Tier 1 and Combat Record
The Tier 1 playlist will be available at the start of Season 01; this playlist will feature decreased health, limited HUD elements, and friendly fire turned on for a more mil-sim-like experience.
Combat Records will also arrive in Modern Warfare II in Season 01. More intel to follow.
We appreciate your patience regarding the launch of these expected features.
GENERAL SEASON 01 OVERVIEW
- New Battle Pass, Now with More Player Choice. Conquer a new Battle Pass as you choose map Sectors your way to unlock both free and premium items in whatever order you decide. - Four Weapons, Six Total Operators. Two new weapon platforms and two Trios — one of elite soldiers and one of football’s finest — are set to bolster your arsenal and Operator roster. - Seasonal Prestige System. New challenges and rewards await those who clear the Military Ranks.
Introducing the New Battle Pass
In the seasons of Modern Warfare (2019), the Battle Pass system offered players a collection of free items, including functional weapons and Call of Duty Points, just by playing the game. It gave our community visibility into what content they were earning or buying, with the ability to upgrade and access 100+ items, including a new Operator, Weapon Blueprints, and more.
In Season 01, we are introducing a brand-new iteration of the Battle Pass with a host of innovations — players will have more choices and more agency than ever before.
Instead of a linear stream of tiers set out in a scrolling row along the bottom of your screen, your Battle Pass takes the form of a multi-Sector map. Players will unlock items using earned Battle Token Tier Skips across this map, which is themed within the current season. Each map has at least 20 Sectors with five items in each Sector — tokens can be used to either unlock adjacent Sectors or earn more items within an unlocked Sector.
Essentially, these tokens can be used to unlock specific items within the Battle Pass at your own pace — whether it is a new free functional weapon or a cool new Operator Skin, you have control over what gets unlocked earlier on the road to 100% map completion. Are you looking for a particularly impressive Operator Skin, Weapon Blueprint, or one of the new weapons? Then pick the appropriate Sector and start acquiring tokens to unlock those items!
Check back next week to see the new Battle Pass in detail.
Four New Weapons, Two Free in Battle Pass
Eagle-eyed players may have seen (and even used) both of the season’s functional weapons within this season’s Battle Pass system while playing the Modern Warfare II Campaign. Now you can wield them across Multiplayer, Special Ops, and Warzone 2.0 modes. Introducing the Victus XMR and the BAS-P SMG at launch and the Chimera and M13B Assault Rifles during the season:
Victus XMR Sniper Rifle — Imperatorium Platform (Launch, Battle Pass)
Hard hitting, bolt action sniper rifle with .50 cal BMG ammunition. Its tungsten sabot tipped bullets are fast and powerful, but require precise shots over long distances.
How to unlock: Free weapon within the Battle Pass.
An aggressive fire rate and modular frame make the BAS-P perfect for the discerning operator who wants to customize their submachine gun. Subsonic ammo hides kill skulls from the enemy team.
How to unlock: Free weapon within the Battle Pass.
With an integrated suppressor and slow, high-energy .300 BLK rounds, the Chimera is adept at close-quarters combat. Subsonic Ammo hides skulls from the enemy team.
How to unlock: Store Bundle or Weapon Unlock Challenge
M13B Assault Rifle — Bruen Ops Platform (Launch)
The M13B features a short-stroke pistol system that allows for a high rate of fire and low recoil.
How to unlock: Store Bundle or Weapon Unlock Challenge
Remember: Each new weapon can use attachments from other weapons across the Modern Warfare II arsenal. Also, they will come with new Base Camos to use across all weapons once unlocked and will count toward the road to Orion Mastery Camo.
Three New Operators
A Nigerian counterterrorist group founder. A Danish Elite Special Forces soldier. And one of Task Force 141’s finest.
These three individuals represent the most elite soldiers you can have in your Operator roster during Season 01. Here’s some background intel on each:
Zeus (Launch)
Born in the South Niger Delta, Zosar Kalu is the eldest of three children, helping to raise his younger siblings while his parents pursued political aspirations. His nickname comes from his youngest brother, who was born with dysarthria (a speech disorder) and would pronounce his name “Zeus.”
Following his year of military service shadowing a Nigerian Army Special Forces Battalion, he enlisted and rose through the ranks of those same Special Forces. At the same time, his family became involved in a high-profile state election but tragically died to a local Al Qatala cell.
Orphaned, and now the last of his name, Zeus established the “Thunder” Corps, a counterterrorism group dedicated to hunting AQ wherever they hide and bringing them to true justice.
How to Unlock: Zeus is automatically unlocked with purchase of the Season 01 Battle Pass.
Klaus (Mid-Season)
A member of Denmark’s Elite Special Forces, Klaus Fisker can almost be considered a living legend among Operators.
Some say his scotopic vision — his natural night vision — was powerful enough to help him navigate a mile in pitch-black darkness before he could read. Others witnessed his exceptional training record, leading his peers with unbridled optimism through exercises.
But legend was made one night on the Urzikstan border, where he carried a wounded comrade 18 miles to the nearest base using the lessons taught by his father... and an unusual amount of chocolate that wounded solder carried with him.
Gaz (Mid-Season)
Price’s right-hand man, Gaz became legend in 2019 when his valiancy during an attack on Piccadilly Circus grabbed the attention of the formidable SAS Bravo Team captain. He ultimately joined Price’s elite unit, known as Task Force 141.
During the events of the Modern Warfare II Campaign, Gaz was pivotal in saving CIA Officer Kate Laswell from Al Qatala. Now he will join his squadmates Price, Ghost, and Soap, as well as ally Farah — all who make up Red Team 141 — to help SpecGru maintain peace around the world.
How to Unlock: Obtain Klaus and Gaz in Bundles to be featured during the Mid-Season Update.
There are also three football-themed Operators who will be available for a limited time…
Squad Goals: Modern Warfare FC Kicks Off In-Season
Whatever name you call it by, the international game of football is making its impact in Season 01 through the Modern Warfare FC event.
During this event, you can sign three of the world’s greatest athletes to your Operator roster by picking up special, limited-time Bundles: Neymar Jr., who will debut on November 21; Paul Pogba, set to debut on November 25; and Leo Messi, who will complete the Operator hat trick on November 29.
More details, including information on a limited-time CODBall mode and a community Support Your Team Pick’em minigame, will be shared in-season.
This year, leveling up past Rank 55 will allow you to earn a persistent Prestige Rank across all seasons, rather than having it reset at the end of each season.
Beginning in Season 01, reaching Rank 56 will unlock Prestige 1. This will grant an Emblem, additional rewards, and a set of challenges — complete those challenges to unlock an exclusive Calling Card.
Season 01 includes four more Prestige Ranks, which also unlock a new set of challenges and rewards: - Prestige 2: Unlocked at Rank 100 - Prestige 3: Unlocked at Rank 150 - Prestige 4: Unlocked at Rank 200 - Prestige 5: Unlocked at Rank 250 and is the level cap until the end of Season 01.
At the end of Season 01, players can continue ranking up from wherever they ended up on the Prestige Ranks. This allows players who may not have enough time to level up to catch up in later seasons, while also not resetting the progress of anyone who reached the Max Rank during that season.
OUT OF COMBAT OVERVIEW
- Call of Duty League 2023 Season Kicks Off. Its first Major will also host C.O.D.E. Bowl III; tune in December 15–18 and prepare to pick up the Launch Pack and Team Packs in-game. - Upgrade to Modern Warfare II Now. Owners get Premium XP in Warzone 2.0, the ability to unlock over a dozen Operators, and more. Get the Vault Edition for even more content. - Round up your change at Pilot or Flying J travel center. Support the Call of Duty Endowment.
Support the Call of Duty Endowment in Honor of Veterans Day
Through November 13, visit a participating Pilot or Flying J travel center to round up your in-store purchase and donate the difference to support the Call of Duty Endowment. Since 2019, Pilot Company and guests have funded the placement of more than 6,000 veterans and counting.
C.O.D.E Bowl III, Call of Duty League Major to Kick-Off Mid-Season
Speaking of the Call of Duty Endowment, the Call of Duty Endowment (C.O.D.E.) Bowl III presented by USAA will be held on December 16th from 12-4pm ET during the first Call of Duty League Major, taking place right after the Season 01 mid-season update December 15 to 18 in Raleigh, North Carolina. The Call of Duty League Major will also host the first Call of Duty Challengers Open. If you think your squad has what it takes to start on the road to glory, see here for more details.
Visit the League’s official website for more information, including when tickets for the first Major will be on sale.
New Call of Duty League Launch Pack, Team Packs to Be Released
During Season 01, we are celebrating an early return to the Call of Duty League™ with a special launch pack for the 2023 season. We are also releasing Team Packs for all 12 of the League’s teams.
Check back here for more intel on these closer to Season 01’s launch.
Gear Up at the Call of Duty Shop This Black Friday
The Call of Duty Shop will hold a special Black Friday and Cyber Monday sale from November 15 to November 28. All items site-wide are 20% off.
Now is a great time to pick up Modern Warfare II before Season 01 kicks off.
Purchase Modern Warfare II to get a premium Warzone 2.0 experience - access to 14 additional Operators to use across both games, as well as accelerated Weapon and Level Progression. As a Modern Warfare II owner, receive bonus XP at the end of each match when you play Warzone 2.0, ensuring that you level just as quickly in both titles.
Plus, as already mentioned, those who own Modern Warfare II will have access to all the content coming in Season 01, including the first ever Raid, arriving mid-season.
Those who want even more benefits should consider upgrading to the Vault Edition, which grants four additional Operators — Ghost, Farah, Price, and Soap — as Red Team 141, the FJX Cinder Weapon Vault, an ultimate version of a Weapon Blueprint with 50+ attachments included, the Season 01 Battle Pass along with 50 Battle Token Tier Skips, and more.
For more information, please visit www.callofduty.com and www.youtube.com/callofduty, and follow @Activision and @CallofDuty on Twitter, Instagram, and Facebook.