Greetings! We have a major announcement about a new update, focused on the Battle of Gazala, releasing July 10!
While we continue to work on the OP Husky stage 2, we’re going to experiment with smaller, highly focused content releases that we can bring to you guys in between major releases. Just because OP Husky is taking longer than we’d hoped, doesn’t mean you should have to wait for more CAOS! These smaller content releases will focus on modelling either specific battles, or order of battle pairs. In addition to bringing you more CAOS, more often, these smaller updates will also allow us to bring you forces from other theaters of the war, outside of the current major design project. We’re going to start out with the Battle of Gazala and its historical orders of battle, alongside the orders of battle for Operation Crusader. Let’s dive in!
New Scenario – Battle of Gazala (May 26 – June 21, 1942):
Historical Background:
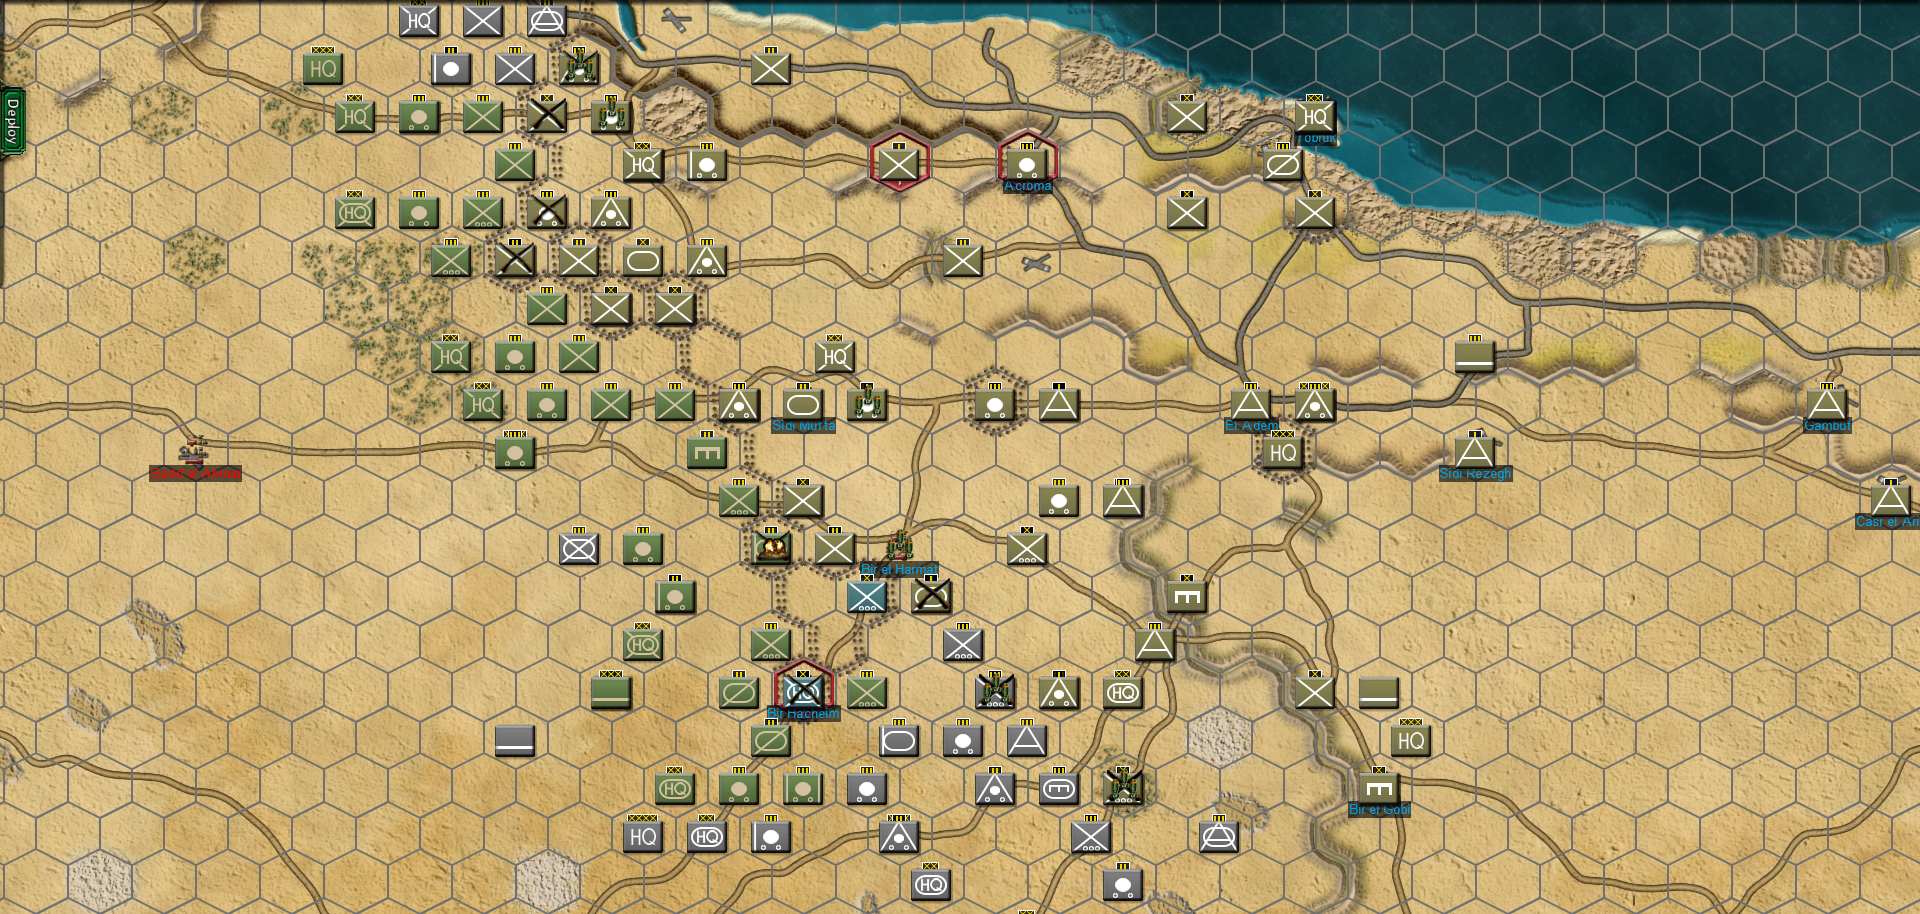
The Battle of Gazala was one of Rommel’s greatest victories during the North African campaign. On May 27, 1942, Panzerarmee Afrika launched a bold flanking maneuver around 8th Army’s southern shoulder and within a day British 7th Armored Division’s forward HQ was overrun and large swathes of the Allied frontline faced encirclement. Despite the initial success of the Axis advance, fierce resistance from Allied units along the Gazala Line jeopardized the operation by disrupting supply flows to the flanking maneuver. However, poorly supported counterattacks by 1st Armoured Division failed to blunt the German advance, and Axis forces overran the center of the Gazala Line near Sidi Mufta on May 30, thereby securing stable supply lines to press forward and further compromise the Allied frontline. After just over two weeks of heavy fighting British numerical superiority in armor collapsed, and continued attrition lent the Axis armored forces a free hand to shape the battle. By June 14 the Allied position grew untenable as retreating infantry lacked proper supplies and support to halt the Axis advance. General retreat towards Egypt was finally authorized on June 17 and the once impenetrable fortress at Tobruk surrendered to Axis forces four days later, with more than 30,000 troops still inside. During Gazala Panzerarmee Afrika inflicted heavy casualties on British 8th Army, reclaimed Tobruk, captured thousands of tons of supplies, and regained operational initiative until their decisive defeat at the Second Battle of El-Alamein in October 1942. Make no mistake, Gazala was one of the most critical battles of the entire North African campaign, and we are thrilled to bring it to life in CAOS.
Re-Creating Gazala in CAOS:
Despite the battle’s decisive historical outcome, Axis victory was far from assured as both sides possessed strong advantages. The Allied defenders possessed hundreds of kilometers of minefields stretching from Bir Hakeim to the Mediterranean coast, numerical superiority in men and armor, and a centrally located supply hub in Tobruk itself. Conversely, Axis forces possessed better combined arms integration, better tanks (for the Germans), and exceptional leadership. Both sides commanded strong air cover, with a slight advantage to the British Desert Air Force owing to its excellent air support capabilities, and shorter logistical tail. Gazala represents a perfect scenario for CAOS because the battle can reasonably go either way, especially with a more coherent response by the Allied defenders. Now, let’s preview the new orders of battle coming with Gazala!
New Orders of Battle:
The Tobruk update not only brings the historical OBs for the Battle of Gazala in May/June 1942, it also brings the OBs for Operation Crusader, in November/December, 1941. We plan to build a historical scenario for Crusader in the future as well, but since we already have the OBs ready, you’ll get them alongside Gazala!
Panzerarmee Afrika - Gazala: The Italo-German Panzerarmee Afrika during Rommel’s greatest victory at the Battle of Gazala in May/June 1942. Take command of the vaunted Afrikakorps, and three corps of Italian troops, including battle-hardened veterans and fresh recruits alike. Panzerarmee Afrika excels at rapid maneuver warfare and commands strong air cover, but it lacks deep armored reserves and relies on fragile Italian infantry divisions to hold captured ground. Panzerarmee Afrika has little trouble taking territory, but it faces a much tougher task holding it.
British 8th Army - Gazala: British 8th Army during the Battle of Gazala in May/June 1942. 8th Army favors defensive warfare, combining plentiful anti-tank guns with robust infantry divisions, strong air cover, and slow but heavily armored infantry tanks. Despite strong defensive capabilities, 8th Army’s offensive punch suffers from severe deficiencies in armor and artillery. 8th Army’s Crusader IIs, Matildas, and Valentines all lack high explosive shells, and American M3 Lees are available in insufficient numbers to bridge the gap. 8th Army also lacks strong heavy artillery support.
Panzergruppe Afrika – Operation Crusader: The Italo-German Panzergruppe Afrika during the British counteroffensive to relieve Tobruk during November/December 1941. Panzergruppe Afrika relies on its three battle-hardened armored divisions, and high levels of morale, to compensate for material shortages and shallow reserves. Panzergruppe Afrika requires skillful maneuver and proper use of combined arms to divide, isolate, and crush numerically superior enemy forces. Every unit is valuable and even the most basic infantry regiments should be used with care because reserves are so thin. For experienced commanders looking for a challenge, Panzergruppe Afrika is the perfect opportunity to wage blitzkrieg on a shoestring.
British 8th Army – Operation Crusader: British 8th Army during its November 1941 offensive to relieve the siege of Tobruk. 8th Army enjoys high mobility, as the 1st South African, 4th Indian, and New Zealand infantry divisions are fully motorized, alongside the 7th Armoured Division. However, 8th Army’s armoured brigades field many obsolete and mechanically unreliable vehicles, in addition to the usual anti-infantry deficiencies of British cruiser/infantry tanks of the time. 8th Army has mobility, but it lacks a strong armored fist. 8th Army also lacks modern medium or heavy guns needed to silence enemy artillery or pound strongpoints into submission. 8th Army shines best when it can outmaneuver opponents and force them into unfavorable counter attacks where its high mobility, strong infantry divisions, and the Desert Air Force can grind them into the dust.
Air Overhaul:
This update tackles excessive lethality of air missions and reduces the number of bombing missions available across the board. Aircraft remain vital to any combined arms strategy, but excessive lethality of air missions has been resolved and bombing missions are less prevalent. Additionally, the weaker nature of air missions in general makes them far more vulnerable to concentrated anti-aircraft. Air denial through extreme concentrations of anti-aircraft, as the Axis historically achieved at Messina during the evacuation from Sicily, is now achievable in CAOS.
Air Bombing and Strike Rebalancing:
Bombing Mission Lethality: Bombing mission lethality remains largely unchanged, and has in fact increased in some years.
1945: Average bombing bombardment strength reduced from 90 to 85.
1944: Average bombing bombardment strength reduced from 90 to 85.
1943: Average bombing bombardment strength increased from 70 to 85.
1942 Average bombing bombardment strength remains the same at 70.
1941: Average bombing bombardment strength increased from 50 to 70.
1940: Average bombing bombardment strength remains the same at 50.
1939: Average bombing bombardment strength remains the same at 50.
Strike Mission Lethality: Strike mission lethality has fallen across the board, especially during the early war years where strike missions have lost 40-50% of their strength. Air strikes still enjoy the benefits of targeting one specific target type, so they are still more likely to damage your preferred target than bombing, but they are no longer practically assured to produce results and they’re even more vulnerable to concentrated AA.
1945: Average strike bombardment strength reduced from 120 to 90.
1944: Average strike bombardment strength reduced from 100 to 90.
1943: Average strike bombardment strength reduced from 80 to 70.
1942: Average strike bombardment strength reduced from 80 to 50.
1941: Average strike bombardment strength reduced from 80 to 50.
1940: Average strike bombardment strength reduced from 70 to 35.
1939: Average strike bombardment strength reduced from 70 to 35.
Support Mission Lethality: The raw fire support effect of Air Support missions has fallen dramatically across the entire war. The old air support model overemphasized heavy twin-engine support aircraft at the expense of lighter single-engine fighter-bombers, thus inflating the raw power of air support. Air Support is a useful tool alone, but its greatest strength rests in its ability to make all friendly units in a combat stronger by unlocking the highest level of combined arms combat modifiers. Air support alone remains useful, but it’s not going to light the world on fire.
1945: Average support mission strength reduced from 185 to 80.
1944: Average support mission strength reduced from 165 to 80.
1943: Average support mission strength reduced from 145 to 60.
1942: Average support mission strength reduced from 125 to 45.
1941: Average support mission strength reduced from 105 to 45.
1940: Average support mission strength reduced from 85 to 20.
1939: Average support mission strength reduced from 65 to 20.
Bombing mission reduction:
In general the number of bombing missions provided per squadron has dropped by 1, although, this varies per aircraft. Here are a few examples per squadron from across the war: Allies:
B-25 (all types): Bombing missions reduced from 5 to 4.
B-18 Bolo: Bombing missions reduced from 3 to 2.
Boston IIIa: Bombing missions reduced from 3 to 2.
Blenheim IV: Bombing missions reduced from 3 to 2.
MB.210: Bombing missions reduce from 3 to 2.
SB-2M: Bombing missions reduced from 3 to 2.
Axis:
Arado 234 B: Bombing missions reduced from 4 to 3.
JU-188 A-2: Bombing missions reduced from 5 to 4.
HE-111 P-4: Bombing missions reduced from 4 to 3.
SM.79: Bombing missions reduced from 4 to 3.
Ca. 314: Bombing missions reduced from 3 to 2.
Other Air Changes:
A range of additional refinements and corrections to the air mission formula yield a series of small, but important, balance changes among fighter-bombers and strike aircraft. Notably, the Hurricane series were erroneously set at 2 support missions per squadron, this has been corrected and they are no longer disproportionately effective compared to their Tomhawk colleagues. On the US side, The A-20/A-26 series have taken a slight hit in total mission numbers, but they remain some of the most effective strike aircraft in CAOS. Additionally, a series of aircraft that have gained air support capability. Soviet players rejoice, lend-lease P-39s can now execute support missions. Italy can press obsolete MC.200s in 1942/1943 into service as cheap fighter-bombers. Meanwhile, German FW-190 A-8s have gained their SC-500 bomb racks, thereby expanding Germany’s late war air support options, while driving up the A-8’s price in the process. Allies:
A-26B Invader: Strike missions reduced from 5 to 4.
A-20G/J Havoc: Strike missions reduced from 5 to 4.
P-38F Lightning: Strike missions reduced from 3 to 2.
P-39 (all variants D and greater): Support missions increased from 0 to 1.
Hurricane II: Support missions reduced from 2 to 1.
Axis:
FW-190 F-8: Support missions increased from 2 to 3.
FW-190 A-8: Interdiction missions increased from 0 to 2.
FW-190 A-8: Support/Strike missions increased from 0 to 1.
RE.2005 Sagittario: Interdiction missions increased from 2 to 3.
RE.2005 Sagittario: Strike missions increased from 1 to 2.
MC.200 (in 1942/1943): Support/Interdiction/Strike missions increased from 0 to 1.
Counter-Battery Overhaul:
Counter-battery is chronically underused in the current live build because it takes too much firepower (typically 60+ barrage points), to gain a reasonable chance of inflicting damage on enemy artillery. Update 1.0.3.0 lowers the minimum bar for effective counter-battery, lowers barrage required to reach the lethality cap, and increases lethality of counter-battery generally; see the bullet points below for details.
Minimum effective counter-battery lowered to 20 barrage points (for reference a single 12-gun US 155mm M1A1 Field Gun battalion comes in at 28 barrage.)
Counter-battery reliably pins target artillery around 40 barrage points.
Counter-battery reaches lethality cap at 80 (used to cap at 120).
Effect on gameplay:
The counter-battery overhaul promises obvious improvements in artillery gameplay, but also for combined arms maneuver. Long-ranged heavy artillery such as the US 155mm M1A1, Soviet 122mm A-19, German 17cm K18, and British BL 5.5” guns can inflict serious damage on shorter-ranged guns. Through careful use of counter-battery you can pin and silence, or even destroy, enemy artillery supporting frontline strongpoints. If the enemy’s defense relies on a handful of powerful howitzer battalions, pound them with counter-battery the impulse before you attack to keep them silent while your ground forces move in. The same strategy works in reverse if the attacker relies on a small number of artillery units to ensure combined arms. Skillful employment of counter-battery makes the rest of the army’s job much easier.
Beyond Gazala:
As previously mentioned, Update 1.0.3.0 Gazala is planned for release on Sunday, July 10. After Gazala, the Operation Crusader scenario will follow in its own intermediate update, combined with user interface improvements, notably an improved turn Situation Report that breaks losses down by type, per side. Once Gazala is released, we should be able to set our final release date for OP Husky Stage 2. For now, we’ll get back to work on testing Gazala, and we’ll be back with a developer let’s play next week!
Let's Play: Operation Husky - Airfield Dash
We’re back with a let’s play of the first 10 turns of the upcoming Operation Husky scenario for your enjoyment! Specifically, the scenario variant with dynamic recruitment, allowing both sides to draw on reserves historically held back in Italy/Tunisia. Join us while we storm the beaches and let us know which of the other upcoming scenarios you’d like to see next? More Operation Husky? Operation Brimstone in Sardinia in July or September variants? Or maybe you want to see the French retake Corsica in Operation Firebrand? Let us hear your thoughts below.
We also have a major announcement coming out later this week regarding the Battle of Gazala and major changes to air balance and counter-battery coming in update 1.0.2.7!
Update 1.0.2.4 Notes and OP Husky Stage 2 Release Plans
We're back with the notes for an intermediate update coming out this weekend, and an update on our OP Husky Stage 2 release plans in May. By the time Update 1.0.2.4. goes live over the weekend, I (Xenophon) will be abroad and out of office, so I want to touch bases with the community on our plans for Stage 2 before I travel to the Czech Republic.
Update 1.0.2.4 Notes:
Gameplay:
AI can play historic OBs in custom scenarios.
Same-nation hostile unit shading. For instance, if you are playing UK against an Allied Operation Husky OB, hostile UK units will be overlayed by a dark shader to distinguish them from your own.
Order of Battle Updates:
Added remainder of UK 1st Airborne Division to the Allied OP Husky OB for use in custom scenarios. This includes the 2nd and 4th Parachute Brigades, and attendant artillery/support units. These units were historically assigned to UK 8th Army during OP Husky and featured in early operational planning, but were not ultimately deployed to Sicily due to air transport shortages.
Numerous updates to Italian 6th Army, including revisions of artillery composition for several coastal divisions, new coastal battalions, and fixed corps assignment for several independent units.
Corrected TOE of UK Paratroop AA batteries 1942-1944, they were unrealistically large.
Corrected TOE of 103rd Panzer Abteilung (3rd Panzergrenadier Division) in 1943, it was one company short and missing its command tanks.
Fixed various minor issues in several OBs, including typos in unit short names and incorrectly set unit parents.
Fixes/Tweaks
Fixed a rare bug that allowed below 1 to 1 odds skirmish combats to inflict excessive casualties on the stronger side.
Tweaked air hub spawn points on Sicily and Sardinia to promote more varied invasion scenario spawns.
Operation Husky Stage 2 Release Plans:
We anticipate full release of stage 2 in the latter half of May, with a public beta earlier in the month, much like the Reinforcements update beta last year. I will be out of office and halfway across the globe in the lovely city of Prague for the next two weeks. After I return, I will prepare a new gameplay video showcasing the upcoming pre-set scenarios alongside the major interface improvements we’re cooking up to release in Husky stage 2.
State of Development:
We have been quiet over the last month as NS2 Archimedes was busy preparing to (successfully!) defend his PhD dissertation and I have been preparing for my trip to Prague. However, progress continues on the new scenarios. We have fully functional OP Husky, OP Firebrand, and OP Brimstone (July and September variants) in closed beta testing now. At this point we’re still working on some of the special rules, such as temporary immobilization for garrison units and withdrawal mechanics before these scenarios are ready to go live. Likewise, Case Axis cannot enter testing until these rules are implemented. Finally, we’re going to exchange the OP Brimstone (May) scenario for something very different from the other scenarios coming in the OP Husky lineup, I’ve left a hint below!
Note For Kaspersky/Avast Antivirus Users
On a final note, several players brought it to our attention that Kaspersky and occasionally Avast antiviruses throw a false positive with CAOS. We will be implementing the appropriate code signing certificate as part of OP Husky Stage 2 to resolve this false positive permanently.
In the mean time, have a fantastic Easter from all of us here at NS2 Games and I’ll be back in May to show off the new features we’ve been working on!
Update 1.0.2.3
We have a quick update today that adds a series of messages to help guide players during requisition in Invasion scenarios.
New Messages:
Added warning message when defender in Invasion scenarios tries to end preturn without deploying any units.
Added pop up message during requisition turns when defender cannot deploy reinforcements because of attacker air supremacy over all ports in Invasion scenarios.
Added pop up message reminding players to restart game after swapping between unit graphic styles in options.
Fixes:
Fixed a rare AI logic error that could cause encircled AI units to fail to move.
Fixed missing description tool tip for Invasion scenarios.
Fixed duplicated 21st Anti-Tank regiment in the British 1939 order of battle.
Operation Husky: Stage 1 Release!
We are happy to present Operation Husky: Stage 1! Stage 1 ended up becoming larger than we originally anticipated, but the end result is so much better for it! Now, let’s storm the beaches!
Invasion Scenario Mode:
Invasions are an advanced scenario mode, intended for veteran players. Invasions include amphibious landings, paratroop drops, and special logistics rules governing both invader and defender reinforcements. Invasions require careful planning on both land and air because attackers can only initiate landings where they control air space, and defenders can only bring in reinforcements through ports outside of the attacker’s air control. Contesting the skies, controlling airfields, and guarding your lines of reinforcement are just as important as crushing your opponent’s frontline forces. In this release, invasion scenarios are available on the island maps: Sicily, Sardinia, and Corsica. We will extend invasion scenarios to Paris, Tobruk, and a new variant of the Somme map shortly.
New Game Mechanics:
Dynamic Air Zone: Air control dynamically projected from map edges and controlled airfields. You can now visualize the aerial battlefield using the air overlay and see just how much of the map your squadrons really cover. Dynamic air zones are used in all game modes.
Amphibious Landings: Amphibious assaults in Invasion scenarios. Units conducting amphibious landings enjoy powerful naval fire support and barrage bonuses.
Commando Landings: Variant of amphibious landings unique to commando units, commandos can land in both friendly and contested airspace, and without requiring a landing marker. Get ready to become paranoid if your opponent is British.
Paradrops: Paradrops for the attacking player in Invasion scenarios. If you have air control over a hex and you have paratroopers to spare, you can drop on it.
New Maps:
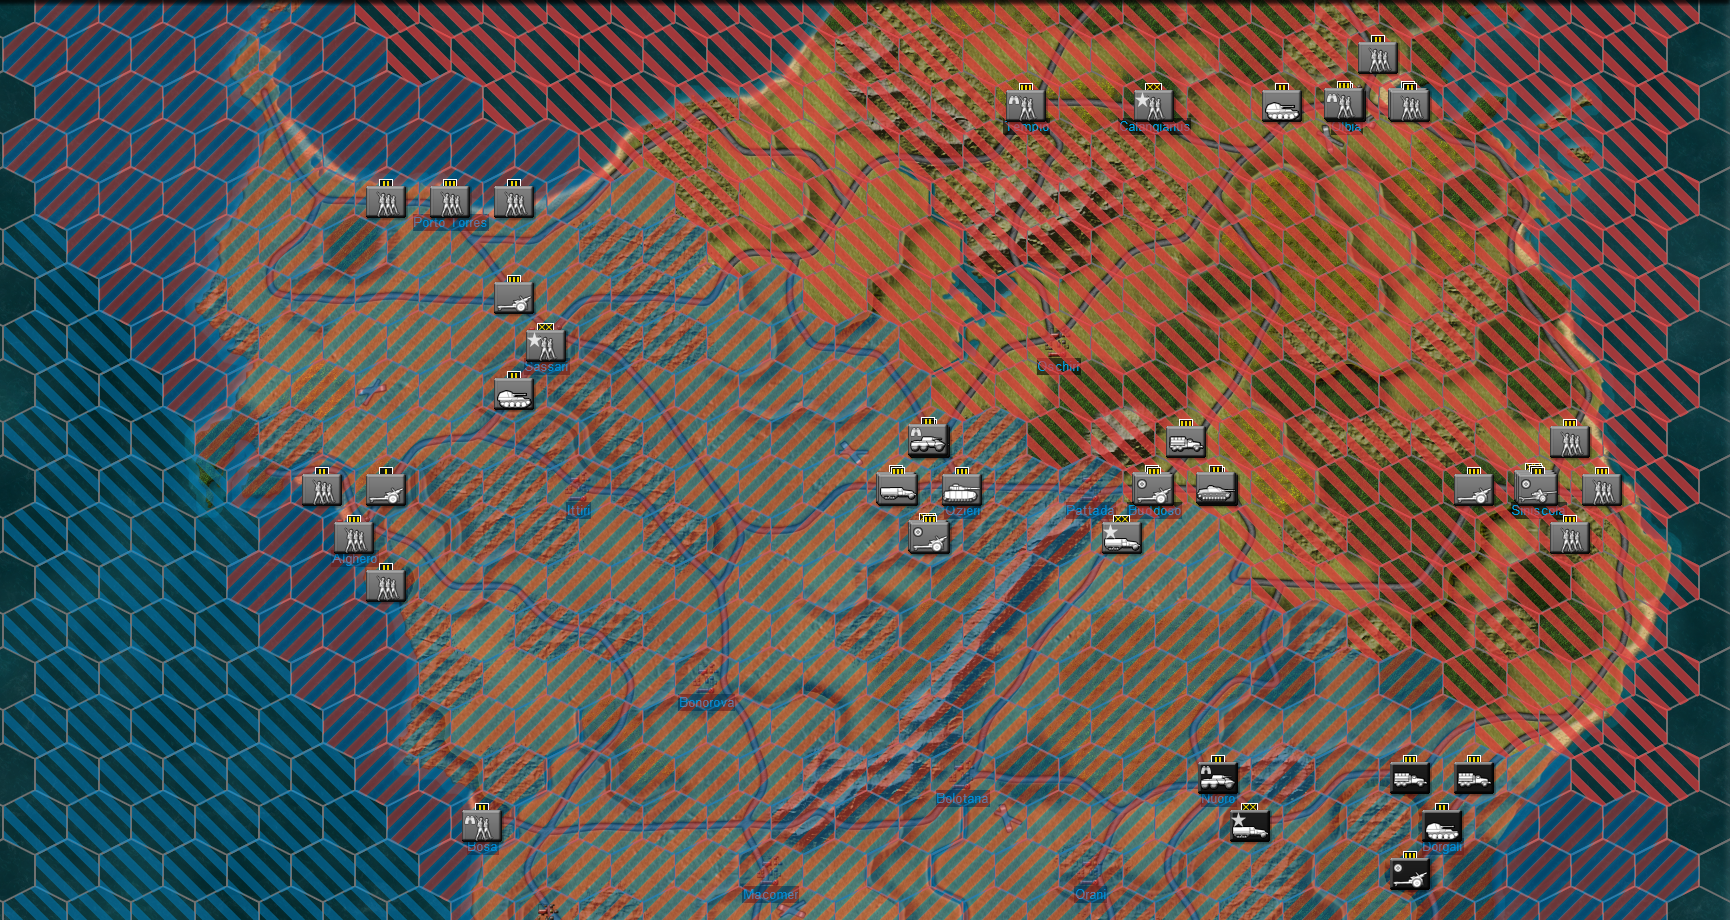
Sardinia: An idyllic Mediterranean tourist destination, and also incidentally a fantastic battlefield. Sardinia features rugged mountain bastions, light forests, and sweeping open plains. Some sectors of the island present serious challenges to mechanized movement, but almost every hill-top fortress can be bypassed and isolated with proper planning.
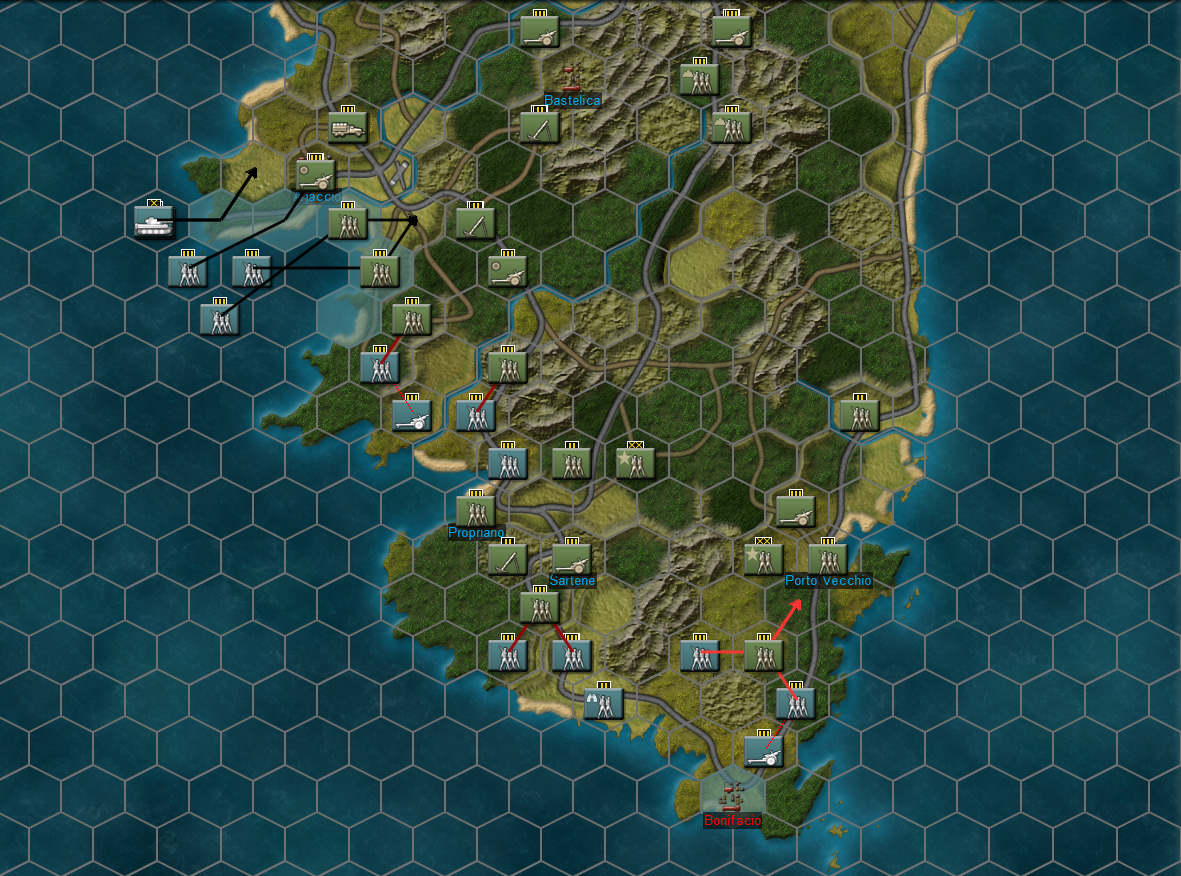
Corsica: A mountainous and densely forested island that boasts many choke-points to entrap reckless adversaries. Corsica favors infantry combat and places even more importance on controlling the air than other maps.
New Orders of Battle and Order of Battle Updates:
New Orders of Battle:
Allied Operation Husky, featuring US 7th Army and UK 8th Army as they stood during Operation Husky in July/August 1943.
US 5th Army, featuring US 6th Corps and UK 10th Corps, as they stood during Operation Avalanche in September 1943.
Axis Operation Husky, featuring the Italian 6th Army and elements of Germany 14th Panzer Corps as they stood during Operation Husky in July/August 1943.
Axis CorSard, featuring all Italian and German forces on Sardinia and Corsica on September 8, 1943, joined by some units held in reserve on the Italian mainland.
Changes to existing Orders of Battle:
Added paratroopers to every Soviet OB between 1941-1945.
Added additional fighter squadron(s) to each of the following OBs, to bring them up to a minimum of 6 fighter squadrons: France 1939/1940, Germany 1939-1941, USA 1939-1941, USSR 1940.
Increased skirmish bonus for all commandos to +35%.
Increased skirmish bonus for all paratroopers and some glider infantry to +25%.
Increased skirmish bonus for most glider infantry to +15%.
Note on Mixed-Nation OBs:
We have temporarily homogenized the graphics of the mixed nation OBs; for example, the German units in Italian 6th Army will graphically look Italian for the moment, but their equipment and organizations are unchanged, so it will not affect gameplay. We had to do this as a temporary measure due to complications we’re working out in the hostile unit shading system employed when an enemy unit shares your nation.
Alternate Unit Graphic Set:
The new alternate non-NATO unit graphic set can be toggled on and off in the options screen. You will need to restart the game for this option to take effect.
Operations on the Horizon:
We look forward to hearing your thoughts on Operation Husky Stage 1! Feel free to drop us a line here on steam, or catch us on discord. We have also updated the design roadmap to reflect our progress and detail what’s coming in Stages 2 and 3! As always, if you’re interested in all the fine details of the changes, we have updated the manual to include the new features. For now, enjoy the invasions and we'll be back soon with more CAOS news!
Operation Husky Stage 1: Coming February 12
Greetings! We are happy to announce CAOS Operation Husky Stage 1 will launch in just under two weeks on February 12! As part of Stage 1, we are also including the dynamic air zone and new unit graphic set originally planned for stages 2/3.
Operation Husky Stage One Features:
New Game Mechanics:
Dynamic Air Zone: Air control dynamically projected from map edges and controlled airfields. You can now visualize the aerial battlefield using the air overlay (pictured above) and see just how much of the map your squadrons really cover. Amphibious Landings: Amphibious assaults in a new Invasion scenario mode designed specifically for naval invasions. Units conducting amphibious landings enjoy powerful naval fire support and barrage bonuses. Paradrops: Paradrops for the attacking player in Invasion and Attack scenarios. If you have air control over a hex and you have paratroopers to spare, you can drop on it.
New Maps:
Sardinia: An idyllic Mediterranean tourist destination, and also incidentally a fantastic battlefield. Sardinia features rugged mountain bastions, light forests, and sweeping open plains. Some sectors of the island present serious challenges to mechanized movement, but almost every hill-top fortress can be bypassed and isolated with proper planning. Corsica: A mountainous and densely forested island that boasts many choke-points to entrap reckless adversaries. Corsica favors infantry combat and places even more importance on controlling the air than other maps.
Historical Orders of Battle and Order of Battle Additions
The historical orders of battle which will be used in the coming historical and hypothetical scenarios will also be available in custom scenarios. Allied Operation Husky, featuring US 7th Army and UK 8th Army as they stood during Operation Husky in July/August 1943. Allied Operation Avalanche, featuring US 5th Army (composed of US 6th Corps and UK 10th Corps) as they stood during Operation Avalanche in September 1943. Axis Operation Husky, featuring the Italian 6th Army and elements of Germany 14th Panzer Corps as they stood during Operation Husky in July/August 1943. Axis CorSard, featuring all Italian and German forces on Sardinia and Corsica on September 8, 1943. Soviet Paratroopers: Every Soviet standard order of battle from 1941 onwards now includes one Airborne Corps (or equivalent number of brigades), the USSR will not be left out of paradrops!
Alternate Unit Graphic Set:
Non-NATO graphics lovers rejoice! An alternate unit graphic set can be toggled on and off in the options screen.
Operations on the Horizon:
After stage 1 releases on February 12 the new gameplay systems required to support pre-built historical and hypothetical scenarios will be fully in place. With stage one wrapped we will set to work on bringing Operations Husky, Firebrand, Brimstone, and Case Axis to life, and bringing you what so many of us have dreamed of for months: a CAOS scenario editor.
Dev Blog 11: Dynamic Air System and Amphibious Landings
Beta testing for Husky Stage 1 revealed that invasion scenarios require the dynamic air system to be reasonably balanced, so we are expediting dynamic air from stage 2, to stage 1. In development terms this means stage 1 will take longer to complete, because the dynamic air system interacts with every aspect of CAOS, and opens its own Pandora’s box of bugfixes and testing before it's release-ready. However, in gameplay terms it elevates air combat in CAOS from something that happens behind the scenes to a fluctuating aerial battlefront that you can actually see, plan around, and interact with. Let’s dive in and see how dynamic air system and invasion scenarios work!
Dynamic Air Zones:
In Operation Husky Stage 1, air power will be dynamically projected from map edges and on-map airfields in all scenario types. Your air zone originates off the map, but you can extend your air control over the battlefield by increasing the number of squadrons conducting air superiority missions, or by capturing airfields to extend the reach of the squadrons you already have. Controlling airspace reduces the effect of enemy air missions and prevents them from conducting amphibious or paratroop landings at all. Ignoring the skies completely and simply massing more tanks will be far riskier, especially in the late-war years. Neglect your air force at your peril.
Visualizing Air Control:
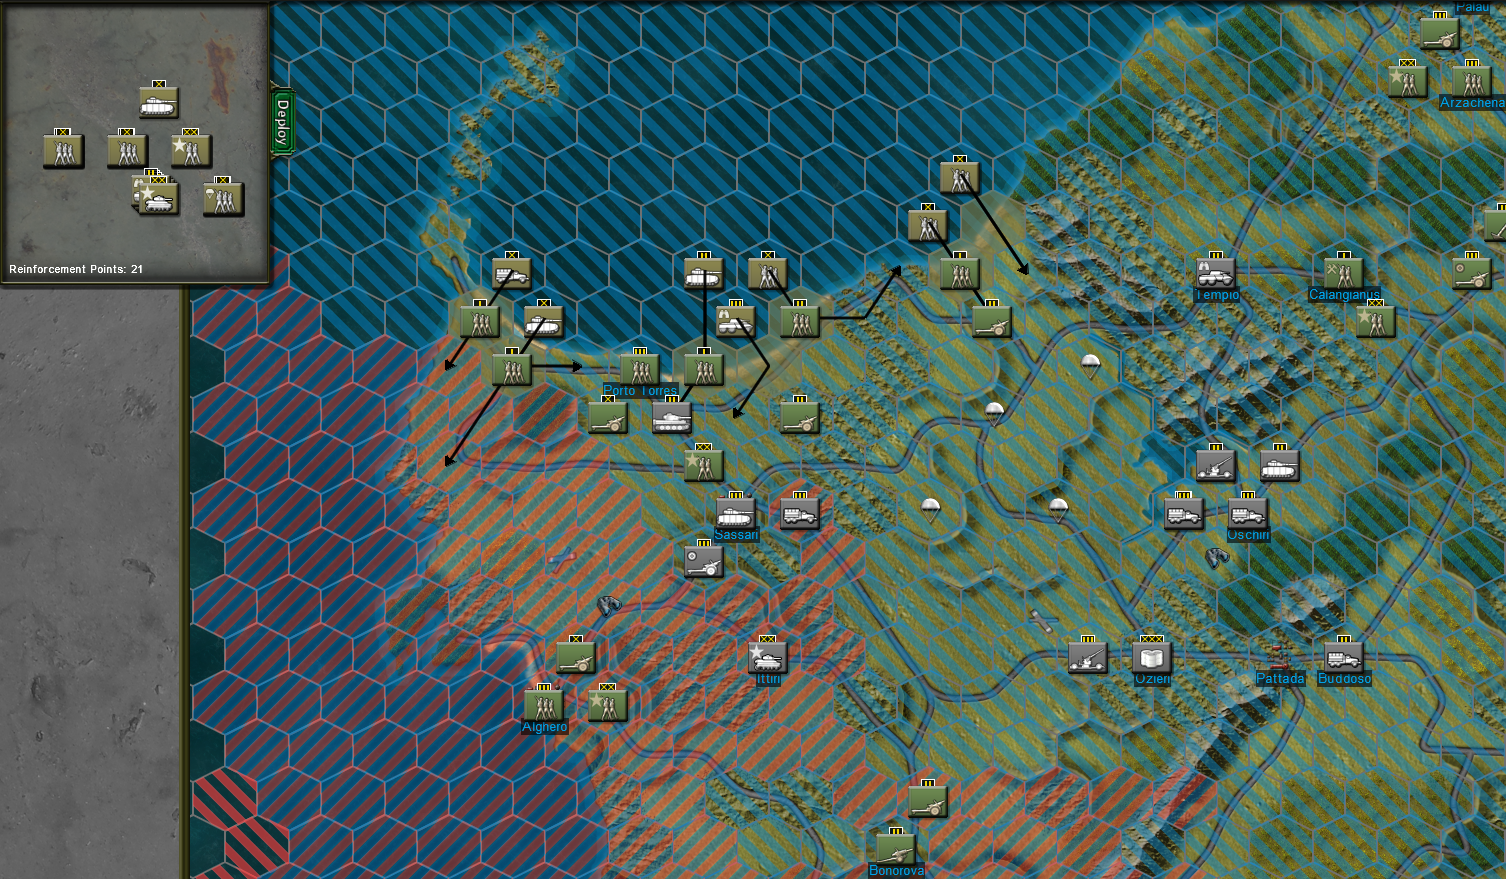
The new air overlay visualizes the aerial battlefield. Airspace control is color coded by faction. In the example above red-highlighted hexes are Redfor airspace and blue-highlighted hexes are Blufor airspace. Hexes that are hash marked both red and blue are areas of contested air space wherein neither side enjoys superiority.
Effects of Air Control:
Amphibious and paratroop landings can only be conducted in friendly airspace, and the efficiency of enemy air missions is reduced in your airspace.
Friendly Airspace Exclusive:
Amphibious Landings: Amphibious landings can only be performed in friendly airspace. Also note that if you make a successful landing and then lose air control over the beach, you will not be able to land additional reinforcements until you recover air control over the hex.
Paradrops: Paratroop drops can only be targeted on hexes inside friendly airspace. If you want to drop behind enemy lines bring enough fighters to push the enemy’s air zone back.
Reduce Effect of Enemy Air Missions: The effect of enemy air support, strike, and bombing missions inside your airspace is reduced.
Friendly and Contested Airspace:
Commando landings: Commando units can conduct amphibious landings in either friendly or contested airspace.
Amphibious Landings and Logistics:
Amphibious Landings:
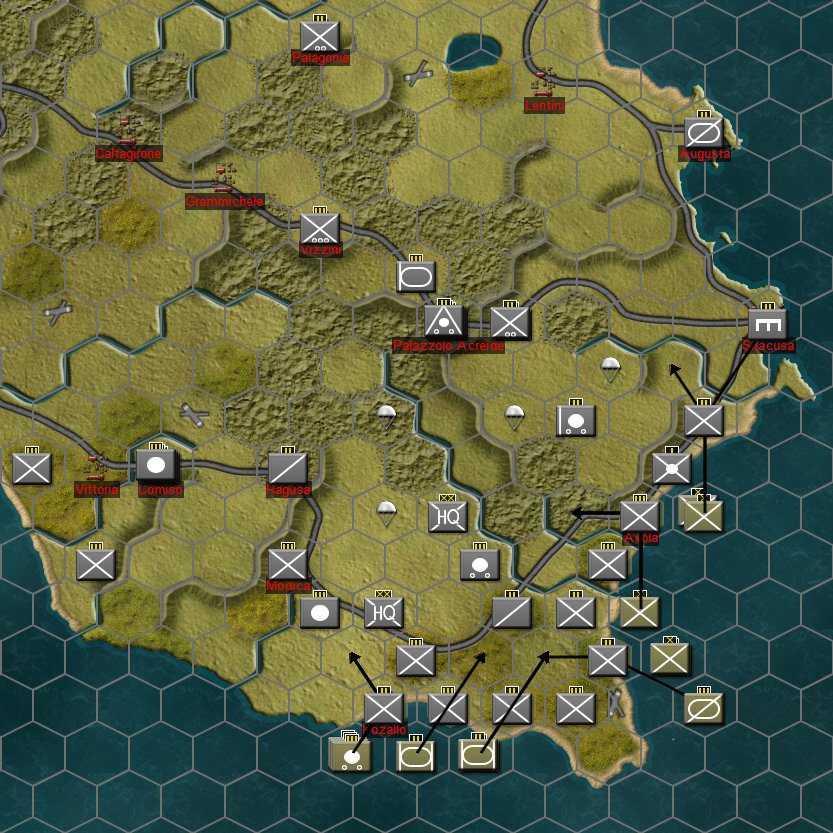
‘Conventional’ amphibious landings involve placing a landing marker, and then selecting 8 invasion beaches within 6 hexes of the marker. In addition to whatever units you storm the beaches with the turn the marker is deployed, these beaches will remain landable to reinforcement units for 3 turns, unless you lose control of the beach. If properly used an invader can deploy entire corps across a full set of 8 beaches in a matter of days. Do not ignore amphibious landings, they start small but escalate quickly. The downside of amphibious landings is that your opponent can see the beaches you selected after you land, even if they do not have direct line of sight on the landing beaches (invasion fleets are hard to miss); so amphibious landings are never stealthy.
In this scenario one landing zone has already been planned and units ordered to land (note the shaded hexes with units waiting offshore). While another landing zone is being placed (note the landing marker, indicated by a transport ship on an octagonal counter), the number above the vessel indicates the number of beaches left to select for the landing zone.
Landing markers can be purchased during requisition phases, which means that if an invader can afford new landing markers and maintain air cover, follow-on landings after the first wave are always a possibility.
Commando Landings:
Commando landings can be conducted anywhere in friendly or contested air space without requiring a beach landing marker. This means unless your opponent has units with line of sight on the commando’s landing zone, they will not know you are there. Use commandos to grab ports or airfields in the enemy’s rear area just ahead of a major ground offensive to seize these objectives. A well-timed commando raid to capture a port can provide a fresh reinforcement point in the enemy’s rear. Likewise, taking an airfield in contested airspace can undermine enemy air resistance just ahead of your own land offensive. The threat of commando landings alone forces your opponent to deploy more forces to secure their rear and lends a significant advantage to nations such as the United Kingdom in invasion scenarios.
Note the lack of landing markers or shaded beaches in a commando landing. If this landing wasn't aimed directly at enemy ports, it could be stealthy.
Ports:
In custom scenarios any city or town on top of a beach hex is considered a port. In invasion scenarios, if an invading player captures a port they can continue to land reinforcements on that hex without needing to expend a landing marker. Additionally, most port-cities are also considered major supply depots, so invaders will typically try to capture one early on in an invasion to simplify their logistics.
Reinforcement Points:
Reinforcement points represent the naval or air logistical assets required to land a combat unit. Deploying units in amphibious landings, commando landings, and paradrops all consume reinforcement points. The number of reinforcement points required to land a unit is equal to its stacking value. Without proper planning reinforcement points can become a serious bottleneck for an invading army. Units stuck in the deployment box with no reinforcement points left to land them will do you little good until you get a chance to buy new reinforcement points in the next requisition phase.
Additional reinforcement points can be purchased during requisition phases at a rate of .5 requisition points per reinforcement point.
Hitting the Beach: Amphibious Combat:
Amphibious Combat:
Amphibious landings are the highest intensity battles in CAOS. When landing units encounter beach defenses they relentlessly attack every impulse until they take the beach, are destroyed, or the turn ends. If a landing unit rolls a retreat in combat they take an automatic 15% strength loss like encircled units do, but keep attacking. While invading forces suffer an amphibious combat reduction and the risk of high casualties, they also gain the powerful bonuses of naval gunfire. Consequently, opposed landings tend to be bloody for both the attackers and defenders.
Failed Landings: Landing units that fail to take a beach but are not destroyed automatically return to the deployment box and suffer 50% cohesion loss, in addition to attrition suffered during the landing.
Naval Gunfire:
Amphibious landings enjoy powerful naval barrage and fire support bonuses. Before combat even begins the beach is hit by naval barrage and then naval fire support is added to the combat value of the attackers for every impulse of the landing. Naval barrage/fire support values differ from nation-to-nation, but in each case is calculated from the artillery throweight of common light cruisers and destroyers. The US and UK lead the higher end of the naval gunfire charts, but naval gunfire of any nation can be dangerous.
Expanding the Beach Head:
Landing units can move one hex of open terrain inland (2 on a road) after landing, movement points allowing. If a beach is well defended landing units will rarely have enough movement points left to get off the beach after the initial battle. But when beaches are lightly held, or undefended, invading forces can immediately start establishing a safe perimeter around the landing zone.
Amphibious Landing Stacking Limit Exception:
Up to 5 stacking points can be landed in a single hex per turn. A common invasion package against defended beaches is 2 infantry regiments + 1 tank battalion to ensure combined arms. You can also use this extra stacking point to get headquarters and artillery units ashore that would otherwise have to wait an extra turn to make landfall.
Destroying/Disabling Landing Beaches
Landing beaches automatically close after 3 turns, after which point the attacker must use a new landing marker to renew that beach head if they want to keep using it. Landing beaches are also removed if:
An opposed landing on the beach fails.
Enemy units occupy the beach.
The beach is inside enemy Zone of Control, and there are no friendly units on the beach to protect it.
Likewise, beaches are disabled and become unlandable (but are not removed), if the invader loses air control over the beach. If the invader regains air control over the beach before it automatically closes after 3 turns, then they can land on it again.
Invasion Strategies:
With the basics covered, let's consider how to actually plan an execute something as monumental as a naval invasion in CAOS.
Attacker:
The invader’s numerical advantages are limited by the logistics of naval landings and aggression is essential to throw the defender off balance The invader might overwhelmingly outnumber the defender, but that only matters if they can actually get boots off the beach. Don’t be afraid to play extremely aggressively during the early stages of an invasion, you can afford to take more losses than the defender can. Take risks, grab supply hubs, grab airfields, expand outward from the initial landing zone as quickly as possible. Force the defender to commit their reserves and then stage follow-up landings on their exposed flanks. If you have commandos or paratroopers consider holding them until a few turns into an operation and then use them to capture ports behind enemy lines to open another front.
Here’s an invasion checklist to keep in mind while planning your operations:
Always make sure you have enough reinforcement points to keep landing new units. In a corps+ or army size scenario, buy at least 40 stacking points during the first turn.
Maintain a strong air force. If you lose air control over your beaches/ports you cannot keep landing reinforcements.
If you’re expecting resistance on the beach, make sure your invading stacks possess combined arms.
Does your invasion zone promise quick access to ports to provide easy access to reinforcements?
Does your invasion zone promise quick access to a supply hub? (Check the supply overlay) If not, be prepared to bring mobile depots in reinforcement waves to keep your troops supplied.
If you ever find yourself in a situation where your landing has been contained and can’t break out, dig in on that front and start pouring units into an alternative landing zone if possible. Time is of the essence, the invader enjoys a force advantage when the game starts, but if you can’t capture objectives and increase your requisition point income then the defender will eventually rival your power and grind you into the dust.
Defender:
The defender’s watchwords are Delay and Deny; the longer you can keep the invader away from major objectives the stronger you get. Keep your best mobile and armored units in central reserve to confront and contain enemy landings as they move inland. Don’t be tempted to park expensive tank regiments on beaches; naval gunfire will cut them up like a can opener and then you’ll have nothing to stop invaders moving inland. Consider deploying expandable infantry supported by artillery and cheap armor to beaches where you expect contact, but you can’t afford to cover everything equally. Weigh what’s worth defending against what you can afford to give up.
Here’s the defender’s invasion checklist:
Check the air overlay every turn to see what beaches the invader could attack. Use the invader’s checklist and your enemy’s observed behavior to identify beaches most at risk and deploy forces accordingly.
Forget a well-balanced air force, bias towards fighters to contest the skies and deny the invader access to beaches behind your lines. Remember the Air Superiority mission focus on the Air Command screen to maximize the value of your fighters.
Deploy mobile units in central reserve and then rush them toward invasion zones to prevent breakouts and contain landings near their beaches.
Create bastions of defense. If you identify a specific airfield or city (especially a supply hub), that the invader must capture to support their invasion make that as hard as possible for them, even if it means sacrificing units.
Station engineers on bridges at critical choke points throughout the map and blow those bridges ahead of the enemy advance. Construct minefields where bridges aren’t available.
Deploy recon units in rear areas to quickly locate and entangle enemy paratroopers for quick removal by your armored forces as soon as they land.
The first few turns of an invasion as a defender against a veteran invader can be harrowing. The invader knows their plan, you can only guess at it. But so long as you can prevent the invader from running free and capturing objectives, the tide will gradually shift in your favor. The invader enjoys many advantages, but so do you; blow the bridges, mine the highways, stuff the cities full of conscripts, level your heavy howitzers out and use them like cannons, throw entire tank regiments at anything vaguely resembling a paratrooper. Delay, deny, and make the invader’s life miserable.
Invasion scenarios will be the most complex scenarios in CAOS and we look forward to sharing them with you in Operation Husky Stage 1! We expect to release Stage 1 in January, but the exact release date isn't set yet, so stay tune for more updates and let us know your thoughts!
Operation Husky Release Plans
We are happy to reveal our release plans for the CAOS: Operation Husky update! Because of the sheer volume of content and systems coming in Husky, we’re going to split the update into three stages so everything can be properly tested and debugged before it hits the live game. The systems such as paradrops, amphibious landings, historical scenarios, and editor coming in Husky will ultimately make it possible for us to expand CAOS into the Russian Front and later the Pacific, so it’s essential that we give this update the time it deserves. All parts of the Husky update will still be completely free, they’ll just be spread out over more time than originally planned to allow ourselves to properly test and polish everything.
Stage 1: Systems and Content
Operation Husky Stage 1 focuses on adding new gameplay systems, maps, and orders of battle, to custom scenarios in CAOS.
Paradrops: Paradrops as a selectable scenario option. When enabled either side can conduct paratroop drops if they possess air superiority. See the paradrop dev blog for more info.
Amphibious Landings: Amphibious assaults in a new Invasion scenario mode designed specifically for naval invasions. Units conducting amphibious landings enjoy powerful naval fire support and barrage bonuses. The mechanics and restrictions of amphibious landings, and the commando landing variant will be discussed in a separate dev blog.
New Maps: Two new maps, Sardinia and Corsica, playable in all custom scenario types.
Historical Orders of Battle: The historical orders of battle which will be used in the coming historical and hypothetical scenarios will also be available in custom scenarios.
Allied Operation Husky, featuring US 7th Army and UK 8th Army as they stood during Operation Husky in July/August 1943.
Allied Operation Avalanche, featuring US 5th Army (composed of US 6th Corps and UK 10th Corps) as they stood during Operation Avalanche in September 1943.
Axis Operation Husky, featuring the Italian 6th Army and elements of Germany 14th Panzer Corps as they stood during Operation Husky in July/August 1943.
Axis CorSard, featuring all Italian and German forces on Sardinia and Corsica on September 8, 1943.
Stage 2: Historical/Hypothetical Scenarios and Dynamic Air Zone:
Stage 2 focuses on Historical/Hypothetical Scenarios and the crucial Dynamic Air Zone feature.
Sicily: Operation Husky (Historical and Free Deployment variants)
Sardinia: Operation Brimstone (May, July, and September variants)
Sardinia: Case Axis
Corsica: Operation Firebrand
Dynamic Air Zone: Air zone dynamically projected from controlled airfields. Paratroop drops and (non-commando) amphibious landings will only be available inside friendly air space.
Allow Players to Disable Nation-Locking: Scenario creation option to allow nations to be played against themselves. For instance, Germany versus Germany matches will be possible.
Stage 3: Scenario Editor
Stage 3 will focus on adding a scenario editor and integrating the new alternate counter set.
Scenario editor: This editor will let you create scenarios on existing maps, you’ll be free to choose both side's nations/years, place units, objectives, supply points, starting zones, requisition points, forts, minefields, etc. These scenarios can then be saved to your scenario list or shared with your friends.
Alternate counter-set: The alternate counter-set will be made available for direct download (likely via steam workshop) before Stage 3 for players who prefer a non-NATO look and want to use it early. But the option to swap between the NATO versus Alternate counter-sets will be added in stage 3. Here's an example of the current in-development alternate counter-set, most of the vehicle/artillery graphics are based on either US or German weapons for easy identification.
When will the stages be released?
We expect to make a public beta build of Husky Stage 1 available around Christmas, with a full release following soon after. Each stage will be released when it’s ready. We look forward to sharing Husky with the community and we hope you're looking forward to a very merry Christmas!