

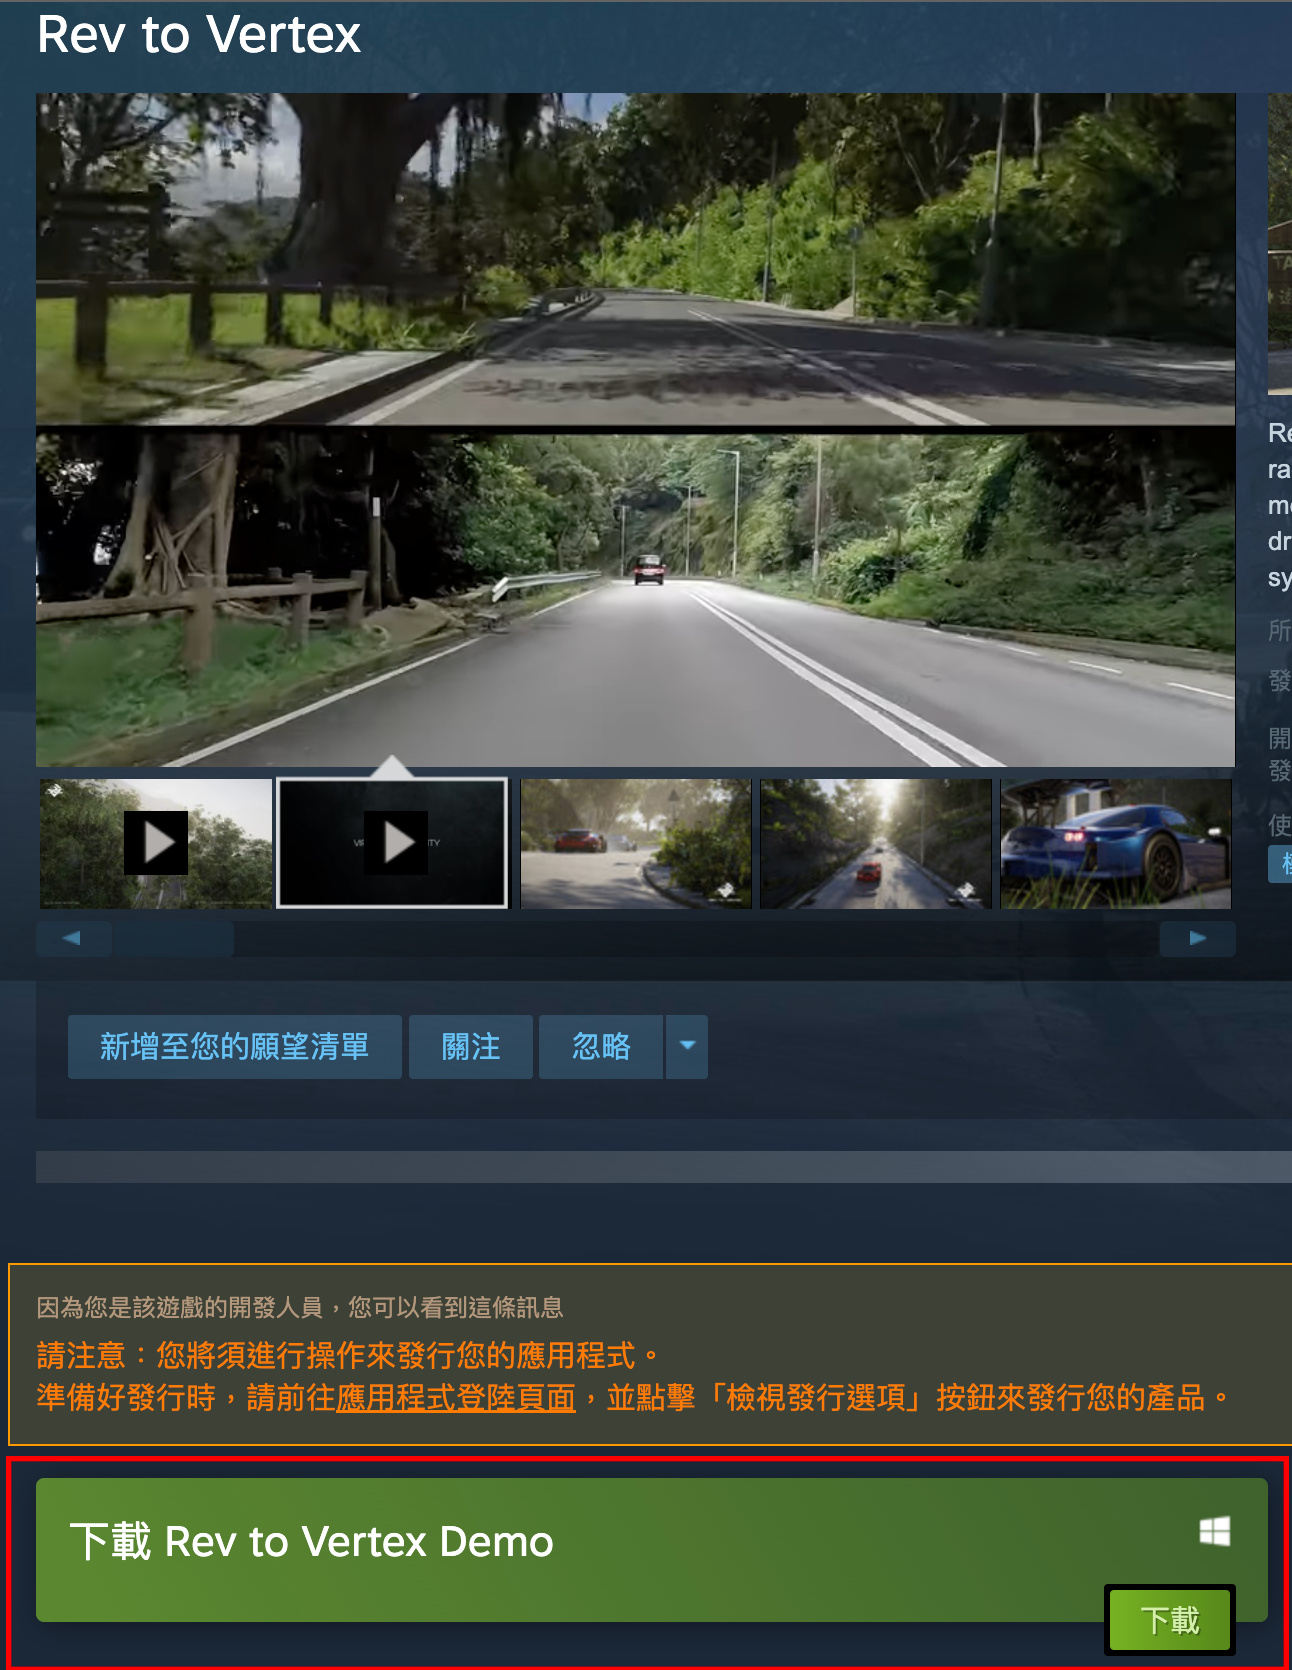
Rev to Vertex
Rev To Vertex Early Access Multiplayer Alpha Version 0.6.1 Update
Controller update:
Revised steering axis deadzone value
Multiplayer mode Alpha version unlocked.
Server sessions: Practice / Race
Starting grid: by join server order
Recommended player limit: 8
Known issue (fix in future updates)
- Virtual mirror performance (currently disabled)
- Invalid live timing in Practice session (currently disabled)
- Major live timing mismatch in Tolo Highway
- Minor live timing issues in Route Twisk
- Car LOD performance (optimizing WIP)
Physics model:
Revised suspension physics calculation
Revised tire damping calculation
Revised tire tread to internal air heat transfer calculation
Revised tire rolling resistance calculation
Revised tire force calculation
All tire physics:
Changed the tire slip characteristics
MZ3-TA:
Revised suspension geometry to raise the height of the roll center
MZ3-TC:
Revised suspension geometry to raise the height of the roll center
NA2-GT1:
Softer rear spring for default high downforce car setup
Rev To Vertex Early Access Version 0.6.0.4 Update
【Rev To Vertex Early Access has been updated】
version: 0.6.0.4
hotfix patch.
Some tyre physics:
Revised load sensitivity parameters
MZ3-Cup:
Revised default car setup
Stiffer springs
Revised front suspension geometry - more anti-dive
Revised rear suspension geometry - more anti-squat
MZ3-TC:
Revised default car setup
Stiffer springs
Revised front suspension geometry - more anti-dive
Revised rear suspension geometry - more anti-squat
MZ3-TA:
Revised default car setup
Revised rear suspension geometry - less anti-squat
ZZT GT3:
Revised default car setup
Softer springs
Revised rear suspension geometry - less anti-squat
A80 GT1:
Revised default car setup
Revised rear suspension geometry - less anti-squat
Rev to Vertex Early Access Controller Setting Guide
*H-pattern is not supported currently. It will be supported in the upcoming updates
*For steering wheel users, using a FFB frequency higher than 250 hz may cause severe performance issues. Proceed with caution.
*For steering wheel users, please take advantage of the “SET MIN” and “SET MAX” buttons to fit your device input into the appropriate range
*For gamepad and keyboard users, if you are not using axis, i.e. if you are going to control the steering left, steering right, throttle or brake with a on/off button, make sure to clear up the axis by pressing all the circular arrow buttons in the AXIS CALIBRATION menu
*The set up menu sucks. We know and we don’t really have an excuse for that. We will revise it in the upcoming updates. (We also know our game could be a lot better. Working hard on it.)
For Steering Wheel Users:
1. Go to SETTINGS
2. The AXIS CALIBRATION menu will show up; if not, click the AXIS CALIBRATION button at the bottom right
3. In the AXIS CALIBRATION menu, your input device, such as wheel base, pedals, handbrake etc., will be displayed under “AXIS READING of” in the top left. Switch to the device you want to set by clicking the left and right arrows next to the displayed input device name
4. There is a set of 2x4 grey boxes beneath the device name. Try rotating your steering wheel or pressing the pedals, one of the grey boxes should react to your device and show value change. Then you just need to set it to either “steering”, “throttle”, “brake”, “clutch” or “handbrake” by pressing one of the five buttons below the input value reading.
5. After you have bind the input device successfully, when you do steering or pressing the pedals, the colourful bars on the right side of the menu should respond. Check if the minimum input and the maximum input react correctly.
6. If the range is not correct, or is reversed, for the pedals, handbrake or clutch, fully release the device, then press the “SET MIN” button; after that, fully press on the device, then press the “SET MAX” button.
7. For the steering wheel, first rotate the wheel fully to the left, then press the “SET LEFT” button; then, rotate the wheel fully to the right, then press the “SET RIGHT” button.
For setting the gear shift button, press the “BACK” button in the bottom right of the AXIS CALIBRATION menu, then look for SHIFT UP and SHIFT DOWN in the CONTROL menu and bind the keys you prefer
8. You can also set the force feedback intensity, force feedback frequency etc. in the CONTROL menu
9. To bind keys in the CONTROL menu, press on the name of the key that is binded already, then push the button on your device you would like to bind. To escape the binding process and revert, press esc on your keyboard
For Xbox Gamepad Users:
1. Go to SETTINGS
2. The AXIS CALIBRATION menu will show up; if not, click the AXIS CALIBRATION button at the bottom right. The AXIS CALIBRATION menu is for you to setup your analog sticks, LT and RT buttons
3. In the AXIS CALIBRATION menu, the name of your connected xbox gamepad will display under “AXIS READING of”
4. Press or move your analog sticks, LT or RT button, you should see the values on the 2 x 4 grey boxes react to your input
5. Set the appropriate input to either “steering”, “throttle”, “brake”, “clutch” or “handbrake” by pressing one of the five buttons below the input value reading.
6. If the range or the LT or RT buttons is not correct, or is reversed, simply fully release the button, press the “SET MIN” button next to the appropriate axis, then fully press on the button and press the “SET MAX” button.
7. For setting up an analog stick for steering, after you have binded the analog stick to the steering, push the analog stick fully to the left. Then, press the “SET LEFT” button next to the STEERING bar. After that push the analog button fully to the right. Then, press the “SET RIGHT” button.
8. For binding the buttons other than the analog sticks, LT and RT buttons, press the “BACK” button in the bottom right to go back to CONTROL menu, and use the CONTROL menu to bind keys.Rev
9. Press on the name of the key that is binded already, then push the button on your device you would like to bind. To escape the binding process and revert, press esc on your keyboard
For Keyboard Users:
1. Go to SETTINGS
2. The AXIS CALIBRATION menu will show up. Make sure all the axis are clear by pressing each of the circular arrow on the right
3. Press the BACK button on the bottom right to go back to the CONTROL menu
4. To bind keys, press on the name of the key that is binded already, then push the button on your device you would like to bind. To escape the binding process and revert, press esc on your keyboard
【"Rev To Vertex Early Access" Release Announcement】
"Rev To Vertex Early Access" is now available on the Steam platform for USD $23.8.
📌 Highlights of "Rev To Vertex Early Access" update and included:
1️⃣ Features certain sections of "Tolo Highway" (Early Access version)
Sections of the second track, "Tolo Highway," have been added to "Rev To Vertex Early Access," offering a different driving experience between city roads and mountain paths.
2️⃣ Features the “FREE PLAY" mode
Select tracks and sectors freely and challenge the fastest time with various car models.
3️⃣ Updates to "TRAINING" mode
Updated training levels for both tracks, guiding you through the strategies of each road.
4️⃣ Features the "Weather Change" option
Choose between clear or rainy weather, adding variable road conditions to enhance player focus.
5️⃣ Multiplayer mode (Coming in late September)
6️⃣ R2V Chapter ZERO main program
For players who purchased the limited "Route Twisk Deluxe Pack" and "R2V Early Access Standard Pack" during the Ani-Com 2023, we apologize for the delayed distribution of certain game content, including the car decal designs. Updates will be provided in the future. Additionally, the R2V-themed gauges will be distributed in late December. We appreciate the support of all players.
R2V is currently in the development phase. The team is striving to enhance various player experiences and game content. We hope players will continue to provide their understanding and feedback, helping us to become even better.
「R2V X Logitech G Deluxe Starter Pack」enter code tutorial
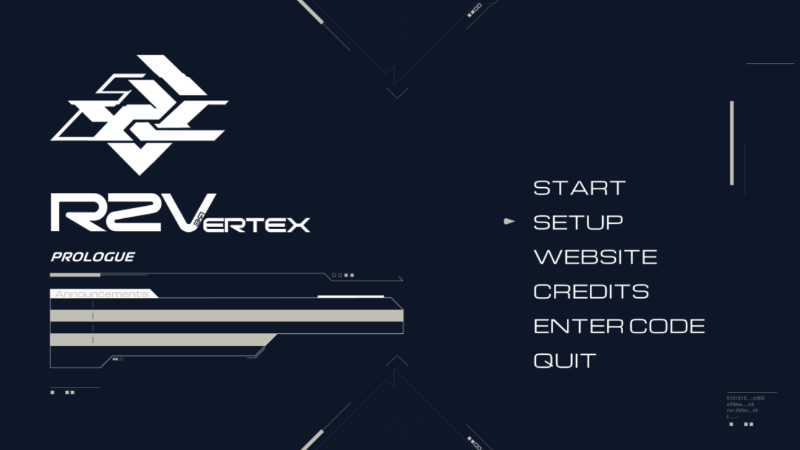
2. When you open the game program, the "Launcher" of "R2V" would like to show 6 selections for you. "START", "SETUP", "WEBSITE", "CREDITS", "ENTER CODE" and "QUIT".

3. You could try to click the "ENTER CODE" selection.

4. And then you need to type the game item code which you owned and click the "Confirm" button. After that, you will receive the game props included in the "R2V X Logitech G Extreme Starter Pack".

** This event are Hong Kong limited.
** If you have any question, please email to pr@plutonization.com and thank you.
Tutorial guide of "Rev To Vertex Prologue" controller setting
1. Select “SETUP” from the main menu to enter setup page.
2. Select “CONTROL” to start control configuration.

3. On the left side of the “CONTROL” menu, use the arrow button to choose between “Keyboard, Controller” or “Racing Wheel” as your input method.

4. Left click on any function to start binding and press your preferred button to bind it to that function. (This page is for binding key presses only, axis such as wheel, paddle and bumpers are configured in the “Calibration” menu)

5. The “Calibration” menu is located at the bottom of the screen, click it to enter Axis Calibration menu.

6. In “Calibration”, you can try to move or press your input axis and examine the difference in the white “Reading” bar to determine what input axis is in use.

7. Press the buttons under the “Axis” title to bind that axis to the function.

8. You can fine-tune the input with the panel on the right with 3 simple steps.
> Let go the axis and click “SET MIN” to set the minimal threshold.
> Push the axis to the bottom and click “SET MAX” to set the maximum threshold.
> Try out the axis and see if it feels right.

9. Some controller setups will use the same axis on different input, for example the Xbox controller’s triggers are all shown as Axis-Z.
In this scenario, you can set both throttle and brake to Axis-Z and adjust with the right panel.
> Set both throttle and brake on Axis-Z
> Let go both trigger and press “SET MIN” on throttle

> Hold right bumper to the bottom and press “SET MAX” on the throttle

> Let go both trigger and press “SET MIN” on brake.

> Hold left bumper to the bottom and press “SET MAX” on the brake.

10. After all settings are complete, please remember to press “Confirm” to save your settings.

The R2V team hereby thank everyone for their responses to the demo.
First, thank everyone for supporting downloading the game and providing feedback and opinions. It provided us with valuable and helpful information, highlighting blind spots we have overlooked, which the R2V team is very grateful for.
Regarding the comments received, allow us to respond to some of the questions :
UI is complex and unfriendly.
- The UI used in the demo is not the finalised design for the game. It was made for the early offline demo in September. The UI is converted from our development tools to make it easier for players to operate the game. The official version of UI/UX will be launched in a later version.
Difficulty and incompatibilities in setting the wheel/controller
- The team has arranged to redesign the “Settings” page.
- Since the team could not arrange all testing models on the market. We are analysing the collected LOG data to make compatibility updates for various brands of steering wheels and drivers.
- Some players reported that they could use the PlayStation controller after installing the DS4Windows (Note. Please assess the risk in using third-party software).
Difficult to drive
- The team initially wanted players to experience the level of road simulation developed. We decided to use a car with a stiffer suspension and a lower body for players to “feel” the unevenness and slope of a real road (especially the textures of white lines), which eventually led to many players expressing that “It is too difficult to control”. The team apologises for the inconvenience, and it is recommended not to go “flat out" for the time being.
- The team will update the game as soon as possible to provide vehicles more suitable for the daily driver so that everyone can enjoy the joy of driving at Tai Mo Shan.
- Some ground roadwork will be corrected in the next update.
FPS drop and high hardware demand.
We recognise the “Settings” page needs to be clearer and is currently a bit user-unfriendly. Players cannot enjoy the game to the full extent and may experience lag. We found A few leading causes and solutions:
- The resolution of the demo follows Window settings. This means if your native monitor resolution is set to 4K, the game will automatically be set to 4K. If the lag persists, try to set the computer's native resolution to 1080P before starting the game.
- Incompatible/unsupported steering wheels may cause high GPU usage.
It is recommended to disconnect the steering wheel and reset the game to test whether lag occurs. If the game loads smoothly and the lagging issue is gone. Then, adjust and lower the FFB settings of the steering wheel. If the lagging persists, please check on the official Discord channel for further updates.

DEMO Launch at 30th Oct (GMT+8)
Due to the lack of experience in using the steam platform for the launch, The team took more time to understand and apply the relevant SDK. Thanks to the platform for clearly pointing out the problem with the upload file so that we can fix the problem with greater precision. This mistake also made us understand the process of updating the program. Similar issues will be avoided for the trial play/BETA/official launch.
The demo will be available for download at 8:00 pm on October 30th. The team is also preparing tutorials for everyone to understand different control settings (Keyboard/controller/and simulators); please pay attention to the official social platform update and STEAM page announcement.
After completing the demo, players can scan the QR code to answer a simple questionnaire to provide us with valuable feedback. The team will give players who complete the questionnaire a specially designed livery playable in the official version to thank all the player's active participation in our project.
We apologise again for the delayed release, and thank you for your support and love!

R2V DEMO | SETTING TUTORIAL (29/10Updated)
Control setting: Default Keyboard setting
Press the [cogwheel] at the top left of the main menu to enter settings. “PREV./” and“.\NEXT” to choose between control settings.
1. GAMEPADLEGACY, GAMEPAD MODERN for gamepad controller (currently do not support PlayStation controller)
2.KEYBOARDLEGACY, KEYBOARD MODERN for keyboard controls
3. STEERING WHEEL for steering wheels
*Attention: Steering wheels and gamepad controller can not be plugged in at the same time. Otherwise, the application will not recognise and work.
Keyblinding Settings
press the [cogwheel] at the top left of the main menu to enter settings; choose the desired input device.
1. STEERING WHEEL AXIS to setup up steering wheel controls
2.CONTROLLER & FFB to setup up keyboard and gamepad’s Force Feedback (FFB)

Graphic Settings:
Press the [cogwheel] at the top left of the main menu to enter settings. Select “Graphic”
1. “PREV./” and “.\NEXT” to choose between settings:
super low, low, medium, high, ultra, hyper, future
- Hyper is set based on rtx3080 performance, Future is set based on estimated rtx4090 performance
2. adjust the graphical settings according to your computer performance and personal enjoyment

Gameplay settings:
press the [cogwheel] at the top left of the main menu to enter settings;, Select “Gameplay”
Players can adjust the driving FOV
Other Functions:
Replay Function: Bottom of the main menu select “PREV./” and “.\NEXT” to choose between replay records and press [REPLAY]
Keyboard “Keyboard Modern” Default Keyblinding for Driving:
View angle/Camera Angle: ”C”
Reset car position: “R”
Remove HUB UI : “1” (1 above Q)
Traction Control System Active/Deavticate: “2” (2 above W)
Anti-lock Braking System Active/Deavticate “3” (3 above E)
AT / MT “4” (4 above R)
Controller “Gamepad Modern” Default Keyblinding for Driving:
View angle/Camera Angle : ”B”
Reset car position : “Y”
Traction Control System Active/Deavticate : “7”
Anti-lock Braking System Active/Deavticate : “11”
Switch between AT / MT : “4” (4 above R)


Demo’s car fixed “Racing Car” settings
If the game fails to start successfully, please make sure to install the latest "DirectX End-User Runtime"
https://www.microsoft.com/en-US/download/details.aspx?id=35
Known Issues:
Connecting the steering wheel and the controller to the computer at the same time will result in incorrect key recognition in the game. If the player has not reset all the keys, both may cannot be used. We recommend that you select one of the two to connect to the computer before starting the game.
For direct drive steering wheels, we suggest players to set the FFB frequency not higher then 125Hz.
We are experiencing some performance issues with certain direct drive steering wheels, such as Fanatec and Cammus. The issue will be fixed soon in the future updates.
Any inquiries and hardware issues. Please provide us feedback at the discord page
https://discord.gg/vx9mrWGN7N