Genre: Real Time Strategy (RTS), Strategy, Turn-based strategy (TBS)
The Great War: Western Front
The Great War: Western Front - Demo Now Available at Steam Next Fest
Your country needs YOU! A gameplay demo of The Great War: Western Front is now available at Steam Next Fest until February 13th.
Enlist today to begin training in the tutorial, where you will learn the basics of trench warfare and much more as American forces arrive in Europe. While we recommend familiarising yourself with the key mechanics and abilities, Bookmarks will allow you to move through the tutorial at your own pace.
Once you are prepared for the real thing, take command of the Western Front in a section of the campaign at the end of the tutorial. You will also have the chance to test your strategy in the historic Second Battle of Passchendaele. Will you succeed in recreating history with an Allied victory?
Pre-order The Great War: Western Front now on Steam and the Epic Games Store, ahead of its launch on March 30 and be sure to follow us on Twitter and Facebook for more news and reveals from Petroglyph Games and Frontier Foundry.
The Great War: Western Front Launches March 30 – Pre-Order Now!
Prepare to deploy, Commanders.
Crafted by real-time strategy veterans, Petroglyph Games, The Great War: Western Front is arriving to PC on March 30! Pre-Order now via Steam and the Epic Games Store to draw your battle plans three days early on March 27.
Enhance the experience with the Victory Edition which includes a detailed digital field guide to provide additional in-game intelligence, five stunning digital wallpapers and award-winning composer, Frank Klepacki's evocative original soundtrack.
Lead either the Allied Forces or Central Powers to victory in the definitive strategic WW1 experience.
In The Great War: Western Front, discover unparalleled levels of strategic choice as you step into the role of both Theatre Commander and Field Commander. As Field Commander, you will make tactical decisions in real-time as you engage the enemy. Plan carefully as you dig your trenches and place your artillery; changes to the battlefield will remain for future conflict. In the role of Theatre Commander, the weight of every decision will be felt as you coordinate and execute your grand strategy. Each role presents great opportunity but with heavy cost, whether it's the effect on your National Will or your soldiers in the trenches. Aligning your plans in each of these roles will be critical to ensuring a successful campaign.
Alongside the struggle for Western Europe in the main campaign, relive pivotal conflicts in Historical Battles, each one featuring footage from the Imperial War Museum's vast archives. Go on to create your own battles in Skirmish or test your mettle against fellow Commanders in Multiplayer.
Join Petroglyph developers Chris and Renato as they play through and discuss the creation of The Great War: Western Front.
Join us at Steam's Next Fest starting February 6 for an early opportunity to lead the Allied Forces through a section of the Tutorial and Campaign.
Not ready to pre-order? Wishlist The Great War: Western Front now on Steam and the Epic Games Store ahead of its launch on March 30. Be sure to follow us on Twitter and Facebook for more news and reveals from Petroglyph and Frontier Foundry.
Dual-Role Commander: Strategise on All Levels in The Great War: Western Front
The First World War produced a significant change in the tactical elements of warfare, from establishing new technologies to gain an advantage, to adapting the strategies behind the deployment of resources. The Great War: Western Front from Petroglyph and Frontier Foundry is dedicated to replicating these changes and their importance to WW1 – and puts you in control of it all.
In the Campaign, you will experience immersive dual-role gameplay that gives you command of either the Allied Forces or Central Powers, both on the battlefield and on a much broader scale. Combining grand strategy and real-time strategy, your faction will be relying totally on you to guide them to victory, as both the Theatre Commander and Field Commander. Let’s look more closely at these two roles.
Theatre Commander
The role of Theatre Commander in The Great War: Western Front allows you to take the reins of your chosen side’s war effort at a grand strategy level, affecting not just the approach for battles and offensives, but the wider tactics of war.
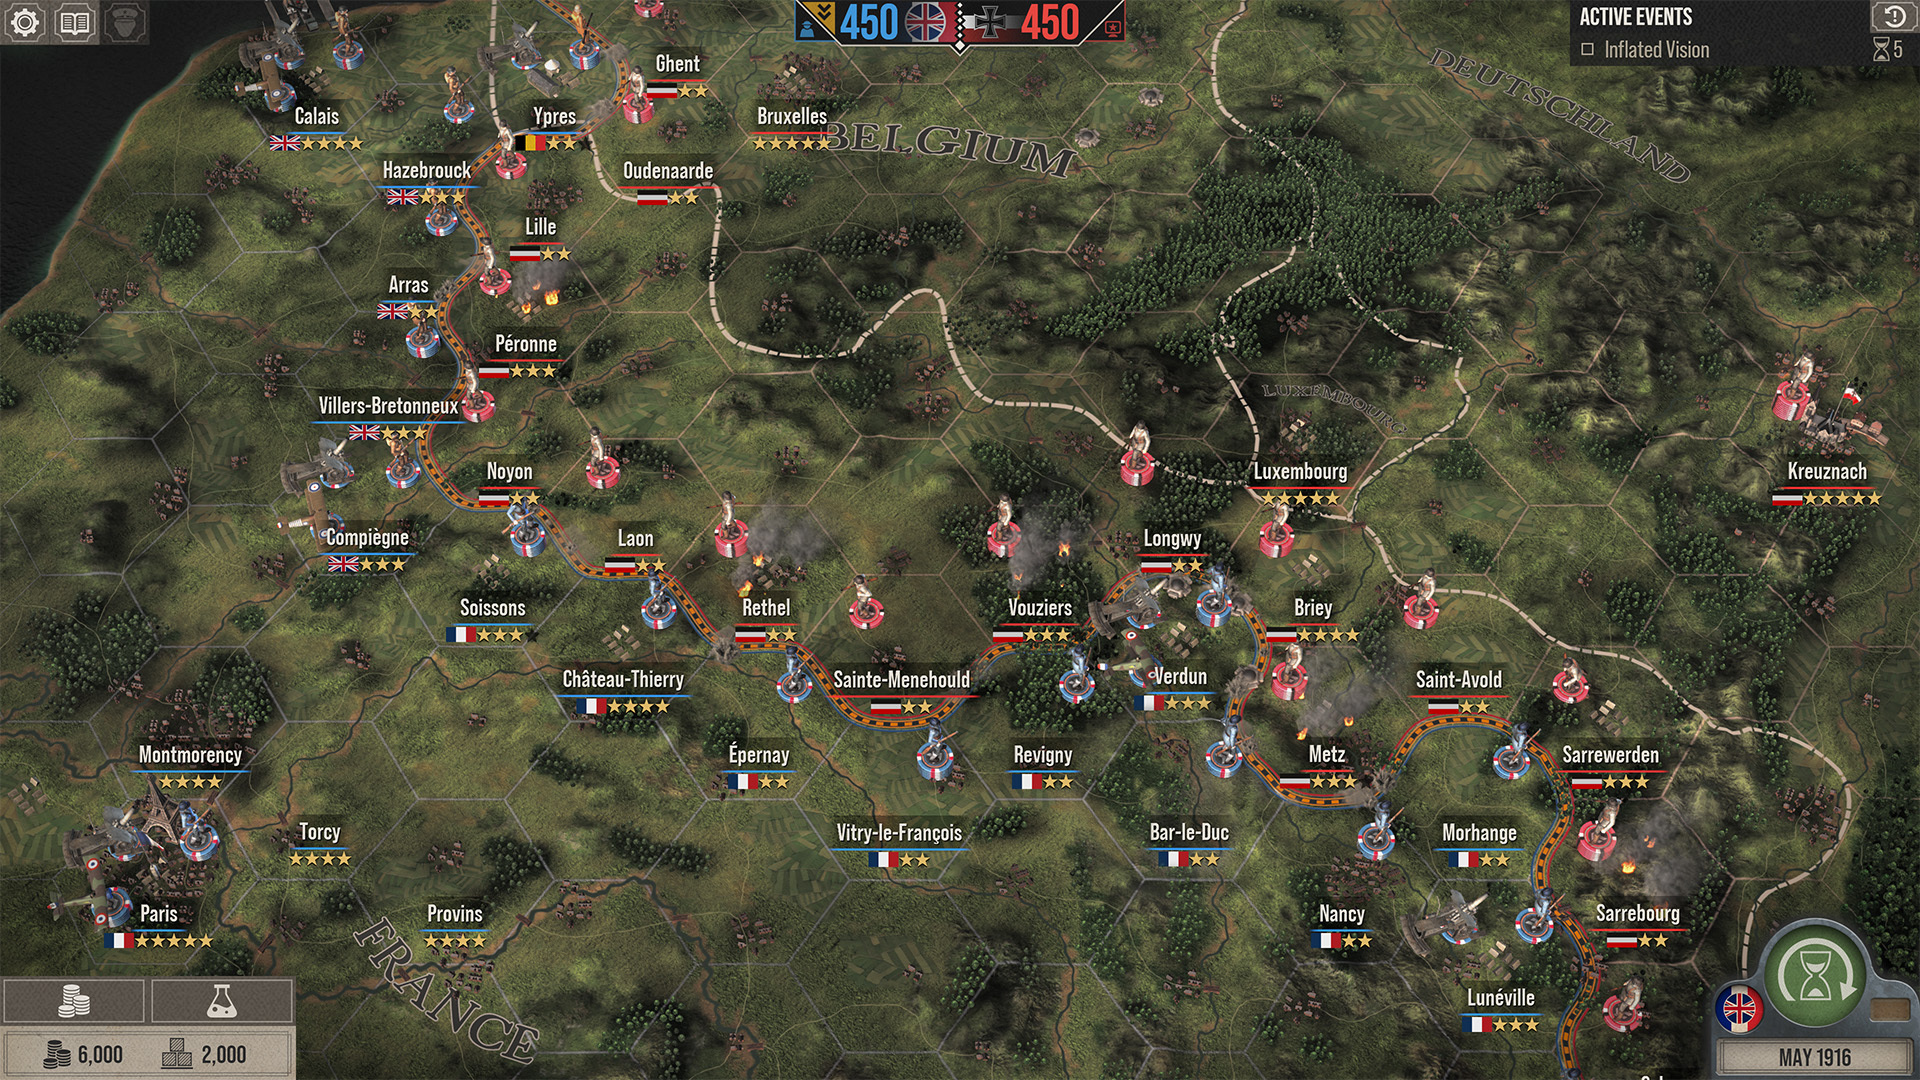
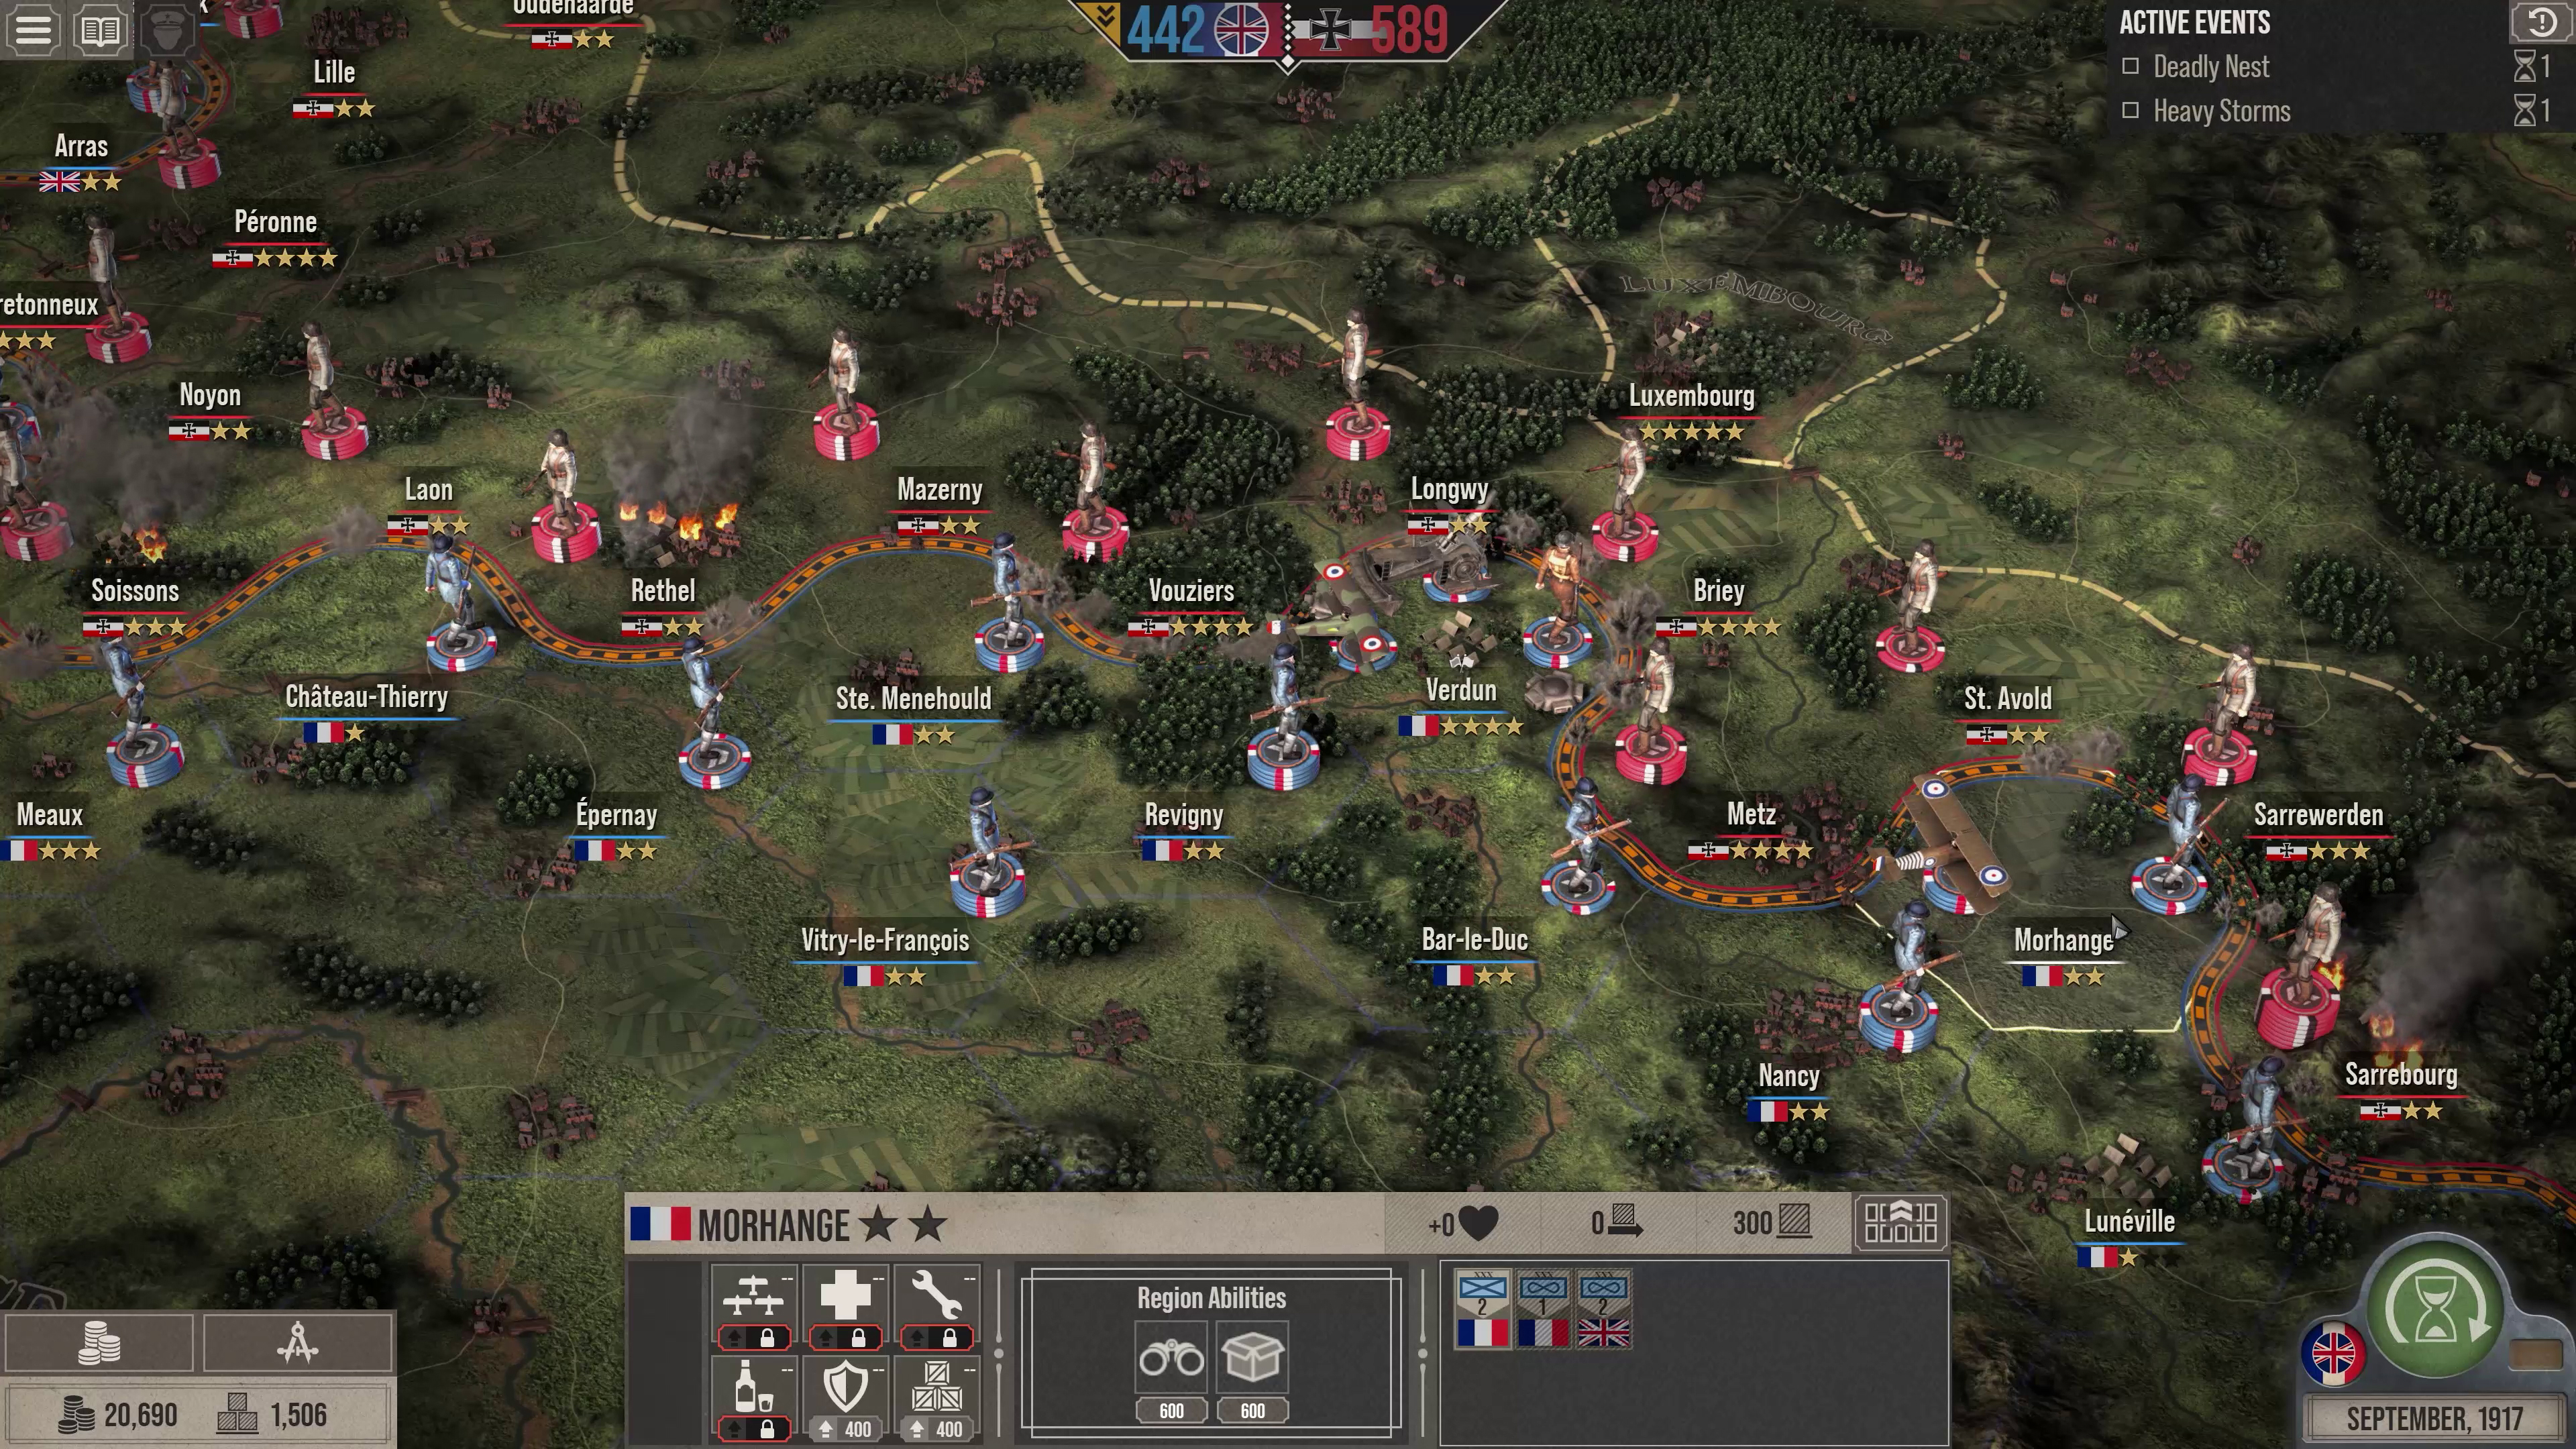
Campaign screen
The Campaign map is your main hub to operate all aspects under your control. A grid represents the Western Front, with each hexagon representing a territory that you are fighting for control over. Winning battles, and taking those territories, is vital. Each move you make as Theatre Commander counts as a turn, which represents one month. You are free to move your units to any controlled region across the Western Front during a turn - though you will be unable to move units and order them to attack or defend in the same turn. To support your soldiers in prominent locations, you can invest in structures, such as hospitals, to improve morale and reduce the cost of replenishing infantries. Consider how stacking heavy amounts of resources into one territory, to increase your chances of victory there, may well leave you vulnerable to an enemy onslaught elsewhere. Deploy your units across the region, try to anticipate the moves your enemy will make in their turn, and aim to strategically push the front line in your favour.
Resources and Currency
Achieving this will require careful tactical use of resources. In The Great War: Western Front, you will manage three main resources types throughout the Campaign:
Gold Reserves are the primary currency, which represents the economic power your faction holds. As Theatre Commander, use Gold Reserves to invest in key resources and heavy equipment as you push across the Western Front, such as maintenance costs, replenishing troops after a battle, and more. The amount of Gold Reserves available to you will be affected by your spending, but also by other factors. Gold Reserves will be generated after each turn, and certain key decisions you face during the Campaign can provide a boost or a hit to this currency. Keeping an eye on your level of Gold Reserves will be important; if you run out, and go into negative Gold Reserves due to mandatory replenishment of troops, you will be unable to initiate battles or purchase anything, until your debt is repaid.
Supply is your resource that represents all of your necessities when it comes to fighting a war, split into two sources: Corps Supply and World Supply. Corps Supply represents the basic supplies carried by soldiers; this can be increased through research and is replenished after each battle. World Supply, meanwhile, can only be generated by converting resources, or from specific events you'll encounter. There will be a limit, per turn, to how much you can convert - though the conversion rate of Gold Reserves to Supply can be improved via conducting specific research. The maximum supply you can draw into a region from the Global Bank of World Supply to supplement your Corps Supply for a battle can differ across regions. Building Supply Depots at a region will help increase that limit. Unlike Gold Reserves, you will be unable to go into a negative figure; if you run out of Supply, you will be unable to use it during battle. Later in this article, we will explain how you can use Supply on the battlefield as a Field Commander.
Research Points are the currency required to purchase upgrades and new technologies, as you conduct research into them. Research Points are earned per turn, or potentially received during significant moments of the Campaign, and can be stacked or used whenever you wish. Let's look at how you can spend those points...
Research and New Technologies
The arms race and necessity for both the Allied Forces and Central Powers to improve the tools for battle at their disposal is represented in The Great War: Western Front's research system. Here, Theatre Commanders can use Research Points to immediately unlock structures, boost the effectiveness of existing resources, and provide new options for both attack and defence. The more Research Points spent, and the more options you unlock, the greater your potential power in battle becomes.
Research is split into six areas: Flight, Infantry, Logistics, Engineering, Intelligence, and Trench. Choose whether to focus your research on any of these areas, or spread your focus across them. Think about the current strengths of your units and resources, and decide if your research should look to emphasise those strengths, or account for weaknesses. Do you want to support your troops better with your resources on the ground? Focus your research on Trench Warfare to improve aspects such as trench cover or machine gun spurs. Think you need something bigger to fight the enemy? Engineering research will unlock upgrades to existing artillery units, or even new tanks. Researching into other areas can help with wider factors of the conflict, like espionage.
The options and progression of the research system is a reflection of WW1, often replicating the advances and changes shown by both sides during the war. Many options in your research will be broken down into multiple levels, requiring you to purchase and unlock the first level, before being able to unlock the second and more effective level, and so on. The highest levels, and the most sought-after technologies, will cost you the most time and Research Points - but could be the defining breakthrough. Will you replicate the advances made in WW1, or take the progress of your faction in a different direction?
National Will
Success in The Great War: Western Front is not just calculated by territorial gains, but by the public support each side wields: their National Will. Maintaining your side’s National Will, whilst depleting the enemy’s, can be your key to overall victory – and as Theatre Commander, you will make decisions that directly the influence the backing you have from your people.
National Will can be affected by the outcome of any battle. Losing territory, or heavy troop casualties, can negatively impact National Will. Even victorious battles that come at a significant cost of soldiers and units will not go down well with the public, so carefully consider the human cost of each engagement.
Other aspects that can affect this are objectives, which offer varying rewards for completing, including National Will. Building specific resources, or researching a certain area within a set period of time, will bring its benefits, potentially including more support from your people. Additionally, throughout the Campaign you will be presented with important decisions which, as Theatre Commander, are yours to resolve. You will be given multiple options to solve the dilemma, with differing consequences including infantry availability, Gold Reserves, and National Will effects. Managing all of these areas closely, and making the right calls to limit the drop in National Will, is a crucial part of the role of Theatre Commander.
Prepare for Battle
All battles in The Great War: Western Front’s Campaign can be conducted at a Theatre Commander level. Factoring in all of the options and aspects we have mentioned, move your selected units and resources into territory you plan to battle for.
Whilst firepower and fortifications are imperative in any battle, so is intelligence. When you view an enemy-occupied region, there will be limitations in what you can see in terms of the enemy’s location, arrangements, and units deployed. Your use of espionage options at the Theatre Commander level will also dictate how much you knowledge you have on enemy units being deployed in any given territory. In WW1, both sides used observation balloons to attempt to get a bird’s eye view of their surroundings and understand what they are up against – and you can do the same in The Great War: Western Front, which we'll explain in more detail later on.
In the Battlefield Deployment area, you have the option to auto-resolve, which will simulate the battle, using the units you have selected for that territory. You will be presented with a ‘likely outcome’ window, showing the expected conclusion based on the parameters in place. Potential outcomes include victory for either side of varying degrees, or a stalemate, with marginal gains made one way or the other. Choosing to auto-resolve a battle could well come at the cost of more soldiers and resources than if you were to control the action yourself, as Field Commander...
Field Commander
In The Great War: Western Front, heading to the battlefield means taking the role of Field Commander. This puts in you in complete control of your side’s actions in battle, setting up troops and resources, and dictating the tactics of every moment of the conflict.
Laying the Groundwork
This begins before the battle commences, as your forces arrive at the scene to get ready for action. A pre-battle phase allows you to prepare for what lies ahead – and a large part of this focus may well be on creating a network of trenches. A variety of trench types (available dependent on the research you have undertaken) give your troops protected areas for movement, firing, and cover. Build defences into and around your trenches, too, such as machine gun nests, artillery, and barbed wire. Tanks and artillery can also be pre-placed to support your troops on any planned offensive. Set up your observation balloon, ready to deploy once confrontations begin. Select their placement carefully, considering the risk of being shot down by opposing airborne balloon busting missions. Check out this article on trench warfare in The Great War: Western Front for more intel on this pre-battle phase.
The Supply that you purchased and banked as Theatre Commander will be used throughout a battle, spent on carrying out actions such as building trenches, artillery barrages, deploying balloons, or rolling out aircraft. This is where your use of Supply Depots, selected and built as a Theatre Commander, can come into play as a Field Commander. Having a Supply Depot at the region you are fighting for can increase the amount of Supply you're able to use - and investing in upgrading those Supply Depots can raise the cap even more, helping with resources for troops and trenches.
The Conflict Commences
Once the battle begins as Field Commander, your attention turns to issuing orders to those troops, using defences and resources in the correct way to forge a path to victory.
All of your active units on the battlefield are displayed at the bottom of the screen, also showing information such as their morale, weapon type, and current level of cover. With a maximum pop cap of 30 for all battles (apart from some Historic Battles, which have lower numbers to replicate the real-world battle), Field Commanders must decide how to spread these units out, and also the cadence of their involvement. As the battle progresses, choose the right moment to bring in reinforcements, selecting exactly where you want them to advance, to keep the pressure on the enemy.
Move one or multiple infantry units at a time around trench networks to gain ground or a strategic advantage – or pick the right time to send troops over the top, into no man’s land, for an aggressive offensive manoeuvre. Order tanks to lead your infantry across the battlefield, absorbing enemy fire and delivering some damage of their own. Choose when to deploy artillery fire, even using a rolling barrage of overhead attacks as cover to move your troops more safely across open land. As it was in WW1, artillery can be a major influence on a battle; use it to suppress the effectiveness of enemy advances, nullify barbed wire that’s slowing your troops’ progress down, or weaken trench defence lines.
In the air, deploy your observation balloons to help you anticipate enemy attacks – and order balloon busting missions of your own to shoot down the other faction’s balloons and reduce their intel. Or, go on a direct airborne offensive by ordering your aircraft to engage the enemy. Fighter and bomber planes can be at your disposal, each used to carry out different types of orders. Bomber aircraft are used for harassment orders, using machine gun fire on enemy units out in the open, or for bombing runs, targeting artillery companies, spurs, or tanks. Fighter planes, meanwhile, will be responsible for balloon busting missions, or battling for air superiority, attacking enemy aircraft.
Whilst instructions can be ordered to air units as you deploy them, once they enter the battlefield, their targets and locations are chosen by the pilot – a reflection of the lack of ground-to-air communication options in WW1. Aircraft will also need to return to ground to refuel during battles, before conducting their next mission. Dual-Role Commanders should also note that aircraft will only be usable in battle if they had assigned an air wing to that region, whilst in the Theatre Commander role. Place your air wings smartly, and use your research to improve the effectiveness of aircraft, to ensure you own the skies and win pivotal dog fights.
Tactics and timing are imperative as a Field Commander – but so is perspective. Brute force and all-out attacks may not be the best course of action. Think about distractions for the enemy, use of cover, dictating lines of fire, and craft opportunities via your strategy to gain the upper hand.
Whether you’re in the role of Theatre Commander or Field Commander in The Great War: Western Front, the main objective remains the same: depleting the enemy’s territory, resources, and National Will. Manage the grander aspects of your war effort to give your side a platform for success, before putting your boots on the ground to navigate your troops through any battle.
Combining the grand strategy aspects of Theatre Commander, with clinical and effective real-time strategic moves as the Field Commander, is the challenge you face. How you approach it, Commander, is up to you.
Wishlist The Great War: Western Front now on Steam and Epic Games Store, ahead of its launch in 2023. Be sure to follow us on Twitter and Facebook for more news and reveals from Petroglyph and Frontier Foundry.
Trench Warfare in The Great War: Western Front - The Field Commander's Guide
The Great War: Western Front puts you in an all-encompassing ‘Dual Commander’ role, allowing players to take control of the war effort at both a grand strategy and real-time strategy level. This means that whilst you can oversee the war and plot a long-term strategy for victory, you can also put your boots on the ground, command any battle, and influence its outcome.
The latter will see you in the role of Field Commander – the individual in charge of all aspects of a battle as it takes place, including all tactical and strategic elements of trench warfare. WW1 on the Western Front was defined by these battles in the trenches – gruelling, exhausting conflicts that saw both sides fight punishing battles for vital territories.
In this article, we’re taking a closer look at all the key areas of trench warfare in The Great War: Western Front – from pre-battle planning, to performing effective co-ordinated attacks, to defending your ground from astute enemy moves.
THE BEST LAID PLANS…
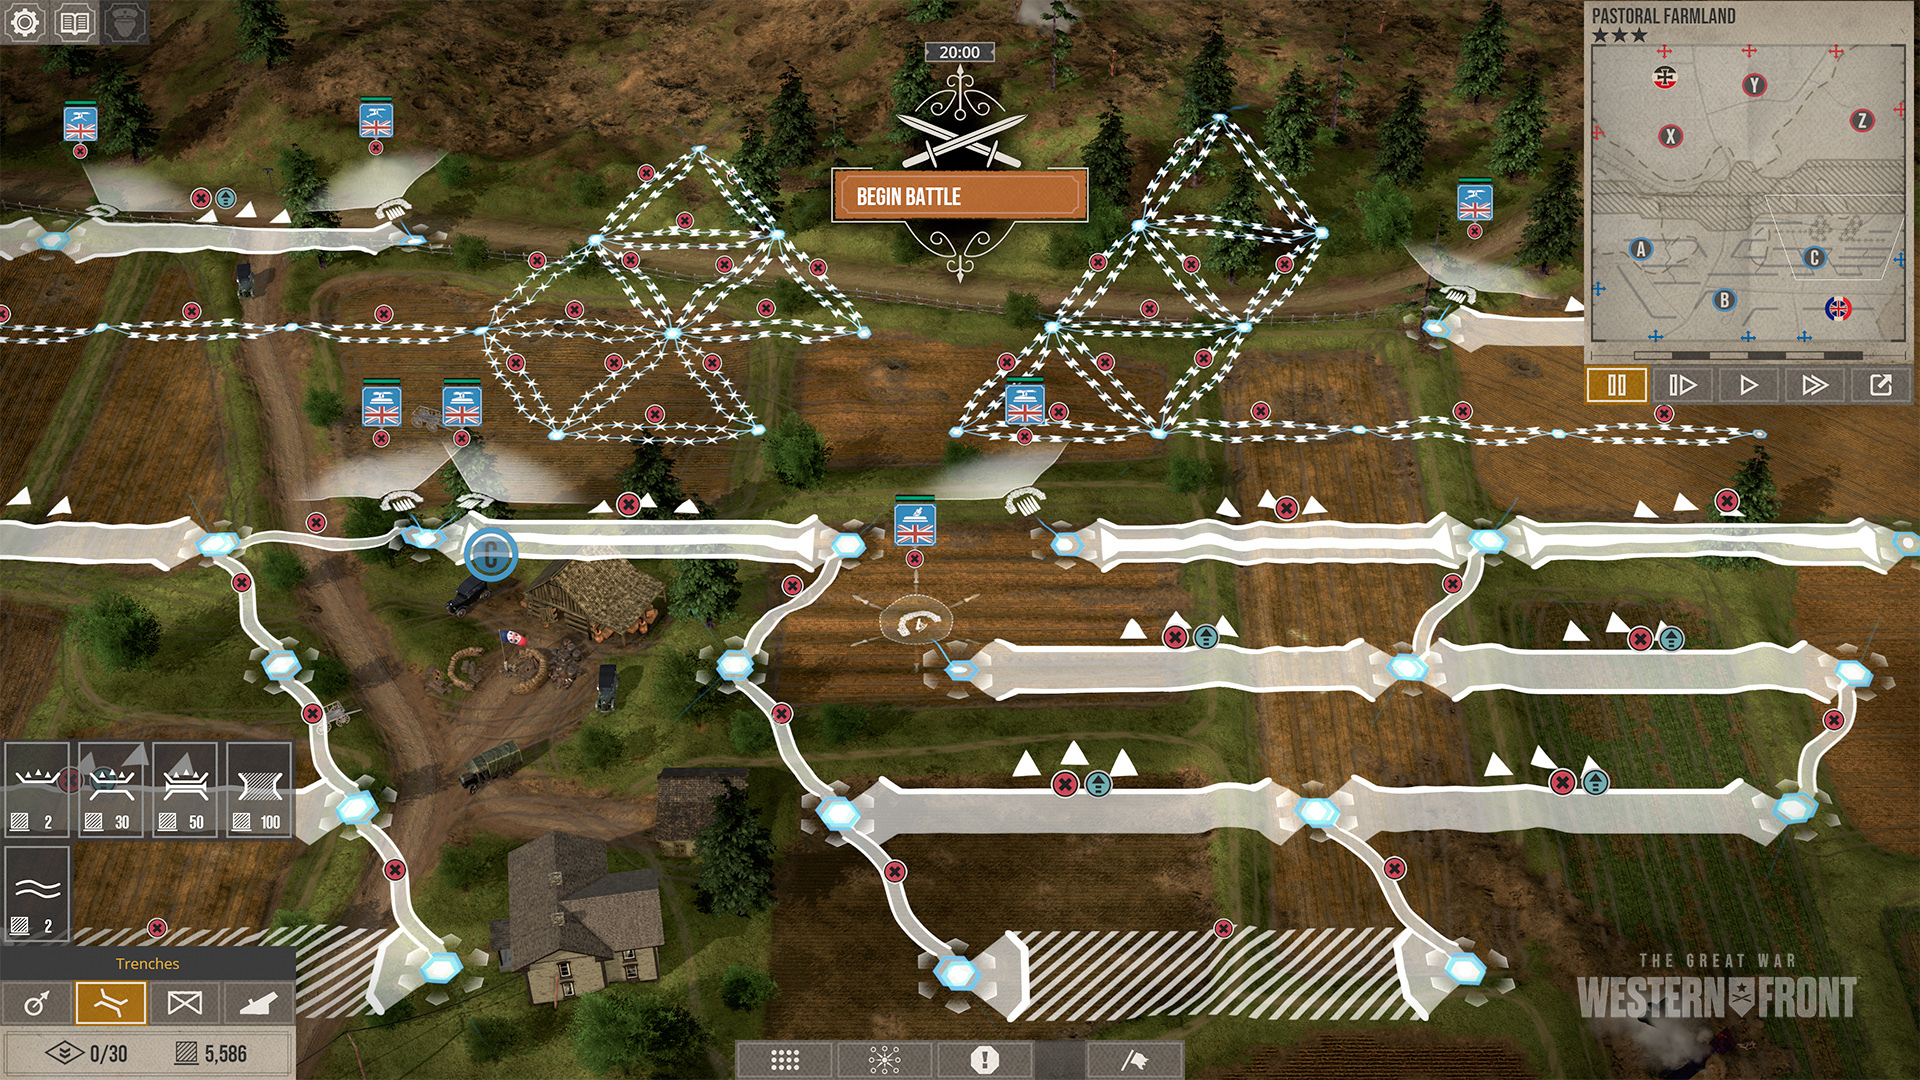
Before every battle in the Campaign, Field Commanders have time to prepare their side for the battle ahead. This pre-battle phase allows you to lay trenches, support, fortifications, and more to support your tactics and your troops.
A key factor during the pre-battle period will be laying down a network of trenches, which give your units the support, safety, and strategic advantage they need on the ground. You have the ability to select from a range of different trench types, before deciding where to dig them and how they connect to other nearby trenches. Types of trench range from a basic firing area, low on cover but allowing troops to fire over the top, to blockhouse trenches, which provide reinforced cover but do not allow attacks.
Location and layout of trenches is an important consideration, alongside their quantity. Smart placement of trenches can help establish fields of fire that work to your benefit, and staggering trenches across the battlefield can help your troops advance or retreat with more cover, compared to trudging across no man’s land. You will have control over all trench placement, apart from the Command Trench - the location where high-ranking officers would often be stationed, far away from the front line, to give orders and receive intel. The Command Trench for yourself and the enemy will already be on the battlefield, and if either side takes over the opposing Command Trench, along with all control points, they achieve total victory for that territory. As such, plan the placements of your trenches and defences to not just give you an offensive advantage, but also to protect your Command Trench as heavily as possible.
When returning to a battlefield, you'll find the remains of trenches from previous battles. Managing and repairing them, then adding additional trenches to reinforce your network, may well be the best course of action in this situation. Whether priming your side for an offensive move, or protecting them from an enemy onslaught, the logistics of your trenches will play a significant role in the outcome of any conflict.
Around the trenches, Field Commanders can also deploy additional resources to support their units. Place artillery batteries to execute long-range strikes and damage opposing fortifications. Install machine gun spurs on the ends of trenches to suppress enemy advances towards your location. Drop in barbed wire to slow the progress of the opposition’s troops, and potentially force their movement towards areas of the battlefield that better suit your tactical approach.
One final option to consider in your pre-battle plans reflects a cunning tactic employed during WW1: Undermining. Forces would secretly dig tunnels underneath the battlefield until they were directly below the front line trenches of the enemy. Explosives would be placed there and detonated for an indefensible direct strike.
Undermining is an offensive tactic that can be unlocked in The Great War: Western Front via research. In the pre-battle phase, choose the undermining option and select the area on the map you wish to strike. Once the battle commences, you can dictate when the explosion goes off, to ensure maximum damage and tactical advantage for your side. Successful undermining strikes can produce huge craters and significant losses for the enemy, creating a potential weak point in their defenses to target.
Utilising any of these options will require Supply, which is a resource you can buy throughout the Campaign. Ensure you are sufficiently stocked up on Supply before a battle, so you are able to use the trenches and defenses you want. However, overuse of Supply in battles could you leave short of options for future conflicts.
TIMING IS EVERYTHING: TRENCH WARFARE TACTICS
All of these preparations are conducted in the pre-battle phase – but eventually, the time for action will be upon you. As Field Commander, your attention must turn from items and resources, to the deployment and movement of your troops and weaponry.
Each battle will be its own unique concoction between defence and attack; a new scenario for you to strategise for. When it comes to attacking, going in all guns blazing at the first possible opportunity will rarely be the best way forward. Efficiency and timing are just as powerful as weapons and soldiers.
Use your trench networks to move forces around the battlefield with more protection, if you’re looking to advance on an enemy position. Consider how troops are spread across the trench line. Do you want to have more reinforcements in specific areas? If you are looking to capture a specific position, are you attacking it from one or multiple directions? Units can be given orders individually, or grouped together to move at the same time. Co-ordinate your plan of attack to give your soldiers protection and aim to overwhelm the opposition.
Movement through trenches is useful, but there will likely come a point in any battle where an attack is only possible by going over the top, into no man’s land. Just like the tactical warfare in WW1, this is a manoeuvre that must be taken with great care and consideration, or you risk significant losses. For such an aggressive offensive move, consider ways to protect your soldiers, and leave the enemy unable to defend themselves sufficiently. A common strategy in WW1 for over-the-top offensives was to hinder the opposition’s visibility of the battlefield by deploying a rolling barrage of artillery fire, in front of their own troops. This would create a wall of smoke that prevented the enemy from seeing no man’s land, offering some protection for advancing units. Field Commanders in The Great War: Western Front can aim to replicate this tactic, ordering artillery fire on a specific position, just before their troops reach it. Of course, timing and co-ordination will be paramount, to ensure the smoke rises at the ideal time, and your soldiers are not caught in the explosions.
Aircraft can also be used as support for your troops on the ground during these moments. Conducting research and investing in new aircraft technologies will give you more potent airborne options during a battle. Deploying them as you are launching a ground offensive can help suppress enemy fire, wear down fortifications, and give your units a major advantage.
WE SHALL NOT BE MOVED
In these real-time strategy battles, though, it’s not just about conducting attacks and moving across the battlefield. Field Commanders in The Great War: Western Front will also need to strategise against enemy attacks, defending your position and resources.
Be it the Allied Forces or the Central Powers, your opposition will look to execute carefully-crafted attacks of their own. Be ready to repel offensive moves from multiple angles, defend yourself from fire on the ground or above, and protect your position on the battlefield at all costs.
In these defensive phases is where much of your pre-battle choices can come into play. If you laid down barbed wire in front of your trenches, this will help slow down the movement of enemy troops, and potentially move them into positions that suit your tactics. Machine gunning points across your trenches will also help limit the amount of opposing soldiers that make it into your trenches. Use your communications trenches to move your troops into the required locations. Keep firing trenches across the front line well-manned, to further push back enemy advances. If you laid down blockhouse trenches, moving your troops into these heavily protected areas will limit losses from artillery and air attacks. Enemy forces can conduct their attacks in waves, meaning you may need reinforcements to hold your ground. Once again, make sure you order your infantry into the right locations, and have adequate numbers in key areas of conflict, to ensure you maintain position. Your opposition will be cunning, strategic, and astute in how they attempt to overpower you. Be ready with forces, fortifications, and tactical judgement to push them back.
ADAPTING YOUR TACTICS IN THE GREAT WAR: WESTERN FRONT
Throughout the Campaign in The Great War: Western Front, to achieve total victory, you will likely battle on certain territories multiple times – and thanks to the living persistent world, the trench warfare at these territories will differ each time. Damage dealt, and fortifications laid, in previous conflicts will remain upon your return, changing the dynamic of the next battle. Your trenches, for example, can be reused, upgraded, re-laid, or even potentially used by the enemy.
Weather will also affect the dynamics of trench warfare. In heavy rain, for example, artillery fire can be less effective, as the mud and soft ground cushions the shelling. In colder conditions, troop movement and morale can drop, potentially lessening the effect of your on-ground attacks. All of these elements should be factored into your strategy as a Field Commander, and you’ll be able to adapt your tactics for every Campaign battle.
In Historic Battles – where you will drop into six pivotal battles of WW1, and aim to complete objectives – you will exclusively take the role of Field Commander, and handle the real-time strategy of your side, giving orders and making decisions to turn the battle in your favour. The parameters of that battle, however, such as the location, condition of the land, fortifications in place, and resources at your disposal, will already be set, based on the conditions on the real battle. It will be down to you to make the best of each scenario, and plot a path to victory.
Whether you’re executing a clinical offensive move and taking enemy territory, or resolutely defending your position from wave after wave of attacks, trench warfare in The Great War: Western Front is a constant tactical test. Deploy units and resources smartly, and co-ordinate your plans with expert timing, to tip the balance of a battle in your favour.
Wishlist The Great War: Western Front now, ahead of launch in 2023. For more insight and news, make sure to follow us on Twitter and Facebook, and subscribe to our YouTube channel to see gameplay and more.
‘Defining The Front Line’ – Behind the Scenes of The Great War: Western Front
In our first behind-the-scenes look at The Great War: Western Front, ‘Defining The Front Line’, we hear from the development team at Petroglyph about the game’s key aspects and goals – from authenticity and accuracy, to strategy and tactics. Check out the video in full here:
The Great War: Western Front provides a unique opportunity to take total command of a significant period in history: The First World War. With an illustrious lineage in strategy titles, the Petroglyph team have set out to create an experience that is not just authentic and dedicated to its subject matter, but also rewarding and exciting. You will make important decisions and strategic moves that reflect the nature of WW1. For example, whilst other wars and battles may focus solely on total victory and dominance, options such as cease fires and surrendering may be worthwhile, cutting your losses in the pursuit of long-term success.
Members of the team, including lead designer Chris Becker and Senior Producer Ted Morris, explain the all-encompassing dual-role gameplay of The Great War: Western Front, which gives you full control over either the Allied Forces or Central Powers. Theatre Commander allows you to prepare for conflict, positioning your units and resources across the front line, researching new technologies, and managing the grand strategy of your side. Field Commander, meanwhile, takes you to the battlefield, as you give the orders and lead your troops into battle in an RTS format.
As with WW1, trench warfare is a pivotal aspect of each battle in The Great War: Western Front. As Field Commander, you will be in charge of placing trenches, barbed wire, machine gun nests, and more ahead of any clash with the enemy. Trench networks are all about creating fields of fire, defending oncoming attacks, and channelling the action in areas that give you the strategic advantage. You can also move your troops through trenches to advance towards the enemy – though eventually, you may well have to go over the top and into no man’s land, which itself requires strategic use of resources to be effective, such as using artillery fire for cover.
Every conflict will be influenced by these decisions, but can also be transformed by the world around you. The living persistent world of The Great War: Western Front means battlefields will be affected by previous clashes, as well as seasonal changes affecting troop capabilities. Find out more about our living persistent world here.
Historic Battles – Command and Define Pivotal Moments of WW1
World War 1 has come to be known as a war of attrition, patience, persistence, and long-term planning. Marginal gains made over periods of weeks and months were often the way that either side would be able to make any kind of progress, as the true toll that the war would take began to become clear.
Throughout the First World War, there were a number of important battles that defined it. Conflicts that saw huge amounts of struggle and strategy come to a head, often fighting over control of vital locations for movement, transport, observation, and general tactical advantage. In The Great War: Western Front’s main Campaign, you will wage war across the same territory that a number of these vital encounters took place on, as you attempt to take control of the war for the Allied Forces or Central Powers. The format of these battles will be uniquely shaped by the actions of both yourself and the opposition in the Campaign, such as deployment of units, previous damage dealt to the land, and the power each side holds at that point in your save.
Today, though, we’re excited to reveal an experience for The Great War: Western Front dedicated to accurately representing a number of these pivotal conflicts, called Historic Battles. This allows you to take control of many those battles and either recreate the tactics deployed in them from over a century ago, or plan your own strategy for victory, which is achieved by completing objectives that represent the vital goals of each real-world battle. Let’s take a closer look at Historic Battles in The Great War: Western Front.
HISTORIC BATTLES: TAKE COMMAND OF DECISIVE BATTLES
We're delighted to announce that you'll be able to discover six playable historic missions in The Great War: Western Front, in Historic Battles. Later in this article, we will be revealing the first of these missions - but for now, here's a breakdown of how each of these battles will be experienced.
Head into Historic Battles to find each of the playable challenges, which portray a crucial battle in the events and outcome of the First World War. Whilst the Campaign in The Great War: Western Front tests you with mastering the dual-role of Field and Theatre Commander, Historic Battles is all about affecting the battles as they happen. As the Field Commander, you will enter the battlefield of each of these six clashes and handle the real-time strategy for your side. Some Historic Battles will place in you in charge of the Allied Forces, whilst others will see you lead the Central Powers.
Each Historic Battle includes pre-set factors that are designed to depict the real-life circumstances of that encounter. For example, the amount and types of units, infantry and resources available to you as a Field Commander will be uniquely pre-determined in each of these conflicts. As the battle develops, you may be presented with multiple-choice scenarios to support your plan – such as choosing between more troops on the ground, or more tanks. Managing all of this carefully over the course of the battle will be imperative.
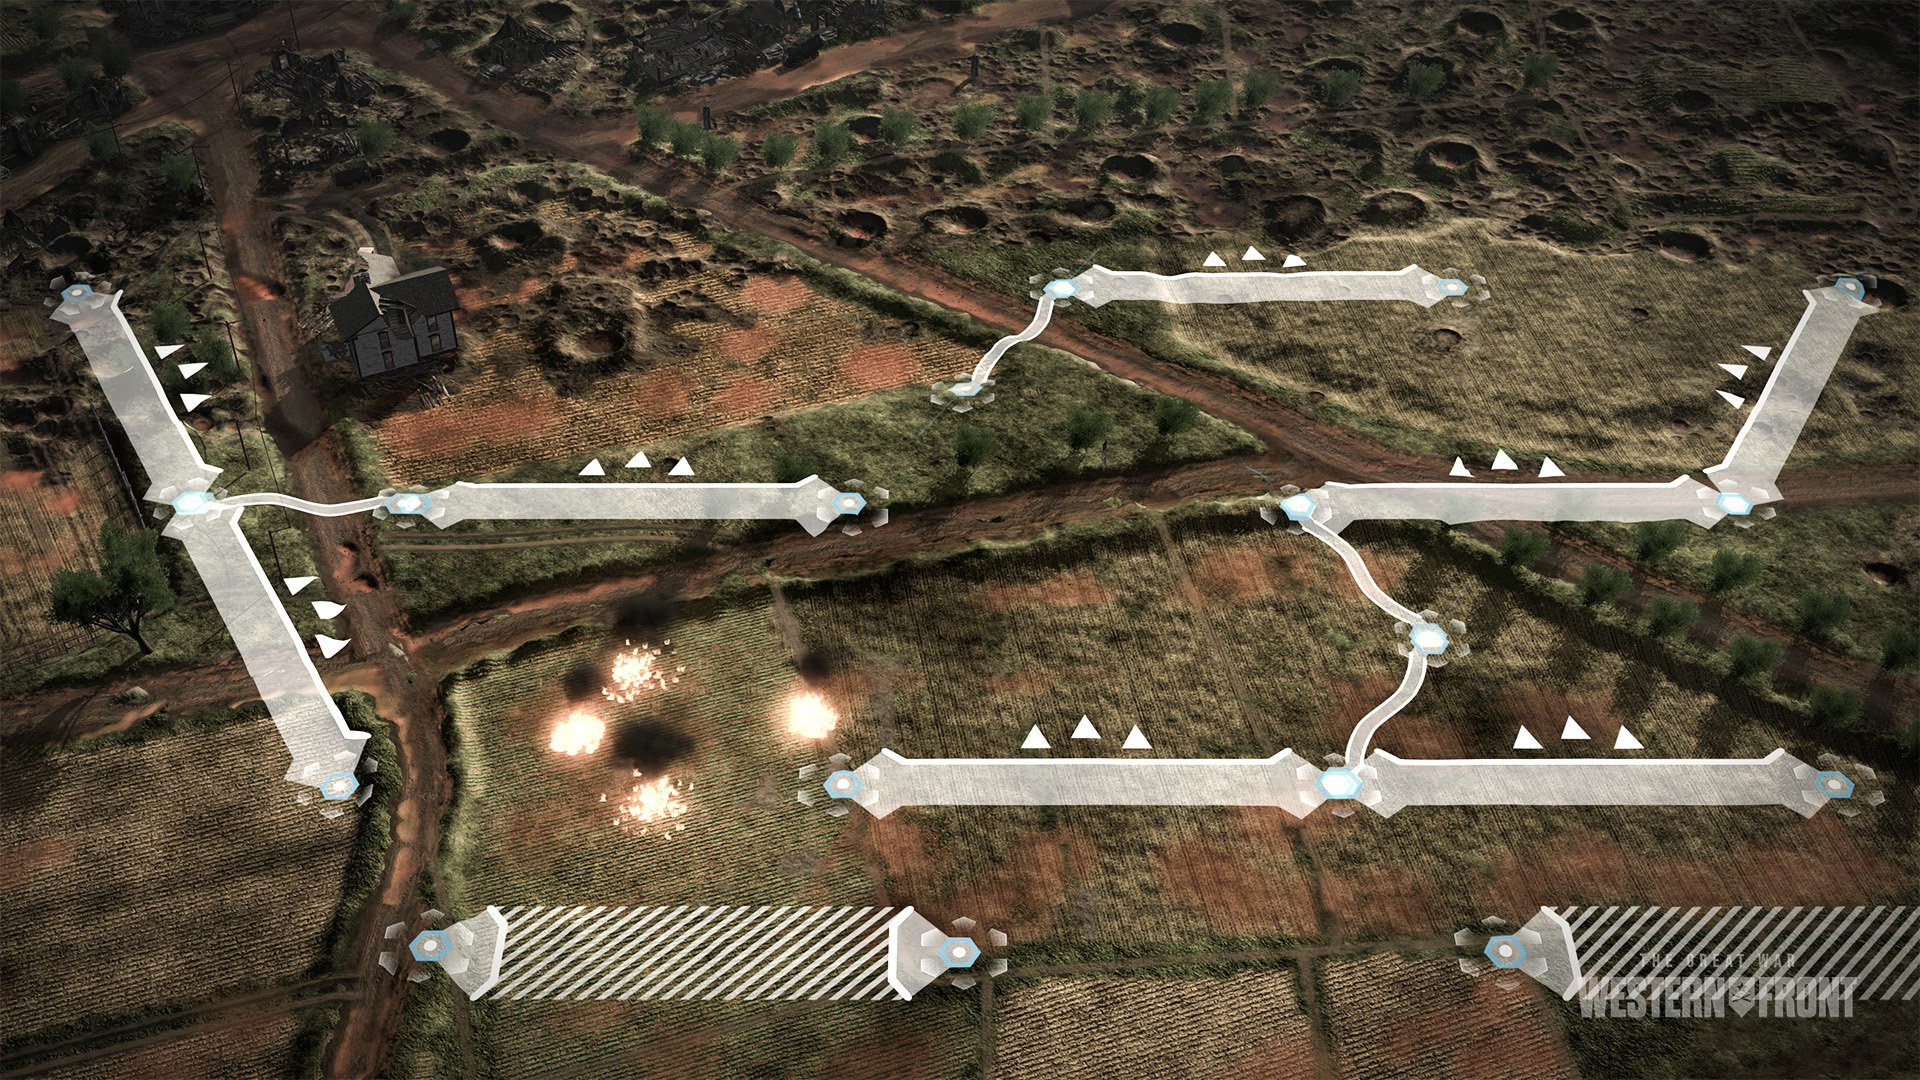
Additionally, the battlefield itself will provide its own unique test. Based on the conditions from the original conflict, each Historic Battle’s environment will include pre-set trenches, damage, craters, and more. Every Historic Battle presents its own challenge, and you will need devise different tactical plans to succeed in each of them.
The definition of success, however, will also differ for each Historic Battle, in the form of objectives. All six of the scenarios feature objectives that must be completed to achieve total success in that battle; some must be completed to achieve any form of success, whilst hitting other bonus objectives will ensure you receive the most prestigious medals for your achievements in battle. Only achieving the main objective will earn you a Bronze medal, whilst the Gold medal will only be received by Field Commanders who complete the main and all bonus objectives.
Once again, all of these objectives are a reflection of the aims and goals one side would have had, going into the real-world battle. For example, an objective may be to hold position and resist attack until reinforcements arrive, take a specific control point within a time limit, defeat a specified amount of enemy infantry, or limit the loss of infantry companies for your side. Every Historic Battle includes five difficulty options to select – from ‘Recruit’, all the way up to ‘Elite’ – but the objectives will remain the same.
Before heading into battle for these confrontations, you will be fully briefed on their context and importance. In the Historic Battles menu, each of the six missions include detailed overviews of the battle, the preceding events that led to this moment, and its significance to WW1. On top of that, before heading into action, a video piece using footage from the Imperial War Museum Archive will introduce you to the battle and set the scene, before you put boots on the ground. Achieving victory in each Historic Battle will also unlock an outro video, explaining the aftermath and repercussions this conflict created for WW1. Finally, as you head into the action, hints will be provided on your objectives, resources, and more to help guide your decisions.
To give you a sense of the pivotal clashes you’ll experience, let's reveal one Historic Battle you will find in The Great War: Western Front...
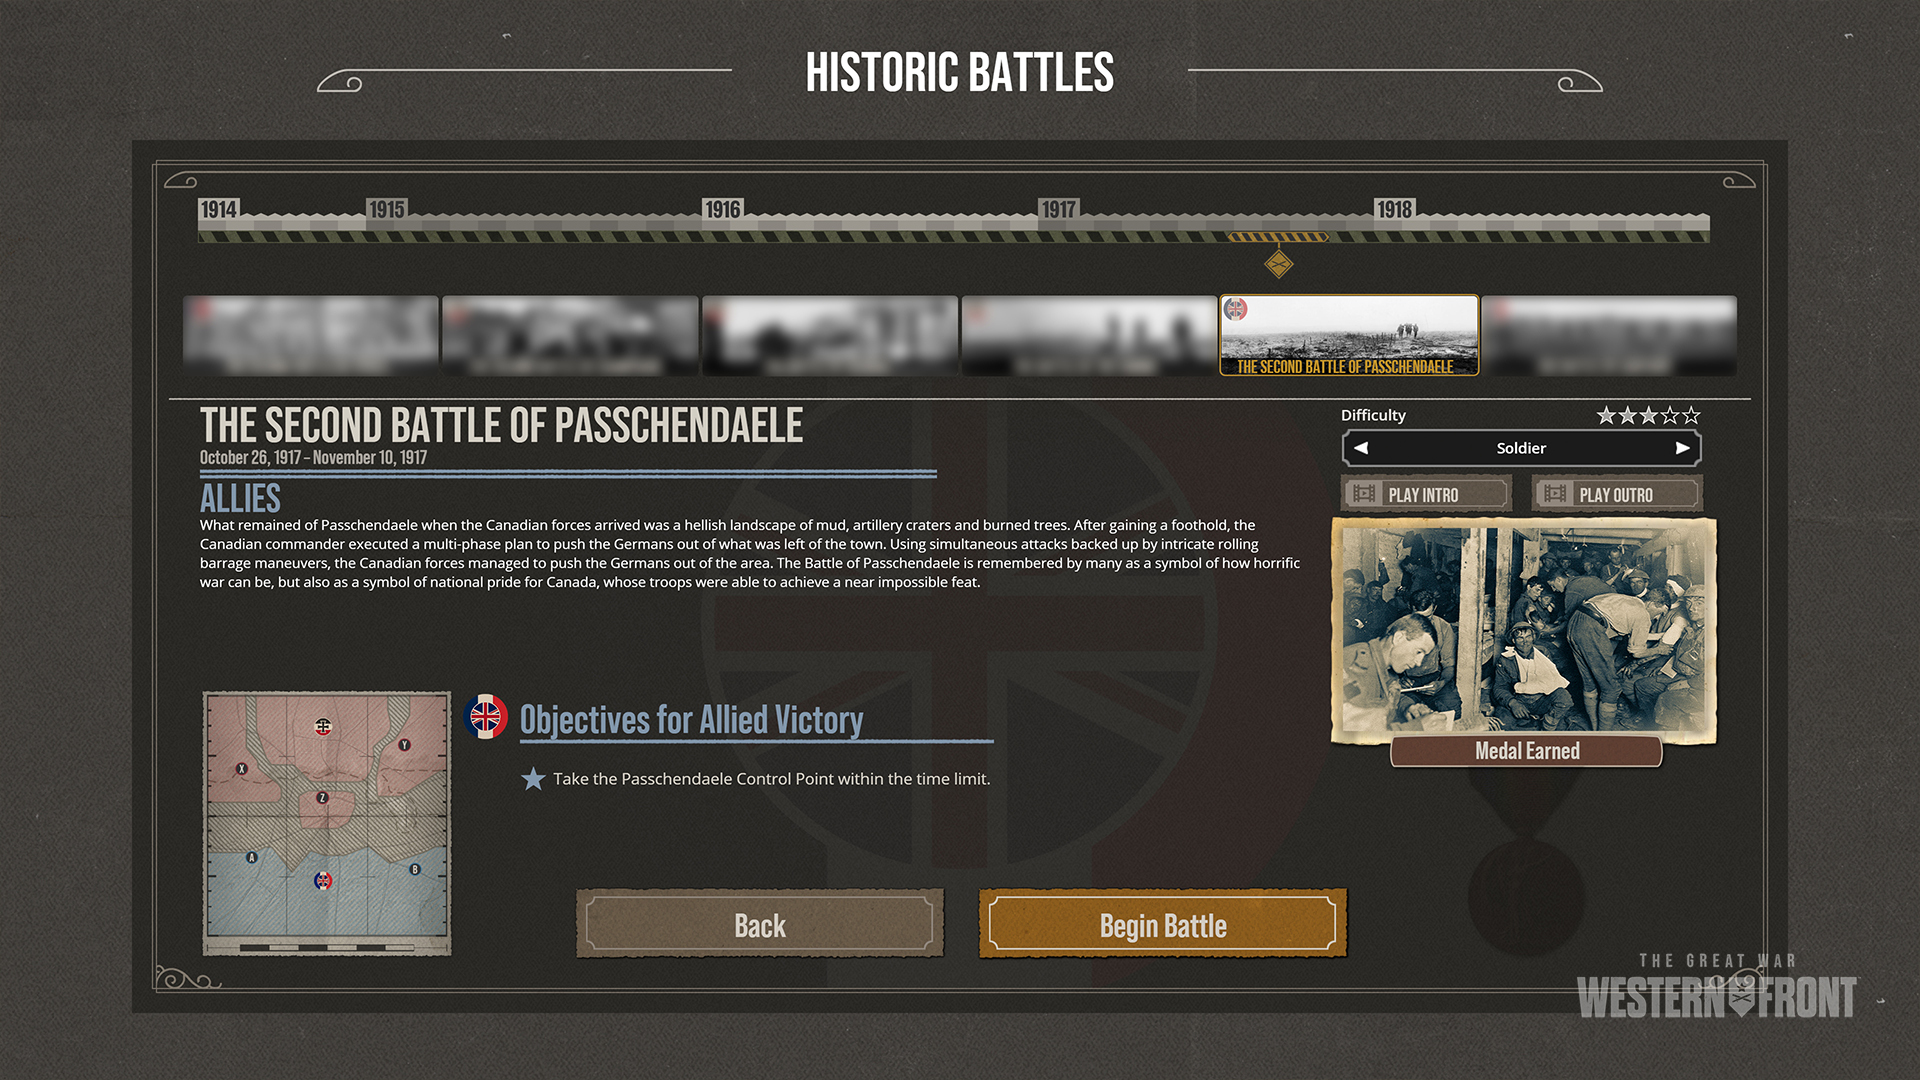
THE SECOND BATTLE OF PASSCHENDAELE
A vital moment of the Third Battle of Ypres, this battle has come to exemplify how the hellish conditions of the First World War were a significant factor. A location already flattened and destroyed from previous battles, Passchendaele had been peppered with artillery craters, swamps of mud, and piles of stone from former buildings. Torrential rain in the summer of 1917, followed by the air shelling, blocked watercourses for drainage, making the ground even more treacherous. However, Passchendaele was still seen as important territory to control, due to being on high ground, particularly with winter drawing in.
Canadian troops, spread across four divisions, played a lead role in the Allied Forces' operation in this attack, and deployed a multi-phase plan to strategically push the German forces back from Passchendaele. A meticulous three-stage attack was put in motion on October 26th, 1917, with advancing troops preceded by a rolling barrage of artillery fire on German territory. With support from British, French, Belgian, and Australian divisions, Allied Forces continued to make progress, but success was limited by Central Powers resistance and the ever-worsening landscape.
By November 10, conflict at Passchendaele ended, as the Allied Forces took the vital ridge on the periphery of Passchendaele, with a final, later push seeing them take the town entirely. Though only lasting a couple of weeks, The Second Battle of Passchendaele was a costly and scarring encounter for both sides. It has become an infamous moment of WW1 not only due to ground gained and lost, but as a harrowing example of the cost of war, both on troops and on the land.
In The Great War: Western Front's Historic Battle, your objective is to replicate the efforts of the Allied Forces and achieve their initial goal of taking full control of the village. Take the Passchendaele control point within the time limit to complete this Historic Battle, and look out for other objectives to complete, improving the medal you earn.
With the six Historic Battles in The Great War: Western Front offering varying scenarios, strategic tests, and challenging objectives, you will need to be at your best as a Field Commander to achieve victory in these vital conflicts. Take on these bespoke battles and either relive history by recreating the real-world tactics, or redefine it by devising your own plan on the battlefield.
Introducing the Living Persistent World of The Great War: Western Front
For over four years, between 1914 and 1918, the Western Front was a key theatre of war for World War 1. As the Allied Forces and the Central Powers fought for territory across Germany, France, Luxembourg and Belgium, mass swathes of Europe became the battlefield for pivotal conflicts.
Inevitably, this took its toll on the land. From the digging of trenches and destructive artillery fire, to gas warfare and underground traps, the Western Front battles destroyed countless towns and villages, as well as huge areas of countryside, as the fight for position and power waged on. This environmental decay hit both sides hard – as did seasonal changes, as long-term battles were affected by the bitter cold, saturating rain, and more over time.
In The Great War: Western Front, the devastation dealt to the land, and the effects of extreme weather, is represented in gameplay – not only visually, but in persistent environmental changes that can transform the dynamic of any battle. As the seasons tick over, and more and more scars of war are laid down, new challenges emerge for you to overcome. Just like the commanders of WW1, you will need to react to – and anticipate – these changes to protect your infantries, overcome the elements, and maintain your push towards victory.
In our first deep dive into key mechanics and features, we’re taking a close look at this persistent living world that will define your experience in The Great War: The Western Front.
Waging War in a Living Persistent World
Throughout the game’s Campaign mode, you will be tasked with making advances in the Western Front, battling to take regions from the enemy, to advance towards their primary base of operations. Each of these regions will be initially controlled by one side, and you’ll need to achieve victory in battle against the opposing troops – or force them to call a cease fire – to seize control of their territory.
Every battle will feature a multitude of events that significantly, and permanently, affect the environment of that region. Digging trenches. Craters and obliterated buildings due to artillery fire. Barbed wire scattered in front of defences to slow down enemy advances. Huge patches of scorched earth caused by flamethrowers. All these facets of WW1 conflicts, used by both sides, will play their part in changing the face of a battlefield.
As a Field Commander, your job is to both guide your troops on navigating the new challenges these changes create, and to use the environment to create new problems for the enemy. These dynamic variations to a battlefield will alter routes for mobility, weak and strong points for attacks, the effectiveness of different types of attack, and more. You must be ready to adjust your strategy and adapt to the ever-changing world around you.
By the end of a gruelling battle, a region’s environment can appear to be a shadow of its former self. Barren, battered, discoloured and bleak, the harrowing effects of war will be permanently etched into the landscape.
Away from the Campaign, in Historical Battles, you’ll find recreations of pivotal battles of the First World War, set up as scenarios for you to take on. These pre-set battles will also feature desolate environments, already affected by war, which will continue to degrade and transform as the battle wages on. We’ll share more information on Historical Battles as we head towards launch for The Great War: Western Front.
Scars of Battle: Returning to War-Torn Battlefields
Landscapes changing and bearing the scars of war will be an ever-present factor in any battle, but the persistence of these environmental shifts creates a new challenge altogether.
The Great War: Western Front captures the severe attrition that took place in WW1, as both sides battled back and forth, tooth and nail, for incremental gains over a vast, but vital, stretch of land. Just like the Allied Forces and Central Powers did over a century ago, you will often have to re-trace your steps, doing battle at the same region multiple times to gain full control. The grip that each side has over each region will differ, which means whilst you could seize control of some regions in a single battle, others will require multiple bouts of warfare to take. Also, as the war develops, the enemy may launch their own offensives, reacquiring a region you’d previously called your own.
All of this means you’ll often circle back to the scene of previous battles – and when you do, the living persistent world of The Great War: Western Front ensures that the battlefield retains the damage done in past conflicts. Trenches and fortifications laid down will remain in place, and can even be added to. Craters from heavy shelling are still present. The natural landscape remains tattered and harsh. The same damage dealt by you and your enemy to that region remains in place upon your return.
This is not just a reflection of the ‘battle of inches’ that defined WW1; it’s also a new challenge for you to face. Battlefields already affected by war will present new tests for creating defences, placing machine gun nests, establishing routes for attack, and keeping your troops as protected as possible. The enemy will also need to re-strategise – they may even choose to occupy trenches you once laid down. No two battles will ever be the same, as more punishment is dealt to both the opposing sides, and the land you are fighting for.
Braving The Elements: Seasonal Changes in The Great War
Whilst waging war with the enemy, and navigating the ever-deteriorating landscape, there will be one more unpredictable factor to consider during battle – the elements. As stalemates, tactical shifts, and the sheer damage dealt caused the First World War to continue for months and years, troops were forced to endure everything the seasons could throw at them. The significance of the weather is represented in The Great War: Western Front, as the changing seasons play a role in shaping the dynamic of any battle.
In the Campaign, each turn taken by both sides progresses the time. Keep an eye on the calendar to see exactly when your battles are commencing, and be ready for the relevant seasonal changes to take effect. Heading to battle in the winter months, for example, will often see environments covered in snow, with once-luscious forests bereft of leaves. In wetter seasons, you will see environments and infantries soaked with water, as the elements make their own mark on each conflict.
The conditions took their toll on troops in WW1, and the same will apply here. Battling regularly in adverse weather can affect the morale and general performance of your units, as they trudge through trenches or brace themselves against bitterly cold winds. Other aspects, such as the performance of artillery fire and the speed at which you can move units across land, can also be swayed by the weather. This will affect the pacing and options available to you; what may have been a foolproof tactic in your last visit to a region may become obsolete, due to the ever-changing landscape.
Whether natural or man-made, all of these unpredictable factors come into play in the persistent living world of The Great War: Western Front, meaning no two battles will play out in the same way. A region that may’ve been relatively easy to traverse at the start of the war may, upon your return, become a scarred and decimated location, totally changing the tactical options available to you. Similarly, commencing a battle in the summer months can be a radically different experience, both visually and within core gameplay, to a conflict in the middle of winter.
As the leader of your troops, your task is to consider all of these factors as you plot a strategy to overcome the enemy. Anticipate seasonal changes, re-trace your footsteps with caution, and turn environmental challenges into opportunities in The Great War: Western Front.
The Great War: Western Front – Extended First Look Gameplay Revealed
Lead your troops. Craft a strategy for victory. Shape the course of history.
Frontier Foundry and developers Petroglyph are delighted to reveal a first look at gameplay from The Great War: Western Front, launching on PC in 2023. First shown during this week’s PC Gaming Show, this extended first look shows more of the ‘dual-role’ strategic gameplay players can expect, an overview of the Campaign, and more of the vital aspects you’ll control in this World War 1 strategy experience.
With a significant pedigree of delivering acclaimed strategy games, Petroglyph invites you to take command of either the Allied Nations or Central Powers in WW1. In Campaign, players will take the lead role in guiding their troops through the war, both on the battlefield and back at base.
As the Theatre Commander, oversee the grand strategy of the war effort by carefully disseminating your resources, researching new technologies, and selecting your points for attack and defence. In this turn-based aspect of The Great War: Western Front, each turn is equivalent to one month, as you set up plans and forces for individual battles across the front-line – with each victory depleting the defences of the enemy, taking you one step closer to victory.
Field Commander, meanwhile, sees you put boots on the ground in RTS gameplay. Watch each battle for a region unfold, deploy units at your discretion, set up your defences, and choose when and how to launch your attacks. Setting up your network of trenches effectively will also be crucial, giving your troops cover from artillery fire and the ability to move across the battlefield with more safety. Decide whether to prioritise defensively, with barbed wire and machine gun nests to slow enemy advances, or go on the offensive, with your own artillery setups and tanks to lead the charge over the top. In a war of inches, every decision in every battle is critical. In real time, make your own decisions to tip the balance in your favour.
Whether as Theatre Commander or Field Commander, you’ll not only be battling the enemy, but also the conditions. Plan your efforts across a living persistent world, filled with a variety of maps that will carry the mark of previous conflicts, which can drastically alter the landscape of a battle.
Relive history, or redefine it. In The Great War: Western Front, the decision lies in your hands.
Welcome to the second installment of our Meet the Team series, where we are introducing the developers behind The Great War: Western Front, Petroglyph. Last time, we shared a little more about the studio itself, but in this week's installment, we will be introducing you to some of the senior leadership team, Joe Bostic and Chuck Kroegel.
Joe Bostic is Design Director at Petroglyph, having begun his 30+ year career at Westwood Studios as co-creator of leading RTS titles like Command & Conquer, Dune II, Red Alert, and Tiberian Sun. Joe is an avid fan of of tabletop wargames, and has collected almost all of them during their heyday. Joe also has a keen interest in military history, and it's this combination of skill and passion that he's bringing to the development of The Great War: Western Front.
Chuck Kroegel is CEO and General Manager at Petroglyph, and is an avid fan of strategy games in particular. He previously worked at Strategic Simulations, Inc. (SSI), known for making war games like the Five Star General series which included titles like Panzer General and Pacific General, so brings a great deal of knowledge to the team. As a board game fan, he's also been heavily involved with Petroglyph's production of these kinds of games, too, including Panzer General: Allied Assault and Guardians of Graxia.
Greetings both, it is great to have you with us today. Why don't we start by discussing more about both of your roles in the development of The Great War: Western Front?
Joe: I serve as the game’s 'visionary'. This role is to keep the game focused on reality as much as possible, and to ensure that the game gives the players similar choices to those that the commanders of the war had to wrestle with. If during development, a question was raised as to the authenticity, or 'does this feel right for WWI?', then I was the person to answer it.
Chuck: I run the studio in general, as well as managing how Petroglyph and Frontier Foundry work together. I am constantly tuned in, and give feedback to the game design, balance, development, and schedule. I also playtest the game and encourage the development towards making it a fun and engaging experience.
Which features of The Great War: Western Front are you most excited to share with fans?
Joe: The battlefields of WWI pose a unique challenge that is unusual in traditional RTS games. A main difference is that the player can have extensive trench networks; stepping out of a trench is inviting certain death and the defenders have a lethal edge with machine guns and artillery. Achieving victory in the face of such a powerful defence is the challenge of the war and I think we’ve captured this sense of danger. A careless assault means defeat, but with skill and strategy, you can claim victory. One interesting aspect is that you can build up your trench lines and barbed wire such that your soldiers, machineguns, and mortars create zones to keep the enemy at bay or eliminate them if they dare to attack. The Great War was the war where artillery became dominant, and you can use artillery in many ways to support attack or defence strategies, some of which you will be able to learn about further on in development.
Chuck: I enjoy that the game gives the player an opportunity to experience it so many ways. Play a campaign with both strategic and tactical gameplay. Play an individual historical battle with a specific tactical situation. Play a skirmish game dialling in the parameters you desire. Play a multiplayer game vs a friend or unknown opponent. I really appreciate how the game portrays trench warfare and how those trench grids evolve over the course of the game, particularly in how those gridline impact the strategy and tactics you employ in your tactical battles, as well as how it allows you to experience this unique war in history with the strategies and tactics that were used historically, but gives you the ability to research your own way to evolve those elements earlier, too.
Which role do you prefer in The Great War: Western Front, Theatre Commander or Field Commander? Why?
Joe: Each role has an appeal to me. I enjoy the intensity of the real-time battlefield, especially when my forces reach the enemy trench line and coordinating troop movement and artillery targeting becomes critical. The challenge doesn’t let up after that as you now must push forward to the next trench line or try to fight down the enemy occupied trenches. Often times, your assault runs out of steam and you decide to call a 'ceasefire' to consolidate your advances. A partial victory is still a victory in a war where small gains were the measure of battle, so choosing to ceasefire can be wise in the ultimate war of attrition.
However, the theatre commander role is a nice break between battles. I can get a cup of coffee and take a break as I plan my next offensive move. The choices made at the theatre level can have profound impact on the field, especially in research and development choices. Success might take a game-changer decision such as investing into tank research or poison gas weaponry.
Chuck: I can’t say that I prefer one role or the other because for me, as I play the game, both roles combine into one as both add to the experience of playing a captivating dance of planning and manoeuvring and researching and spying on the Theatre level and then see the benefit of such efforts as I dive into the tactical battles with artillery barrages, massive infantry charges, and tank manoeuvres at the Field level to weave my story in and out of the bigger and then zoomed in living experience of being both a Theatre and Field Commander.
What made you want to develop The Great War: Western Front?
Joe: It is a dream project because it combines my love of military history and WWI. I like games that combine a grand-strategy element with a tactical combat element such as with the Total War series or Star Wars: Empire at War. I also have a special connection to WWI. My grandfather (b. 1898) enlisted into the army as soon as he was 18 which was just in time for America’s entry into the war. I have his Brodie metal helmet as physical reminder.
Chuck: We wanted to make an historical game on a war that has not been greatly explored in our industry, in a way that would bring to light the unique elements of that war and allow players to experience and appreciate those men and women who gave their lives fighting it.
We hope you have found this insight into some of the team at Petroglyph interesting, and we offer our thanks to both Joe and Chuck for sharing more about their roles and experience and how those impact the development of The Great War: Western Front, coming to PC in 2023.
Meet the Team #1: Petroglyph Games
Reporting in, Commanders,
Welcome to the first of our new Meet the Team series, in which we will be introducing you to the development team responsible for creating The Great War: Western Front, Petroglyph. In this series, we will be sharing a closer look into the various teams at Petroglyph, so you can get a little more insight into the people behind The Great War: Western Front ahead of its 2023 release.
In this first post, we will be sharing a little more about who Petroglyph are as a company, as well as their impressive pedigree in the world of Real-Time Strategy (RTS) games. We hope you enjoy getting to know a little more about the studio.
Petroglyph is an independent game development studio based in Las Vegas, USA, which was founded in 2003 by three developers from Westwood Studios: Joe Bostic, Michael Legg and Steve Tall, who between them have an astounding 100 years' worth of experience in the gaming industry, having worked on projects like Command & Conquer, Legend of Kyrandia, and Command & Conquer: Red Alert. Since then, Petroglyph has launched 17 games, and is now an award-winning developer best known for creating genre-defining RTS games.
With just over 20 developers with an average of over 10 years' gaming experience working at their Las Vegas studio, Petroglyph prides itself on making games they themselves want to play - and this translates clearly into the games they develop. They've also been known to step outside the box, and have produced a number of board games in-house, too; these include titles like Panzer General: Allied Assault, and Heroes of Graxia.
That just about marks the end of our first post in the Meet the Team series, but we hope you enjoyed your insight into Petroglyph as a studio, and that you are excited to join us and Petroglyph on this journey to launch The Great War: Western Front. Make sure to join us in coming weeks to learn more about the individuals working on The Great War: Western Front, and to follow us on Twitter or Facebook to get all the latest updates in the run up to our 2023 launch.