Showdown United Republic of Adal Day 229, 17:30 Factions Deployed: SpecGru / KorTac
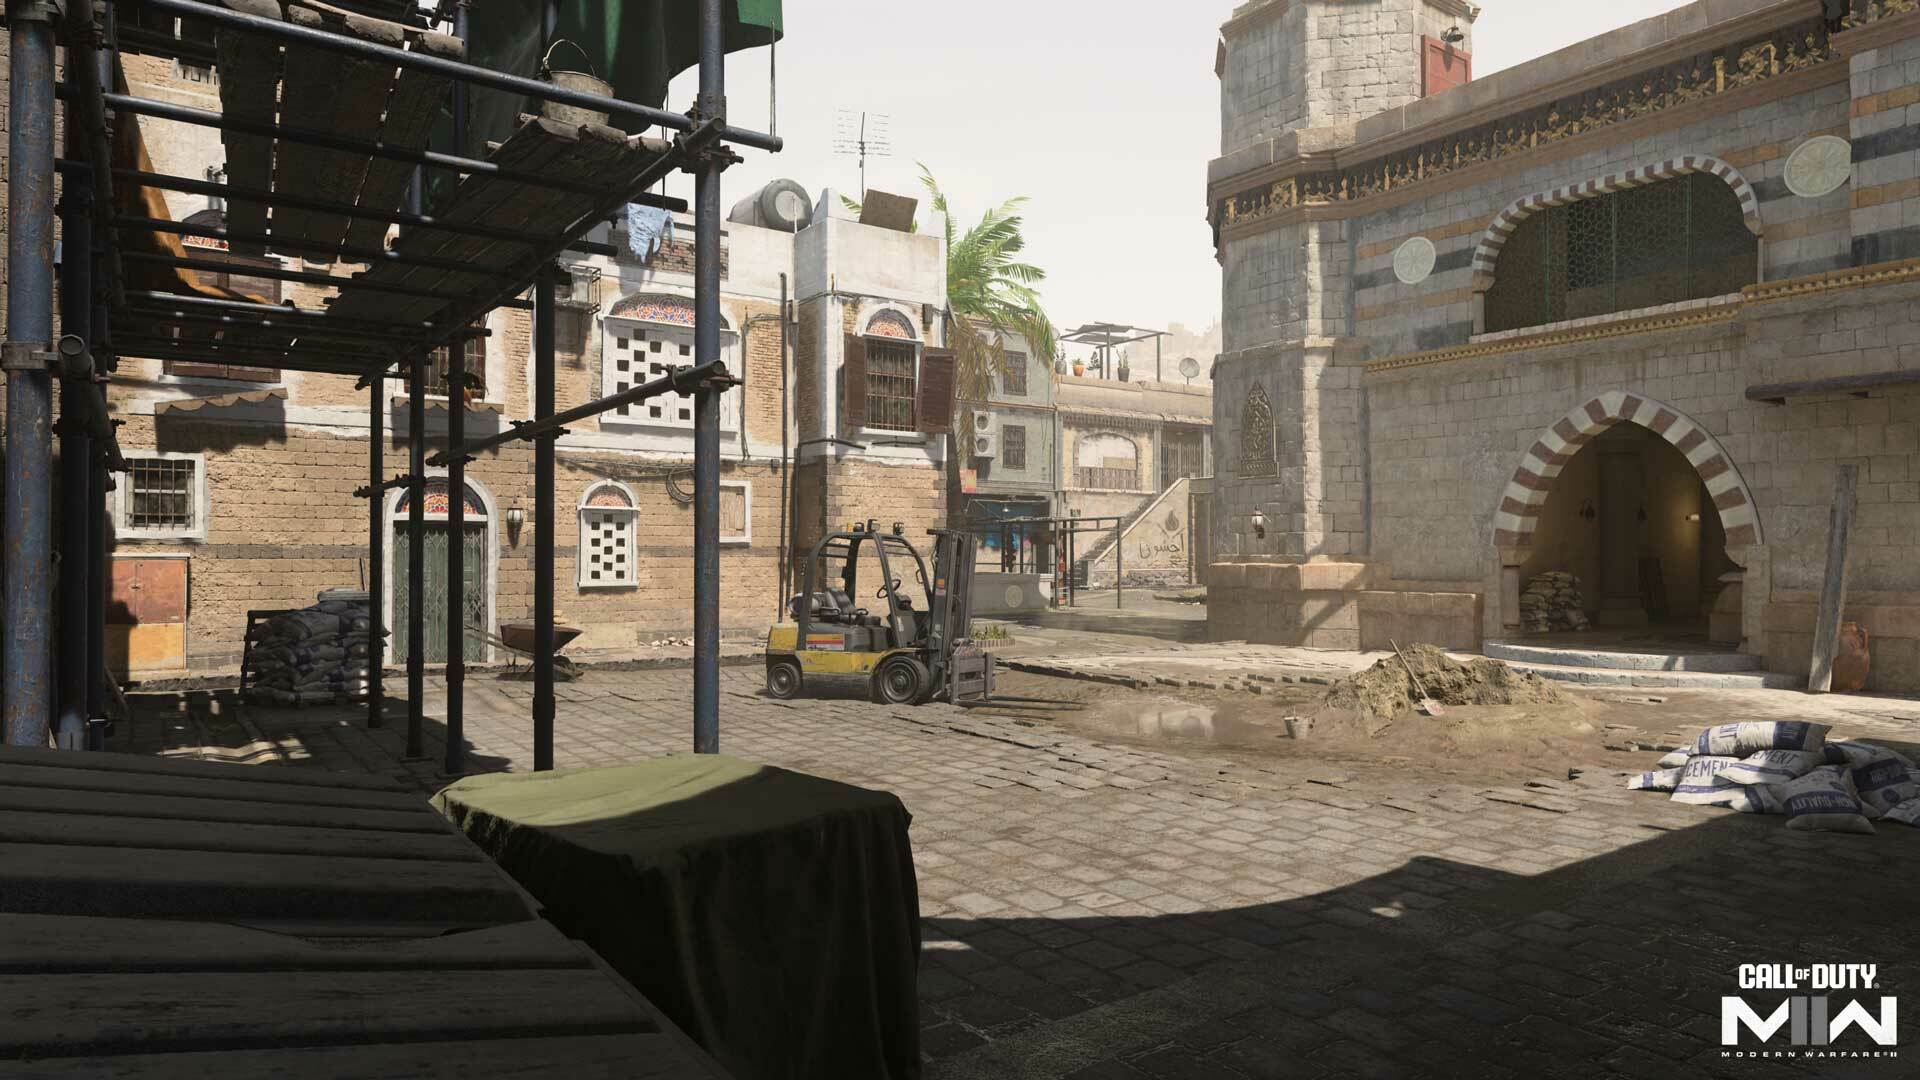
Positioned in Al Mazrah’s Akhdar Village, Showdown — first featured in 2007’s Call of Duty® 4: Modern Warfare® — is a medium-sized Core Multiplayer experience where action funnels in and around an iconic courtyard and its statue.
Only the bravest — or most foolhardy — Operators will attempt a crossing, with danger looming above and below. The perimeter offers its own challenges, funneling players into tense engagements in its narrow confines.
Here is what you need to know:
Spawn Point: KorTac
KorTac Spawn Zone (West) — Construction
KorTac forces start in Construction amid ongoing renovations. From here, there is a direct view through the West Tunnel toward the courtyard. Branching paths lead to the southern Chicken Coop and the northern Food Stalls. Heading straight towards the central Statue can be a death trap, though the stacked sandstone and wooden pallets in the West Tunnel may be useful as defensive positions against those situated at the other spawn.
On the perimeter, the Food Stalls offer a slightly safer route compared to the Chicken Coop route. The stairs here offer easy access up and over the closed metal gate. Where the Chicken Coop gets the advantage, however, is in its side entrance toward Statue, which can serve as a flank route against enemies in the courtyard.
Spawn Point: SpecGru
SpecGru Spawn Zone (East) — Main Entrance
SpecGru enters the match through the more pristine Main Entrance. They, too, can head straight toward the courtyard or flank around the perimeter. The East Tunnel features some large cover options that can be used for a more defensive approach toward Statue.
The northern Van route is exposed to sightlines past the metal gate, though it’s possible to climb atop the vehicle and mantle to the overhead ledge, where you’ll have a greater vantage point against enemies on the other side. There’s also an entrance to the covered walkway surrounding the courtyard. Break to the southern Glass shop for a less exposed approach to the gate. Nearby stairs offer rapid access to the courtyard’s second story.
Map Maneuvers: Route Planning
For the purposes of this guide, we’re dividing Showdown into five main sections:
Construction
North Path
Main Entrance
South Path
Courtyard
Construction
Construction is nearly wide open, with only the forklift, cement bags, and the corner dumpster offering cover across its flat, square surface. The biggest challenge here is anticipating enemy attacks — will they arrive via the West Tunnel, Food Stalls, or Chicken Coop? Using the cover objects at hand, it’s possible to partly conceal yourself from one or two of these pathways, but you’re in turn reducing your own spatial awareness while doing so.
When holding the area for an objective, request support to cover the left and right flanks so you can focus on the central tunnel. If one of the flanks comes under fire, move up for additional support to better concentrate your defenses.
North Path
For this guide, the North Path includes, from east to west, Van, Blue Tarp, and Food Stalls. Van is mostly open, with some scattered cover objects for added defense. Your options expand near the eponymous vehicle, offering a quick means to get onto the ledge overhead. Run across the hanging boards to switch sides, or race for the upper path to move toward Food Stalls or into the upper levels of the courtyard. There’s also a ground-floor entrance into the courtyard from here, though getting to it exposes you to attacks from enemies on the other side of the gate.
In Food Stalls, the corner staircase and the low wall in front of the cafe provide great defensive positions when covering the area. When you’re covering the main path through the gate, consider setting up behind the white planter box with a sniper rifle or other long-ranged weapon in hand. For more aggressive play, race up the staircase to fire on enemies from above or to slink into the courtyard’s upper walkway.
Main Entrance
While not identical, the Main Entrance offers largely the same tactical choices as Construction, with a flat open square and some minor cover options throughout. Bring backup when defending the area to help you cover the three pathways in, and be ready to book it for the East Tunnel should any aerial streaks descend on your position.
South Path
Consisting of Glass Shop, Slide, and Chicken Coop, the South Path offers the other means of crossing the map outside of the Courtyard. Though cover objects are sparse, the long planter box in Glass Shop offers a solid defense when engaging enemies here, while the corner scaffolding offers a height advantage but little cover. Note the wooden platform under the Courtyard’s southeast ledge — this is a solid position from which to ambush incoming enemies.
The stone staircase offers a straightforward route over to Slide. From here, you can jump down to ground level or head into the lower Courtyard. You can also hop onto the wooden awnings along the bottom map border to maintain verticality. The Slide offers a powerful vantage point over Chicken Coop.
Courtyard
At the dead center of the map, the Courtyard with its central Statue sees some of the most intense action in the match. The surrounding walkways present dangers at every turn, but when you need to cross the map fast, it’s tempting to take the risk. With a combination of intel-gathering through comms and UAV assistance, plus judicial use of the available cover, it’s possible to get through here alive, but your timing’s got to be flawless.
When it comes to the surrounding walkways, be prepared to fight for your position on the coveted upper level. With a vantage point over Statue, plus sights over the North and South Paths, it’s a powerful area. With four entry points leading to the upper level, however, you must always be on guard, prepared to take on enemies attempting to usurp your position.
Objective Routes and Rotations
Mode Intel: Domination
At the start, expect some serious action on the South Path as teams fight to get through the courtyard’s southern opening toward the B flag. The East and West Tunnels will likely see similar levels of action as well; consider taking the stairs to the upper walkway, which is a good — albeit slightly exposed — power position.
Though the A and C flags are on opposite ends, the map is small enough that one or two aggressive Operators can push to the other side while the rest of the team is engaged with the B flag by Statue. This helps take the pressure off the Courtyard as the enemy falls back to retake their lost flag. Once that happens, taking the B flag becomes more feasible.
Mode Intel: Search & Destroy
Search & Destroy changes up the dynamics on Showdown with both bomb sites positioned along the upper walkway to the north and south. With just one life per round, it’s important to master the four entrances to the upper floor: the staircases leading up from the ground floor in the southwest and northeast corners, as well as the two outer walkways over the metal gates leading straight to the top floor.
As the attacking team, consider aggressively pushing forward while sending a bomb carrier — and potentially a bodyguard to assist — upstairs to plant. Defenders will have to send at least one Operator upstairs to gather intel if they hope to counter this strategy, but no matter what, a midrange weapon with a 3.0–5.5x magnification scope can help take out the bomb carrier regardless of which site they go for.
Mode Intel: Hardpoint
Showdown has six Hardpoints, with each one positioned in a meaningful location outside of the central Courtyard. However, there will definitely be foot traffic here as players take the shortest route possible to the next objective.
It’s worth fighting for a position along the upper Courtyard walkway; because there are two Hardpoint locations here, as well as two Hardpoints by the metal gates, it is certainly a power area to lock down. Also, staying up here offers protection from aerial streaks and largely negates threats from below.
When it’s time to take the Hardpoints in Construction and the Main Entrance, however, head back to the ground floor to clean up hostile forces.
Top Tips
1. Explore the perimeter first. While dangers abound everywhere, the fight perimeter is generally more focused and predictable. Once you’re familiar with the layout, start moving into the central walkways and exploring the middle.
2. Careful with the aerial streaks. Though the skies are clear, the structure surrounding the courtyard offers thick overhead cover against incoming aerial streaks, so be mindful of your timing or you’ll have a hard time finding a target.
3. Downtime, what’s that? Showdown’s layout pairs long, narrow lanes with plentiful right angles, often requiring a sudden change between close- and long-range engagements. Remember that swapping to your pistol is always faster than reloading, and it provides dependable power when you need to make the switch.
4. Ledge hang trick shot. See those overhead boards set up along the northern Blue Tarp? With a precision jump, you can activate a ledge hang from them, catching incoming opponents off guard. You’re quite exposed in this position, so don’t overdo it.
5. Grenades to upper walkway. When you don’t have time to engage in a precision firefight with someone on the upper walkway, consider tossing a grenade up there instead — or using a Drill Charge to penetrate the walkway — for a quick engagement starter, if not a solid elimination.
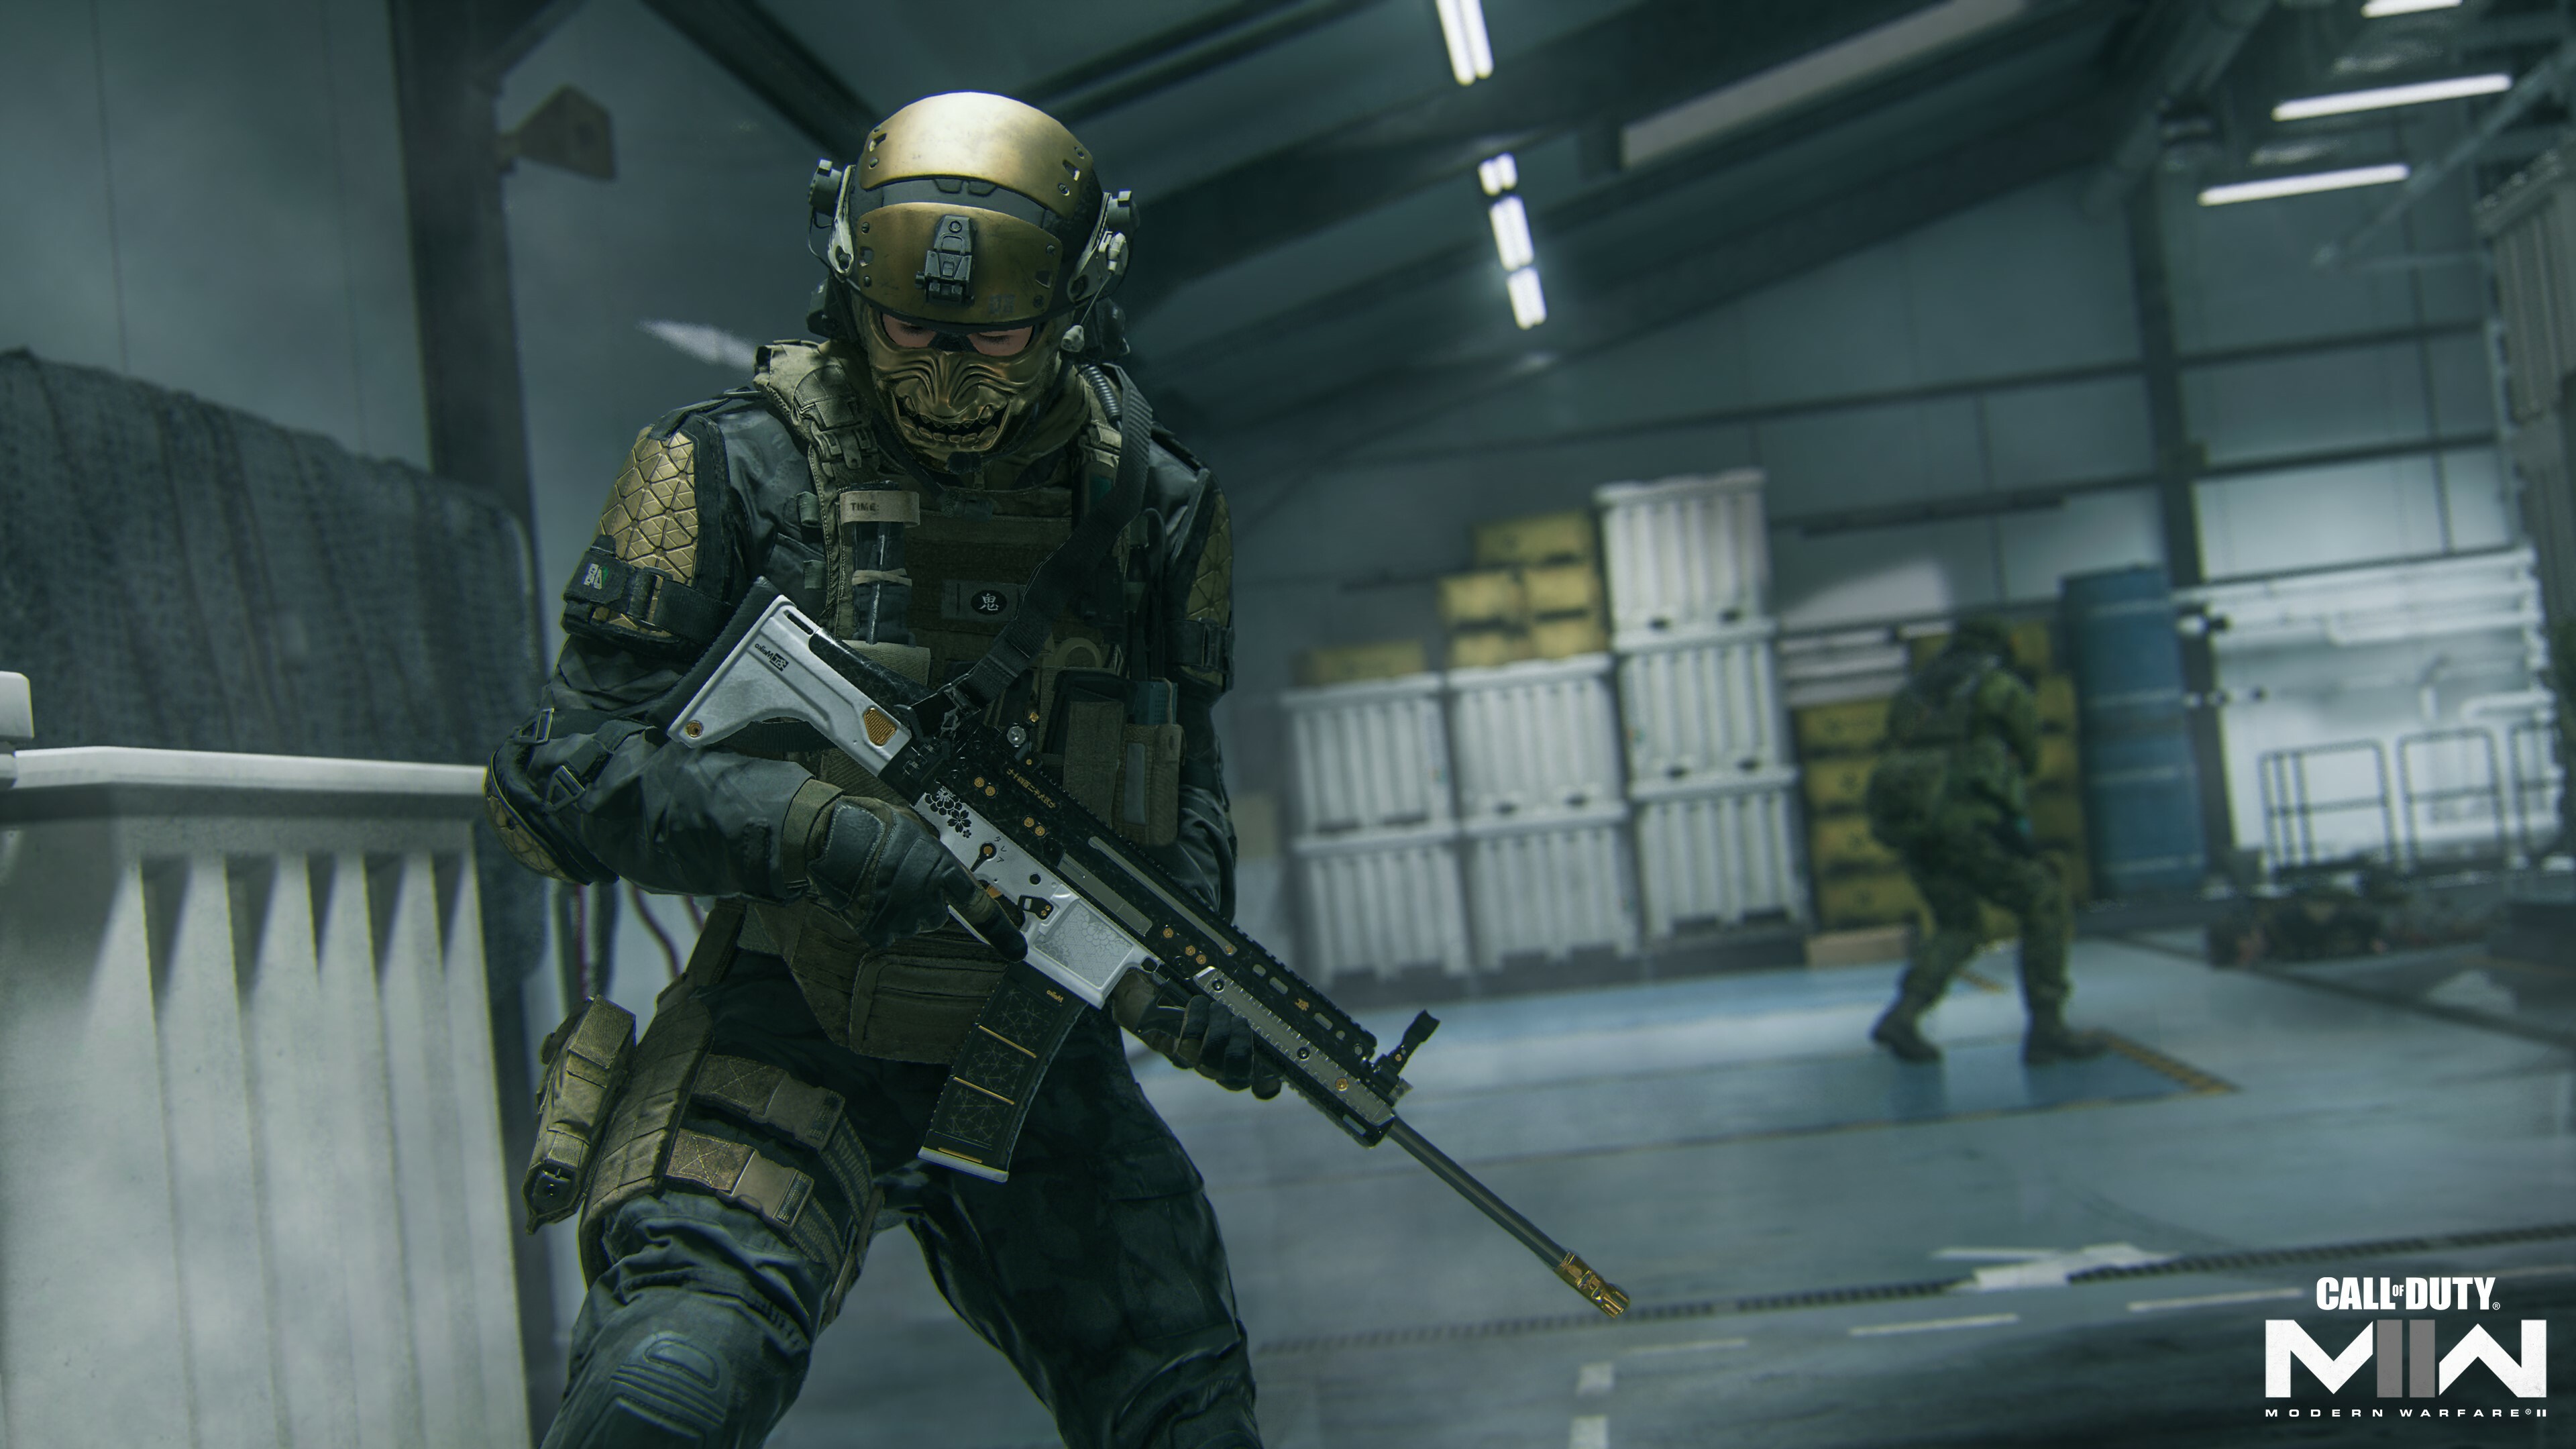
6. The right tool for the job. Versatility goes a long way when holding the upper walkway over the Courtyard. The new Season 04 Tempus Razorback Assault Rifle, unlocked for free in the Battle Pass, is a great example of a weapon that can engage targets downrange but can also hold its own against nearby enemies.
7. Pincer attack. When approaching an objective within Construction or the Main Entrance, try to split your forces to come in from at least two different directions, thus dividing the enemy’s focus with an effective pincer attack.
8. Now try to find me. Smokes — Grenades and the Field Upgrade — can be helpful to conceal movements, especially in the Courtyard. Just be mindful of Thermal Sights or predictable movements that can counter this strategy.
9. If it ain’t broke, don’t fix it. This version of Showdown is very faithful to its original design, though on top of the massive graphical improvements since then, the updated movement mechanics add a new layer of strategy. Use your mantling abilities — especially around the perimeter — to get above your enemies fast and use slide to get behind cover when taking fire.
10. Take your skills to Call of Duty:Warzone. Starting to feel confident after several matches? Consider switching over to Warzone and heading to the Ahkdar Village POI in Al Mazrah. Use the skills you gained in Multiplayer to lock down the area as you fight to be the last squad standing.
Drop into the new urban playground Vondel on June 14 in Season 04 of Call of Duty
Season 04: Vondel Map Tactical Preview
Per the full Call of Duty®: Modern Warfare ® II and Call of Duty®: Warzone™ Season 04 Announcement, we intercepted an important intelligence report on the brand-new map Vondel, to be made available for Battle Royale and DMZ experiences within Warzone™.
The following is an exact copy of the report, with redactions ([[REDACTED]]) in place to protect current identities and ongoing operations:
SITREP
On June 8, 2023, SpecGru commenced Recon Operation: Red Light, Green Light. This intelligence, surveillance, and reconnaissance (ISR) operation took place in Vondel, an historic district within a greater metropolis built on an extensive river network, well away from the current areas of operation (AOs) — Al Mazrah and Ashika Island.
Following the complete evacuation of all Vondel civilians after the events of [[REDACTED]], SpecGru deployed several fireteams, including Victor Team consisting of Jesus “Chuy” Ordaz, Enzo Reyes, and Kleópatros “Kleo” Gavras.
They and other SpecGru forces were met with heavy resistance on the ground. However, they still confirmed the presence of notorious Operator Nikto before reporting that [[REDACTED]] appears to have taken complete control of the city.
Their report follows.
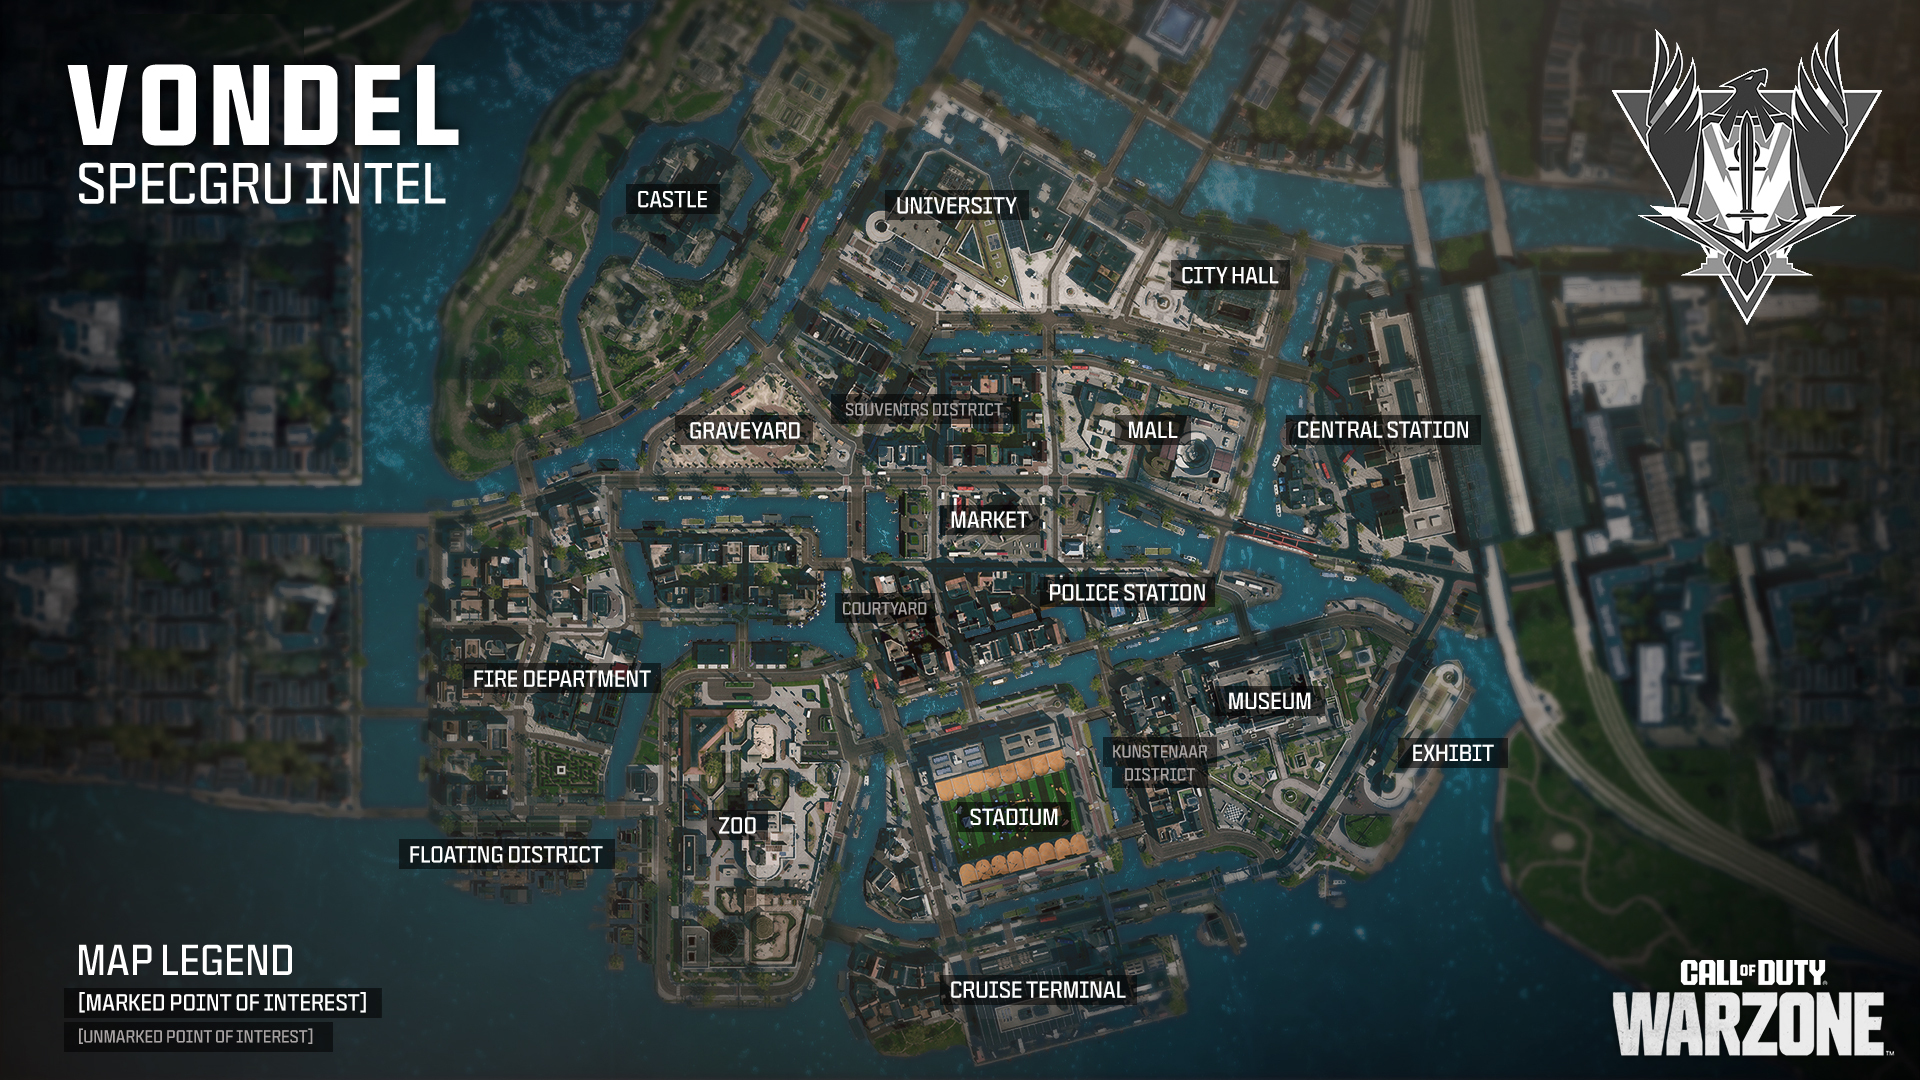
RECON REPORT: POINTS OF INTEREST
This satellite image represents the entire AO of Vondel.
Prior to deployment, Operators are advised to familiarize themselves with the various points of interest overlaid therein.
Note: When referencing hostile forces within the AO, this refers to DMZ infiltrations only.
With this in mind, the following is an initial briefing on each Vondel point of interest:
Castle
Vondel’s Castle is a 13th-century world heritage site located in the city’s northeast sector. Intel suggests that the central island currently holds the main fortified headquarters of [[REDACTED]] and that they are deeply entrenched within the fortress.
As the mist dissipated, Operator Kleo reported a complex interior with several bedrooms, chambers, living spaces, and hallways connected by passageways, a crypt, and at least one water access point.
This fortification is technically the tallest structure in Vondel, though it may not offer the most prominent of sightlines. Operators should expect light to medium enemy resistance when breaching its interior locations.
On the perimeter, there appears to be a small, abandoned chapel with a crypt, as well as a working farm, a pavilion, and some gardens.
The survey team encountered several UAV towers in this location, making it one of the more exposed areas for recon tech in Vondel. Operators should be prepared to encounter one or multiple enemy Strongholds and heightened enemy response.
Be advised: The main road network only covers the southeast side of the island; other access points are the bridges leading to the main Castle and dirt roads around it. Although entry points via the land are limited, there are numerous amphibious access points, including the Castle’s moat. The use of watercraft or amphibious vehicles, along with stealth underwater infiltration, is recommended.
The Castle itself is the main lynchpin for control of this area. Operator Chuy confirmed that the interior of the ransacked, three-story structure includes a dining hall, kitchen, master bedroom, bathrooms, a multi-story foyer, and a multitude of other chambers. Expect fast-paced, close-quarters engagements.
The exterior is outfitted with several ascenders that lead to impressive vantage points at the top of the structure where Operators can utilize numerous (but exposed) sightlines to other points of interest.
University
Prior to the events of [[REDACTED]], Rivenberg University was a renowned research facility.
The main structure is three stories, with its primary entrance leading to a reception area. The atrium is an open concept with staircases leading up and down floors, with shops and a second-story courtyard.
A courtyard ascender, as well as the other three around the building, leads to the top of the university parking structure, which also has a spiral ramp up to the other levels and the green roof.
Additionally, there is the Rivenberg Art Center, which contains multiple floors of what appears to be midcentury artwork, as well as an artist’s penthouse on the accessible third floor. There are two exterior ascenders to this living space, with views over to City Hall, the Mall, and back to the University.
This area also contains a University village, with several small shops and their maintenance hallways, a staging area for a concert, the gas station behind the Art Center, and a few floating homes on the rivers surrounding the island.
Be aware: The atrium provides many opportunities for a counterattack. Operator Reyes describes the artist’s penthouse as an advantageous location to clock enemies coming from nearby POIs such as Castle, City Hall, and Mall. Also, note the reinforced glass of the University village roof connects to the second floor of the University. Operators should use that as a potential flank route against those on higher floors.
Intel suggests that there are two enemy Strongholds in this region — one in the University and the other in the village — both heavily occupied by elite soldiers. Additional intel gathered during [[REDACTED]] suggests a possible Dead Drop [[REDACTED]].
The gas station is the only dedicated land vehicle filling station in North Vondel. To gain an advantage, Operators are advised to activate the UAV tower at the Art Center behind the station, and use caution when navigating the exposed bridge to the northern road.
City Hall
The Greek Revival building has five floors, two of which are widely accessible. The main vestibule contains a grand staircase to the building’s iconic main room, which has a marble-floored foyer with several lion statues and an impressive ceiling fresco.
From meeting rooms to the rear mailroom to the central courtyard, there is no shortage of areas to sweep through to find enemy opposition. The building’s rooftop cupola will serve as a handy vantage point. Operators can access this via an exterior ascender from the foyer balconies or by navigating the adjacent rooftops.
Operators who manage to lock down this area may hold the advantage in most combat situations. Close-quarters combat should be expected within the Town Hall, with most midrange combat possible through the exterior of the building via the windows.
A nearby UAV tower covers the Town Hall. Operators are advised to activate this tower when taking a stealth approach. Intel suggests that an elite force controls City Hall, and Operators should proceed with caution. There also appears to be several suitable extraction points in and around this area.
Central Station
Primary target Nikto and [[REDACTED]] forces appear to have attacked the Central Station, with severe collateral damage reported throughout the vicinity. There is evidence they used this location as their insertion point during the events of [[REDACTED]].
Access points to the Station include numerous ground-level doors at the front and side entrances of the building, as well as a handful of underground entrances.
Operators should use caution while infiltrating the latter. Alternatively, the staircases on either the north or south sides of the building can be utilized for more immediate platform access.
Be advised: When inside the main Station, check the ticket plaza, mezzanine, and shops for useful items — and be wary of hostile forces. The recon team noted what appears to be a connecting tunnel beneath the main staircase, as well as elevator shafts up to the second-floor Museum area and roof.
The stationary trains on the main platform are firmly locked. There are two walkways over the tracks that lead to the secondary platform, which has a small underground space. Short- to midrange weaponry will be the most combat effective around this platform. Expect close-quarters engagements in the small spaces within the Station structure.
Northeast of the Station is a small plaza and a canal that serves as Vondel’s northern border. The western and southern perimeter are earmarked by a red bridge that leads to a Mall, a canal-side gas station, a bus depot, a “tramhalte” stop, and a bicycle lock-up area. This area is an optimal bivouac spot as enemy forces appear to be much fewer than in the main Station.
Mall
Taking up two whole city blocks, the Kardinaal Shopping Center consists of an older, Baroque Revival structure and a sprawling outdoor market of abandoned shops — all connected via a walkway over a bus drop-off.
The two-story main Mall building is easily marked by its outdoor fountain. Both interior floors have a variety of smaller stores to investigate, from a bookshop to the Caffe Johannes. This area is optimal for looting useful items, but Operators should be cautious of enemy-laid traps.
Due to this area’s open nature, aerial ordinance may be most effective in removing enemy squads or other hostile forces. Otherwise, expect close-quarters combat. Operators are advised to use this area as a rendezvous point before rotating to the Market, Central Station, or Police Station.
This area appears ideal for an amphibious approach, particularly when field-testing the new and versatile TAV. Operators can access either of the two ramps on the east bank, as well as the one on the north and any of the three near the Central Station.
Souvenirs District (Unmarked)
This unmarked POI comprises three clusters of townhomes — the majority of residential structures along Vondel’s northern sector.
Operator Chuy reported some tenement buildings being internally accessible, as well as fire escapes and exterior ascenders providing pivotal access to the linked roofs. The ground floors are occupied by a variety of abandoned cafes, pubs, and tourist shops.
The easternmost townhome cluster is situated north of the Market, earmarked by a “Red Light Stories” sign. It is the largest of the three clusters and contains two distinct wooden stairwells to the rooftops.
The second, central cluster is a triangular collection with one block facing the canal and another block angled between the two other blocks.
The third, western cluster is L-shaped and adjacent to the Graveyard. Outside of a small alleyway with an exterior ascender to the eastern section, these homes are all interconnected and offer solid sightlines to the Castle and University areas.
Operators should take note of the various building colors and wall murals to orient themselves within the complex tenement design. Operator Reyes notes the south side of the eastern cluster is marked by a purple tiger mural, and the north side with a blue mural with what appears to be multiple birds. The rooftops can easily be traversed for better visibility of nearby POIs.
This area has two UAV towers — one in the main block and another in the L-shaped block. The former appears to provide coverage of the modern Mall section only, without any overlap from adjacent towers. The latter is vital for gathering intel on who may be in the triangle tenement block and on the east side of the Graveyard.
The threat level here is high, and DMZ Operators should expect up to three potential Strongholds — one for each tenement block. Be advised, this area may have a Dead Drop location in [[REDACTED]].
Market
The Nieuwde Stardtpoort (translation: New Stargate) is a billiards hall and bar converted from a medieval outbuilding. It overlooks the heavily damaged Vondel Market, which provides little cover. Operators should move quickly through this exposed location.
The Stardtpoort contains a two-floor interior, a ground-floor bar, an upper billiards table area with several windows overlooking the surrounding area, and two “Employees Only” entrances to the spires that have interior ascenders to the roof. Operators can also utilize the scaffolding to climb onto the hall’s exterior spires and flat roof, which provide clear sightlines over to the Mall and river.
Operators are advised to lock down the Stardtpoort building for an impressive power position over the vicinity.
The canal to the west of the building contains one of Vondel’s main tunnels, allowing for a more stealth-focused approach to the canal bordering the University and City Hall.
Graveyard
Operator Chuy reports that the Graveyard has a central funeral parlor and crematorium. Intel suggests that [[REDACTED]] is active within the underground morgue. The main two-floor building has enough roof space for reconnaissance or countersniping.
Expect a heavily armored enemy presence. Scatter that [[REDACTED]] may be traversable west of the Graveyard after it originates from [[REDACTED]].
Police Station
Southeast of the Market, the Police Station appears to have taken damage from recent skirmishes around the Central Station and Market areas.
The exterior of this five-floor structure has two ascenders. Inside, the ground floor consists of a reception area and hallway. To move up, Operators can use the stairs, the ladder, or the interior ascender in the elevator shaft. The rooftop offers vantage points over the Mall, Market, Museum, Stadium, and the adjacent townhomes to the west.
The cluster of townhouses west of the Police Station features rows of mixed-use buildings. Rooftops are accessible, as are the numerous abandoned dwellings and storefronts.
Operators can utilize the canal here to engage in drive-by combat within a TAV. This stretch also offers Zoo access to the west, as well as an infil point to one of the major tunnel networks where [[REDACTED]] continues operations.
The Police Station and nearby townhouses are ideal for fast-moving Operators who favor parkour and tactical sprinting to jump — not mantle — through rooftop attics or across townhouses. Back on the ground, look for fuel and vehicle repair at the gas station adjacent to the Police Station.
Courtyard (Unmarked)
This area consists of luxury apartments and a variety of abandoned boutiques encircling a central courtyard.
Operators are advised to utilize that courtyard as a central lane, with the rooftops providing a great vantage point for fighting within and around this POI. Operator Chuy reports that several of the shops and apartments are accessible, with layouts that support tactical movement for an advantage in close-quarters combat.
Operators can also secure Loadout items via ground loot and supply boxes. This area is mission-critical and a hotbed for small-squad combat.
Intel gained by the recon team places a Stronghold at the center of the District and a UAV tower on the south side, near the bridge leading to the Zoo. Aquatic vehicles are advised when accessing the Stronghold’s perimeter.
Fire Department
The Fire Department is located on the upper half of Vondel’s southwest island, with the adjacent Floating District being the AO’s southernmost point.
The Department itself is U-shaped. A propane tank was reported on fire next to the Helipad and represents a potential hazard. Unconfirmed reports indicate elite soldiers are locking down the Fire Station as a fortress, along with two potential Stronghold locations on the north side.
On the other side of the helipad is a boat docking area with a radio mast that provides a treacherous but impressive vantage point over the low-lying Castle grounds and Graveyard. Watch for enemy snipers from these locations, as well as from the Kunstenaar District and Zoo.
North and west of the Fire Department are more townhouses; these are highlighted by a ribbon mural (on the west side), stores, and a concert stage (at the north apartments). The latter also connects to a gas station outside.
Be advised that [[REDACTED]] runs right through this area. A secured Dead Drop location at [[REDACTED]] has also been observed.
Floating District
The Floating District comprises shipment containers, homes, and other living quarters built either on steel beams or concrete floats with an intricate wooden walkway connecting them. During Warzone operations, you can swim around and under these dwellings.
The Floating District is a potential hotbed for small squad firefights. Operators are encouraged to utilize sidearms and knives for more stealth-based maneuvers. Expect an enemy Stronghold in the nearby townhouse block to the north and proceed with caution given the presence of well-equipped enemy forces in the proximity.
North of the Floating District is another townhouse cluster, earmarked by “Vraag Alles” graffiti on a green building, as well as a small hedge maze where loot appears to be of significant interest.
Zoo
Though the land animals within the Zoo have been evacuated along with the local population, many of the exhibits can still be explored.
Traversing the Zoo from the southern boundary and heading north, there is an Animal Hospital and Aviary on the west side and the savanna hut and exhibit on the east.
Farther north is the Zoo’s main entrance and restaurant. At the Zoo’s center is the aquarium. In this two-story structure, one can still see a leopard shark, along with a sunken ship and other aquatic life within the reinforced tanks.
The far north side of the Zoo contains a reptile house, with views out to the rest of the park, as well as the parking lot on the other side. Head east across the bridge to reach Centrium Stadium.
Adjacent to the Zoo perimeter is a gas station to the west and a bridge to the north.
All of the Zoo’s exhibits and overall design allow for a variety of engagement opportunities. The central aquarium roof can be considered the main power position, but Operators should watch for snipers from the savanna exhibit or the windmill landmark by the Stadium.
Stadium
The Stadium is a roughly symmetrical setting with adequate cover on either side and a pentagonal center. Large obstacles used for a recent paintball tournament at the facility provide unique opportunities for engaging enemy combatants on the field. Suffice it to say, the premier league finale has been postponed indefinitely.
Nearby townhomes are earmarked by the “blue lady” mural and a large-scale lion painting.
Just outside of the Stadium is the windmill, one of the tallest structures in Vondel, making it a possible power position if captured effectively. However, Operators are advised to watch for enemy Stronghold activity in its vicinity, as well as the high vantage points provided by the UAV towers at the Museum townhouse cluster.
Cruise Terminal
The Cruise Terminal is composed of three main buildings.
There are two main gates and an extensive, two-floor interior featuring seating areas, restaurants, shops, and more. Operator Kleo reports that the roof is accessible from the inside via a parkour route up the elevator shaft, or by the ladder located on top of the adjacent skybridge.
The Maanlicht Hotel is composed of a first-floor lobby, two adjacent buildings via staircases on the second floor, a lobby with a billiards table and a wraparound deck on the third floor, and routes leading up to the roof helipad. There is an elevator shaft with an interior ascender, as well as an exterior ascender on the building’s west face.
Finally, connected to the Hotel via a deck, which has a lengthy skybridge over to the Central Stadium, is the Vithzey Food and Wine eatery. Outside the ground-floor reception area is the main square bar, along with a smaller bar on the second main floor in a red velvet lounge, which has a staircase on one side that wraps back to the main bar. Operators can continue up the staircase to reach the solar-paneled roof, or take the south-facing exterior ascender for a faster route.
A Ronan Oil waterfront gas station sits adjacent to this building, as well as the old drawbridge, which is slightly raised for water vehicle traffic, allowing access to the Museum. On the opposite end is another row of townhouses across from the Stadium block, earmarked by a small park right on the ocean.
Maneuvering between the three main structures could be pivotal for Operators with short- or medium-range weapons. Snipers can head up to the rooftops to countersnipe those at the Museum or Stadium.
Expect increasingly heavy enemy reinforcements throughout this location, especially within the Hotel, Vithzey building (which also houses a UAV tower), and townhouse cluster. Fierce combat is also likely in and around the waterways of this POI, due to its quick access to the canals, the main river, multiple amphibious access points at the park, and the waterway gas stations near the old drawbridge.
Museum
The Hayring Museum is an ornate, centuries-old structure featuring two formal gardens, a subterranean reservoir, a bar, a concert stage set in a flooded crypt, and an escape route to the canal on the north side.
There is enough space in the Museum grounds and even through the Museum’s center for a vehicle to pass through. South of the main structure are the gardens. This picturesque open area by the main waterfront is close to the Exhibit and contains several courtyards and a chessboard landmark. Operators favoring land combat are advised to hold down this location.
The Museum itself is large enough to use midrange weapons indoors, and its roof — one of the highest points on the map — is ideal for scouting ahead or sniping enemies in the courtyard or surrounding points of interest. Anticipate the Museum to be locked down as a fortress under certain combat conditions.
West of the Museum near the Stadium is another cluster of townhouses, known to the locals as Kunstenaar District.One structure is tagged with a bird mural, but otherwise it is similar to other residential zones with accessible rooftops, exterior ascenders, and mazelike interiors. The cover afforded here allows squads to rotate with favorable win conditions, but expect heavy resistance, as this is a known Stronghold. One of the two UAV towers is positioned within the townhouse cluster (on the north side); the other is in the Museum’s east courtyard.
The recon team discovered a Dead Drop [[REDACTED]]. . . .
Exhibit
The second, more modern Nieux Museum on the southeastern extremities of the Vondel perimeter appears to be modeled after an ocean liner. This houses a collection of modern art and has a main spiral staircase leading up to a sloped roof garden. The roof offers sniper lines to the Museum and parts of the Central Station.
Be advised: Combat within the various galleries of the Exhibit building favor CQB weaponry. The exterior has enough open space to use long-range rifles, which can aid in the elimination of foes using the canal network, as well as those close to the Central Station and within the vicinity of the waterway gas station (all due north). The Exhibit is being treated as a fortress for certain combat operations.
DEBRIEF
Attention all Operators.
Due to recent reports of KorTac Operator Nikto and additional [[REDACTED]] forces breaching the [[REDACTED]], the SpecGru Recon mission has been aborted, effective immediately.
Refer to the above Tactical Overview prior to any subsequent deployment to ensure your full operational readiness in Vondel.
Fight across brand-new battlegrounds in Season 04, launching June 14
Modern Warfare® II Continues on a Global Scale
Al Mazrah, Urzikstan, Ashika Island, Las Almas . . . and now, Vondel.
The waterfront district of a Baroque European city where centuries of old-world history blends with modern architectural developments, Vondel saw a complete evacuation due to an imminent attack threat, right as Operators descended into the darkness of the Al Mazrah Koschei Complex during a fierce sandstorm at the culmination of Season 03.
While Vondel is a brand-new locale for Operators to explore, the ensuing chaos is part of a plan activated by a familiar and infamous masked figure, whose forces are operating in both Al Mazrah and Vondel. Peer through the dust clouds, and you’ll recognize the apparent leader of these unknown forces:
His name is Nikto. And he’s ready to Run This Town.
This is Season 04 of Call of Duty®: Modern Warfare® II and Call of Duty®: Warzone™, launching on June 14 at 9AM PT.
Expect Patch Notes led by Infinity Ward and Raven Software to be released prior to the release of Season 04. Additional development support is provided by (in alphabetical order) Activision Central Design, Activision Localization Dublin, Activision QA, Activision Shanghai, Beenox, Demonware, High Moon Studios, Raven Software, Sledgehammer Games, Team Ricochet, Toys for Bob, and Treyarch.
WARZONE OVERVIEW
Welcome to Vondel. This medium-sized map is ready to host Resurgence, DMZ, and the Lockdown LTM at launch, with standard Battle Royale in-Season.
Over a Half Dozen New Features. Tactical Amphibious Vehicle (TAV), the return of Favorite Supply Boxes, dynamic fog, a new Field Upgrade, and more.
The Sandstorm Continues in Al Mazrah. In addition to Vondel’s introduction, Al Mazrah sees some slight topographical changes during Season 04.
Warzone Ranked Play Resets, First Full Series in Season 04. Ready yourself for a full Ranked Season with more rewards to claim. Read more about Warzone Ranked in the General Overview part of this blog.
More at Mid-Season, Including Traditional Battle Royale in Vondel, New Vondel Gulag. The action will only get hotter as we look towards a summer Mid-Season Update.
New Map: Vondel
Set your coordinates for an all-new map and Exclusion Zone.
Size-wise, Vondel’s geographical footprint is between Al Mazrah and Ashika Island, welcoming up to 18 Operators for DMZ and 72 Operators for Resurgence game modes. Expect a mixture of densely-packed urban streets and canals, larger structures to fully explore (inside and out), a large degree of verticality and the means to counter those that take advantage of it, including parkour routes and numerous secrets to discover.
Developed by Beenox, Vondel features 15 distinct points of interest, including a medieval Castle dating back to Saxon times, an abandoned Zoo, a Greek Revival–styled City Hall, and a soccer Stadium currently set up for an epic paintball tournament final. There are also densely packed town houses, small alleyway cafés, and a variety of other locales to explore and take tactical advantage of.
However, Vondel’s unique topography and access points are focused around its intricate canal system. In addition to several different road types and bridges, Operators can dive (or even drive) into the water surrounding Vondel’s islands and city streets, or use watercraft and a new amphibious vehicle to get around this tight cityscape.
With all that said, we received a special tactical overview pre-brief from SpecGru that details Vondel’s multiple points of interest. Expect declassification and release on June 8.
Launch Modes: New Lockdown LTM, Resurgence, Updates
New Limited Time Mode: Lockdown (Launch Window: June 28)
Vondel is under Lockdown.
A brand-new mode in Call of Duty: Warzone — inspired by the Multiplayer mode Hardpoint — Lockdown will task multiple Quads at capturing and holding zones around the map rather than being the last squad standing.
Perfect for those who enjoy objective-based modes and who spend plenty of time in both Multiplayer and Battle Royale, Lockdown allows for Custom Loadouts right at the start of the match. This means a squad could go for the Call of Duty League™ bread-and-butter of up to three Vaznev 9Ks or TAC-56s, and a Sniper Rifle user on the side . . . or you can find your new favorite loadout combination when trying to master rotations and defensive setups to crush the opposition.
Expect Lockdown to roughly last about double the time of a traditional Hardpoint match. You can theoretically fit four matches back-to-back within an hour, and still have time to grab some water or a hand warmer.
Lockdown is a limited-time mode for players to try out at Season 04 launch, as it will be a part of the launch playlist rotation for Warzone.
Resurgence (Launch)
Would you rather drop into Vondel for some familiar fighting? Then prepare for a Resurgence.
The core Resurgence rules and flow from Ashika Island will carry over to Vondel, and two new features are being added to improve match quality and pace of play: Dynamic Resurgence Timers and the Vengeance Icon.
Dynamic Resurgence Timers
Resurgence modes are set to receive a new Dynamic Timer feature. As part of a general plan with aspirations for all online modes, Call of Duty developers are introducing a new feature — Dynamic Resurgence Timers. This automatically adjusts a squad’s timers should one or multiple squad members disconnect.
Should those squad members rejoin, the Resurgence timers revert back to their “normal” countdowns.
However, in general, dynamic Resurgence timers should be an equalizer for squads that suddenly find themselves short an Operator.
Vengeance Icon
When you’ve just been dropped during a Warzone match, it may be time to reevaluate your tactical mettle. Don’t get tilted, get even; in other words, wouldn’t you want to know where the Operator behind your squadmate’s killcam moved to after they eliminated them in a Resurgence match?
The Vengeance Icon allows you to find out who that is.
In Season 04, all Resurgence matches will include this new core mechanic: an icon that is in the direction of the opponent that eliminated your squadmate. This icon merely shows direction, not exact location, and is tied to the death of your squadmate.
The Vengeance Icon lasts as long as the Resurgence Timer is on for your squadmate; if your squadmate is down for 15 seconds, the icon only lasts for 15 seconds. If you eliminate this rival, an additional five seconds is shaved off all squadmate Resurgence countdowns in addition to the normal elimination value.
Perfect for squadmates who don’t use microphones, the Vengeance Icon provides support for squad-based Resurgence game modes. However, the intel is only as good as your skills: the icon will be helpful in tracking down the enemy, but it’s up to you to finish the job.
Both Dynamic Resurgence Timers and Vengeance Icons are planned to be included in Resurgence playlists regardless of map.
DMZ Updates, Including Dynamic Fog
DMZ Operators: Welcome to Vondel.
From the Cruise Terminal to the Central Station, expect to fully explore the cobblestone streets, numerous waterways, market squares, waterfront townhomes, and other main points of interest across Vondel as part of your ongoing DMZ missions. Up to 18 Operators – six squads of three – can deploy to Vondel at any given time.
This new Exclusion Zone comes to Season 04 alongside an exciting major update for DMZ, featuring the following additional DMZ content:
Forward Operating Base: A Central Hub for DMZ
A more centralized hub for all communications and Operator upgrades within DMZ is coming to Season 04. Known as the Forward Operating Base (FOB), Operators complete objectives to earn a variety of upgrades to use across DMZ. These upgrades come in four different categories:
Weapons Locker: Insured and contraband armaments and upgrades.
Stash: Wallet and Key Stash size increases.
Bounty Board: For Exfil, Bartering recipes, and Buy Station discounts.
Comms Station: Allowing Urgent Mission access.
All Operator Upgrades within the Forward Operating Base are passive, don’t need to be equipped, and allow for efficient progress across all aspects of DMZ.
Urgent Missions, Reputation with Factions, Wallet
Within the FOB you can unlock Urgent Missions. These are a new type of Faction-requested tasks. They are usually quicker to complete, and provide an excellent way to earn Faction Reputation, unlock more Story Missions, thus giving Faction Missions even more agency.
Specifically, Urgent Mission completion grants a tracked Reputation with individual Factions, all shown in the Forward Operating Base along with your objectives that allow you to unlock insured slots, the out-of-game Wallet, as well as expanding DMZ elements like the Contraband Stash, Key Stash, and Wallet Capacity.
And yes, DMZ will allow you to keep your extracted Cash from each match in a Wallet. You can then choose to re-infiltrate with a full pocket of Cash, potentially making it easier to complete objectives that require hundreds of thousands of Cash for completion… Or so your Operator can go on a spending spree.
Phalanx Faction, More DMZ Comms to Come
There is more intel to come on DMZ, including additional details on new and refreshed missions, Urgent Missions, a clandestine faction known as Phalanx that is [[REDACTED]], and the Signal Intelligence Contract. Expect declassification of all this info and more in a special Infinity Ward DMZ Community Update on June 9.
However, do not expect the new Boss [[REDACTED]], a vehicular [[REDACTED]], and Weapon Case Rewards such as [[REDACTED]] to be declassified until the start of Season 04.
For now, here is some initial intel on the new Dynamic Fog feature, which mostly pertains to action in DMZ:
Dynamic Fog
Because Vondel is built atop a network of canals and is technically below sea level, this location is subject to fog during certain inclement weather conditions. Initial intel suggests that fog could be present during DMZ infiltrations, as well as on very rare instances in other game modes.
This new technology in Call of Duty — dynamic fog — allows for players to feel more ingrained in the world of Modern Warfare II.
Especially during Resurgence and Battle Royale modes, Vondel’s usual weather is sunny with very few clouds — if any — in the sky. However, there is the possibility of fog rolling in due to the marine layer.
Typically, it is light enough to still see your opposition, except at extremely long ranges. However, in rare instances, the fog will have density to the level shown in the screenshot above.
If this level of fog rolls in, it may be wise tactically to reevaluate combat, seek weapon optics to circumvent the weather, or head indoors, giving yourself optimal combat opportunities.
Additional Features, New TAV
Expect the following new features coming to Vondel, with some also to appear across all maps in Warzone:
New Vehicle: The Tactical Amphibious Vehicle (TAV)
This four-passenger vehicle can travel over both land and water, making it the perfect ride for the streets and canals of Vondel.
Because of its amphibious nature, the TAV may not be the fastest vehicle on land or sea, but rather is a jack-of-all-trades for cruising the streets and canals around Vondel. Simply drive the TAV off the road and onto water, or emerge from the water onto an exit ramp, and you will see the TAV’s value in the vehicle lineup.
There is plenty of room for the whole squad, too, so don’t leave any of them behind without a tactical plan both in and out of Vondel’s waterways.
Favorite Supply Box (Assault of Vondel Event Unlock)
Formerly known as the “Personal Supply Box” in the original Call of Duty®: Warzone™, the Favorite Supply Box is a rare container that, when opened, unlocks your favorite weaponry and deposits it out for you to quickly gather and utilize.
Each Operator’s Favorite Supply Box contents will be different in theory, as the Box pulls the Primary and Secondary Weapons from the Favorite Loadout you choose, along with ammo and an Armor Plate. To choose a Favorite Loadout, simply go to the Weapons section of the Warzone menu before your match begins, hover over a Custom Loadout, then select “Set to Favorite.” You’ll know it works when there is a star icon next to the Loadout. By default, your first Custom Loadout is your Favorite Loadout.
Remember, this Supply Box is rare within Vondel, so when you find one, open it quickly to get your favorite weapons before an enemy player gets the opportunity to secure theirs!
Reinforcement Flare (Assault of Vondel Event Unlock)
This Field Upgrade can be an absolute game-changer in Battle Royale matches, as its purpose is for reinforcing your squad via squadmate redeployment.
After being purchased at a Buy Station or found via scavenging, the Reinforcement Flare can be placed to signal the return of a random squadmate. This is a little like a “Buy Station Redeployment” but without the ability to choose who gets revived.
A high-risk, high-reward option — due to the signal flare in the sky exposing you to your adversaries — consider this Field Upgrade as an option for that end-game Loadout.
New Public Event: High Stakes
In addition to other Public Events that are present in Battle Royale and Resurgence matches, Vondel will launch with a new Public Event: High Stakes.
When it starts, several Loadout-sized crates will drop from the sky. Capturing them grants Double Weapon and Player XP for the duration of the match. And if you’re wondering if this bonus stacks with Double XP Tokens or Double XP Events . . .
Yes — an Operator who already has Double XP active will gain QUADRUPLE XP if they or a squadmate secure this package.
An absolute boon for those looking to rank up quickly, prepare to double down when these crates fall from the sky.
Taxicabs on the Canals (Assault on Vondel Event)
Like Al Mazrah, Vondel has a train station, but given the smoldering wreckage on the tracks and the extensive canal network, there needs to be another way to get around the city on a self-piloted vehicle…
Enter the Taxicab, an autonomous boat accessible as part of the Assault on Vondel Event (detailed in the General Overview section of this blog). Planned to be deployed after Stage I of the Assault on Vondel is completed, these auto-piloted boats move around the canals on set routes, with Operators also able to “speed them up” should their leisurely pace be too slow for active firefights.
The Sandstorm Subsides in Al Mazrah
Al Mazrah no longer has a sandstorm buffeting Operators and Combatants, but the damage to downtown is already done.
Al Mazrah City now has several sand banks to climb upon, which offer new and creative ways to approach some of the city’s prominent buildings. Specifically, expect a massive sand dune up the side of the TV tower, the Embassy, and the “Highrise” building. The dunes also piled up across some roadways, including covering parts of the highway system, and nearly flooded entire small structures in the main downtown area.
There is also some partial destruction that will offer new approaches to maneuvering in, within, and outside of the city.
More details on Al Mazrah updates will be provided in the Patch Notes next week.
More at Mid-Season: Vondel Battle Royale, Gulag
There’s no need to wait for Season 04 Reloaded, especially as you’ll want to be on Vondel at launch to learn all of its secrets.
However, Traditional Battle Royale fans should know that this main mode will be available on Vondel starting at Season 04 Reloaded. This includes a brand-new subterranean Gulag for Vondel, hidden deep within the more medieval parts of town.
Mid-season is also when the return of the Occupation Scan Public Event and a new quest for [[REDACTED]] involving [[REDACTED]] will be available.
MODERN WARFARE II OVERVIEW
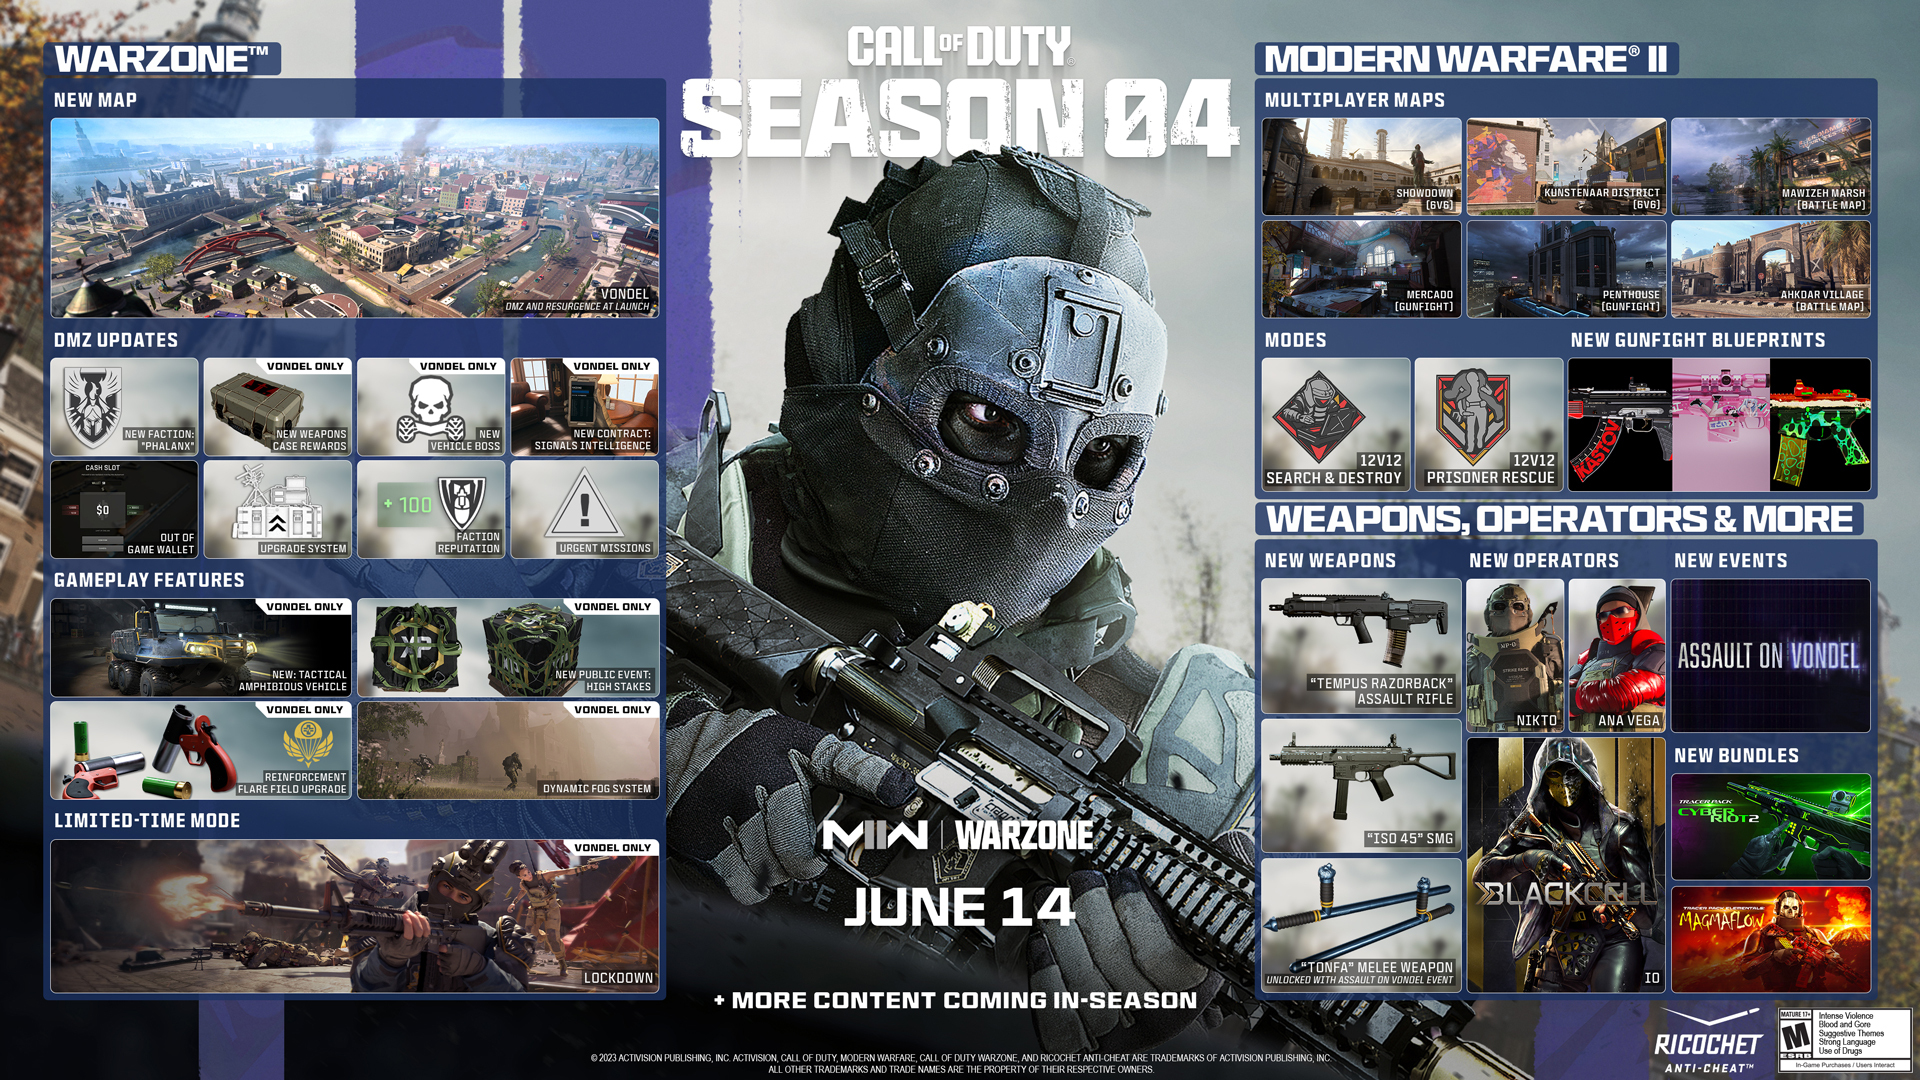
A Six-Pack of New Multiplayer Maps at Launch. Showdown. Kunstenaar (pronounced “khun-steh-nawr”) District. Mercado. Penthouse. Mawizeh Marsh. Ahkdar Village. Plus one more Core MP map planned for mid-season.
Search & Destroy, Prisoner Rescue to Expand to 12v12 for a Limited Time. Expect the Playlist rotation to include these intense modes with double the number of players on each team.
A New Ranked Season. Rise and grind; shoot for a new top Division and unlock those cool Ranked Rewards as you prepare for the exciting conclusion to the Call of Duty League season. More details in the General Overview.
Seven New Multiplayer Maps
From familiar locales to brand-new Multiplayer maps, Season 04 is coming out swinging at launch with two maps for each of the three Multiplayer experience types, along with a third Core map at mid-season:
Showdown (Core Map, Launch)
This map is originally from Call of Duty® 4: Modern Warfare® and is currently present in the Ahkdar Village area of Al Mazrah.
Now, as part of Season 04, this iconic map drops into Modern Warfare II at Season 04’s launch. It’s a great place to practice for those hot drops . . . or just drop airstrikes and helicopter Killstreaks with Gold weapons just like old times.
More intel on Showdown is to come before launch, but just know that it is exactly how you recall it with a few modern changes. Namely, some mantling/mounting spots and set pieces that bring it into Al Mazrah. Stick to the perimeter for “safety,” or go right down into the courtyard to potentially face the opposition head-on.
Kunstenaar District (Core Map, Launch)
Located west of the Museum in Vondel, the Kunstenaar District (translation: Arts District) features a row of town houses, boutique shops, a central plaza, and a swimmable canal along its west flank.
Check out the street art throughout the map as you battle along its classic three-lane design. Use the Shadow Company trucks and other vehicles for cover as you move up the main roads, and race across the map’s scattered interior locations to quickly change from lane to lane.
Want a first glimpse on this Vondel point of interest? Keep an eye out for our upcoming Kunstenaar District Multiplayer map guide on this blog.
Mercado (Gunfight Map, Launch)
The Mercado is a section of Las Almas cleared out for Gunfight and Face Off battles. Combat within this large, covered structure will be frenetic on multiple levels, so get ready to stay close to your duo or trio, get in, and get out.
Penthouse (Gunfight Map, Launch)
Time to take Gunfights all the way up to the top. The Penthouse, situated in the heart of Chicago, features a lap pool, an outdoor firepit, and a tight-angled modern interior. Just don’t stare at the Chicago skyline for too long, lest you get hit with a Finishing Move.
Mawizeh Marshlands (Battle Map, Launch)
Mawizeh Marshlands is from the region of the Al Mazrah map containing the infamous River Diamond Luxury Resort . . . or what’s left of it.
Get comfortable around this area with boots on the ground and in vehicular combat, and you’ll be more than prepared to take down the opposition in any game mode that occurs in this area, from the shallow, murky waters of the flooded swimming pool to the luxury resort under construction.
Ahkdar Village (Battle Map, Launch)
Similar to Mawizeh Marshlands, this Battle Map is a subsection of Al Mazrah — specifically, this map is the footprint of the fortified Ahkdar Village.
Action is mostly contained in the village (where Showdown is also located), and its most notable boarders are the railroad to the south and the stepped farms and base of the mountain to the north. Vehicular combat may be frequent within the city walls, although infantry can take to the battlements, rooftops, and alleyways to counter them.
Both of these maps are incredible ways to learn these specific sections for Warzone Battle Royale matches – from parkour paths and secrets to lines of sight and vehicle routes – so consider dropping into a Ground War or Invasion to gain some valuable intel.
Vondel Waterfront (Core Map, Mid-Season)
Although more intel is on the way for future operations this Season, expect core multiplayer combat to expand to a second Vondel location — the floating houses of Vondel Waterfront — as part of the mid-season update.
Search & Destroy, Prisoner Rescue to Expand to 12v12 in New Playlists
Those who recently played Modern Warfare II may have enjoyed the “10v10 Mosh Pit” Playlist, a collection of respawn game modes with increased lobby counts. Additionally, we know there is a large Search & Destroy and Prisoner Rescue community, with some wanting a bit more of a frenetic vibe and larger squad counts.
As part of regular Playlist updates, Modern Warfare II will introduce 12v12 Search & Destroy as well as a 12v12 Prisoner Rescue mode. These single-life game modes may be even more intense with double the players in the lobby… Just remember to keep that trash talk respectful when you hit that clutch 1v7 moment.
The 6v6 versions of these experiences will still be available in Quick Play, but expect there to be Featured 12v12 Playlists of these modes during Season 04.
More at Mid-Season, Including RAID Finale
The last RAID episode for Special Ops will be released as part of Season 04 Reloaded. Prepare your trio for the exciting conclusion to the RAID series before [[REDACTED]]; complete Episode 04 also unlocks new skin for Farah.
As previously mentioned, expect the Vondel Waterfront Core Multiplayer map, as well as additional updates to come as part of Season 04 Reloaded.
Season 04 of Modern Warfare II and Warzone: General and Out Of Combat Overview
GENERAL OVERVIEW
The Assault on Vondel Begins at Launch. Complete challenges to unlock new items not just for yourself, but also for the entire community, including a new melee weapon: the Tonfa.
New Weapons. In addition to the Tonfa, ready yourself with the Tempus Razorback Assault Rifle and ISO 45 SMG, both available for free in the Battlepass.
New Operators, Including Nikto. The masked ex-cover agent returns with a vengeance. Other Operators include a total badass working for SpecGru and [[REDACTED]].
Prestige Levels Continue, New Challenges Available. Reach Level 850 to unlock a special Weapon Blueprint.
Prepare for the Assault on Vondel Event
Nikto has arrived, and he’s brought company.
This deep-cover agent is taking over Vondel with his cloaked army of mercenaries; as an Operator, your mission is to fight back against Nikto’s clandestine army and reclaim the city in the Assault on Vondel Launch Event.
The Assault on Vondel Launch Event is planned to begin on Season 04 launch day (June 14) and last until July 7.
You can do your part by completing challenges, which will give you medals for personal unlock rewards as well as contributing to the grand community medal count total.
Once a predetermined number of medals are earned, features such as the Taxi Boats & Tramways, Reinforcement Flare Field Upgrade, the Favorite Supply Box (detailed above in the Warzone section of this blog), and the new rough-hitting Tonfa melee weapon will be unlocked for all Operators to take advantage of.
Five New Operators, Including Nikto
Both SpecGru and KorTac are getting reinforcements as the action expands to Vondel.
Nikto (Launch – Battle Pass)
The former FSB deep-cover agent was first spotted in Modern Warfare® (2019), using his menacing signature black mask to cover the disfiguration of his face caused by Mr. Z. A methodical and calculated soldier, Nikto is a natural-born leader who appears to fear nothing, with next to no gaps in his skill set as the ultimate soldier of fortune.
He worked with the CIA to hunt Victor Zakhaev in Verdansk, but since October 2022, he’s been AWOL… Until Season 04.
Now in Modern Warfare II, he leads a new special forces group that is taking over Vondel. Whether he is the leader of this group is unknown, but one thing is for certain: He will stop at nothing to ensure the city is his to rule.
Io (Launch – BlackCell)
Biographical intel for this Operator has been [[REDACTED]].
Ana Vega (Launch Window – Bundle)
The daughter of paramedics and Army reservists with family roots in Cuba, Ana Vega never had the opportunity to get to know her parents. Both were killed during rescue operations in the early days of the Urzikstan conflict.
The Gold Star child followed in their footsteps in attempt to reconnect with her fallen parents, graduating with top honors from the United States Military Academy and enlisting in the Army’s Combat Medic Specialist Training Program (CMSTP).
Proving her exemplary proficiency in combat and as a medic, she eventually caught the attention of her commanding officer, who fast-tracked her to a position on a prestigious Special Forces unit with the 75th Ranger Regiment.
After demonstrating her worth, she became one of the first female Ranger combat medics and was later tapped for Task Force Pineapple– a volunteer unit designed to get US assts out of Central-West Asia. During the operation, Vega was critical in saving several wounded allies from the brink of death due to an RPG, earning her a Combat Medical Badge in the process.
Inspired by the op and her parents’ sacrifice for the greater good, Ana now lends her services to more humanitarian efforts as she currently works alongside PMCs providing protection and medical care on aid missions around the globe…
And you better believe she is ready to take on any mission in Multiplayer, Special Ops, or Warzone.
Izanami (AKA “Izzy”) (In-Season – Bundle)
Biographical intel for this Operator has been [[REDACTED]].
Butch (In-Season – Bundle)
Biographical and visual intel for this Operator has been [[REDACTED]].
In addition, expect Farah to receive a new Operator skin for those who complete RAID Episode 04 later this season, an exciting conclusion to the Modern Warfare II Campaign’s direct continuation. By Season 04 Reloaded, expect something extraordinary to come to the Operator pool as part of the Season 04 Reloaded update…
Increase your Arsenal with Four New Weapons
Two versatile weapons and a martial arts tool highlight the initial offering of new armaments for Season 04.
Tempus Razorback (Assault Rifle — Launch, Battle Pass)
A masterclass in exceptional manufacturing, this Tempus Armament assault rifle features a bullpup design and frame-vibration control, resulting in a smooth and controllable full-auto 5.56 weapon.
Unrelated to an “earlier” version of this weapon with the same name, the Tempus Razorback Assault Rifle offers an impressive damage profile, rapid rate of fire and is set to add to the already deep pool of jack-of-all-trades weaponry.
How to unlock: Unlock in Battle Pass Sector D13.
ISO 45 (SMG — Launch, Battle Pass)
The ISO Platform’s answer to room clearing. This SMG dominates with a high fire rate and the stopping power of .45 Auto rounds.
A throwback to Modern Warfare (2019), the ISO 45 functions similarly to the old ISO, known for its lightweight design and decent fire rate for short- to midrange engagements. Its higher-caliber rounds make it a heavy-hitter compared to its fast-firing counterparts, but require the Operator to get those shots on target.
How to unlock: Unlock in Battle Pass Sector D19.
Tonfa (Melee — Launch Window, Assault on Vondel Event Unlock)
"This hard-polymer, edgeless melee weapon delivers blunt trauma without risk of dulling or breaking. Versatile, comfortable, and lethal in the right hands."
Centuries ago, warriors on the Japanese Ryukyu islands defended themselves using martial Kobudō — the “old martial way” using armor and weapons such as the bo staff and sai.
Another one of these weapons is known as the Tonfa. This wooden baton has a handle located roughly a third of the way down the weapon’s length. Dual-wielded, the Tonfa is a defensive weapon first (although there is no way to “block” in Call of Duty), but it is a powerful tool for dealing devastating strikes to your opponents.
In addition to having some new Finishing Moves, this new martial arts tool offers a unique change-of-pace option within the Secondary Melee Weapon pool.
How to unlock: The final Assault on Vondel Unlock, along with the “Lion’s Share” Weapon Blueprint.
Additional Armament: Expect the [[REDACTED]] Shotgun to be added to your available arsenal at Season 04’s mid-season point.
Multiplayer and Warzone Ranked Play in Season 04
Season 04 of Modern Warfare II and Warzone bring another Ranked Season, with this being the first-ever full Ranked Season of Warzone!
Hopefully you’re ready to compete, because there are plenty of new rewards for both Multiplayer and Battle Royale Ranked Play:
Multiplayer Ranked Play Rewards
5 Wins: ‘Season 04 Competitor’ Weapon Sticker 10 Wins: Pro Re-Issue Vaznev-9k Weapon Blueprint 25 Wins: ‘Please Rotate’ Weapon Charm 50 Wins: ‘Lock it Down’ Large Weapon Decal 75 Wins: ‘MWII Ranked Play Season 04’ Loading Screen 100 Wins: ‘MWII Season 04 Ranked Veteran’ Weapon Camo
Battle Royale Ranked Play Rewards
Placement Challenges Finish ‘Top 15’ 25 Times: ‘Cash Out’ Large Decal Finish ‘Top 5’ 25 Times: Pro Issue Lachman Sub Blueprint Finish 1st Place: ‘Team Wipe’ Weapon Charm
Kill & Assist Challenges Get 25 Kills or Assists: ‘WZ Season 04 Competitor’ Sticker Get 250 Kills or Assists: ‘WZ Ranked Play Season 04’ Loading Screen Get 1000 Kills or Assists: ‘WZ Season 04 Ranked Veteran’ Camo
Earning Rewards and Top 250
In addition, you can still earn rewards based on your highest Division reached during that the season. Remember that your starting Division (and SR) is based on how you finished in Season 03.
And remember: the #1 player in Season 04 on the Top 250 Leaderboard will receive a unique, one-of-a-kind Calling Card and Emblem for the ultimate bragging rights… Until Season 05, because a true number one player is only as good as their last season.
Prestige Levels Continue, New Challenges Available
It’s time step up to Prestige 17.
When Season 04 launches, the Prestige Rank cap is set to increase from 13 to 17, with a new maximum level cap of 850. Each of the four new Prestige Ranks and 200 levels come with a new icon besides the number, as follows:
Prestige 14: Unlocked at Level 700. Prestige 15: Unlocked at Level 750. Prestige 16: Unlocked at Level 800. Prestige 17: Unlocked at Level 850 — this is the maximum level that can be achieved in Season 04. Players will also receive an exclusive Weapon Blueprint for reaching this Prestige Rank.
Remember that every Prestige Rank you’ve unlocked so far – and the additional Prestige Ranks available at the start of Season 04 – unlock a new set of Challenges. To access all the Challenges available in the game, simply open the COD HQ menu (visible at the top-right of your screen), select the “Challenges” tile, and for Prestige-related Challenges, check out the Calling Card Challenges section. Complete these Prestige Challenges to earn new Calling Cards, including Animated Calling Cards for completing full sets of Challenges.
As before, all progress will not reset at the beginning of each Season. You can continue ranking up at the level at which you ended Season 03, whether it was before the Prestige Ranks (1–55) or within the Prestige Ranks (56–650).
Patch Notes Available Next Week
In addition to blog posts about featured seasonal content, the Call of Duty studios will release Patch Notes that detail all the changes coming with this major seasonal update.
Patch Notes will include weapon balancing updates, as well as bug fixes and more. Expect Season 04 Patch Notes to drop just prior to launch, on June 14.
OUT OF COMBAT OVERVIEW
New Official Twitter account is now online, dedicated to publishing centralized updates regarding live-game issues, fixes, patch notes, and more.
When the Chips Are Down, Who Will Fold? And who will win Call of Duty League 2023 Championship? Witness all the action at the Call of Duty League Championship Weekend going down June 15 – 18 at the Thomas & Mack Center UNLV.
Your Own Personal Ghost. Everyone needs Ghost watching their six; get the new figurine from the COD Shop and stay frosty.
Still Time to Upgrade. With dozens of weapon platforms to level up and a dozen-plus Operators to unlock – not to mentioning everything coming in Season 04 – there is plenty of reasons to get Modern Warfare II.
New Official Twitter Account: CODUpdates
In partnership with our incredible studios collaborating on the Call of Duty franchise, we are excited to announce a new official Twitter account that’s dedicated to publishing centralized updates regarding live-game issues, fixes, patch notes, and more: @CODUpdates.
Begin following today to be up-to-date on the latest consolidated updates across all games and modes, including Call of Duty: Warzone and Call of Duty: Modern Warfare II, as well as our full library of Call of Duty titles. This new effort, bringing together important updates across all of the Call of Duty studios, is a part of an ongoing effort to keep our players informed with all the latest intel from across the franchise. Drop in and give us a follow to never miss an update!
The Call of Duty League 2023 Championship Goes All In
It’s all come down to this:
The 2023 Call of Duty League season is coming to a close June 15-18. The top eight teams with the most CDL points will head to Las Vegas, where they will compete for the coveted $2M+ prize pool and priceless bragging rights as the best Modern Warfare II team in the world. Don’t miss the action, snag your tickets before they’re gone. Fans can also catch every second of the heat live on Twitch and YouTube, while earning viewership rewards to unlock in-game.
And for fans who are looking to tout their best in gameplay, the 2023 CDL Championship Pack is now available.
COD Shop Highlight: Orion Ghost Collectible
The Call of Duty: Modern Warfare II Orion Ghost Collectible Figurine is small but mighty. Standing at 6.5 inches tall, this collectible depicts Ghost in an all-too-familiar camo. Only this time, it’s not just his weapon standing out. Buy it here!
Head over to the Call of Duty Shop for more figures and collectibles, as well as the latest in COD merch.
Upgrade to Modern Warfare II, Get Rewarded in Warzone
Haven’t experienced Modern Warfare II yet?
You are missing out on Premium XP while playing Warzone, quick ways to level up over 50 weapons through Multiplayer and Special Ops, Multiplayer Ranked Play and its exclusive rewards, and the ability to unlock 14 exclusive Operators to use across both games.
Plus, those who own Modern Warfare II can access content coming as part of Season 04, including six additional Multiplayer maps across Gunfight, Core 6v6 modes, and Battle Maps for all-out Ground War skirmishes… All dropping right when the season launches on June 14.
New Creator Bundles Bring TimTheTatman and NICKMERCS to Call of Duty
Pledge your allegiance to the Tatman army and show your support for the MFAM legion with two new creator-themed Bundles featuring Call of Duty® streamers TimTheTatman and NICKMERCS.
The inked-up TimTheTatman and the Spartan-themed NICKMERCS Operators come packed with their own Pro-Tuned Weapon Blueprints, as well as Finishing Moves, Charms, Loading Screens, Emblems, and more so that you can fully embody these Call of Duty titans for all your battles in Call of Duty®: Modern Warfare® II and Call of Duty®: Warzone™ 2.0.
Both Bundles will launch in the in-game Store starting at 10 AM PT on May 31.
Tracer Pack: TimTheTatman Operator Bundle
Featuring recorded voice lines and a full-body scan of TimTheTatman, this Operator brings the pain to all his opponents. The two Pro-Tuned Weapon Blueprints are emblematic of his WarzoneTM 2.0 playstyle — both include tattoo designs that change as you switch up the chosen weapon camo and a Death Effect causing victims to explode in a burst of waffles, donuts, and tacos.
The full Bundle includes the following items:
“TimTheTatman” Operator, including a hard carry of Kevin the Penguin
“The Gatman” Assault Rifle Blueprint
“Tatty Fatty” SMG Blueprint featuring a Triple T–themed laser sight
“Tatman Tactics” Finishing Move
“Tactical Taco” Loading Screen
“Kevin” Weapon Sticker
“Waffles” Weapon Charm
“TTT” Emblem
NICKMERCS
NICKMERCS enters the field of battle with an Operator based on a full-body scan of the content creator that features two versions, one helmeted and one hooded.
The full Bundle includes the following items:
“NICKMERCS” Operator + two Operator Skins “Nickmercs Spartan” and “Nickmercs Hooded”
“Fate” LMG Blueprint
“Plan A” Shotgun Blueprint
“Kickin’ It” Finishing Move
“Legionary” Loading Screen
“MFAM”Weapon Sticker
“Nickmercs” Weapon Charm
“Spartan Merc” Emblem
Drop in as TimTheTatman and NICKMERCS Starting May 31
Both the TimTheTatman and NICKMERCS Operator Bundles will be available for purchase in the in-game Store starting at 10 AM PT on May 31.
Support Veterans With the Call of Duty Endowment Valkyrie Pack
Season 03 Reloaded is now live in Call of Duty®: Modern Warfare® II, bringing the new Alboran Hatchery 6v6 map plus Giant Infected and Faceoff 3v3 to Multiplayer, alongside the new DMZ Koschei Complex in Call of Duty®: Warzone™ 2.0.
Show your appreciation for military veterans by deploying into these new experiences and more with the Call of Duty Endowment (C.O.D.E.) Valkyrie Pack for use in Modern Warfare II and Warzone 2.0. The Valkyrie Pack honors female veterans and the substantial contributions they make every day in the military. You’ll also directly contribute to the Endowment’s mission to place unemployed and underemployed veterans in the U.S. and U.K. into high-quality jobs.
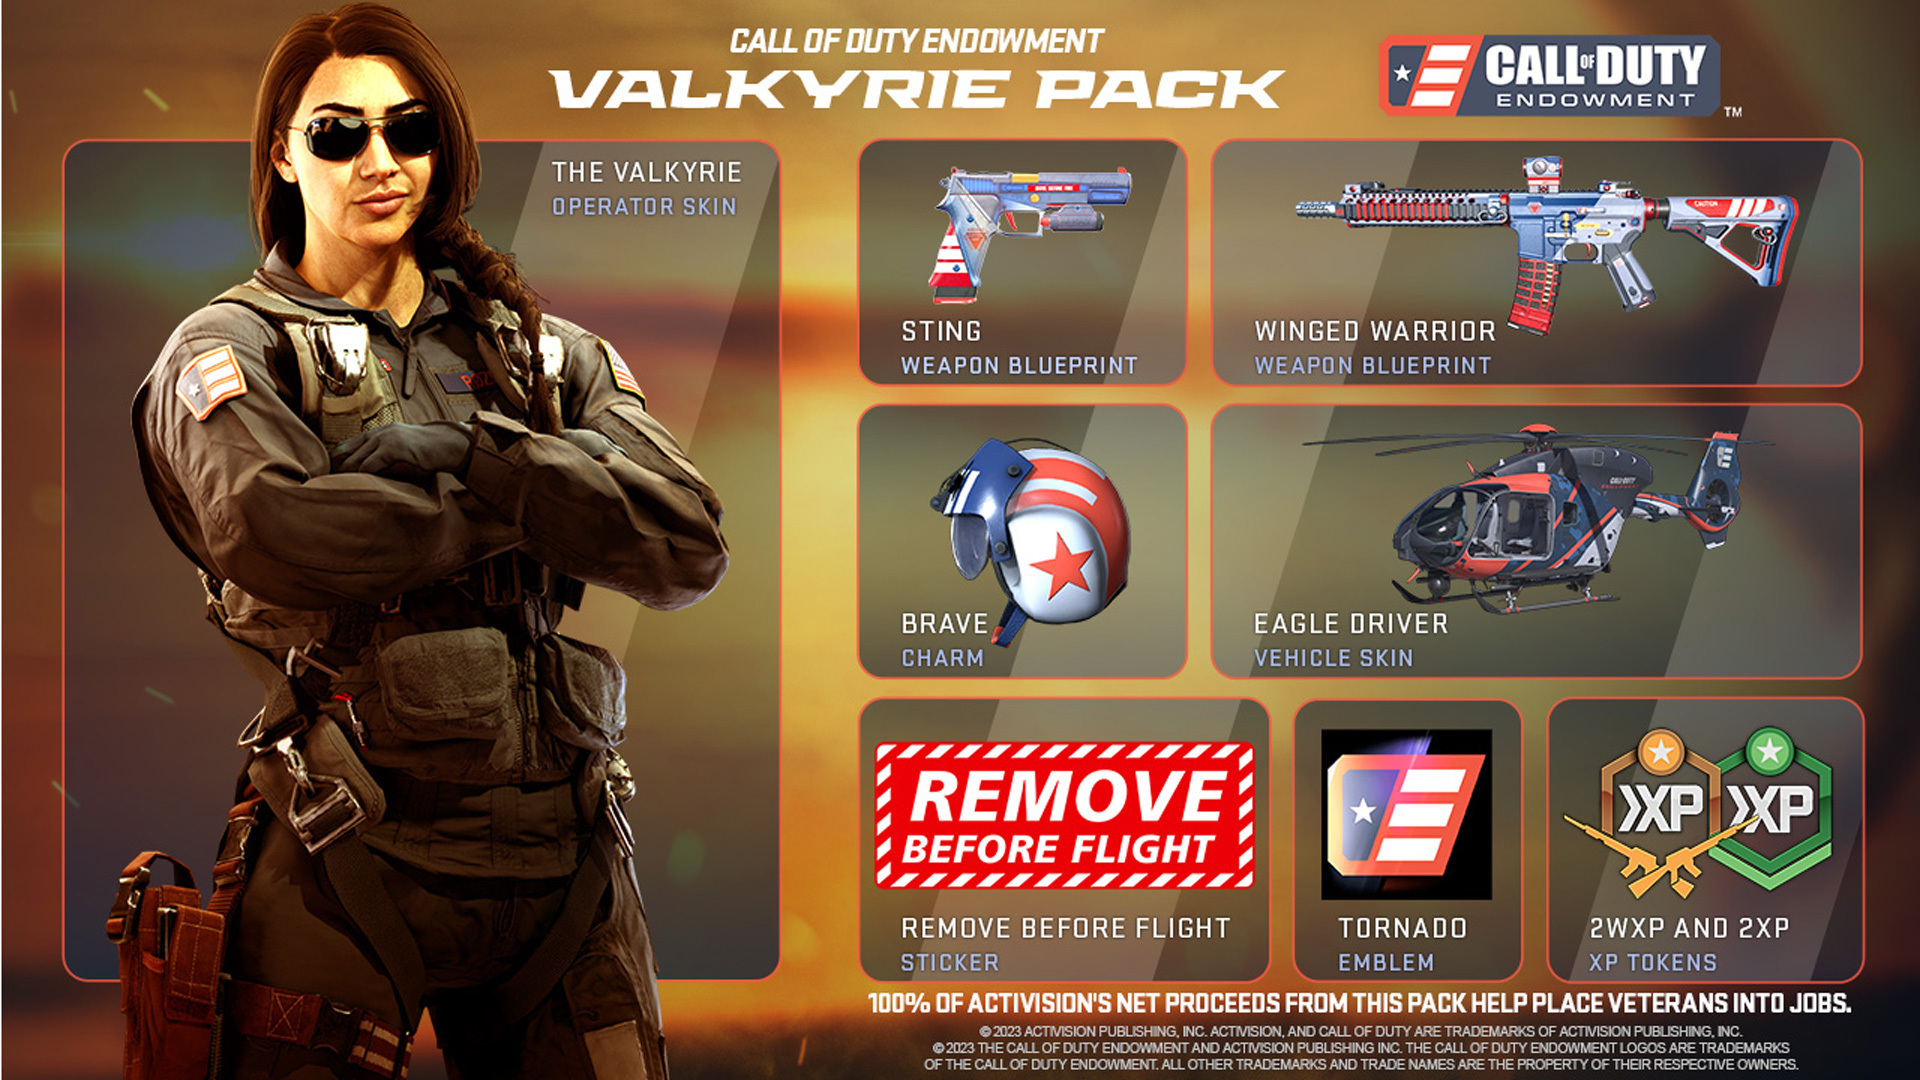
The C.O.D.E. Valkyrie Pack
Purchase the Valkyrie Pack to immediately unlock the following in-game items:
· “The Valkyrie” Roze Operator Skin · “Sting” Handgun Blueprint · “Winged Warrior” Assault Rifle Blueprint · “Eagle Driver” Light Helo Vehicle Skin · “Brave” Weapon Charm · “Remove Before Flight” Sticker · “Tornado” Animated Emblem · One Double Player XP Token · One Double Weapon XP Token
This offer is for a limited time only, so get yours while you can to support U.S. and U.K. veterans.
About the Call of Duty Endowment
Since 2009, the nonprofit Call of Duty Endowment has helped more than 118,000 veterans find meaningful careers after their military service. The Endowment seeks to help U.S. and U.K. veterans find high-quality careers by supporting groups that prepare them for the job market and by raising awareness of the extraordinary value veterans bring to the workplace. For more information about the Call of Duty Endowment, please visit www.callofdutyendowment.org.
C.O.D.E. Raises $1 Million in Loot for Good In-Game Event
Early this May, Warzone 2.0 players who extracted at least $30,000 of in-game Cash in DMZ helped raise $1 million for the Call of Duty Endowment in the first in-game charity extraction challenge. Continue supporting Military Appreciation Month by purchasing the Valkyrie Pack to help get even more U.S. and U.K. veterans into high-quality jobs.
Season 03 Reloaded Now Live
Season 03 Reloaded of Modern Warfare II and Warzone 2.0 is now live. Along with new maps and modes, the midseason update also brought Ranked Play to Warzone 2.0 along with a host of new Battle Royale features, Raid Episode 03, new camo challenges, and more.
Get the C.O.D.E. Valkyrie Pack in the in-game Store for Modern Warfare II or Warzone 2.0 and take flight against your enemies no matter the challenge.
Stay frosty.
For more information on the Call of Duty Endowment, follow @CallofDutyEndowment on Instagram and @CODE4Vets on Twitter.
For more information, please visit www.callofduty.com and www.youtube.com/callofduty, and follow @Activision and @CallofDuty on Twitter, Instagram, and Facebook.
Kevin Durant Operator Bundle | Call of Duty: Modern Warfare II & Warzone 2.0
Run the court with Kevin Durant 🎯
The Kevin Durant Operator Bundle will be available for a limited time in the Call of Duty Store starting tomorrow, May 12 🏀
Prepare to deploy to Alboran Hatchery, a new 6v6 Multiplayer map launching as part of Season 03 Reloaded in Call of Duty®: Modern Warfare® II. On this medium-sized map, Operators must navigate in and around the hatchery’s storage and warehouse facilities set on a rolling green hill beneath towering turbines.
Use the large cover objects to conduct stealth operations around the map or climb up for a view of the surrounding area. It’s all about balancing exposure with intel-gathering here, with the best teams combining the two for a highly coordinated fight.
Spawn Point: KorTac
KorTac Spawn Zone (North) — Loading Area
Though the Fishery Warehouse is right by KorTac’s spawn-in location, the building doesn’t include rooftop access or south-facing windows. If you’re looking to engage the enemy right off the break, utilize your height advantage to move up and attack the enemy down the hill.
Be aware of your sightlines when moving up, always considering the Storage rooftop. Sometimes it’s better to stay low and out of view while other times you may want to climb up to better engage the enemy.
Spawn Point: SpecGru
SpecGru Spawn Zone (South) – Shipping Area
SpecGru forces spawn behind the southern Storage, with options to burst through the building or move up along the perimeter. As the enemy team starts the match at a height advantage, you might prefer to climb onto the roof. From there you’ll gain a commanding view of the map with plentiful opportunities for long-range combat and scouting.
Midrange players may prefer instead to navigate on the ground floor, using the map’s large cover objects to control their sightlines while moving up toward the Fishery Warehouse.
Map Maneuvers: Route Planning
For the purposes of this guide, we’re breaking up Alboran Hatchery into four main sections: - Fishery Warehouse - Containers - Main Entrance - Storage Building
Fishery Warehouse
In its dominant position on the map’s north half, the Fishery Warehouse is a major thoroughfare with danger at every turn. Operators can navigate around the tanks and containers in search of their enemy or jump up and scan the area from above. It can get crowded in here fast, so consider the advantages of pushing the attack or slinking away and flanking.
Unlike the southern Storage building, the Fishery Warehouse rooftop is inaccessible. There are no south-facing windows to watch over the other side of the map, either. This focuses the fight on the inside of the warehouse, so be ready to engage on approach.
Containers
There are two exterior container zones: the central Mid Containers and the northern Side Containers. While positioned in different areas, moving through them presents largely the same challenges. Do you move slowly and carefully around the tanks, or climb up for a better view? Each presents its own risks and rewards. Note that even on top of the distant Side Containers, rooftop snipers on Storage can still take aim at your position.
Main Entrance
For this guide, we’re including the eastern Electrical map section when discussing the Main Entrance, bordered by the two parked trucks. While midrange Loadouts will often trade shots up the hill, this area can be locked down with SMGs and Shotguns, too. Use the trucks, walls, and generators to minimize your exposure to long sightlines, forcing your enemies to engage at close range. If the fighting gets too hot, you can always slip away toward the Mid or Side Containers to keep engagements at arm’s length.
Storage Building
While positioned at the lowest point on the map, the Storage building hosts the greatest power position on its rooftop. With obstacles surrounding the perimeter, it’s easy to climb up and take aim at distant enemies. Each side of the roof has windows dropping down into the Storage interior as well, so you can quickly drop out of sight when spotted.
The Storage interior is more segmented than the northern Fishery Warehouse, with two main sections and the Foreman’s Office to the side. You can also move around the building’s flat perimeter; its west side leads to the yellow stairs climbing toward the Mid Containers and the east extends toward Electrical.
Objective Routes and Rotations
Mode Intel: Domination
Domination focuses the battle in and around the industrial buildings, with the A flag in the Storage Building, the C flag along the Side Trail next to the Fishery Warehouse, and the B flag in the middle of Electrical to the east. On a map this size, it’s most effective to fight for two flags and then hold your position. Flags A and B make a good combo, as players can use the Storage rooftop to get shots on B, or take A and C to keep the enemy contained in the east.
Communicate when you’re changing positions to keep your team evenly spread, and don’t hesitate to swap Loadouts when you need to adjust your playstyle. If the enemy team starts hammering one of your positions, consider pulling back and instead seek out their less contentious flag.
Mode Intel: Search & Destroy
Every tank, crate, and other large cover object takes on a sinister new meaning in Search & Destroy, as one small mistake can quickly lead to your elimination in the round.
Smart defenders will know to avoid the sightlines from the Storage rooftop as much as possible... Unless they trust their shot is true and they can pick off an inaccurate attacker.
It pays to move as a group, but how much you split up between the two bomb sites is up to you. Bring your full force to bear on one site or get loud at one while sneaking the bomb toward the other. Whatever your tactic, move up methodically and call out spotted enemies.
On defense, it can pay to hop onto one of the containers for a better view, though drop back down ASAP to avoid rooftop snipers. You’ll likely attract attention by showing off your position, giving you the advantage in setting up a defense. It may also be worth leaving a defender in the Fishery Warehouse who can readily rush to the defense of either bomb site as needed.
Mode Intel: Hardpoint
The fight intensifies in Hardpoint as players are taken around the map in a loosely counterclockwise direction from hill to hill. The hill order is as follows: Electrical, Fishery Warehouse, Storage Building, Side Containers, Mid Containers.
Expect the aerial streaks to light up when defending any of the three outside objectives, with more intimate battles erupting around the interior Storage and Fishery Warehouse points. Use scrap time to set up an early defense at the next hill, leaving one or two teammates along the path from the previous point to ambush enemies doing the same. Consider the Birdseye Ultimate Perk for a more zoomed out minimap to better track movement in and around the Hardpoints.
Top Tips
1. Just a peek. Use your excellent climbing ability to get up and over the tanks or to get on top of one of the center trucks. There are climbing opportunities everywhere here, and while you risk exposure in using them, the intel you’ll gain is often worth the price.
2. Recon in the air. Sometimes climbing onto something isn’t the best way to gather intel on the enemy, especially when you’ve got enemies scanning the horizon for such plays. The Recon Drone Field Upgrade is great in these situations, providing visuals and marking capabilities from above without exposing your Operator to harm.
3. A tool for every job. Sightlines change fast here, between close engagements near the containers and interior spaces and longer ranged fights breaking out across the map. Consider pairing the Overkill and Fast Hands Perks to spawn in with and quickly switch between two Primary Weapons, each focused on a different playstyle. Or you can opt for one of the new Season 03 Reloaded full-auto Handguns as your Secondary once you’ve completed their unlock challenges.
4. Off you go. Are enemy snipers having a field day on the Storage Building rooftop? Be an anti-sniper and circle around the back and sides of the building, climbing up at different points to attack players taking advantage of the power position. Clearing this rooftop makes it much safer for your team to move around on the ground.
5. Control the fight. With the cover options available to you, it’s largely your choice whether to pursue and press the fight in a skirmish or to fall back and let the enemy come to you. Always consider your current Loadout, the match needs, and your risk of exposure when determining how to best approach each battle.
6. Nice setup there. Hatchery’s many tanks, vehicles, and other large cover objects make it difficult to know who or what might be just around the next corner. Equip the Spotter Perk to see enemy equipment, Field Upgrades, and streaks through walls, helping you better determine exactly where the biggest threats are located.
7. Delivery on the way. Midsized maps like this are perfect for calling in Care Packages. Whatever team you’re on, there’s a good chance you can use one of the two buildings as cover while you call in the goods.
8. Ground siege. With the Fishery Warehouse and Storage Building providing air cover, you might want to consider ground-based streaks instead. Set up the Sentry Gun to cover the Main Entrance by Storage or atop one of the tanks for greater firing visibility. Call in the Wheelson-HS to hunt down Operators indoors and out.
9. Danger! Danger! Having trouble anticipating enemy movements? Equip the High Alert Ultimate Perk for a visual warning when an enemy player spots you outside of your view. When your vision pulses, get down, reposition, and hunt down the Operator who triggered the ability.
10. Mark your spawn. After getting some matches in, you’ll start to find your favorite spots, whether that’s holding it down inside or battling through the greater outdoor areas. With a Tactical Insertion on hand, you’ll have more opportunities to get back in the action exactly where you want to be . . . provided the enemy doesn’t destroy the flare.
For more information, please visit www.callofduty.com and www.youtube.com/callofduty, and follow @Activision and @CallofDuty on Twitter, Instagram, and Facebook.
Warzone Ranked Play Is Here | Call of Duty: Warzone 2.0
The stakes have never been higher😤
Warzone Ranked Play is here 💪Climb the ladder to show off your skill in Call of Duty #Warzone. Rise to the top and get highly coveted Ranked Play rewards.