Sharpen your blades and pack your anti-goat spray, it’s time to embark on your Desktop Dungeons: Rewind adventure. Our loving remaster of the original award-winning Desktop Dungeons is out now!
We’re launching with a 15% launch discount! And if you already own the original Desktop Dungeons, you'll get the new one for free! We'll be adding it to your library soon, so keep an eye out and we'll let you know as soon as it's out!
So, what are you waiting for? Dive into the world of Desktop Dungeons: Rewind today!
And please don't forget to leave a review if you enjoy the game. It really helps us out!
Adventure awaits, - QCF Design
The Fighter, Thief, Priest, and Wizard - Exploring character classes #15
Not only is this a double threat class post, it’s a double double threat! (Double threat)^2, if you will. Today is a little different: we’ll be giving a general overview for all of the tier 1 classes, and talk tips on how to play them. We’ll also be giving hints for their class challenges, as they’re a load of fun and unlock items for your normal runs. We’ll be finishing off with some other basic tips for advancement if you get stuck. Let’s get into it!
Fighter
Abilities
💪 Instincts - Can sense enemies farther away in the fog 💪 Veteran - Gains XP when attacked by higher level enemies, and less XP needed per level 💪 Pit Dog - Dungeons runs start with 1 level of standard Death Protection on the character.
Don’t let the name deceive you, Fighters are very versatile. They make great use of spells and while also being fantastic strikers. Poke higher level enemies for XP, maybe realise you can actually kill them! You’ll be able to level up and get stronger, faster. Better. Harder.
Kin
💪 Dwarf - Dwarves were buffed in Rewind, and they’re great if you want a forgiving experience in early dungeons. +10 max HP can help you roll the early levels, so get a conversion in early. 💪 Goblin - Fighters are good at levelling up, Goblins are good at giving experience. What a match. While you won’t have any combat bonus from conversion, using level ups as heals is great, so keep an eye out for them! 💪 Elf - As we’ve said, fighters are not just focused on hitting things and can use spells well. Burndayraz’s damage scales with level, and Elves can help you get more casts off! There’s an early quest that’ll have you playing this way, so you’ll see the strength.
Class challenges
The first fighter challenge is fairly simple: use Wonafyt and Imawal to get enough levels and then take on the boss. Using Imawal on an enemy that is slowed from Wonafyt will give you one bonus XP, and the next enemy you kill after using Imawal will grant 50% more XP.
💪 Use all of your mana before exploring 💪 Use Imawal on slowed enemies for more XP 💪 Convert your items before fighting the boss for an extra edge
The second challenge is a little harder because you’ll be dealing with Goo Blobs, which have high physical resistance. Kill them with Burndayraz when you find it, and make sure to get value out of Veteran XP. The boss deals tons of damage, and attacks back when you Burndayraz. Potions are your friend!
💪 Get Veteran XP value from enemies you can’t kill 💪 Pay attention to your glyphs and where you can use them 💪 The boss will require many health and mana potions to beat
Thief
Abilities
🔪 Stabber - Deals an extra 30% damage to enemies with full health 🔪 Hoarder - +33% more items on dungeon map 🔪 Survivor - All Health Potions and Mana Potions restore both health AND mana
You scale incredibly well with Stabber and can spike super hard for a boss fight with potions! Make sure you hit enemies before you Burndayraz them to not lose your bonus damage from Stabber. This class gets better as you unlock items, so do the class challenges!
Kin
🔪 Halfling - Having more health potions for synergy with Survivor is super strong. This will focus more around attacking 🔪 Gnome - Much like the halfling, more potions gives more value from Survivor. However, you’ll be more focussed on spells like Pisorf and Burndayraz. 🔪 Orc - Gaining base damage from their conversion bonus, Orcs focus more on getting value out of Stabber. Glyphs like Getindare and Bysseps will be super useful.
Class challenges
This class has the strangest and most difficult challenges. In the bronze challenge, you’ll be playing around Getindare to take out bandits, collect their charms for health and damage, and then take out Trapped chests for their loot. The chests hit hard, so make sure you can regen enough!
🔪 An enemy with First strike will always hit you first, unless it is slowed 🔪 You’ll always be level 1 in this challenge, so your HP regen will be very slow 🔪 Take out the trapped chests ASAP! The 5th one will help you with the final boss
The silver challenge is ROUGH, but it will teach you how to use Lemmisi and Weytwut effectively. You’ll find the trapped chests again, but the enemies are far stronger. Use Lemmisi to reveal more tiles, and Weytwut to swap positions with revealed enemies.
🔪 Weytwut can be used on enemies that are far away 🔪 Lemmisi will always restore 1 mana when cast, use it to get out of sticky situations 🔪 While you’ll need potions for the final boss, using them to level up is also a good choice
Priest
Abilities
💒 Good Health - An extra 3 health is gained per level 💒 Good Drink - Health Potions are 100% effective 💒 Good Golly - Physical damage against Undead is +100%
Good Health and Good Drink alone make this class super strong. Every potion is a full health restore, and you have massive amounts of health. This combined with picking off high level undead enemies (vampires and zombies preferably) can turn you into a powerhouse.
Kin
💒 Halfling - More health potions to make use of Good Drink is a monstrously strong combo for taking down bosses, particularly in the Eastern Tundra 💒 Orc - Increased base damage will help you to kill some high level undead early, and scale up into some crazy damage late game 💒 Elf - This is more of a fun choice that ends up being a strong and balanced experience. You’ll be slinging spells more than other Priests, so enemies with high physical resists don’t get you down.
Class challenges
This class has the most simple challenges to complete, but the second challenge will be locked behind finding Gods (don’t worry, you’ll run into them.) The bronze challenge is fairly simple: kill undead, and find a chainsaw and shotgun to help you out. I’m not joking.
💒 Look for kills on higher level undead to boost your levelling 💒 Find tools to help you get that job done
The silver challenge is similar to the bronze challenge, except you won’t have as many undead enemies to pick off and Goo Blobs will have physical resistances. The boss is also incredibly tough, so make sure to save all of your health potions.
💒 Burndayraz and regen fighting Goo Blobs is the best way to take them down 💒 Save health potions and a level-up for the final boss. Frank has an unreasonable amount of health and damage.
Wizard
Wizard is fun if you like slinging some spells, and they work well with 2 other kin that have mana synergy (Gnome and Elf). And for my money Sorcerer is one of the most enjoyable classes in the game, so getting them early is fun!
Abilities
🧙♂️ Magic Sense - Can see locations of all glyphs from level start, all glyphs are small items. 🧙♂️ Magic Affinity - Skills cost -1 mana, glyphs donate 10 points to other conversions. 🧙♂️ Magic Attunement - Starts with Burndayraz, double burning stacks
See those little blue marks in the fog? Those are Glyphs! Make your way towards them to get value from Magic Affinity value ASAP. You don’t need to worry about holding them and clogging your inventory because they’re small. Magic Affinity will give you 2 Burndayraz casts from level 1, but the second part needs some explanation: holding more glyphs makes your conversions better. This means you can hoard Glyphs and convert bought items for massive amounts of conversion points. This makes your choice of Kin important.
Kin
🧙♂️ Gnome - Mana Potions are great for spiking against bosses in a way that having more mana sometimes can’t match. Having more mana potions can also make getting Mana burned less of an issue. 🧙♂️ Elf - Don’t get me wrong: having more max mana can help your early game tremendously, and it comes at a super low conversion cost. However, once you reach a point where it takes 18 tiles to fill your mana bar, things can get awkward. Still strong though! 🧙♂️ Orc - Do you know of Punchomancy? It’s not a tale the Wizards would tell you. The Orc’s conversion bonus is +2 base damage… Pisorf’s damage scales with your base damage and costs less mana than Burndayraz. Not to mention having more base damage great for synergy with Getindare and Bysseps. Go get em’ and be the best Punchomancer around.
Class challenges
The bronze wizard challenge is very easy as long as you read your spells. The guards can be bypassed. Things are going to get weird into the silver challenge though, don’t worry.
🧙♂️ Read your spells! 🧙♂️ Front gates are… Optional.
The silver challenge, aptly named “Malfunctionarium,” is a strange and difficult dungeon. Every enemy, and I mean EVERY enemy, will shuffle their positions on the map whenever ANY enemy takes damage. Not only this, but enemies with lifesteal will chunk your health when revealed. Luckily, there is a way to stop blinking enemies: slowing them. Use this to try to get monsters to stick around for 2 hits.
🧙♂️ Use Weytwut and Wonafyt to slow enemies and disable their blink 🧙♂️ Move towards the glyphs revealed by Magic Sense 🧙♂️ Wonafyt prioritises enemies in this order: Monsters that are not slowed, monsters that are the same level as the player, monsters that are a lower level then the player. There’s a trick you can do with this to slow the same monster multiple times. You’ll figure it out though, Harry.
Basic tips for advancement
Alright, this section should be short and sweet (don’t tell the Gnomes I said that.) Here are some hints on how to progress in the more “meta” sense.
Puzzles
Puzzles are the tutorials of this game. Unlock a god? Play the puzzles to see how they work. No idea how attack priority works? Play the puzzles to get all the details. That Kin you unlocked seems bad? Play the puzzles to see how they can be useful. You’ll also get rewards to upgrade your kingdom!
Class Challenges
As we’ve discussed, each class has challenges that teach you how to play them. Finishing the bronze challenge will give you gold, and finishing the silver challenge will give you an item that will start appearing in shops. Speaking of which…
Unlocking Shops
While out and about, you might find a funny looking scroll. It summons a demon that serves an interdimensional being called Bezaar. Don’t, worry they have the best bargains in town! You’ll have to do a quest or two for them to get better items, so keep an eye out for those.
The Witch is another character you’ll come across. They’ll sell you potions and send you on weird quests for more potions. This will help you in dungeons.
Unlocking Gods
Subdungeons are useful finds. They can contain gold, items, challenges, and snippets of lore. Sometimes, however, you’ll find one with an altar… Be wary of these rooms as they can be deadly, but overcoming the challenge or solving them will reward you with the presence of a God. These gods are fickle beings, and we’ll be writing a post on how to use them sometime soon!
That's all for today! Release day is coming up fast, and we hope you're excited. Remember that if you own the original before 18th April, you'll get Rewind for free!
If you want to check out the game before buying it, you can get small bites of it with our Demo... Daily!
Love you all! Stay hydrated, call your parents, and remember to breath deep!
Get Desktop Dungeons: Rewind for FREE if you own the original Desktop Dungeons!
Venerable and Cunning Desktop Dungeons Kingdom Administrators!
The hourglass of time is swiftly draining its sands, as the momentous launch of Desktop Dungeons: Rewind approaches! With only a week to go, we wanted to spend a few precious grains of time-sand to express our appreciation for all of you, our loyal players.
This year marks ten years since the original Desktop Dungeons was released, and you’ve been with us every step of this thrilling adventure. Could we have done it without you? No. You cheered us, you challenged us, and you supported us. Without you, the sands of time would have buried our beloved game.
To show our gratitude, we're offering an incredible surprise to those who have played and loved Desktop Dungeons. Do you want to know what it is? Are you ready for a spoiler? Then continue!
We’re going to be giving away Desktop Dungeons: Rewind for FREE to everyone who owns the original Desktop Dungeons when the new game releases. Yes, you read that correctly! FREE!
See you - and your friends, your neighbours and everyone else you’re going to tell about this game - next week! (Or else we release the goat.) - QCF Design
Desktop Dungeons: Rewind will launch on Steam on April 18th!
Attention, Kingdom Administrators,
We’re pleased to announce that Desktop Dungeons: Rewind will be launching on Steam on April 18th, 2023! It’s been 10 years since the award-winning puzzle roguelike first hit Steam, Desktop Dungeons: Rewind adds a new wrinkle to our beloved gameplay: Insurance! Oh, and the whole game is in 3D now too
Mark your calendars and wishlist Desktop Dungeons: Rewind now and be among the first to send adventurers to their doom, retirements, and successful retraining opportunities!
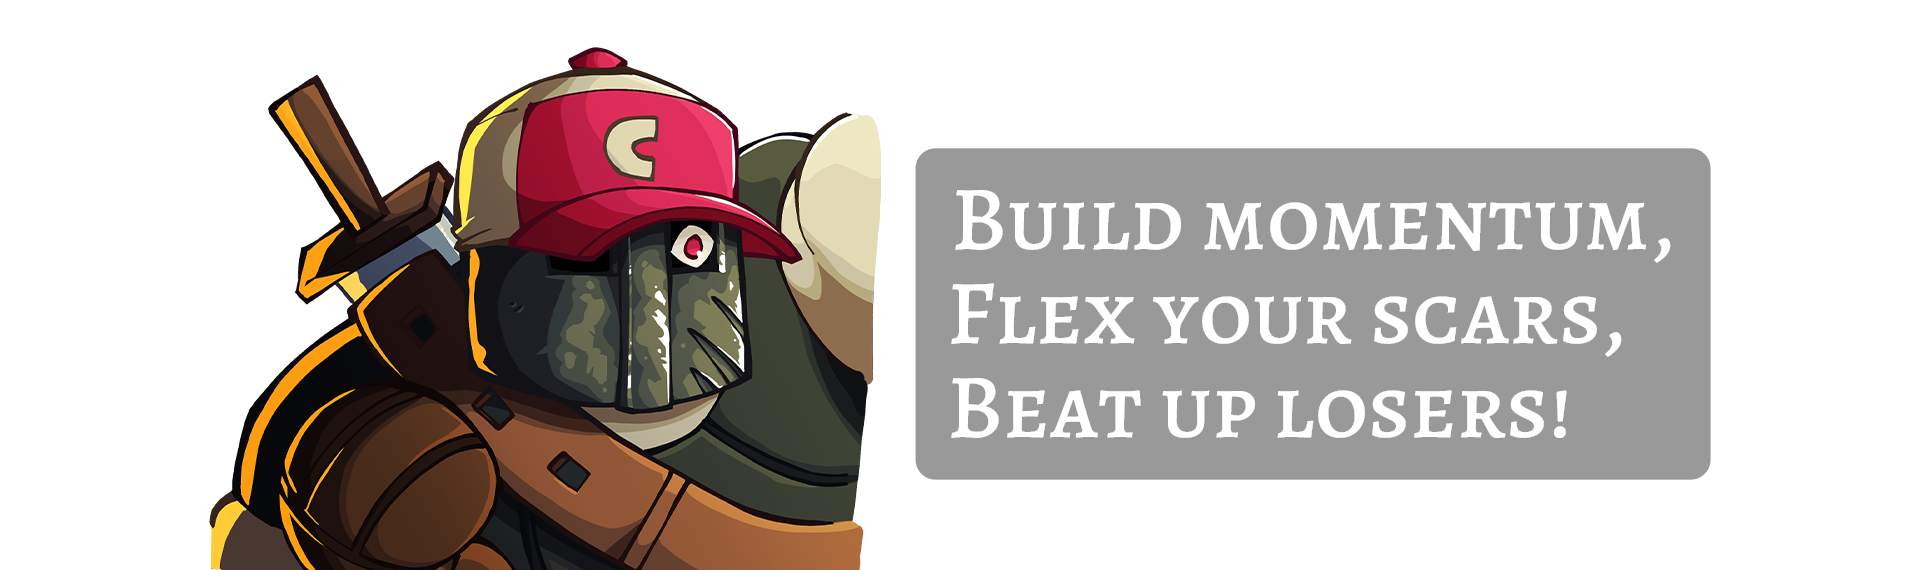
The Crusader - Exploring character classes in Desktop Dungeons: Rewind #11
You wanna learn how to stack momentum? How to stack those profits? How to stack the heads of anyone that’s in your way? You’re in the right place. Crusaders are an unstoppable force, chain pulping losers that could never get where you are. Are you ready to learn the ways of the Crusader?
(if you somehow don't find this guide helpful, check out this link for better explanations)
Abilities
💯 Scars - Poison Immune, Mana Burn Immune, Curse Immune
💯 Momentum- Successive kills add 15% bonus damage. Levelling up or losing momentum halves bonus
💯 Martyr- Extra altar spawn
Momentum. Speed. Power. This is what the Crusader is all about. Stack 'em tall, knock' em down. When you land the killing blow on a monster, momentum will give you 15% bonus damage. Hitting a monster and not killing it, or levelling up, will halve your momentum. It’s all about the momentum. Kill a couple of popcorn to get to bonus damage, and smash the boss’s face in. Level up, build more momentum, more speed, more power. Smash the boss’s face again. Boss? More like, “hold that loss.” Because they’re a loser and you’re not.
We’re tough. Real tough. We’ve got Scars. No more poison, no more mana burn, no more curse. Only Momentum. These other classes need to get on our level. We can fight Serpents, Wraiths, and Thralls without even caring, they’re so scared of us I’m surprised they even hit back. We can take out the toughest they have and not give a damn. We’ve got momentum.
We’re gonna die for a cause. We’re Martyrs, and our cause is momentum. You know we ride in the big leagues, with extra Deities around us. If they can’t give us anything, we disrespect them. Yeah, we’ll make our way through the punishment and take that Piety. Fast. We’ve got better options, bigger fish to catch. Momentum.
Kin Choices
💯 Orc - Momentum is a product of mass and velocity, and Orcs bring the mass. Hit harder. Stack those gains and then stack those profits as you sell the head of that chump they call a “boss.” Loser. We’re using mathematical formulas over here. Our base damage is multiplied by our bonus damage. That means we get value from momentum with base damage. Yeah, we’re smart. We know how to grow conversion investments.
💯 Halfling - Halflings have that grind-set investor lifestyle. Potions give us mass, our mindset gives us speed, and therefore we get that momentum. Halflings are trading entrepreneurs. They’re artists at it, really. Invest your Health Potions in Reflexes with Tikki T, or in Piety with the Glowing G, or supplemental Health Boosters with big man JJ. They’re visionaries, really.
💯 Goblin - If you’re not levelling up on the daily, you’re gonna lose at life. Crusaders don’t lose. Goblins level up. Every. Single. Day. Their conversion is supreme. You’ll lose your momentum, but pick yourself back up. Take that heal, rebuild your momentum, use that power.
Gods
💯 Taurog - Our main man Taurog has force. That’s why we like him. We stack the bodies of losers and Taurog gives us the drip we need to do our job. We’re out here doing damage to these dungeons while looking good in Gloat and Will. Smashing people with Skullpicker and the Wereward. Momentum. With Taurog, we’re an Unstoppable Fury. Literally.
💯 Dracul - Drac knows everyone is below us. Drac also knows that there’s no point feeling bad for them. This is our world, they're just living in it. Levelling up makes us lose our momentum, but gives us health. Drac cuts out the middleman and heals us straight up with Blood Swell so we can keep our streak. You know we’re hungry for success, and Blood Hunger keeps us full. It’s called “life steal,” but we think of it more as “life repurposing” because they weren’t doing much with it.
💯 Tikki Tooki - Power is work divided by time. Tikki makes work happen in no time. That’s right, the amount of power is undefinable. He likes it when we take out the little guys. He knows that’s what they weren’t going anywhere, just wasting space on your dungeon floor. In return, we get the speed to dodge attacks, the Reflexes to hit harder, and Tikki’s Edge to learn how to level up faster. That’s momentum. Never forget it.
And for those Gods that have nothing to offer us… Disrespect them. Desecrate their altars. Earthmother? Yeah we’ll take that 30 piety and chug a Burn Salve to get rid of the corrosion. Binlor? Yeah take my resists, I didn’t have them anyways. Just make sure you don’t mess with the Glowing G - actually, nevermind. Try it and let us know how it goes lil' bro.
Glyphs
💯 Pisorf - You know what doesn’t kill momentum? Getting people out of our way. Pisorf! We’ve got things to do, and your face needs to meet that wall. Damage? Check. Momentum? Also check.
💯 Bysseps - It’s all about the numbers. The numbers don’t lie, and they spell disaster for your enemies. Bysseps gives us more numbers, 30 of them to be exact, which are all added to our bonus damage. If they’re trying to resist you, you’ll slowly take that away from them as well. We got a 144 2⁄3% chance of winnin'.
Most Glyphs are useful to us, but be careful with Burndayraz as it’ll break your momentum. Now that’s not fire. Make sure to use Glyphs to hustle some Piety for your main G(od).
And that's all there is to it. Remember to subscribe to the Crusader newsletter and buy our online course to get more in depth advice for only 999 499 gold! This is a limited time offer. Use your momentum to get it.
Check out the Daily Demo for bites of the full game... Daily!
The Gorgon - Exploring character classes in Desktop Dungeons: Rewind #10
We’ve done it! We’ve reached 10 class posts! Thanks for reading them and we hope they’ve helped you get your Dailies done. Speaking of Dailies, we’ve just pushed a patch that fixes a lot of issues and buffs up the functionality of the leaderboard, so make sure to check it out.
To celebrate, we’re looking at a monster class voted on by Twitter. This week, slithering into the mix, is the Gorgon! They're simple to explain but hard to play, with an irresistible gaze and an amazing hairstyle. Let’sss get into it.
Abilitiesss
🐍 Azure Body - Starts with 25% Physical resist, Death Gaze Immune, -50% bonus damage
🐍 Amethyst Stare - Starts with Death-gaze 10%. Death-gaze effect deals unresistable damage upon attacking enemies with low health.
Much like we sssaid with the Monk and Paladin, the physical resistances from Azure Body make you better at regen fighting! This combined with your naturally poisonousss strikes from Sapphire Locks means you can often take down high level physical damage enemies.
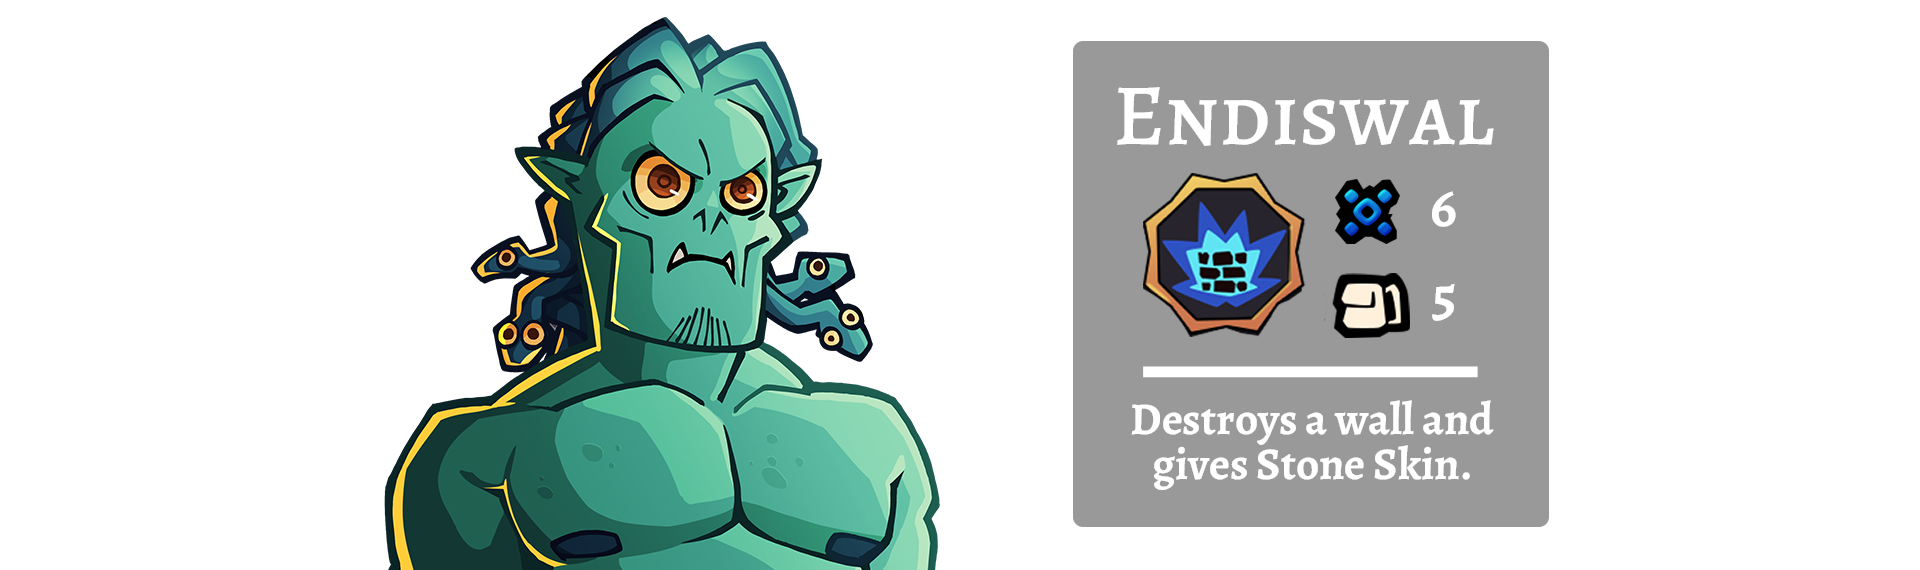
As a Gorgon, you are immune to Death Gaze and have your own Snake Stare (thanks Serafs!) Amethyst Stare gives you Death Gaze, and your conversions increase the % at which you’ll execute. When enemies are below your threshold your next attack deals unresistable damage. If this kills them they'll be petrified, leaving their remains behind. You’ll need to get rid of their remains with Endiswal.
-50% bonus damage from Azure Body is a hefty penalty, but can be overcome with some items (or a very fun Binlor strategy!) You can also bypass this by holding onto Burndayraz, which will switch up your damage profile, slow regen enemy with Burning to make poison last longer, and deal damage that increases with your level.
Before we continue, here are some notes on Poisonous Strike:
For each stack of Poisoned, enemies will not regenerate one health.
Exploring to heal will remove Poisoned stacks from enemies.
Undead enemies cannot be poisoned.
Poisonous Strike inflicts Poison stacks equal to five times your level.
Godsss
🐍 Binlor Ironshield - Starting with the Endiswal Glyph, we can easily build up some Piety for Binlor. What are we going to do with this piety? We’re going to buy Stone Form! (This irony is not lost on us.) Stone Form will give us Might whenever we destroy a wall, counteracting the -50% bonus damage penalty. Stone Fist can also be bought to knockback enemies into walls, and with Poisonous Strike you don’t need to worry about them regenerating while you chase them down. Your petrified enemies near Binlor’s altar will be destroyed when you buy Boons.
🐍 The Earthmother - Most regen fighters enjoy Earthmother because of the damage reduction from Vine Form, and the Gorgon is no different. Greenblood is also useful, as corroding enemies will significantly boost your damage throughout a fight. There is some slight anti-sssynergy as your petrified enemies block Blood Pools for Plantation.
🐍 Mystera Annur - Mystera will reward you with piety for casting glyphs, and you’ll be using Endiswal plenty! Mystic Balance will reduce the cost of Endiswal and Burndayraz, and Magic is always useful. However, Weakening will take away your physical resistance and Flames will render your attacks almost uselesss.
Two other Deitiesss to keep in mind are Taurog (for more resistances and damage) and Dracul (for the usual Dracul late game spike.) Whatever you do, don’t worship Glowing Guar-... actually nevermind. Just try it and see how it goes.
Glyphsss
🐍 Imawal - Because you know what we need? That, right, more petrification! Because your main strategy is hunting down high level enemies that deal physical damage, using Imawal on a low level enemy will give you a pretty big experience boost. Fully worth the 5 mana, and you already have Endiswal to clear the remains.
🐍 Burndayraz - Fireballs mix up your damage type, bypass the penalty from Azure Body, and apply Burning. Burning makes enemies heal as if they were one level lower. Less regen means that your stacks of poison last longer!
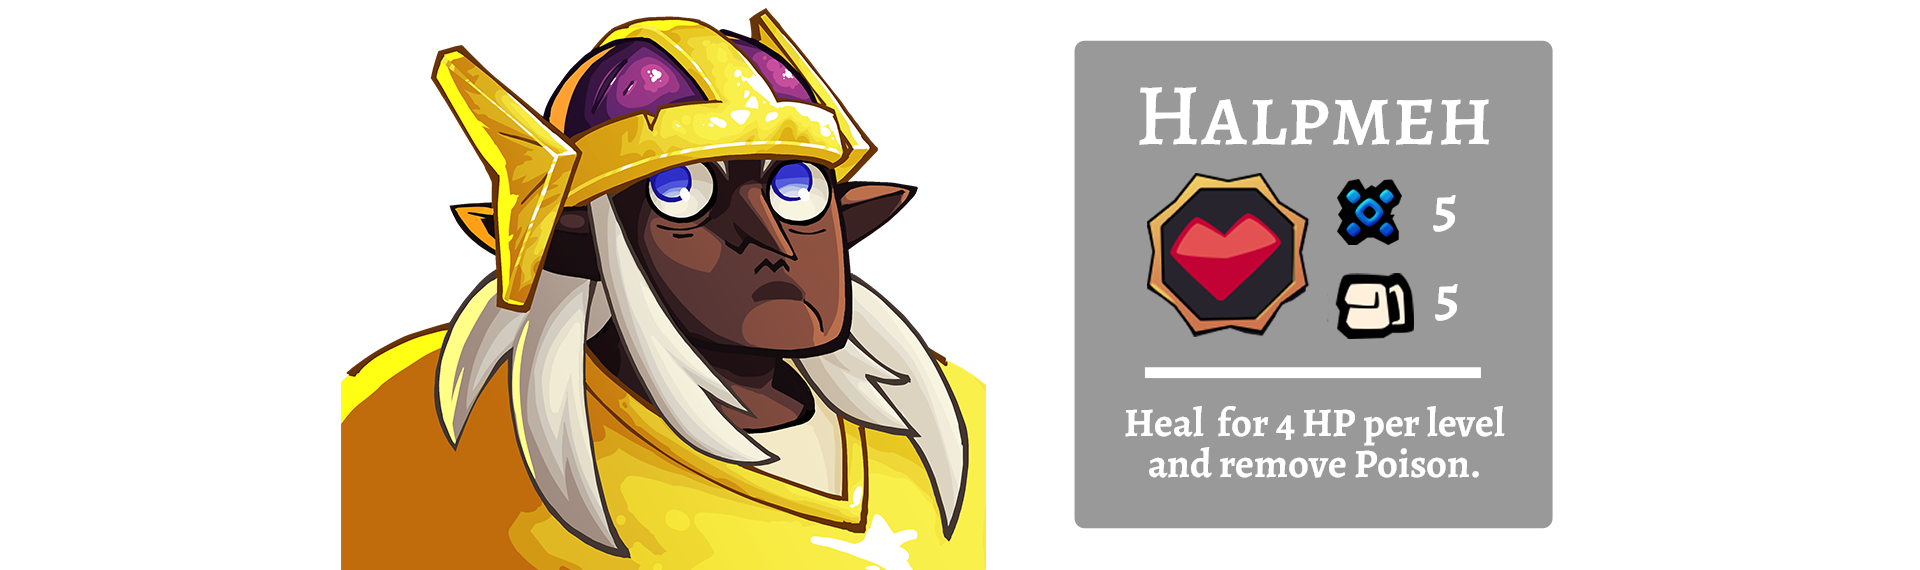
🐍 Halpmeh - Healing up in the middle of a fight can help you to build up more poison on higher level enemies, which in turn lets you explore for more health and mana. Keep that train going and they’re going to be the ones needing halp!
Obviously you’ll be using Endiswal all the time when cleaning up leftoversss and making your way around the dungeon, while using the Stone Skin it gives you to tank big hits. Getindare and Weytwut lose a bit of value because of your Death Gaze pseudo-execute. They're still useful in some situations, and Weytwut can be used to line up the Binlor combo.
Strategiesss
So which prey are you going to be looking for as a Gorgon? Here are the best snacks around that you’ll be able to munch on:
🐍 You win the mirror match with Gorgons. (This irony is not lost on us.) Your immunity to their Death Gaze combined with their physical damage and relatively low health makes them easy pickings.
🐍 Meat Men are defined by their large health bars and low damage. This is great for building up your poison and outhealing them with exploring.
🐍 Lessser snakes, called Serpents, can be handled with ease so long as you have a level up or Halpmeh ready to clear their poison.
You’ll struggle more with undead enemies who can’t be poisoned and enemies that deal magic damage. Zombies hit hard, but at least they deal physical damage which you can resist. Wraiths on the other hand will deal magic damage, can’t be poisoned, resist physical attacks, AND will mana burn you. Do not engage unless you have Burndayraz. Bandits are manageable, but will Curse away your physical resistances for a while.
That'sss all for today! My "S" key on my keyboard has been acting up, sorry about that.
The Paladin - Exploring character classes in Desktop Dungeons: Rewind #9
“Paladins are state-sanctioned spiritual warriors who can smack foes across the head with either sword or scripture depending on what the situation demands. They tend to be unbearably smug about it.”
Returning for another class post, lead by a higher power, we're talking about the Paladin! Are you a fan of commitment? Do you like carrying out the will of divine beings? Well this week’s class is for you! Play the Paladin, pledge your allegiance to your one true Deity, and do their bidding to win your run.
Abilities
📜 Holy Work - Cannot switch religions. God boons are 20% cheaper. Gods do not punish.
📜 Holy Hands - Starts with the Halpmeh glyph, regains +1 HP/level with it.
📜 Holy Shield - Starts with 25% Physical resistance.
Let's start with a short writ about Gods in Desktop Dungeons: Rewind. When you worship a God you have access to their boons, which cost piety. You can gain piety by taking actions your God likes and lose piety by blaspheming. If you go below 0 piety, you will be heavily punished by your God. You can also desecrate the altars of other Gods to appease your own, or convert to worship them instead. Converting costs half of your piety and you must have at least 50 piety.
Holy Work is the defining feature of the Paladin class. While most other classes waltz around the pantheon and make Gods work for them, Paladins know what’s right: monotheism. They’re rewarded with cheaper boons and forgiven for their sins when at 0 piety. Playing around not being punished is essential and makes the Paladin very flexible.
Holy Hands and Holy Shield work together to make the paladin a formidable force for delivering divine retribution. Healing with resistances gives more effective health, and regen fighting is a strong option as you can convert the mana you gain into health with Halpmeh. Pick off higher level enemies that deal physical damage with ease!
Kin Choices
📜 Elves - Elves make for amazing vassals due to their conversions giving them mana. Being able to cast Halpmeh three to four times in a fight will give you two health bars to play with, taking down the fiercest of foes. Does an enemy have physical resistance? No problem! Use your bonus mana to burn them with holy fireballs. Just make sure your Deity appreciates your Glyph casting habits and you’ll be set.
📜 Orcs - Orcs bring a little muscle to the Paladin’s holy house. With bonus base damage from conversion, regen fighting can make them a menace at all points in a Dungeon. As strikers, they excel at worshipping Gods like Taurog or Binlor that help you hit things. Glowing Guardian can also help you break through high physical resistances with Cleansing.
📜 Halfling - Bringing their own potions to their dungeon pilgrimage, Halflings can play in creative ways while worshipping. Glowing Guardian and Dracul will usually punish you for drinking potions, but Paladins can ignore this downside if they have no piety to lose. These extra health potions can also be given to Tikki Tooki for Reflexes or to Jehora Jeheyu for Boost Health. Having more health from worshipping Earthmother will make health potions more effective, and having them available after Taurog reduces your mana makes both great Deities a great option.
As per usual, Humans can be played much the same way as Orcs. Gnomes create mana potions, and can be played similarly to Elves or Halflings. Dwarves are alright, but Halpmeh’s heal does not scale with maximum health so there isn’t much synergy outside of having more health for resistances.
Gods
📜 Glowing Guardian - Being punished by GG will remove everything in your inventory and often end your run… But no longer! As a Paladin, you can farm piety by healing poison with Halpmeh to grow your collection of prayer beads and reach Enlightenment for a massive late game spike. Cleansing, Protection, and Absolution will keep you healthy. All at 20% off!
📜 Taurog - Wrath is your path, trodden by many and survived by few. But with Taurog at your side, you’ll be armed to the teeth with weapons of war and given the gift of becoming an Unstoppable Fury! With the reduced cost of boons, picking up Taurog’s gear is fast and simple, turning you into a powerhouse of violence. Be careful, your fire is fierce but can often be short lived, and you might struggle with less mana later into the run.
📜 Pactmaker - This is a new face to the pantheon! Pactmaker isn’t “someone” you “worship,” they are simply a force to be bargained with. When certain conditions are met, they will take your piety and provide you with a bonus. For example, Body Pact will give you resistances whenever you are damaged, and will cost you 4 piety. No piety, no bonus. As Paladins have more piety than other classes, Pactmaker can passively ramp up their strength through a run. Drinking potions? Alchemists Pact. Converting Items? Spirit Pact. This is for your own strength… Right?
While we’ve highlighted these three Gods, there are many ways to worship each Deity, and each will come with a different way to play. Some deity choices are better suited to different Kin, so if you aren’t preparing an altar, keep your mind open to the possibilities!
Glyphs
📜 Halpmeh - The butter to your holy bread, Halpmeh is your defining glyph. When cast it heals you for 5 health per level, letting you fight longer and take down higher level monsters. That’s really all there is to it! Remember that each mana you gain effectively heals your level in health, so you’re regening as if you were one level higher.
📜 Bysseps - If your strategy is hitting things over and over again, bigger arms always help. Bysseps can be cast in between each hit for a 30% damage boost, and will also shred through enemy resistances by 3% with each hit. This will help whittle down enemies with high physical resistances.
These two Glyphs are useful for most gods, and after that you’ll see your Glyphs change based on Deity. For example, you’ll use Pisorf while worshipping Binlor, some Burndayraz casts to give Glowing Guardian a burnt offering, or Imawal to make the Earthmother’s forest permanent.
That's all for today! While all Paladins worship their own Deity, they realise that each faith is valid and respect each other for their choices. 💕
The Bloodmage - Exploring character classes in Desktop Dungeons: Rewind #8
“Bloodmages are the mad scientists of the magic-using world: essentially the Sorcerer gone a little bit rotten. Not rotten enough to be considered un-heroic, but still not the sort of person you'd want to meet in a shadowy alchemy lab.”
Welcome to the 8th Desktop Dungeons: Rewind class post! Let’s dive into the class with the fastest way to your heart… The Bloodmage! Corrupted by magic and driven insane by a thirst for power, they’re guaranteed to find a way under any enemy’s skin.
Abilities
🩸 Power Hungry - Mana Potions are 60% effective and boost Sanguine
🩸 Sanguine - Starts with Sanguine 20% buff, drinking blood restores 1 mana
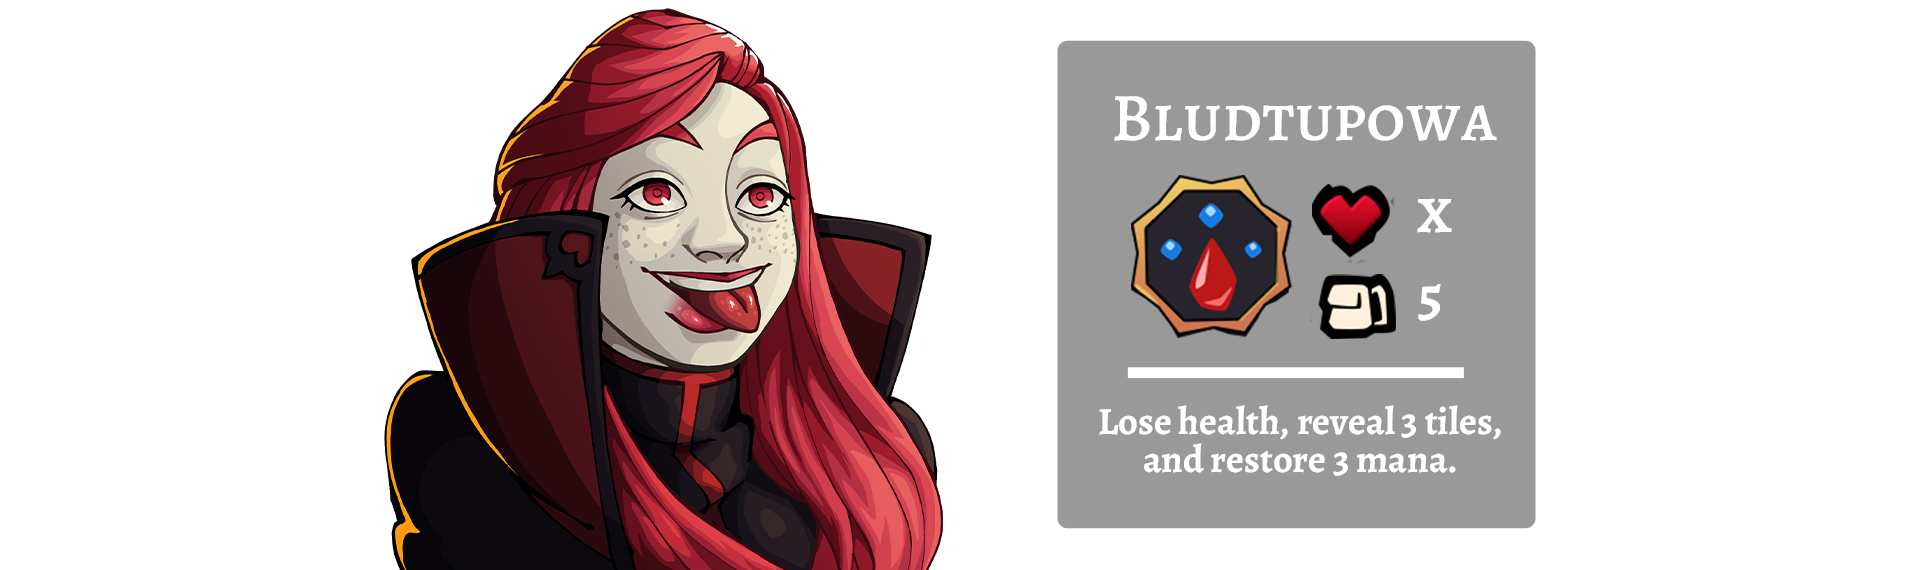
🩸 Insane - Starts with the Bludtupowa glyph, -3 max mana
Bloodmages unlock a new resource to play with: blood pools. Killing an enemy that is not bloodless will leave a blood pool on the dungeon floor. With the Sanguine trait, Bloodmages can consume them to regain 20% of their health and one mana! This can be used mid-fight to heal up for another hit or get enough mana for a Glyph cast. Either way, the rivers will run red.
Power Hungry makes Mana Potions the Bloodmage’s second favourite drink (after a home-made Bloody Mary.) Instead of restoring 40% of your mana they will restore 60% to balance out the penalty from Insane. More importantly, they increase the amount of health restored by Sanguine by two percent! This can make saving your blood pools until after drinking Mana potions an efficient choice if you don’t want to clot your run.
Insane gives the Bloodmage a free Bludtupowa Glyph at the start of each run. Bludtupowa is a unique Glyph: it reveals tiles without healing monsters, deals damage to your character, and restores mana. Trading your health for mana and making use of Sanguine can allow a Bloodmage to unleash a string of fireballs like no other class. This comes at the cost of having -3 maximum mana, but this can be played around.
Kin Choices
🩸 Human - Ah, humans. Always the versatile option! Humans are good at playing with what they get, they really are universal receivers. They can spike well in the late game with their conversion bonus and damage items, while letting Burndayraz and Pisorf help them through the early game. Once you’ve run out of tiles to explore, you’ll often be able to convert your Glyphs and pummel bosses in between blood sippin’ sessions.
🩸 Dwarf - Bigger bodies means more blood. Pretty simple! When Dwarves convert items they gain health, which works fantastically with Sanguine. With more efficient blood pools, you can repeatedly throw yourself at anything in your way and probably win. Dwarf Bloodmages can get so tanky that the only blood monsters will draw is with a red crayon!
🩸 Gnome - I guess they are called Bloodmages, so let’s talk about a Kin that plays around Glyphs. Gnomes can create their own Mana Potions when converting items, which doubles down on synergy: you have more mana to cast spells because of Power Hungry, and you regain more health from the improvements to Sanguine. Anything that stands in your way is going to bleed and burn as you switch between fireballs and fists, all while restoring large chunks of mana and health.
In general, Bloodmages are a very versatile class and can be played however you want. In the same vein as the Human, Orcs can make a good choice of Striker with a better early game but more of a reliance on Pisorf. Halflings are a similar type to Dwarves, making HP out of nowhere with Health Potions. Finally, Elves can make great casters in place of Gnomes as their bonus mana can clot the penalty of Insane.
Gods
🩸 Jehora Jeheyu - Unsurprisingly, the God of Madness is a good fit for the Mad Mages. Boost Health lets you trade a Health Potion for more maximum health which makes Sanguine more effective, and Boost Mana can help balance out the penalty from Insane. Losing a Mana Potion from Boost Mana can feel bad unless you’re playing a Gnome, but it’s usually worthwhile.
🩸 Dracul - The God of Undeath himself, and the only way other classes can gain access to Sanguine. Late game, you’ll be playing around your blood pools anyways, so a Dracul conversion can be a good choice for Strikers to access Life Steal and buffed Sanguine. Blood on blood, baby!
🩸 Binlor Ironshield - As per usual, resistances are great for adventurers that restore health. Pisorf is also a good damage spell, and its lower cost fits well with the Bloodmages reduced mana pool. However, winning with Binlor late game is like drawing blood from a stone, so it’s usually wise to build up Piety and resistances before converting to another deity like Mystera or Dracul.
Whatever you do… Do not worship Glowing Guardian! He’ll punish you heavily for using Bludtupowa and slurping on your favourite forbidden sauce, which means you’ll likely end up losing all of your items. Just don’t do it. Mystera can be a good choice for Elves and Gnomes who can spam fireballs, and Earthmother is a useful god as Vine Form and Entanglement can make your run a lot smoother.
Glyphs
🩸 Bludtupowa - It’s time to talk about Bludtupowa. Let’s talk about exactly how it works: on activation it deals damage to the player equal to three times their level. It also reveals the three nearest unrevealed tiles and restores three mana. Monsters and the player do not regenerate from the tiles being revealed by this Glyph. Trading health for mana is useful when your health doesn’t matter. For example, if you’d die on a monster’s next hit, you can cast Bludtupowa to land the final blow with a Burdayraz or cast Getindare. This trade is also worthwhile if your main strategy is casting Glyphs for damage, and allows you to use Bludtupowa and Sanguine as an engine to pump out damage.
🩸 Getindare - Both Bloodmage Casters and Strikers can benefit from Getindare. As a Caster, cast Getindare before combat and explore to restore mana before beginning. Start the fireball fiesta and use the saved Getindare to make the last attack from safety. Getindare is the perfect mana cost for the amount restored by Bludtupowa, and so it can be used for important final hits when playing in a Striker style.
🩸 Weytwut - Making the Glyph list for its synergy with Pisorf, Weytwut can be used to set-up an enemy next to a wall or another enemy before sending them into the grinder. Orcs work best with this strategy as their base damage from conversions powers up Pisorf. Against two bosses this combo can win a dungeon, so hold on to Weytwut if you find it!
As usual, Burndayraz and Pisorf are the Glyphs at the heart of your attack strategy. Wonafyt can function similarly to Weytwut in a pinch, and Endiswal can help with set-up. Bysseps can be used effectively on Strikers, but casters will find little use for it.
That’s it for today! If you're healthy, remember that donating blood saves lives. World Blood Donor day is in June, so get started early 💓
The Assassin - Exploring character classes in Desktop Dungeons: Rewind #7
Wait… Did you hear that?
Of course you didn’t! Welcome back to another Desktop Dungeons: Rewind class post! This week we’ll be looking at the Assassin: a poisonous professional with a propensity for dispatching plebs. Sneak your way around enemies and slice 'em to pieces!
🐱👤 Light Foot - Exploring the area around a monster grants First Strike
🐱👤 Swift Hand - Starting attack penalty, attacking lower level monster is instant kill
Assassins are a hit squad all on their own that can be played in a variety of ways. They can be played as Strikers, relying on their regen fighting prowess, or Casters, making the best of their ability to oneshot lower level enemies. Being flexible and going for a Hybrid of these two is also viable.
Poisoned Blade gives the Assassin a free Apheelsik glyph at the start of each run. Apheelsik poisons enemies, which stops their regeneration for an amount of health based on your level. This helps the Assassin to attack enemies and explore without enemies regenerating health! Apheelsik synergises well with Light Foot, as you’ll want to reveal the area around an enemy to have access to First Strike. As a final nail in their coffin, you’ll deal bonus damage to poisoned enemies.
Swift Hand is the Assassin class's defining feature: attacking any enemy that is a lower level than you will instantly kill them, regardless of how much damage you have. Interestingly, this ability is what makes a Caster build viable! Most Casters will neglect their attacks in favour of spell damage, which can make killing lower level enemies (nicknamed “popcorn”) cost health for attacks or mana for Glyphs, and therefore cost black space. Swift Hand can also make levelling during a fight for the healing very easy, as killing popcorn is automatic.
On the flip side, Swift Hand also gives a penalty to your starting attack bonus. This means that you rely on poisoning an enemy to deal more damage with attacks. Playing around this usually involves your kin choice, which we’ll get into now!
Kin Choices
🐱👤 Human - Make for a great choice when planning to play a Striker build, as their conversion bonus of 10% damage can offset the attack penalty from Swift Hand. You’ll still need Glyphs like Apheelsik, Bysseps, and Burndayraz to take down tough foes, so stay flexible throughout your run and be willing to play a Hybrid depending on what you find!
🐱👤 Elf - Elves favour a Caster build with their conversion bonus providing a boost to your maximum mana. Finding a Burndayraz during the mid levels of your run is important, so you might consider preparing Flame Magnet. Instead of poisoning enemies to regain your health, you’ll be doing it for mana to fling fireballs. Instantly killing lower level monsters means you don’t need to worry about wasting space to heal or restore mana!
🐱👤 Goblin - Welcoming a new Kin to the Class Posts, we have the Goblin! Goblins are a very unique Kin, as they gain experience from converting items. This sneaky boost to your levels makes Swift Hand incredibly strong. Goblin Assassins can set themselves up to level up many times in a single fight, giving them refreshers on their health. Watch a boss deal with that!
As an alternative to Humans, Orcs can make for great Strikers at the cost of versatility. Orcs don’t do very well with Hybrid Assassin builds. If you don’t feel like playing an Elf, Gnomes make for a decent substitute. It’s a bit of a downgrade, but if you can prepare items that synergise well with potions like Trisword it can be a slight upgrade.
Gods
🐱👤 Tikki Tooki - Well if we’re killing for something, it’s probably money (or experience, in the case of interning Assassins.) Tikki is a difficult god to manage early into a run because he’ll punish you for being hit multiple times by the same enemy. No regen fighting for you… What makes him good to worship is Tikki’s Edge, which gives you bonus experience on kill. When you’re snacking on your popcorn with your Swift Hands, this stacks up fast. Any piety you have left over can be spent on potions to spike for a boss fight.
🐱👤 Mystera Annur - Assassins can make great casters because of their ability to kill lower level enemies with a snap of their fingers. Getting mana from Mystera through Magic can make for a couple more spell casts, and using Weakening to crack through resistances is amazing! And just like that, they disappear… Magic!
🐱👤 Dracul - We haven’t talked about Dracul in a class post yet. This is mostly because he’s a big scary vampire man, but it’s also because he’s used as a late-game transition to kill a boss. Blood Tithe allows you to drink blood pools for health, and Blood Swell can provide you with a full health refresh if you don’t care about being cursed. Having access to blood pools is guaranteed as the Assassin because of Swift Hand, and refilling with health during a boss fight is very valuable. However, assassins are terrible at using Life Steal (insta-killing things has a downside, who would have thought!) and so Blood Hunger isn’t useful.
Glyphs
🐱👤 Apheelsik - This Glyph is so important for the class that you start with one for free! Use it frequently to unlock your full potential. Poison, attack, regenerate, attack. Rinse and repeat until your target is nothing but a pile of poisonous chunks! They’ll never see it coming... 🐱👤 Burndayraz - Ah, good old Fireballs. Assassins are the sneakiest demolition experts, and can use fireballs as finishers or consistent damage depending on their build. Undead enemies can’t be poisoned, and so using Burndayraz as your heal negation for these enemies will help regen fighting and damage. 🐱👤 Wonafyt - Wonafyt summons a monster from the dungeon that is the same level as you and slows them. If there are no monsters the same level as you, it will teleport lower level monsters… And we know how fights go for lower level monsters! This Glyph has amazing synergy with Tikki Tooki: he rewards you for casting it, and further rewards you for killing experience valuable low level enemies. Slowed enemies are considered to be experience valuable… So get to summonin' and slicin’!
Having innate first strike from Light Foot devalues Glyphs like Getindare and Weytwut, so don't be afraid to convert them early (although Weytwut can get rid of an enemy's First Strike!) Imawal is always useful when trying to level up, especially if you're taking down higher level enemies.
And that's it for this week. To play the Assassin ASAP, wishlist Desktop Dungeons: Rewind! Also make sure to follow our Twitter, join our Discord, and play the Daily Demo.
Dive into the Desktop Dungeons Rewind: Daily Demo NOW!
Greetings, mighty Kingdom Administrators!
Are you ready for a daily dose of dungeon-delving excitement? Look no further, for the Desktop Dungeons Rewind: Daily Demo is now available for download, FREE of charge!
That's right! Starting today, a new and thrilling procedurally-generated dungeon awaits you every! Single! Day!
Test your mettle and see if you have what it takes to conquer these treacherous challenges.