New RoboRepairs: Fool Captchas and Improve Your Golf Swing!
Happy Monday, RoboEngineers!
Last week, we talked about new camera and vacuum updates. This week, we’re unveiling some brand new RoboRepair Tutorials that were made after our Steam Next Fest demo!
RoboRepair Tutorials Recap
For those that are new to this term, RoboRepair Tutorials are a collection of small challenges designed to help players learn the ins and outs of RoboCo such as how to resize a part, change joint types, and operate the Controls and/or Properties Menu. To learn more about these challenges, including why we made them, where they’re located in RoboCo, and more, make sure to check out our first devblog about them!
Become a Professional Golfer!
For RoboCo's Early Access launch, we wanted to include at least one RoboRepair about the port assignment interface on our microcontroller. In real-world robots, you use physical wires to plug sensors, motors, and other controllables into ports on a microcontroller so that the microcontroller can communicate with them. RoboCo uses a similar concept of ports to handle the references to its controllables for players using Python scripting.
RoboRepairs are a good format for covering common gotchas that players might encounter, by giving them a broken robot and an opportunity to fix it. Ports are a good candidate for this style of tutorial because they are an intersection point between RoboCo's user interface and the Python script a player has attached to a robot. So we designed a RoboRepair where a port assignment is missing and the player has to plug in the only controllable available before the challenge can be completed.
Understanding ports could help a player troubleshoot or modify a scripted robot they downloaded from another player off the Steam Workshop. And of course experienced coders will need to know where to set up port references and how to fix them when they break!
But enough about the educational value, I know what you all are thinking: What a glorious Dad bod on that golfer! We agree! Where did the golf theme come from? Well, to showcase a port assignment error, we wanted a robot to carry out a series of actions and fail when it reached one of the steps. If you’ve played golf, you’ll know that there’s little in sports more complicated than a golf swing!
I Am Not a Robot!
We also made a new RoboRepair about resizing pistons! Much like the ability to resize motors in order to increase their torque, the ability to resize pistons to make them longer is crucial to solving objectives in certain challenges (see a lot of robots from the playoff round of FGRC21). As such, we wanted to call special attention to this ability, especially since it could easily be missed, leaving players with oddly short pistons to work with.
When brainstorming possible themes for the RoboRepair, we recalled one of the earliest robots we made, back when RoboCo was a VR-only prototype internally known as RoboEngineers. During this time we built several whimsical contraptions as we developed a tone for the game, including a robot filling out the "I Am Not a Robot" captcha on a laptop. This robot really captcha’d our imagination, so we were excited to find that with a modified piston arm and an aesthetic refresh, this robot fit quite well as our RoboRepair tutorial for resizing pistons. So we're happy to have this sneaky fellow back in the game again!
Other Things We’re Working On
Q4 2022 continues to approach and our team is working hard to make RoboCo the best Early Access game possible! Here’s a list of some of the things we’ve been working on behind-the-scenes:
Cleaning up defects and usability issues in challenges
Hooking up sound effects and reviewing with our A/V Director
Revising campaign data and part unlock data
Optimizing
A new robot building feature that will be revealed in a future blog!
And that’s it for this week’s devblog! Are you excited about these new RoboRepair Tutorials? Make sure to let us know in the Official RoboCo Discord! Next week, RoboCo’s QA Analyst Austin Smythe joins us to talk about what it’s like QAing on RoboCo!
Last week, we talked about our latest RoboEngineer Spotlight honoree, Bufflehead! This week, we’re showcasing our new camera selector plus some more vacuum updates!
Take a Seat in the Director’s Chair!
Currently, there are three camera options in RoboCo: tethered follow, follow, and free look. Speaking of the free look camera, we had a couple of players during the demo ask if there was a way to move it around, and there is! To move the free look camera around the environment, hold the right mouse button and use WASD to place it somewhere new. Once you’ve positioned it correctly, let go of the right mouse button so you can drive your robot again. We've updated the hover tooltip to be clearer about this.
But enough about the free look camera, let’s talk about the new camera selector. To use it, first make sure your camera is in either tethered follow or follow mode. Once that’s done, a new camera focus selector UI will appear in the upper-right corner of the HUD.
You can then choose which robot you would like the camera to follow. Currently, the selector defaults to the largest robot, but you can select a different robot to follow via the HUD. You can also cycle through different robots by hitting Tab on your keyboard (or a remapped key of your choice).
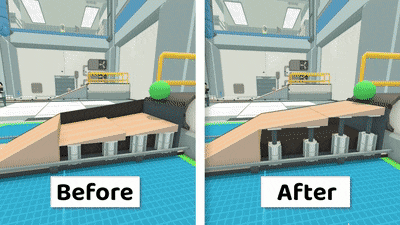
The reasoning behind this addition was simple. Unlike Besiege and other similar games, RoboCo doesn’t have a starting block that limits players to building one mechanism at a time. As a result, we’ve seen players add unattached blocks or constructs to a build zone, which our game would then read as a separate robot. This meant that when the player entered Live mode, the camera would try to find a balance between the two parts, leading to confusing camera behavior like the one showcased below.
This is why the new camera selector defaults to the largest robot. You can also cycle to a different camera to track down the unattached parts. It also allows for a new scenario in which a player can easily have more than one robot on the screen, leading to more ambitious builds and designs!
Turn Your Vacuum Into a Leaf Blower!
In addition to the new camera selector, our team has also been finalizing some updates to our vacuum part. First, our WIP vacuum up until now just drew objects closer to it, but now it actually vacuums up small objects into a receptacle. We wanted to make sure that you wouldn't lose important objects, so we also added the ability to reverse the air flow direction so that the vacuum will expel or blow away objects.
It is worth noting that you can only vacuum up and spit back out small “mesh objects” like socks. Bigger objects will just be sucked forward or blown backward while “particle objects” like smashed food mush will just be sucked up and never spit back out.
To switch between the different airflows, you can either flip the airflow direction in the vacuum's Properties Menu or map the action to a key in the Controls Menu. We've also added the action to our custom API so you can use it for programming!
To visually tell the difference between the modes, we added new particle effects. When the vacuum is in normal mode, the airflow will look like little cyclones. When it’s in reverse mode (a.k.a leaf blower mode), the airflow will look like jets.
Other Things We’re Working On
As we approach Q4 2022, our team wanted to make a habit of including a list of ongoing development projects that may interest players! Some of the things we’re working on include:
Cleaning up defects and usability issues in challenges Troubleshooting a tricky physics bug Hooking up sound effects and a little bit more music Reviewing and editing English text to make everything as clear as possible Porting the game to work with the file system on the Quest 2 A new robot building feature that will be revealed in a future blog!
And that’s it for this week’s devblog! Are you excited about the new camera and vacuum updates? Let us know in the Official RoboCo Discord or on social media! Next week, we’re unveiling some new RoboRepair Tutorials we’ve been working on that didn’t make it into the Steam Next Demo!
Last week, we released a new episode of Check Out Our Robots! This week, we’re doing another RoboEngineer Spotlight!
The RoboEngineer Spotlight is an award given to an outstanding member of our Official Discord community. This person can either be an exceptionally talented engineer, an astute teacher or programmer, an active participant in RoboCo events, or all of the above. As our community continues to grow, this person along with other winners like RedPug and Da Bald Eagul become even more essential as they continue to make our Discord a more welcoming and collaborative place.
Without further ado, please give a big applause to our latest winner….Bufflehead!
Bufflehead has been a member of the RoboCo Discord since June 22, 2022! Like previous winner KingBR, Bufflehead is one of eight engineers to be crowned a Robot Build Competition Winner. In fact, you’ve probably seen a lot of Bufflehead’s robots on RoboCo’s social media, particularly his creation Handy Andy. Handy Andy was one of several robots from the Discord featured in the first episode of Check Out Our Robots and made a special appearance in our OTK Games Expo Cinematic Trailer! He is also well known for recreating famous pop-culture robots in RoboCo, including WALLE, E-100, and R2-D2. You can see these robots and more in the video below!
If you would like to learn more about Bufflehead and our other RoboEngineer Spotlight winners, please consider joining our Official RoboCo Discord. Not only will you have the chance to have yourself and/or your robots featured in the devblog, you’ll also get access to the plethora of upcoming Discord-only competitions we have planned for RoboCo at launch!
And that’s it for this week’s devblog. Make sure to congratulate Bufflehead the next time you see them in the Discord! Next week, we’re bringing Luke Jayapalan back to talk about the new camera selector, vacuum updates, and more!
Last week, we talked about drones and some RoboCo cosmetics with a new coat of paint! This week, we’ve got a brand new episode of Check Out Our Robots for you to enjoy!
For those new to this series, Check Out Our Robots is a series dedicated to showcasing the coolest robots ever built in RoboCo! For this episode in particular, we wanted to showcase some of the coolest robots players built during the 2022 Steam Next demo as well as other robots from our development team and The 2021 FIRST Global RoboCo Challenge that we didn’t get to last time!
Let us know what you thought of the episode at YouTube or our Discord! A lot of the robots in this video come directly from the #creations channel in the Official RoboCo Discord, so make sure to join our community and scroll through the channel to see more robotastic machines! You can also check out the first episode of the series here!
And that’s it for this week’s devblog! Thank you to everyone who submitted robots to our #creations channel during Steam Next Fest! Next week, we’re highlighting a new Discord member in another RoboEngineer Spotlight!
Last week, we shared about the Color Picker! This week, we’re showcasing some spe-shell new parts and cosmetics! You may have seen these in the Steam Next demo, but not our very first entry…
Drones are Back!
One of the most exciting announcements we’ve made recently, RoboCo has officially brought back propellers! You'll be able to use the propellers with the classic rod+motor combo and some Python code to control and stabilize your robot. While we’re still working out some kinks, we're planning to include a quadcopter example robot that demonstrates how you can take your deliveries sky high!
Play Endless Fetch with Your RoboDog!
In addition to propellers, our team revisited a foam ball turret we prototyped earlier in development and have now turned it into a functioning feature! Not only is it the perfect way to keep your dog entertained and the humans nervous, but it's also fully controllable, with different levels of power and emit rates available via the Properties Menu.
BUBBLES!!!
Yet another early prototype returns! Like our turret, you can use the Properties Menu to fill the screen with as many bubbles as you can with the adjustable emit rate and particles per emission.
Fish are Cosmetics. Not Food
Sebastian, Crush, and Aquaman would love this new collection of cosmetics! Choose to decorate your robot with starfishes, barnacles, shells, coral, and anemones to give it that perfect under-the-sea look.
And that’s it for this week’s devblog! Which new part or cosmetic are you the most excited to try out? Let us know on social media or in our Official RoboCo Discord! Next week, we’ve got another episode of Check Out Robots ready and waiting to be watched, so make sure to tune it for that!
Paint All the Colors of the Rainbow with the Color Picker!
Last week, we talked with 3D Artist Demetri Sofides about the redesign for Chrome Thumb! This week, we’re showcasing a powerful but easily missed aspect of our Paint Tool - the color picker!
Previously On RoboCo…
In a previous devblog, we introduced RoboCo’s much-anticipated Paint Tool which allows players to add color to their robot via the Paint Themes Menu or the Paint Tool. The Paint Tool itself further breaks down into three types of brushes: the theme brush, the fill brush, and the detail brush.
At the time, you could only select preset colors from RoboCo's color palette. This palette of preset colors remains the quickest and easiest way to apply colors to your robot that will look nice in the game!
Shortly thereafter we added a full-fledged color picker to give players access to any color of their choosing, but we hadn't covered it in a blog until now!
What is a Color Picker?
If you’ve ever opened up a design program like Photoshop, you probably know what a color picker is. For those that don’t, a color picker is a graphical tool used to select colors or color schemes. Colors are represented with a hex code, a combination of numbers and/or letters unique to a specific shade of color. For example, the hex code for the blue we use in our RoboCo logo is #69c9f3.
How Does It Work?
To access the color picker in RoboCo, you first need to access either the Paint Tool in the RoboCo Toolbar or the Paint Themes Menu. When you click inside the box of the color you want to change, there’s a new icon in the right-hand corner next to the brush. That icon is what you click to access the color picker.
Once you’ve entered the color picker, you have one of three options for selecting a color: the hex code, the eyedropper tool, and the color slider and field.
Using the Hex Code
If you have a specific color in mind and already know the hex code, you can input that into the color picker to obtain the specific color you want.
Using the Eyedropper Tool
If you want to grab a color from RoboCo, like the green we use for the build borders, you can use the eyedropper tool to grab colors from the environment!
Using the Color Slider
If you don’t have a hex code or nothing in the environment strikes your fancy, you can use the color slider to find a color for your robot! The slider helps you hone in on a color and updates the color field to match.
Using the Color Field
Once you've used the color slider to hone in on a color, you can use the color field to target the precise shade you want.
The cool thing about this tool is that, once you find the color you’re looking for, you’ll be able to copy the hex code for it too!
Saving Your Colors
If you find a color and want to use it again, make sure to save it by creating a new Paint Theme! Once you’ve determined the colors you want and assigned them to a category, you can click the green “Save” button to add it as a preset!
You can then access those presets by hitting the "Preset" button and typing in your theme’s name.
And that’s it for this week’s devblog! Are you excited to take your RoboArt to the next level? Let us know in our Official RoboCo Discord! Next week, we’ve got some more awesome parts and quirky cosmetics to unveil!
We Re-Designed Chrome Thumb with Cutting Hedge Technology!
Last week, we unveiled RoboRepair Tutorials, a brand new way for players to learn the basics of RoboCo. This week, we’re going behind-the-scenes of Chrome Thumb’s redesign with 3D Artist, Demetri Sofides!
For those who haven’t met him, Demetri joined Filament Games in 2021. Aside from creating 3D assets (including environmental resources and cosmetics) for RoboCo, Demetri has also lent his 3D modeling skills to the upcoming Otter Planet and a ton of other cool projects. A fun fact about Demetri - he was part of an archaeological excavation in the Aegean, where he helped dig up a Byzantine-period grave containing seven skeletons 🦴
Nicole: Thanks so much for joining me today to talk about Chrome Thumb, Demetri!
Demetri: Happy to be here, Nicole! I’ve got a lot of exciting things to talk about, so I’m pumped!
Nicole: Let’s get straight to it then! However, before we talk about Chrome Thumb, I’m wondering if you could explain what exactly a 3D artist is and your own personal history with RoboCo?
Demetri: Originally, I was brought onto RoboCo to help design new cosmetics, like some of the sci-fi cosmetics you’ve seen in previous devblogs. I’ve also helped a lot with set dressing, or building visual assets for current campaign challenges. In fact, Chrome Thumb isn’t the first level I helped redesign! I also worked with Luke Jayapalan and the rest of the team to help build parts of the reimagined Freights in High Places.
Nicole: What does that process of designing new parts look like then?
Demetri: Usually it starts with Luke or another team member coming to me with an idea for a part. Sometimes it will come with a reference image, other times it may just be a description of what the part is supposed to look like and/or needs to do. From there, I’ll sketch what I think the part will look like or pull up reference images of similar real-life objects. Once we’ve then agreed upon the drafted concept, I’ll then model the prop in something like Autodesk Maya, Zbrush, or Blender. Since I have some Unity experience, I can then take that model asset and put it directly into RoboCo, where I play around with it until it's perfect.
Nicole: So what was the inspiration behind making all the new art assets for Chrome Thumb then?
Demetri: Chrome Thumb has been through a lot of iterations. Before I got to it, it was a lawn mowing challenge, something long-time fans may remember. It then evolved into a gardening challenge, with the goal evolving from cutting grass to tilling soil and planting seeds. The issue became that there was some dissonance in the visual direction, as many objectives and secrets were scattered around the environment. Because of the work I’d previously done on Freights in High Places, they decided to bring me back in to help fix that!
Nicole: I can imagine that was a very challenging task, given how different Chrome Thumb is to many of the other levels in RoboCo.
Demetri: It was, but that’s what made it super fun! Many levels take place in warehouse environments, so I really wanted to create this large, organic environment to help differentiate this level from all the others. Originally, Luke and I talked about turning Chrome Thumb into a bayou or Wild West themed environment. While the bayou idea was eventually scrapped, we did like the idea of a farmhouse and eventually added some city park elements to create the Chrome Thumb level you see now.
Nicole: Is that where you got the idea for the hedges?
Demetri: Kind of. We wanted the level to be open but not too open if that makes sense? When we had Roma Jensen (another artist at Filament) come in to work on color palettes and artwork to flesh out the space, I was thinking up ways to cleverly provide players direction on where to go without necessarily telling them where to go. Originally, I used wooden fences but then decided on hedges because it communicated the organic theme of the level better. These hedges work as a sort of maze (like the Third Task of the Triwizard Tournament in Goblet of Fire) with each section leading a player to a secret or showing off a cool asset we made.
Nicole: Speaking of player interactions, are there any cool new ways for players to interact with the level that weren’t there previously?
Demetri: The dirt! I’m so proud of the dirt particle effect I made. Because we changed the goals of the level, Luke and I collaborated on a new part called the rotary blade, which is used specifically to till soil. When a player passes over a dirt mound with the rotary blade, it creates this awesome effect that causes dirt particles to fly into the air, making the whole process of tilling the soil really immersive. I spent almost a week working on that by itself and it was very much worth it!
Nicole: Was that the most challenging asset you made for the level then? Or were there other things even more time-consuming than that?
Demetri: The hedges were probably the most time-consuming. Partially because, as I said earlier, we wanted to find a way to divide up the level and provide direction without being too obstructive. Additionally, the whole level didn’t really come together until after I brought the hedges in, so choosing what they looked like and, more importantly, where I wanted them to go really dictated what was available for me to do in those cordoned-off spaces.
Nicole: By contrast, what art did you have the most fun making?
Demetri: I have a particularly soft spot for the gnomes. Not only because they guide players to a secret but also because they spawned a Slack emoji in Filament Games’ internal messaging channel. I also put a basil plant in the greenhouse, which has a lot of personal significance to me. I’m Greek, and basil is a commonly used herb in Greek cooking, so showcasing a plant that was a must-have in my family’s own garden was really cool.
Nicole: Final question for you, Demetri - are there any secrets or fun facts about the level that you can mention/
Demetri: I don’t want to dive too much into it because it’s honestly super cool, but there’s a fake floor somewhere in the Chrome Thumb level that players can access. Also, a fun fact for players that might have played the Across the Goo Challenge is that the water effect used for the Filabee fountain is copy-pasted goo, so maybe don’t drink the water unless you're REALLY thirsty.
Nicole: Thanks so much for joining us today, Demetri! I’m so glad we got to go more in-depth into how you guys think about and design RoboCo challenges!
And that’s it for this week’s devblog! What new art asset for Chrome Thumb was your favorite? Let us know in our Official RoboCo Discord or on social media! Next week, we’re continuing our art trend and showcasing a brand new (and extremely versatile) Paint Tool feature - the Color Hue Picker!
Last time, we traveled back to the Jurassic period and showcased some fearsome dinobots! This week, we’re talking about a new campaign element to help teach the ins and outs of RoboCo - RoboRepair Tutorials!
These are meant to work together with several of the other tutorial and discoverability strategies that we covered in a previous blog. We described each of those strategies in terms of their goal, so let's do the same thing here.
RoboRepair Tutorials
Goal: Help players learn how to fix common robot-building issues and how to use features not covered in the introductory tutorial
Basically, we knew that beginning players might often run into similar robot-building issues, like having too much weight at the top of their robot that causes it to tip over.
We also knew that some features, like our joint editing system, were too advanced to cover in our introductory tutorial, and needed a different place to be taught.
How do RoboRepairs work?
Hopefully several of you got to check the RoboRepairs out during the recent Steam Next demo. For those who didn't, here's a description of how they work.
You will find the RoboRepair tutorials in small sub-menus embedded at various points in the campaign. You don't have to play the tutorials, but if you do, each is worth 1 bit. These bits add to the bits you are earning from the main challenges. Once you have enough bits, you can unlock new challenges, new parts, and perhaps a new group of RoboRepair tutorials.
Each RoboRepair tutorial consists of a topic like "Flip Motor Direction." When you load a RoboRepair tutorial, you will arrive in a small scene with a robot already built for you. The robot is meant to carry out a simple task, like driving straight ahead through a goal line. You will be guided through one or two steps to test out the robot. Inevitably it will turn out that something about the robot isn't set up correctly. For example, the robot spins in a circle instead of driving straight.
Now you know why this robot was sent to the RoboRepair division for diagnosis and repair! You will then be given access to a very limited set of tools to fix the problem -- for example, you can only edit motor properties. (No adding or deleting parts, no moving or resizing, nothing else except a Select tool, some motors to click on, and their resulting properties panel.)
You can make changes and see what happens until you find the right fix and complete the task. In our example, that would mean this:
In other words, RoboRepairs are simple puzzles that give you such a limited set of tools that you pretty much have to stumble across the solution.
RoboRepairs seem like an interesting way to teach! How did they come about?
RoboRepairs were inspired by our struggle to turn our main campaign challenges into a traditionally scaffolded tutorial. In several games I've worked on in the past, I'd aim for what I might call a Plants vs. Zombies style tutorial, where there's a linear sequence of levels, and each level teaches a new concept. The concept could be a game rule, an interesting consequence when multiple rules are combined, or a new mechanic. Other good examples of this style of tutorial include Portal or Trainyard. Games with this approach are often praised for making the game into one giant tutorial that doesn't feel like a tutorial and instead just feels like you're playing the game.
In the early stages of developing our campaign, we brought elements of that approach into RoboCo that remain to this day -- for example, we ordered our challenges into ascending complexity, and we decided to unlock new robot parts as the campaign progressed. But since each challenge requires such distinct robot functionality, our game turned out to be more of a variety pack than some other games might be. In RoboCo, you couldn't incrementally improve on the same starting robot the way that you might in Besiege where all the levels in a campaign involve some form of destruction.
Another problem was that RoboCo has pretty much all of its robot building functionality available at the start. Typically when a game delays a tutorial, it's because the feature that tutorial covers can be locked until later, like new plants in PvZ. We could do that with robot parts, but we didn't want to withhold robot building functionality beyond the initial tutorial. It sounded too frustrating: "Well, finally when I get to Challenge #4, I'll be allowed to edit joints!" Especially since you could find yourself in a situation during Challenge #2 where the default joint type wasn't right for what you were building, but now there would be no way to edit it.
Therefore, RoboCo challenged us to think outside the box. We designed and prototyped several ideas, and ultimately settled on RoboRepairs as a new challenge type with which we could add engaging on-demand learning opportunities.
While RoboCo was being developed, a video from Game Maker's Toolkit came out that succinctly put to words the nature of the problem we had been facing. As a robot building sandbox game, RoboCo shares a lot in common with the other "complex games" mentioned in the video.
Ok, so if these RoboRepairs are intended as tutorials, why not guide the player through the exact steps of the fix?
Well, first off, we should say that we do feel that guided tutorials like the introductory tutorial in our Sandwich Server challenge (showcased below) have their place. We know that beginning players do actually need the basics demonstrated for them before they can be expected to start trying more exploratory forms of learning.
But players won't think as deeply or retain info as well when they don't experience enough surprises or friction during an activity -- for example, if they are just following guided instructions in a video game and therefore everything goes according to plan. (If you're curious why this is, I suggest this delightful video on The Science of Thinking.)
We can get away with this guided approach in our introductory tutorial, because many of the actions covered in that tutorial are such core robot building functions that we expect that players will quickly repeat them after the tutorial ends, which gives the reinforcement we want.
But as players grow increasingly comfortable with the most basic actions in RoboCo -- like rotating the camera, attaching constructs, driving their robot, etc. -- we know they will appreciate the game starting to take a lighter touch with its later tutorials, giving them more agency to experiment and figure things out on their own. That's where the simple puzzles and limited tools of the RoboRepairs come in. We make the puzzle just open enough to create opportunities for mild moments of friction, but never so much friction that players should really get stuck.
If RoboRepairs are simple puzzles, isn't the title a big spoiler? Like in a RoboRepair called "Servo Motors," I can tell the robot's problem will involve the servo motors….
Exactly! We're not aiming for challenging puzzles of the sort you'd find in a puzzle game. Even something as simple as, "which of these servo motor properties will do what I want?" is enough mental friction to get your brain engaged. If the title of the RoboRepair is a major hint as to what you're trying to do, that's a positive thing, given that our goal is mild friction only. Then you just have to figure out how to carry out the repair. This is meant to be a super quick tutorial after all!
We thought about giving each RoboRepair tutorial a whimsical name like "Once! With Feeling" that would be purely for flavor and vague about the repair. But we decided it was more important that players be able to browse the list of RoboRepairs, see a topic they might want to learn about (like "Servo Motors" or "Rotational Joints") and jump directly into the tutorial of interest.
Why make the RoboRepairs optional instead of required? Why let you select them in a flexible order?
Basically, learning how to build robots in RoboCo is so nonlinear that we can't always predict what players will want to know, or the order in which they will want to know those things. This goes back to that video about "complex games."
Thinking about how to tutorialize RoboCo over the years has given me a new appreciation for fighting game tutorials -- you know, the "Lesson Mode" that walks you through every mechanic like "Walking," "Jumping," or "Medium Attack." These are not one of my preferred forms of tutorial, as they're rote and not really even intended to be fun. But one thing they do quite well is they let you access any lesson from the menu, so you can skip the things you know and get on-demand help for the specific thing you are curious about.
We figured we could mimic aspects of that flexible, on-demand access of fighting game tutorials, but improve upon the model with our RoboRepairs in two ways: No one gets excited to open up a "Lesson Mode." Instead, in RoboCo, we placed our RoboRepairs in multiple sub-menus within the campaign itself to make them optional parts of the full campaign. You could almost think of them as side quests that become available in small batches during the campaign. To avoid the rote quality of fighting game tutorials, we made our RoboRepairs more puzzle-like for the reasons we described above.
These RoboRepairs sound pretty helpful! Are there plans for more tutorials to showcase other gameplay aspects like coding or other complex mechanisms?
We're adding a couple more tutorials before Early Access. We'd love to add even more post-launch depending on what features players would benefit from most.
As for their contents, we're currently aiming to teach intermediate features that weren't adequately covered by our other strategies, rather than advanced features. Teaching how to code would be quite involved and probably deserves a whole automation campaign of its own, so we don't expect to be attempting that any time soon, but maybe someday! We do have a RoboRepair tutorial under development that will teach how to assign controllables (like sensors) to ports on the microcontroller, so that they can be referenced via Python script. This is more about teaching the user interface than coding as such.
We appreciated the constructive criticism and suggestions from players who played through the RoboRepairs Tutorials during our Steam Next demo, and we will do our best to keep those suggestions in mind as we finish up our RoboRepair Tutorials and develop new ones. In fact, chances are good that you’ll see updates regarding our progress on the Tutorials in future devblogs!
And that’s it for this week's devblog! Have the RoboRepair tutorials been helping you? What other aspects of the game would you like to see tutorials about? Let us know in our Official RoboCo Discord! Next week, we’re talking about all the new artwork and assets we created to transform Chrome Thumb into a gardener's paradise!
Last week, we did a deep dive into all the available sensors for automating robots! This week, we’ve got another Check Out Our Robots post featuring some of Earth’s most fearsome and beloved creatures which also happen to have retired from existing….dinosaurs!
However, before we introduce our new dinomechs, we wanted to personally thank everyone who participated in our demo this month! Our team was so excited to get RoboCo back in the hands of players and we were genuinely floored by the creations you made, the kind words you offered, and the help you provided to each other.
As we will continue to prepare RoboCo for its Q4 2022 launch, we will do our best to incorporate all the suggestions and constructive feedback we received as well as expand upon showcased concepts and mechanics. We’re committed to making the best sandbox robotics game we can and, thanks to YOUR efforts these last couple weeks, we are closer than ever to that goal!
Tyrannosaurus Rex
Fun Fact: While the signature “Tyrant Lizard” is known for its hilariously tiny arms, its arms weren’t all that tiny. Measuring about three feet in length, a T-Rex would’ve been able to bench press 400 pounds, which is about the size of a modern-day gorilla or lion!
Triceratops
Fun Fact: The signature horns and wide head of the triceratops made up a third of its body, making it one of the most prized fossils amongst museums and collectors. In fact, a wealthy dinosaur fan bought an entire triceratops skeleton at an auction for over 1 million dollars, which he later donated to the Boston Museum of Science. The skeleton is now affectionately named Triceratops Cliff.
Brachiosaurus
Fun Fact:Brachiosaurus is, based on its completed skeleton, the largest dinosaur to have ever lived. Reaching heights of up to 41 feet tall, this behemoth of a dinosaur was capable of standing and balancing its monstrous 89 tons on its back legs, allowing it to reach the highest of branches for food.
Pterodactyl
Fun Fact: Did you know that there’s no such thing as a pterodactyl? The term doesn’t have any meaning in the paleontologist community and is a term coined and made popular by Hollywood! Thus, the scientific name for this species is Pteranodon.
Ankylosaurus
Fun Fact: Did you know that some ancestors of the Ankylosaurus may have had armored eyelids? The thousands of bone plates on its back (which effectively made it bite-proof) and huge, club-like tail weren’t safe enough!
…And The Most Famous Dinosaur of All!
Fun Fact: Created by the Google Chrome UI/UX team in 2014, The Dinosaur Game has become the best (and only fun) part of losing your internet connection. Why did the developers decide to center it around a dinosaur? Well, they believed that being without the internet was the equivalent of going back to the prehistoric age 😂
And that’s it for this week’s devblog! What’s your favorite Dinobot? Let us know in the RoboCo Official Discord! Next week, we’re discussing the whats, whys, and hows behind RoboCo’s newest campaign element: RoboRepair Tutorials!
Last week, we recapped our time at the OTK Game Expo and our plans for Steam Next! Today, we’re talking more about the different sensors you can use for automated robots in RoboCo!
However, before we get into the blog, we wanted to remind you that this weekend is your LAST CHANCE to play our demo before it goes away on June 20, 2022! If you’ve been itching to make some complicated robots, experience the campaign first-hand, or learn more about the wonderful world of automating robots with Python, head to our Steam Page and download the demo today!
What Are Sensors?
Sensors are programmable parts that allow a robot to interpret the physical world into processable data. You could think of them as the robot equivalent to our eyes or ears. The robot can be instructed via code to take actions based on the sensor data it receives, which is what allows a robot to complete tasks on its own (like delivering a sandwich across a crowded restaurant or launching a soda can across a room).
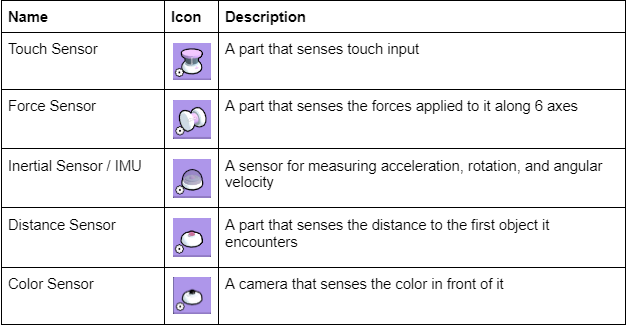
What Type of Sensors Are in RoboCo?
Because there are so many different tasks and environments to tackle in RoboCo, we wanted to start with a wide variety of sensors! The ones that are currently available to players are listed below:
How Do I Use These Sensors?
To use these sensors, you first add them to your robot. Then, as you're writing your Python code, you can use our custom API documentation to write code that allows you to control these sensors.
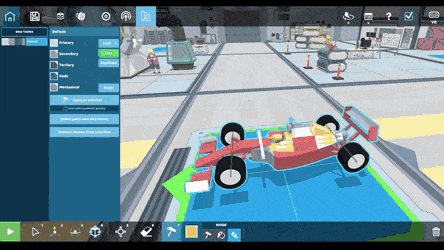
Once you upload your Python code into RoboCo via the microcontroller, you can map your sensors to specific ports. You can either do this automatically via the Auto-Assign Button or manually like in the example below.
We know that may sound like a lot, but don’t worry! Our team has already made a guide about loading scripts and assigning ports in a previous devblog called A Guide to Robot Programming. Check it out if you want to learn more about the microcontroller and how we use it to add scripts to RoboCo!
How Powerful Are These Sensors?
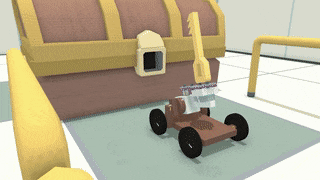
Thanks to the multitude of available sensors, we’ve been able to design and automate robots capable of completing challenges with the press of a button! Some of our favorite examples from the team are down below!
We also encourage players designing their automated robots in the demo to share their creations with us in the Official RoboCo Discord. It's delightful to see what you all are making, and our dream is to see members of our community get excited about coding and help each other so we can all have fun while becoming better RoboProgrammers!
And that's it for this week’s devblog! Have you enjoyed programming robots in RoboCo? Let us know on Discord and/or social media. Also, make sure to download the RoboCo demo before it goes away on June 20, 2022, if you haven’t already! Next week, we’re revealing some prehistoric creations in a new installment of Check Out Our Robots - Dinosaur Edition! 🦖