I hope everyone's enjoying the Railroad History Jam! There's already a ton of excellent stuff on the Steam Workshop that you can play.
This post is just to let everyone know that submissions for the jam will still be open over the weekend, which means any unfinished maps can still be uploaded up until Monday! (no strict time).
As well as that, I've just posted a "historic" version of the GeTA Sulfur map! While the original map is set in the present day, this version is set back in the steam era, and features lots of little details and changes that reflect how the fictional railway has grown over the years.
You can find this new version here: https://steamcommunity.com/sharedfiles/filedetails/?id=2428821668
And the original modern day version here: https://steamcommunity.com/sharedfiles/filedetails/?id=2411234288
And of course you can find the full collection of liveries and maps for the GeTA Sulfur here: https://steamcommunity.com/workshop/filedetails/?id=2411238890
If you've already submitted a layout, why not have a go at making a historic version! It's a lot of fun, and really adds depth to the history of your railway. And with submissions extended till Monday, it's worth a try!
Here's an example of the Oatery yard from the GeTA Sulfur map, both modern and historic:
(Click to view HD screenshot)
In other news, I've just spent the last couple of weeks away on holiday!
As you may (or may not) know, I'm actually a solo developer. I work on this game on my own, which means I handle everything like programming, modelling, map making, social media, Q&A, etc.
This means that it's quite tricky for me to take a break, since no one is left in charge to take care of things while I'm away. So events like this (jams and competitions) are a perfect opportunity for me to take a break from working on the game.
During this jam, i had a holiday around the South Island of New Zealand, and had a wonderful time! Here's some of the beautiful places I visited:
(Click to view HD screenshots)
Mt Richmond (Marlborough):
Ben Lomond (Queenstown):
And Milford Sound (Fiordland):
After a lovely holiday, I'm very excited to be getting back to Rolling Line, and I have a ton of interesting stuff planned for the rest of this year! In fact this year is going to be a big one for Rolling Line, and there are going to be some BIG features on the way.
Thank you all so much for taking part in the Railroad History Jam, and remember you can still submit entries over the weekend! I'll be making another news post after the weekend to show off my favorites and wrap-up the event.
In the meantime, enjoy!
Railroad History Jam! v3.33
Welcome to the Railroad History Jam!
Last year there was a "Fantasy Livery Jam" which was all about making liveries for your own fictional railway ideas, and it was SO MUCH FUN! So here's something I've been planning for a while, which takes my favorite parts of the Fantasy Livery Jam and makes them even better. And guess what, my favorite part was the history! I love designing layouts that have stories behind them, and a sense of time (like older and newer areas, different logos & livery versions, new & old rolling stock, and an ever changing locomotive fleet).
The goal of this event is to make a collection of liveries/mods/layouts that showcase a railway's history, be that a fictional railway you design yourself, or a real-world railway that you want to re-create the history of! (So unlike the Fantasy Livery Jam, you can now choose to base your ideas on a real-world railroad this time if you want to).
But of course (in my opinion at least) the best part is being creative and designing your own fantasy railroad! With fictional locations, logos and history.
Here is the full info:
You can make as many liveries, QuickMods, liveries of QuickMods & prop mods for your railway as you like, everything is free-game. Then you can combine all those elements together into a layout to show your railway in action.
One idea is to even create multiple layouts, showing the same location at different points in the railroad's history! e.g. one in the modern day, then a separate layout set in the steam era.
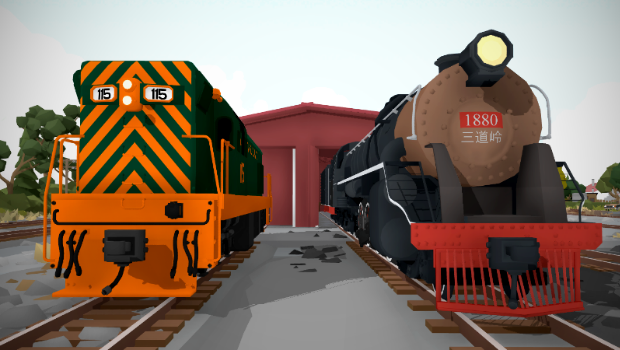
The GeTA Sulfur Railroad
Now of course I wanted to join in on this jam myself too! So I've created my own example entry already, which you can use as inspiration for creating your own entries.
It's called the GeTA Sulfur ("Geo-thermal Tranz Alpine" Railroad) and It's a fictional railway based around sulfur mining in the mountains! You can find the full collection of liveries and mods here on the Steam Workshop, and of course the layout itself:
You can read the descriptions on each workshop item to learn more about the fictional history of this railway.
I had a ton of fun making this layout, and it makes use of all the new features (like switchboards, turntables and skyboxes). I hope you have fun exploring it and learning about it's history!
Custom text signs
But that's not all! This update also adds a new feature, which is custom text labels and signs. This means you can easily type your own text labels (which are perfect for adding name-plates to your layout, or adding some extra info to the map).
You can also use them for signage inside your layout too!
You can find these new custom sign props inside the "Room -> tools" drawer:
When you have placed one on your layout, simply use the "Edit options" popup (Q on PC) to set the heading, sub-heading and text alignment.
You can also type in new-lines by holding 'shift + return'
And that's everything!
You've got all the way till the 18th of March to work on your entries for the Railroad History Jam. I can't wait to see the kind of stuff people will make! Remember you can design your own fictional railway, or base it on a real-world railway. both are fine. The goal is just to have fun and celebrate some history that you are passionate about.
Just remember to check this option when you upload to the Steam Workshop:
Enjoy!
Switchboards! v3.32
This update adds the ability to create a "switchboard" which you can put anywhere on your layout to display a map of the track (and control turnouts with little switches!). You can make as many of these as you like, and you can choose which track they display. This means you can have different switchboards for different parts of your layout!
On the same topic as skyboxes and turntables, this is another feature from the old "top of the south" layout that you can now create yourself!
These switchboards are designed to be like the real-world switch panels you find on real model railways!
You can customize the width/height/size etc of these switchboards and give them a name. As an example, the "Miami Shelf" layout (accessible by starting a new game and choosing it from the list) now has switchboards included.
These switchboards also appear inside the cab of your locomotive when you are driving in miniature! This means you can control the turnouts around you from inside the cab, plus the switchboard also shows an icon for where your train is on the map! (plus the direction it is facing)
The potential for these switchboards is pretty crazy, members of the community have already started using them to map out their huge yards, like this: (created by Doggo The Doggo on the Discord server)
Setting up and customizing switchboards
To make your own switchboard, start by grabbing one from the "Room -> tools" drawer. Then place it on the ground/table/wall.
Then use the "Edit options" popup (Q on PC) to open the options menu for it.
From here you can change some basic settings like:
Set the name label text
Show/hide the name label
show/hide the turnout control levers (like if you would prefer to have these hidden and just show the track map)
Set whether this switchboard will show up in train cabs. (this is very useful if you want to have one big switchboard for your whole map, but then have lots of smaller individual ones for each area. You can make only the small ones show up in cabs!)
Change the rotation of the track (if you want to display the track map at a different angle)
You can click on the "Board size options" button to access more display options like:
width/height
scale factor (this will zoom-in/out the map)
offset center x/y (this changes the center of the map, to move it up/down left/right around the board)
If you go back to the previous menu and choose the "track region options" button then you can set up which track this switchboard will use.
Click the "add bounds box" to spawn in a cube (just like with skyboxes!) which you can then place on your layout. You can place as many as you like to cover the area. any track inside these boxes will show up on the switchboard.
Click "back" to apply changes and the new track should appear on the switchboard!
Please keep in mind that these "bounds boxes" cannot be rotated! they need to follow a 90-degree grid. This is a technical limitation, but you can place as many individual cubes as you like to work around this.
Anyway, that's all for this update! It's great to have another one of the old legacy features finally built into a tool that everyone can use, this means I am one step closer to making a full-on remaster of the "top of the south" layout using modern editing tools! Lots and lots of updates are on the way, and plenty of stuff to look forward to! In fact there may even be a big competition/jam just around the corner *wink* *wink*
Enjoy!
Skybox editing! v3.31
Have you ever noticed the extended scenery that you can see on the "top of the south" layout? (the original New Zealand main layout).
When you are in certain areas you can see things like mountains and sea off in the distance in miniature scale, even though the edge of the table is all that is there in large scale.
Up until now this feature has only existed on the old "Top of the south" layout, and this is because that layout was made using entirely different tools than what modern player-made layouts use.
But piece-by-piece I am bringing every feature of the main layout over to the new editing system, so everyone can use these features in their own layouts!
And one of the big ones was the "extended scenery" you can see.
Well you can finally make this same effect yourself!
There is a new panel of options on the wall (next to all the room options like wall size and colors):
From here you can place props on specific layers and start creating and editing your own skyboxes.
The "large scale only" layer is useful for: - walls and room details that you only want to see when looking at the layout in large scale, but you want to be hidden when driving trains in miniature.
And the "miniature scale only" layer is useful for: - scenery that extends beyond the sides of the table, like backdrops and landscapes that surround your layout. These are hidden in large scale but you can see them when driving trains in miniature.
Beyond this you can also create your own "skybox regions" which allows you to make unique scenery show up based on where you are in the layout (e.g. show a mountain backdrop from one area, but a huge desert from another area)
But this starts to get a bit more complicated, so I've written a full step-by-step guide on how to create a layout that makes use of these new features:
With these tools you can make your layouts so much more immersive to explore, since being in miniature mode can have fully detailed skyboxes and scenery off in the distance, while you can still keep that model railway table & bench-work in large scale at the same time!
As an example, I've updated the official "Puzzling World" layout to include extended scenery using these new features! You can access it in-game just in the "new game" menu:
This is just a simple example with one layer of skybox scenery. But if you get creative with the more advanced "skybox region" system you can have multiple types of scenery on the same layout! like a vast desert that transitions into a city or mountain valley after passing through a tunnel and entering into a new skybox region.
There are already lots of map makers who are super excited about this new feature, so there's bound to be some awesome skyboxes showing up on the workshop soon!
Enjoy!
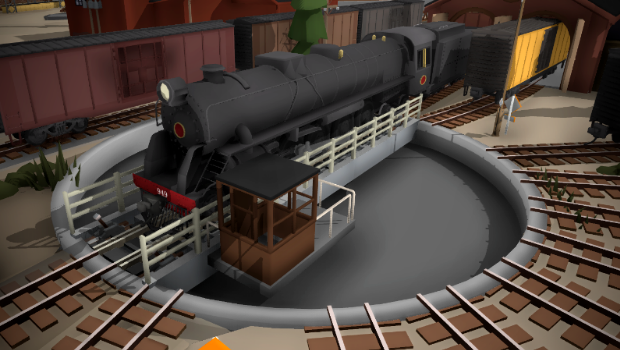
Turntables! v3.30
They are finally here! Turntables may very well be the most highly requested feature in Rolling Line's history (aside from multiplayer of course).
And three years down the line, here we are! Fully operational and customizable turntables you can use in your own custom layouts.
You can find a few examples in the new "track -> turntables" drawer:
But the real flexibility comes from generating your own ones in the "track -> generator" drawer, and switching over to the "Turntables" track type:
In this view you can customize the size, depth, and the number of track exits you want the turntable to have.
This means you can have massive turntables, or even very tiny ones!
But of course that's not all! Once you place your turntable down on the table, you can then customize all sorts of details and colors using the "Options" popup menu (left-hand-context option):
Inside this menu you can change a range of visual features of the turntable. These are:
Base - the circular base of the turntable, which scales with the track length and stays stationary
Center detail - an option extra detail in the center of the bridge that rotates with the track
Side detail - an optional small building/platform attached to the side of the bridge
Bridge - the rotating section of the turntable (the part the track is connected to)
Pivot - the center point that the bridge spins on (doesn't rotate)
Terrain - an optional square of land that fills in the gaps around the turntable, which makes it easier to build around
All of these extra details can be painted their own colors!
But also remember that turntables are the same as any other piece of track, which means you can paint them with track details like bridges, 3rd-rails, different ballast etc.
On the topic of track painters, this update also adds a bunch of new track bridge styles!
Controls
Another thing you can customize in the turntables options menu is the control style, along with a couple of other things in the "Turntable control options" menu:
In this menu you can:
Set whether the control levers are visible or not
Set the turn speed of the turntables (how fast it rotates)
The control style
The two control modes are:
"Stop at next exit" - clicking on one of the turntable levers will make the turntable spin until it reaches the next available exit, and then it will stop automatically.
"Continuous" - clicking on a lever will make the turntable spin continuously until you click it again, at which point it will stop at the nearest exit.
Aside from clicking the individual levers to control the turntable, you can also easily control it using one of the hand held controllers (the same ones you use to drive trains!)
Simply select the turntable and then use Q and E to change the direction that it turns.
Oh, and another new thing you can do with the hand-held controllers is you can control wagons with them! Before you could only control locomotives, but now you can control every wagon too. This can be really useful for shunting, hump yards, and just for fun of course. Though it may not be "realistic" it felt like such a useful feature it was worth keeping!
And that's basically everything! I'm so happy to have finally added working turntables into the game, as this is something I've been just as excited to see as the the community has.
This is actually the first proper track-related feature i've added to the game in a long time, so it's great to add some more variety to the trackwork that layouts are built upon.
I can't wait to see what kind of stuff people can do with these new tools!
Enjoy!
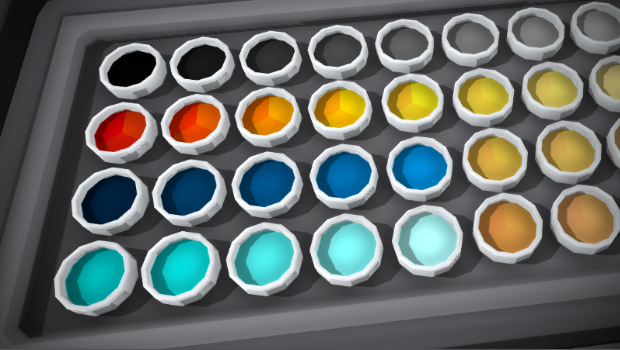
New colors (and more!) v3.29
Today's update includes something I've been meaning to add for ages!!
The original default paint colors have been slowly added to one-by-one ever since the game was first released, and have never gotten a real clean-up. For example, the choices of greens and browns have been incredibly limited, so 90% of maps all use the same shade of green. Well that's finally going to change!
This update completely re-does all of default colors, and adds tons of new useful color ranges and pallets that the game desperately needed.
But that's not all though!
This update also adds a bunch of quality-of-life changes which include:
a new "unlit transparent" material painter
"alpha cutout" material for mods
copy & paste buttons for all text input boxes
the option to copy & paste tags between mods
Ability to copy color hex-codes from any painter
Ability to clone colors from the multi-paint popup UI
an exit button to close the multi-paint popup UI
buttons to copy-paste dynamic track data from within the drawer
Small fixes for the index controls
I'll go into more detail on these new changes in this news post!
New "Unlit transparent" material painter
Much like the other material painters (like "transparent" which makes props see-through, and "unlit" which makes them glow in the dark without shading) the new "Unlit transparent" material painter makes props both see-though and glow in the dark!
This material type can also be used in mods! Along with a new version of transparency called "Alpha Cutout" (this version has less depth-fighting issues and sharper edges)
New colors
The main part of this update is the re-do of the default colors. You can still find all the original legacy paint drawers in the "misc" category!
Here are the new 4 drawers of colors:
Some new color types to note are:
Far more green options
more autumn yellows and oranges
Wide range of browns (dirt & dry grass)
Lots of desert soil colors
Set of pastel colors
Set of metallic colors (for cars)
Lots of tans and reds for brick and building materials
Rust colors
"Solid" colors, like pure red/green/blue etc
Wider range of water shades
Lots of copy-pastes
You can now copy-paste text from any textbox input window:
You can also copy-paste tags between mods and workshop uploads! This means you can easily import your own comma-separated list of tags from outside the game, or save your in-game tags to a text file.
Copying track data has always been possible by pressing "Return" while hovering over track, but there is now a dedicated "copy" button inside the dynamic track generator drawer. This is useful for copying data between track types.
Cloning colors
Much like with dynamic track, you can copy the color of any prop by pressing "Return" while hovering over it. This will spawn a painter in your hand with the corresponding color.
But this update now makes it possible to clone colors from the popup multi-paint UI by clicking on them: (the multi-paint UI also has an exit button now!)
Doing so will also copy the color hex-code to your clipboard! You can also now copy the hex-code of any painter in the drawers using "Q"
And whenever you have a color hex-code on the clipboard you can easily paste it into the custom color generator UI using the "Clipboard" button!
This also means that you can copy a hex-code from outside the game (like from an online color picker) and paste it into the game to make that color!
Index control fixes
Lastly, this update fixes the controls for cloning and editing paints from within the drawers for Index controllers. This was something i overlooked during the earlier VR updates.
Anyway, that's about everything! Lots of quality-of-life changes that make dealing with custom colors a lot easier.
These new default colors are sure to make a visual difference for maps being made beyond this point. Even though custom colors are always an option, people are far more likely to stick to the easy access of the default colors. So having more options is always great!
Enjoy!
Ka, Da & U20C liveries! v3.28
Welcome to 2021!
To start the year off, here’s a whole bunch of much-awaited custom livery templates! These are:
Steam Ka
Steam Ka tender
Diesel Da
Diesel U20C
I hope everyone had a great Christmas and New Year and has high hopes for the year to come! I certainly have big plans for Rolling Line, and there are a ton of great updates already panned. But getting things started with some new livery templates gives everyone some new variety for liveries to start the year off with!
Lots of people have already started making liveries with these new templates, and you can find a bunch of them on the Steam Workshop. You can find them simply by going to the Steam Workshop and using the “livery type” drop-down list:
Just as with all the other liveries, you can find the templates in the "Rolling Line -> Modding -> templates" folder.
Plus there's a guide here on Steam which explains how to make your own liveries! All you need to make liveries is basic image editing software (even MS Paint is fine):
Anyway, that’s all for now! This update is a nice creative one to start the year off with, but the next one will likely be a bit more “feature” oriented.
Enjoy!
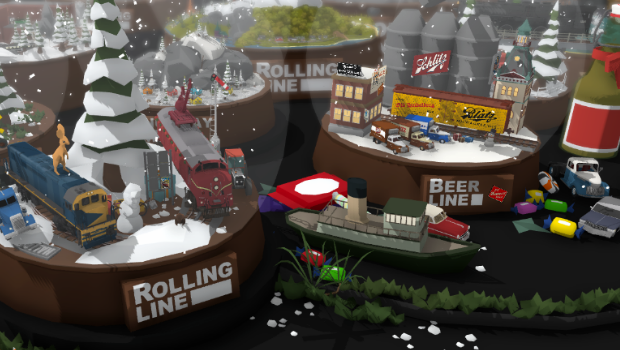
Snow globe collection! v3.27
Congratulations to everyone who took part in the Snow Globe Jam!! There were over 140+ entries and I played through every single one of them ːsteamthumbsupː
So many creative ideas, excellent detailing and really clever use of props (and even mods!). Some people re-created cities and railways in miniature, while others made abstract dioramas. Some even hid smaller railways and additional tiny snow globes inside theirs!
To celebrate the event I've made a collection of my personal favorite snow globes and packed them all into one map! Keep in mind there were many more I wanted to include but the map was getting pretty dense already (so there were still some more excellent entries that aren't included in this collection)
You can access this map simply by starting a new game and choosing the "Snow Globe Jam" map:
I highly recommend you go and have a look at all the entries for yourself! There were so many amazing ones, far more than i could have packed into one map. You can view them all on the Steam Workshop here: https://steamcommunity.com/app/754150/workshop/
And that's all for now! I hope you all had a lovely Christmas, and 2021 is right around the corner! There will be more news coming in the future as to what updates I've got planned, so keep an eye out for that. There's tons of important stuff on the horizon.
Congratulations again to everyone who took part in the Snow Globe Jam! It was a hell of a lot of fun!
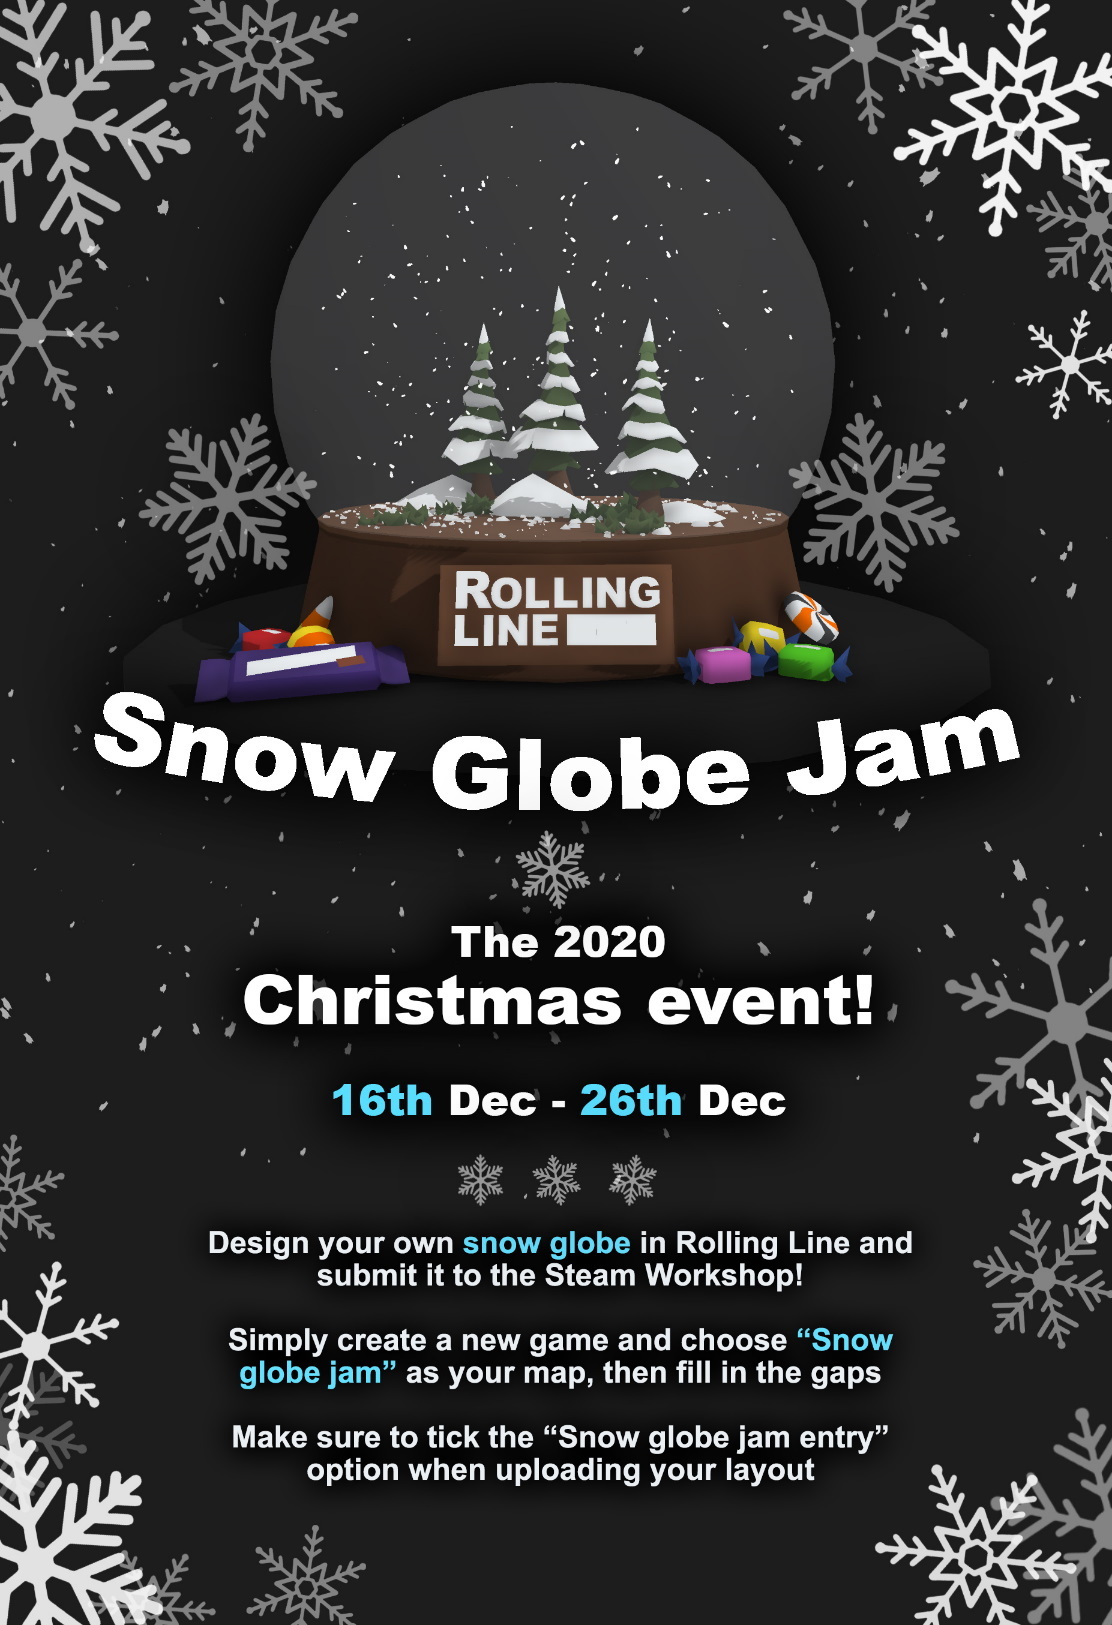
Christmas event: Snow globe jam! v3.26
Wow, 2020 sure went by quickly... It's already nearly Christmas! And that means it's time for a Christmas event.
So here's something creative, why not try making a snow globe! The goal of this "snow globe jam" is to design your own little scene inside a pre-set snow globe and then upload it to the workshop. You can make anything you like, from something really simple to something completely out of this world. There are truly no limits, other than the literal limits of the inside of the snow globe!
Joining in is simple, just start a new game (from the main menu) and choose the "Snow globe jam" map!
This will give you a map with a snow globe ready to fill, and how you fill it is entirely up to you!
I recommend that you keep the default size of the snow globe, just to keep in the spirit of trying to build within the tiny size it already has.
Technically you can scale it smaller/larger, but if you do then you might loose your chance to get included in an end-of-jam compilation (only snow globes that used the default size will be included). More info on this "end-of-jam compilation" will come when the event is complete. But if you have an idea that requires a larger/smaller snow globe then feel free to make it anyway, the more variety the better!
You can also get a copy of the snow globe prop out of the new "Misc -> Christmas 2020" drawer and use this in your layout, you dont have to use the "new game" map option.
Last thing to remember is that you need to tick the "Snow globe jam entry" option when you upload to the workshop!
And that's all! Let your creativity run wild, and see what you can build in such a tiny space.
For anyone who has been put off previous competitions/jams by the size and challenge of making a submission, this one is a super easy and approachable one. Give it a go and see what you can make!
Aside from the snow globes, this update also adds Christmas present props! You can paint them any colors you like, and you can certainly include them in your snow globe.
There's even a special golden one that is full of all kinds of interesting things:
You can find all of these presents, as well as the original snow-globe prop and a bunch of candy/chocolate bars in the new "Misc -> Christmas 2020" drawer:
As well as everything mentioned above, this update also changed a few small things:
Changed the material of the prop placing 'ghost' effect
Brought back the unique Christmas main menu scene
Fixed the material on the rubbish bin when using "many lights" lighting mode
The item hover UI text is now visible through items in from of it
On another note, I am going to be in Auckland from the 17th to the 21st and hosting a public demo of Rolling Line on the 19th and 20th as part of the "We love VR" event! You can find more info about the event here: https://www.weloveaotearoa.co.nz/we-love-vr
If you're in Auckland then you're welcome to come and say hello!
I can't wait to see what kind of snow globe ideas people come up with! Have fun! and merry (early) Christmas!
New magazine: Weka Pass! v3.25
It's here! the 6th issue of the official Rolling Line magazine!
On that page you can also directly download a PDF version!
And of course you can read these magazines in-game (PC and VR) in the magazine rack:
This magazine issue talks about the Weka Pass, Paranapiacaba, the Miami Shelf layout, the Hallowed Cove comp, and more. In fact it's the largest magazine so far, with 37 pages! (almost double the length of the next largest)
As well as this new magazine, this update also fixes some SteamVR binding issues (surrounding joystick dead-zones) so if you have made manual adjustments to your VR bindings then make sure to reset them to the default bindings in order to receive the changes!
Remember you can fully customize and rebind your VR controls using the SteamVR input system. There is a full guide here on how to do this: https://steamcommunity.com/sharedfiles/filedetails/?id=2029205314
A few other features to note in this update are:
Magazines now stay in your hand in VR when loading saves (e.g. clicking "visit this layout" from within a magazine)
Pressing the trigger on the index controllers now no longer spawns the magazine from the magazine rack, only grabbing with your hand does
Inside demo mode there is now a list to load all your downloaded workshop layouts
Fixed issue where selecting a save on the workshop list would change your last selected local save, and vice-versa
If you have manual rotation/grab locomotion disabled then these steps will be skipped in the movement tutorial
Holding shift + 1,2,3,4 in demo mode (for VR) will load the corresponding tutorial
And that's all for now! It's been OVER A YEAR since the 5th issue of the magazine came out, so I've had a lot of fun finally making another one! I hope everyone enjoys it.
On another note, I am going to be in Auckland from the 17th to the 21st and hosting a public demo of Rolling Line on the 19th and 20th as part of the "We love VR" event! You can find more info about the event here: https://www.weloveaotearoa.co.nz/we-love-vr
If you're in Auckland then you're welcome to come and say hello!