We are back! Unity of Command II got released in November, to a good amount of press coverage, glowing reviews, and (predominantly) satisfied players clocking up good hours with the game. We, on the other hand, ended up totally busted from the pre-release crunch.
We are now well rested and all that, but the whole thing made me appreciate my friend Fernando’s militant views on crunch that much more. I’m not sure if another Christmas without a released game would be great either, but the crunch definitely had us bruised.
Release Recap
The release day itself was exciting: it’s been 8 years since the original Unity of Command, and more than 4 since Dev Diary 1. We all got together to push the “release game” button at 7pm local time that evening. This button is a new thing on Steam, as previously you’d just schedule a time and the game would be released automatically. Not sure why they changed to this new system, probably not “because it’s more fun”, but then you never know 😀
You’d expect some bugs and crashes on release, and sure enough we had them, but there were no real disasters so that’s good. We made quick work of the crashes even before the holidays (updates 1-9), and have since moved on to balancing and quality of life improvements. As of this writing, the game seems to be in good shape overall.
One persistent complaint that we’ve been getting is that the game needs more tooltips, tutorials etc. This is… true, and is something we are looking to address in future updates. Thankfully, the community has stepped in: check out Unity of Command II – Short Guides by Sampstra Games for example, or this Japanese language guide by Poge. Many thanks!
Updates and Testing Branch
Starting with Update 10 earlier this month, we have created a Testing Branch on Steam. The updates are now bigger and require some testing before being released. If you want to help us test, or just check out some of the new features and fixes, you can join the Testing Branch.
Update 10 has gone live for all users earlier today, and we have already started the work on Update 11 in the Testing Branch. Check out the full changelist for Update 10 on Steam discussions. Notably, Update 10 includes Wacht Am Rhein, a standalone scenario for the Battle of the Bulge played as the Axis.
We’re looking to add more standalones like this in the future. Here’s a subtle teaser for the one coming up in Update 11. 🙂
Roadmap
We plan to continue with the updates, adding new features, quality of life improvements, and standalone scenarios. Regarding entirely new campaigns: we are discussing them (for DLC) but we did not finalize any plans yet. After the huge 30-scenario Allied campaign in the base game, we are perhaps looking for something punchier. We’ll see…
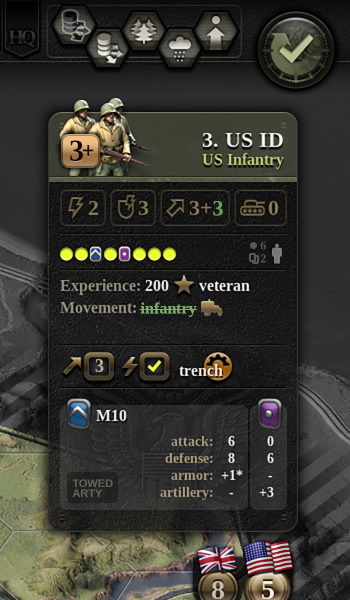
This next image is the design for some of the unit sheet details we’re adding in Update 11. Can you notice the changes and/or guess what they’re for?
These changes will come bundled with a new batch of tooltips, and hopefully all of that will communicate the unit state more clearly to the player.
Another thing we’re looking at is letting the players restart the campaign from previous conference, as opposed to last scenario only. This has been requested often enough, but there are technical issues that make it non-trivial so we’re only getting to it now. The planned score penalty is 10%, capped at 250 (too harsh?). There will be no prestige penalty as usual.
Further down the line, after Update 11, we are working on a rather large content drop (free update, not DLC). This will add a number of what-if scenarios to the campaign, including completely new what-if campaign tracks.
Along with the new content, there will be a few rule tweaks, and a good chunk of AI work. All of this will require balancing, which means that the Testing Branch will become exciting later in February. If you understand “exciting” to mean “unbalanced and full of people arguing over unit stats”, then this might be a test you’ll want to join 🙂
As a final note, we have added Steam trading cards for Unity of Command II. Pending approval, they should go live in the coming days. I’m not sure what to think of this feature, as this is the first time we have trading cards, but I guess I’ll find out soon enough.
Cheers,
Tomislav
How Unity Of Command 2 balances game design with military history
The first Unity Of Command was designed for the open steppes of the Eastern Front. There, the major battles were about manoeuvre, with tank units chasing and covering miles of ground for their objectives, and lines of infantry moving to counter and support. The steppes were perfect for UoC’s unique focus on maintaining your army’s supply lines.
So, when designer Tomislav Uzelac began thinking about turning to the Western front for its sequel, he knew he had a problem. The big battles of France and Italy were slow and attritional, crossing mountain ranges and facing enemies dug into forests. “The question was, how do you go from Case Blue, where you cover 1,000 kilometres in Russia over a month and half, to Monte Cassino, where you stay pounding on one position for six months?” he tells me.
The answer lay in pushing and pulling at the frontline between military accuracy and game abstraction, and in exploring tiny design details which you’d never think could lead to making a vast theatre of war this fun to play. But as well as dealing with Europe’s topography, the sequel would also have to be a lot more complex than the first.
Unity of Command II is out now! Launch stream and a huge giveway are live!
Dear friends,
Unity of Command II is now available!
Join us right now for a launch celebration and watch a very special guest, XTRG (www.twitch.tv/xtrg), play through the opening stages of the war!
There's a 10% launch discount that's active today, as we appreciate the patience, feedback and support you've given us. Thank you!
Finally, there's a surprise from our co-production partners on this project, Croteam, as well as from 2x2 Games: a huge giveaway of 100 games, including Unity of Command Trilogy Bundle, that will fly out in chat during the stream.
Have fun and remember to drop us a line in the discussions section here on Steam, or forums over at unityofcommand.net.
Unity of Command II releases next Tuesday, November 12th. You heard it here first, PR be damned! 😀 To celebrate the occasion, please have this sequel to The Power of Supply – the most popular post this blog has ever had.
This isn’t just a trip down memory lane, mind you (but hey, 8 years!). Supply is our signature mechanic, and it has been revamped with an eye to all of the theaters of WWII that we plan to visit this time around.
Granted, you won’t be seeing that much of a supply pinch with the Allies in the base campaign. They usually have generous supply, and only really see supply issues immediately following a naval landing. By the time we reach Russia though (in DLC), I suspect the words “supply disruption” will ring with some dread. You are welcome!
Supply Sources
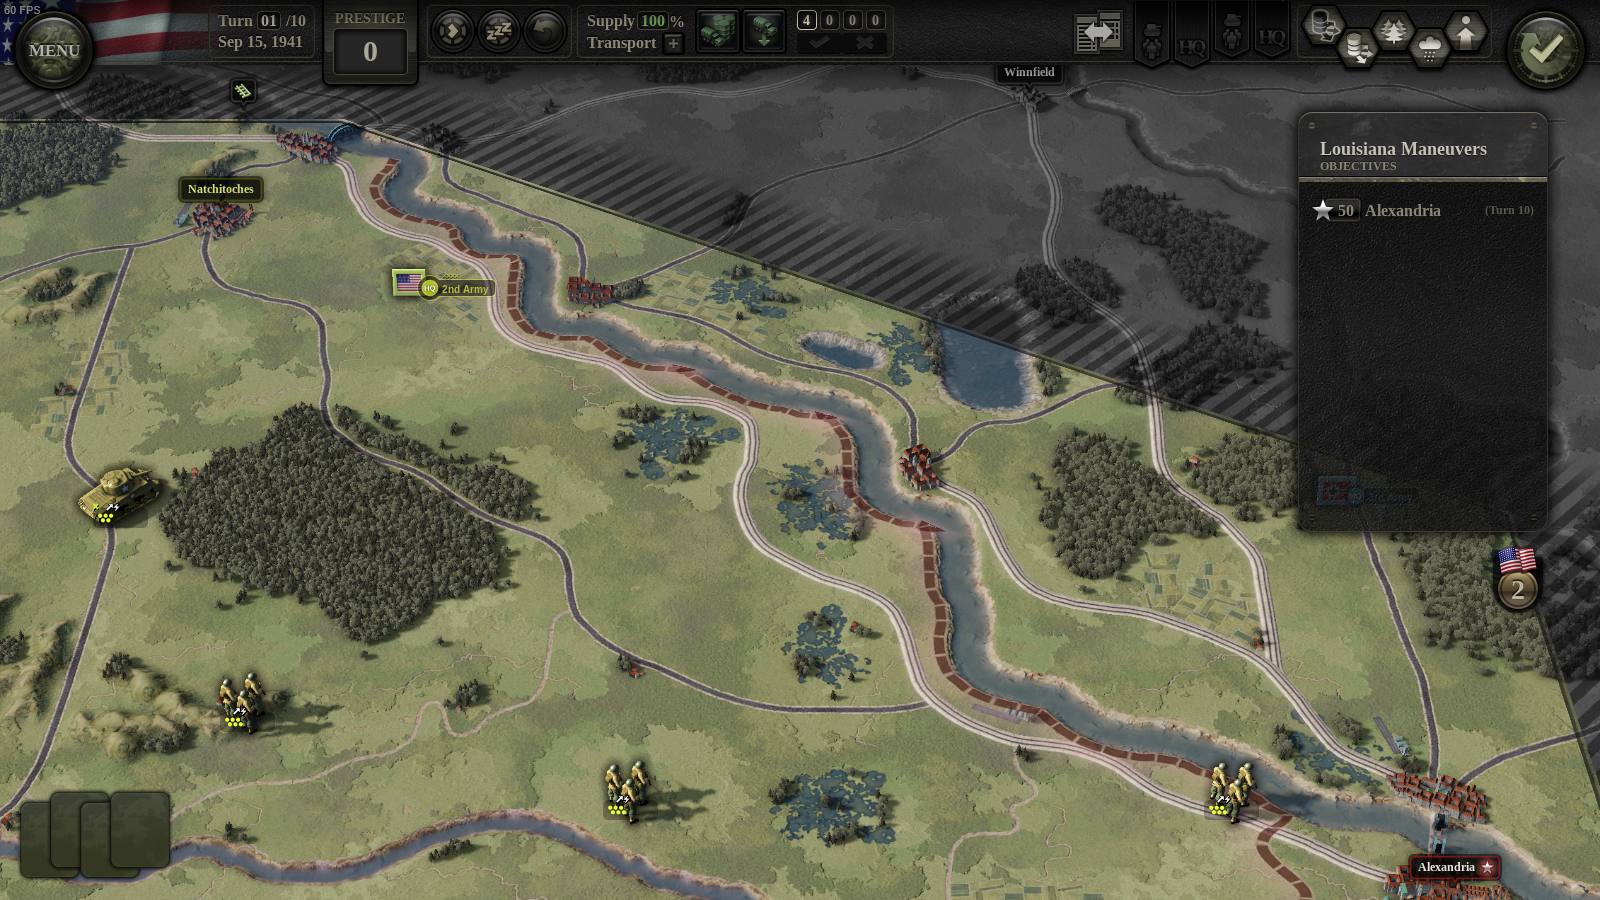
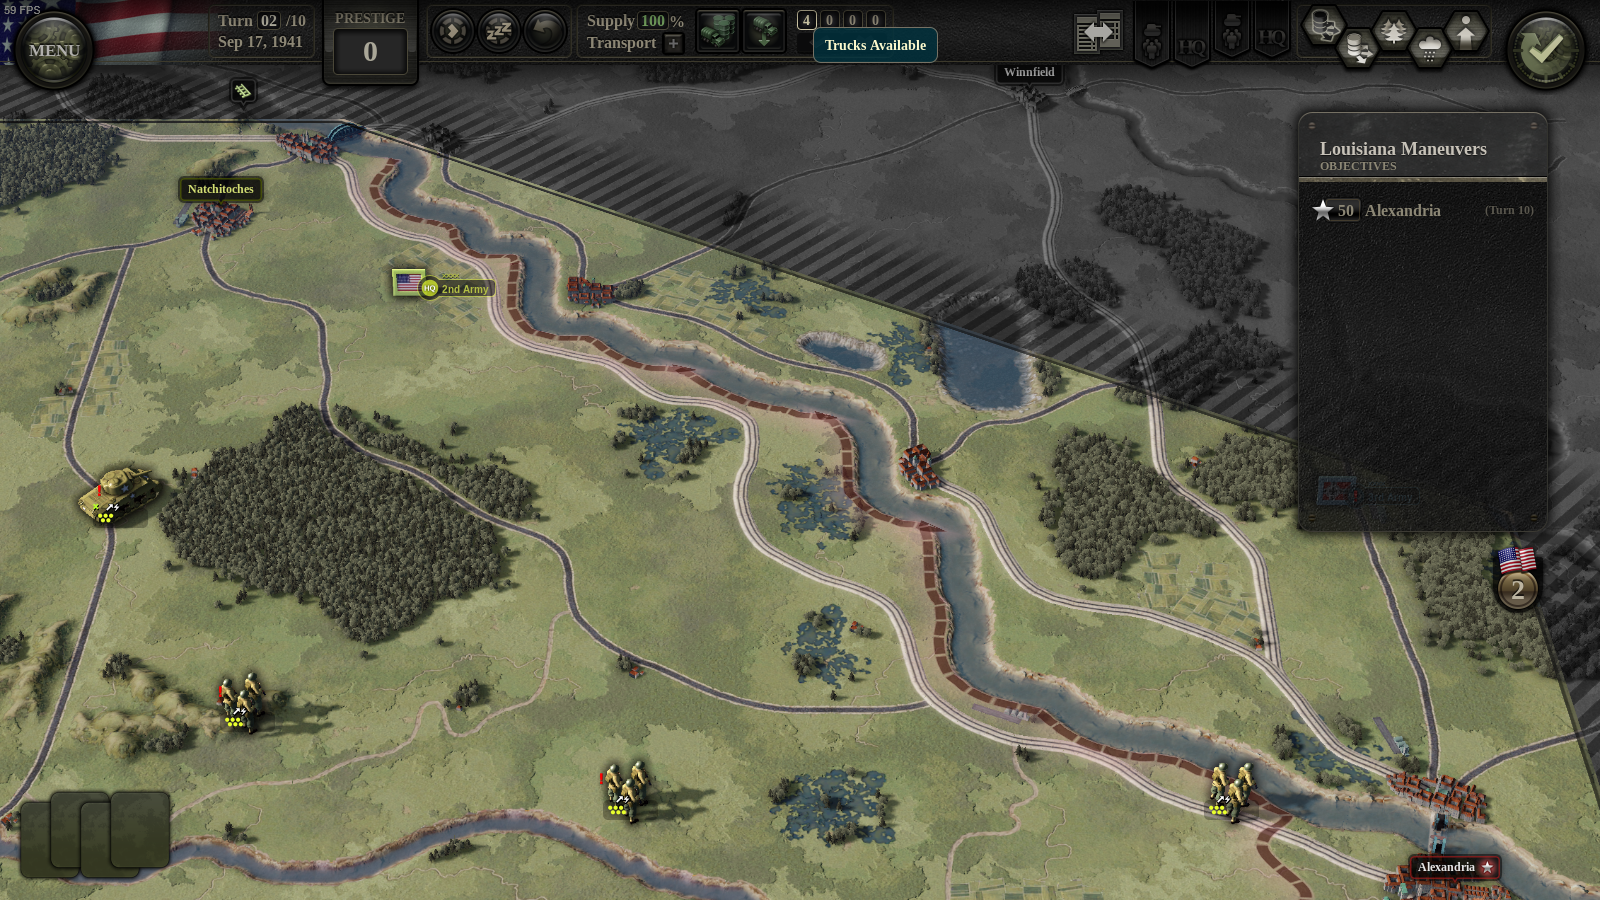
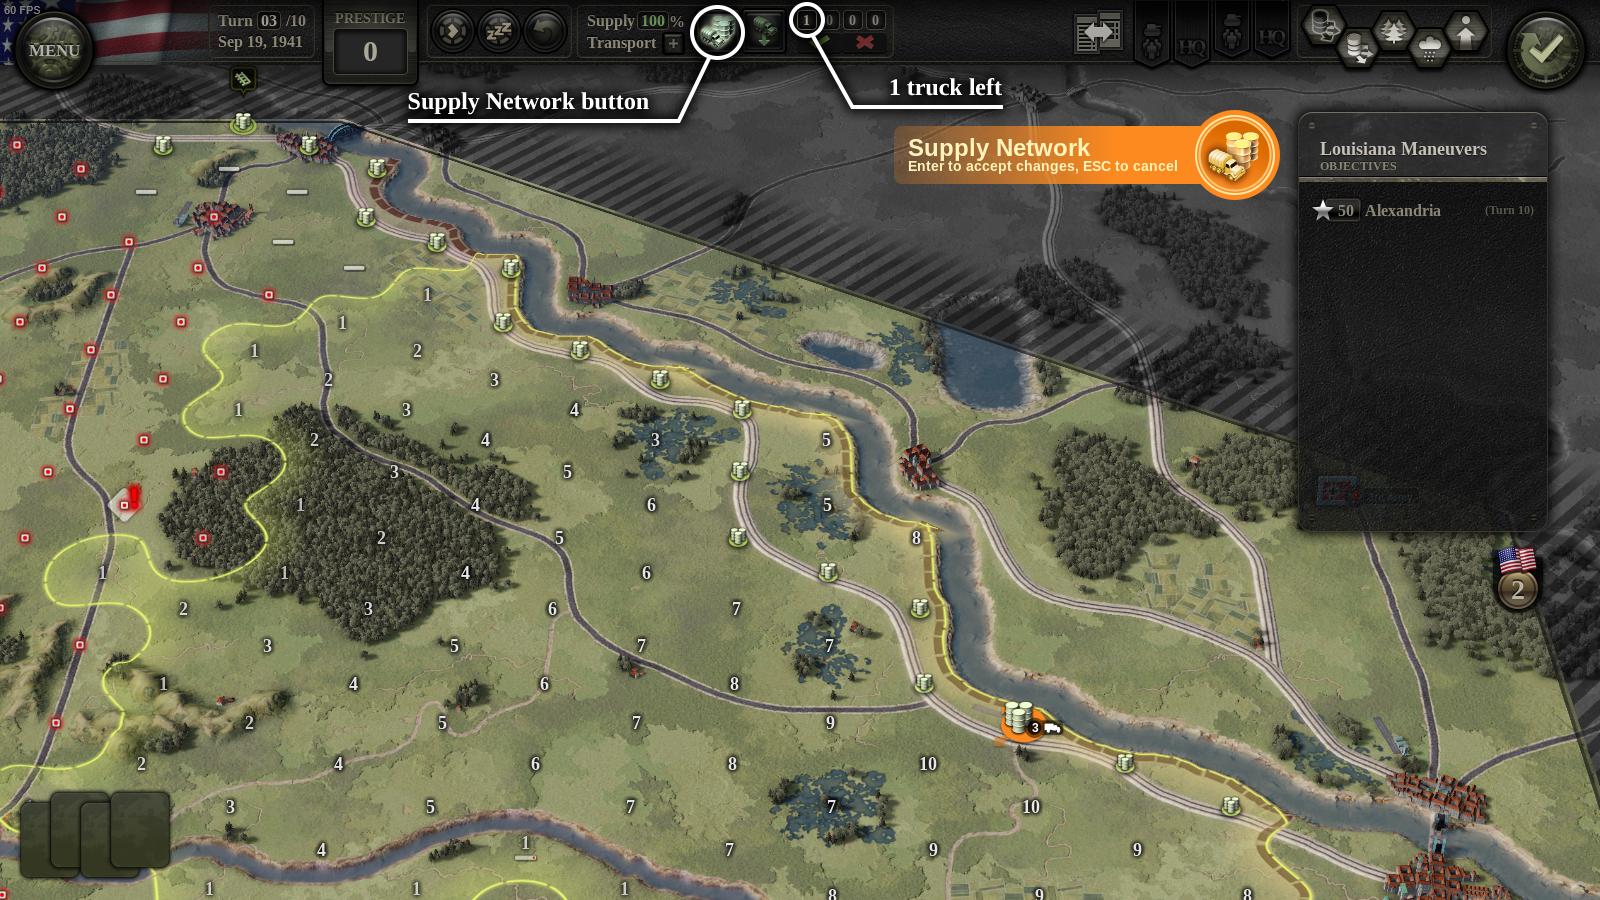
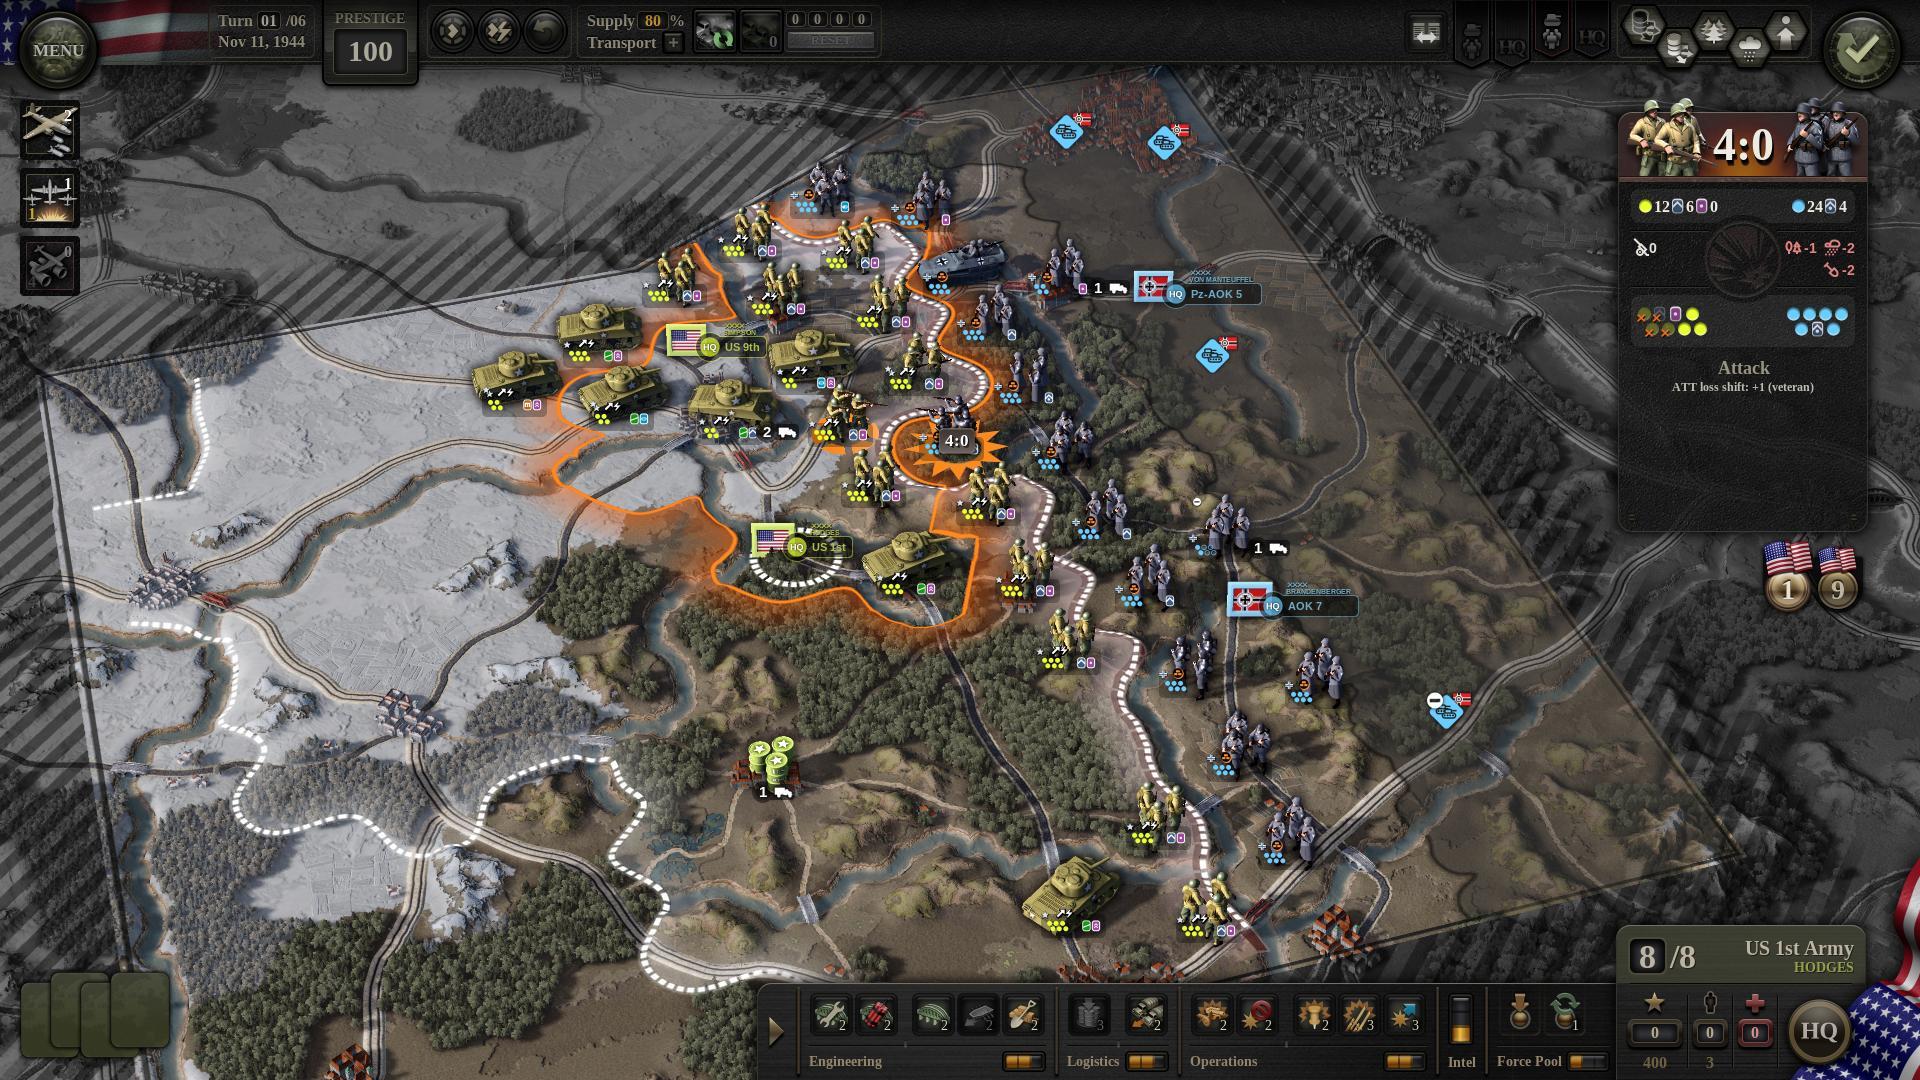
So let’s start with what we know. In screen #1, we see three US infantry units and a single US armored unit, during the Louisiana Maneuvers of 1941. The units are trying to reach their objective in Alexandria (lower right), but for the purpose of this explainer, I will make them just stay in place for the next couple of turns.
Units need to be supplied on every turn, otherwise they become weak and ineffective. They receive supply at the start of the turn, but only if they are in a supplied hex (location). In screen #2 (below), I press the Supply View button (hotkey V) to check which hexes are in supply and which aren’t.
Supply originates from a supply source (upper left), and then spreads along rail without restriction. You can see that hexes on the rail line itself are supplied (barrel icons). However, farther afield, only a narrow strip along the rail line is supplied (horizontal bar icons). All other hexes on the map are unsupplied (red dots).
The supply view also tells us that three of our units are out of supply (diamond w/ red dot): the armored unit, and left and central infantry units. Infantry unit to the right is in supply because it sits on a supplied rail hex. After I press End Turn, screen #3 shows you what happens on turn 2: the three units now have a red out-of-supply marker (exclamation icon).
Supply Hubs
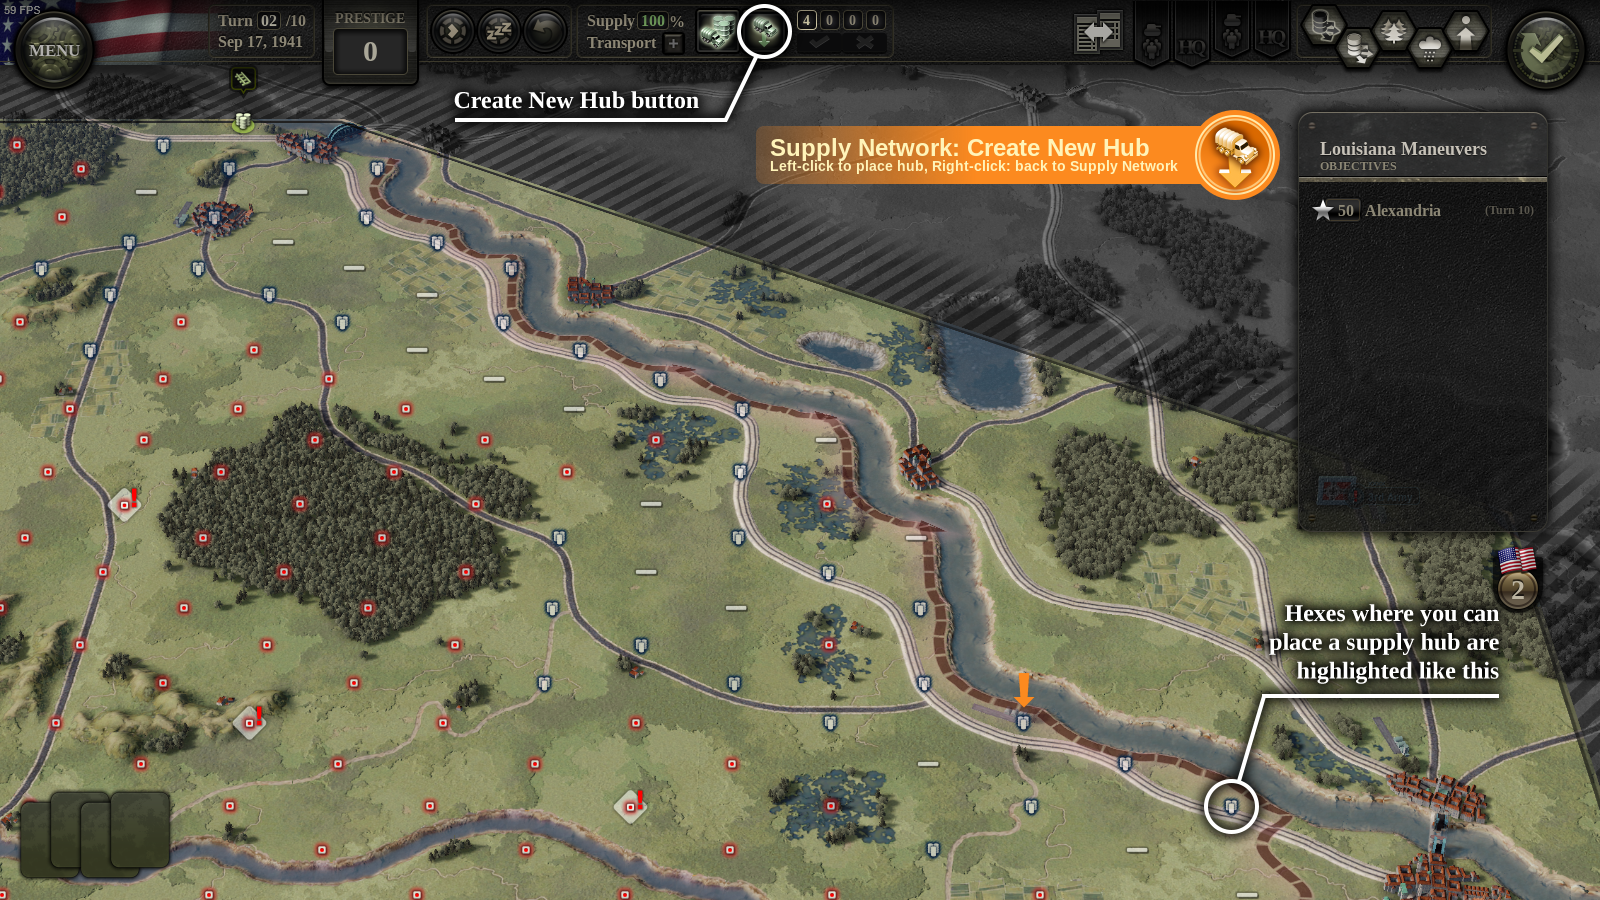
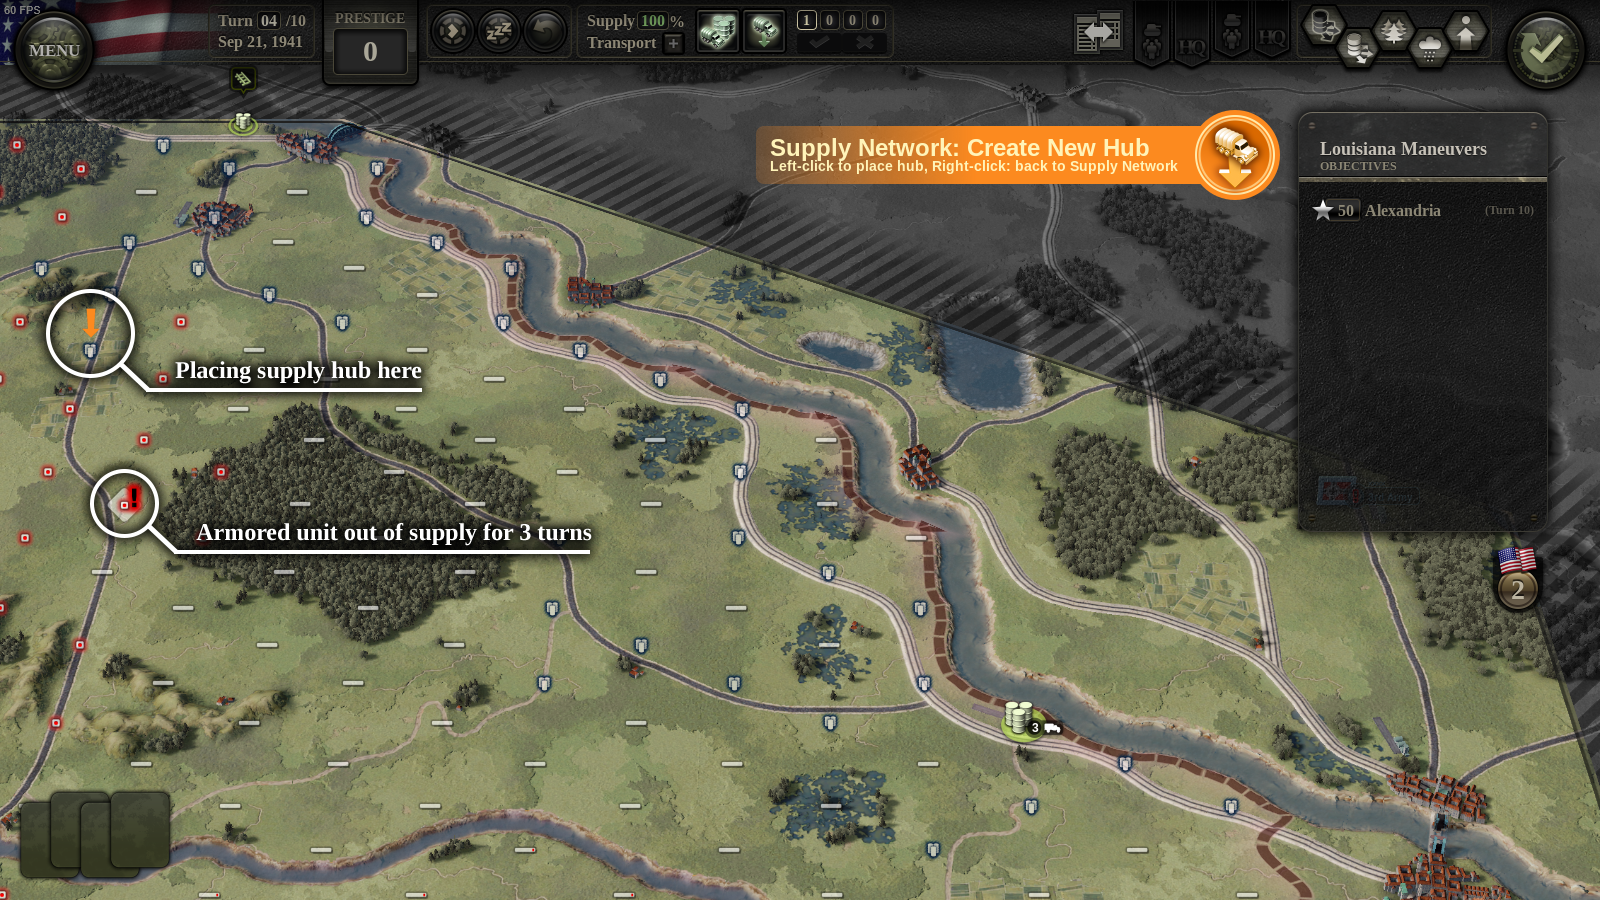
Alright, now I will create a supply hub to push supply outside that narrow strip around the rail line. In screen #4, I press the Create New Hub button (truck w/ arrow) to see where I could place one. You can see that most of the highlighted locations are on the rail line itself (white/blue barrels). Let’s focus on those on-rail locations, and we’ll remember to mention the other ones later.
I decide to place a supply hub close to my objective in Alexandria, so I click where the orange arrow is pointing to.
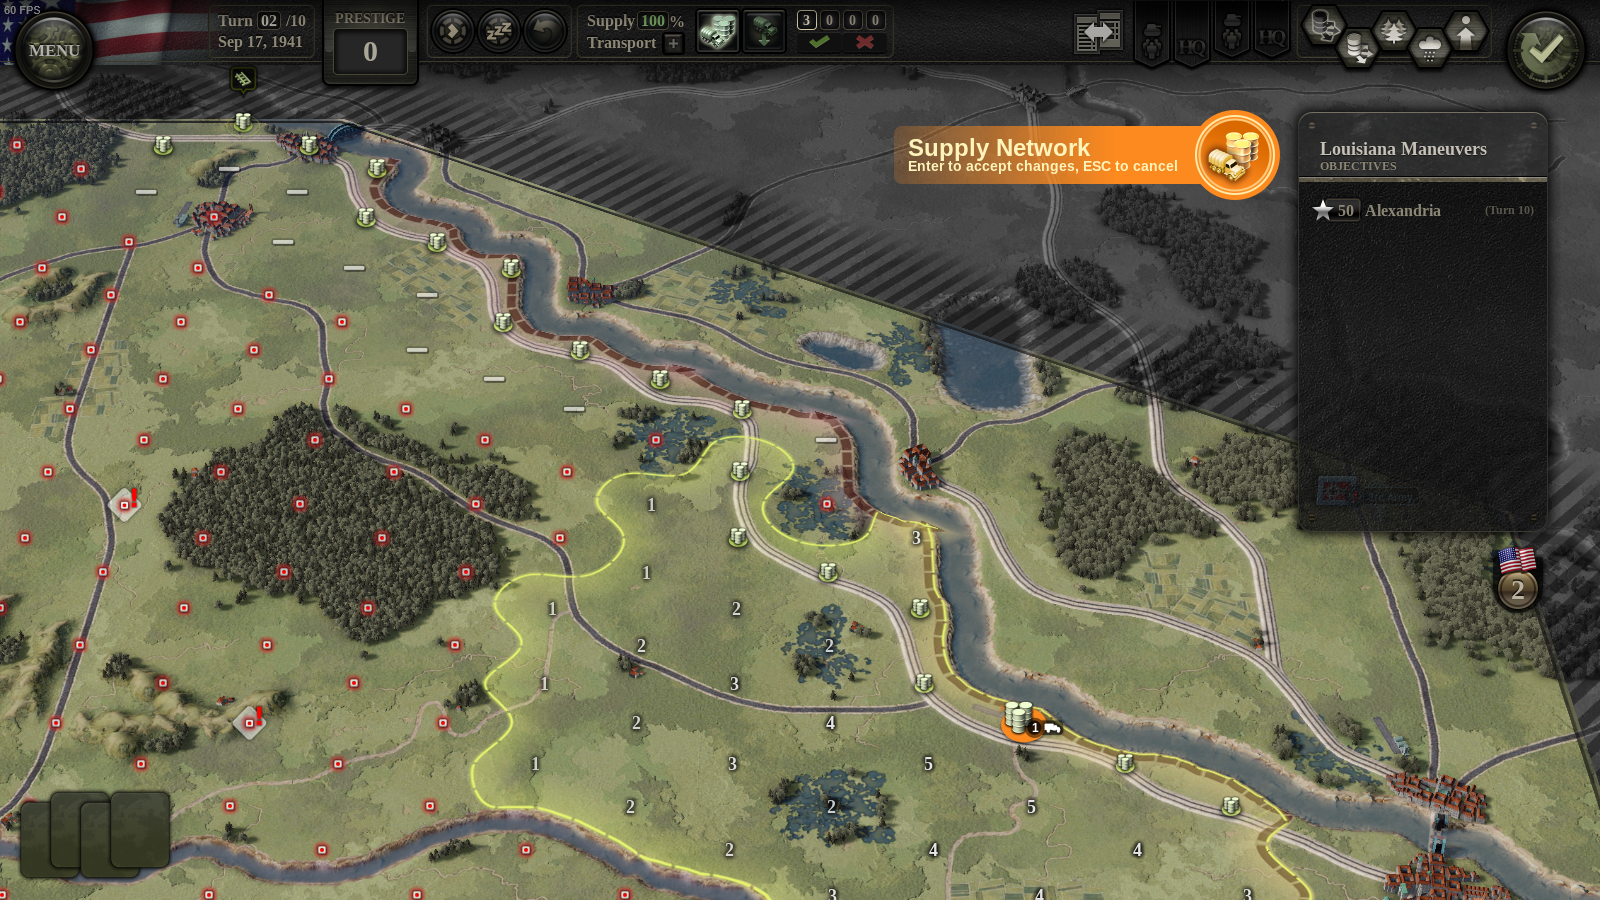
I have created a new hub, and immediately you can see (in screen #5) the area it supplies. This hub has a supply range of 5 MPs (movement points) or 1 truck. In Unity of Command II, range is usually shown using trucks as shorthand: 1, 2, 3, 4 or 5 trucks simply mean 5, 8, 10, 11 or 12 MPs respectively.
The area supplied by this hub is traced out using the hub’s 5 MPs: we start with 5 and count down to 1 using cost values from the supply column of the movement table. You can tell, for example, that it costs 3 MPs to enter a swamp hex, while it’s only 1MP for clear terrain.
Notice how my central infantry unit is not shown in this view anymore: this is because the new hub will be able to supply it! The other two are still out of supply, but we’ll deal with that later. I hit ENTER (important!) to accept hub placement, and then immediately press End Turn to see what happens next.
Units out of Supply
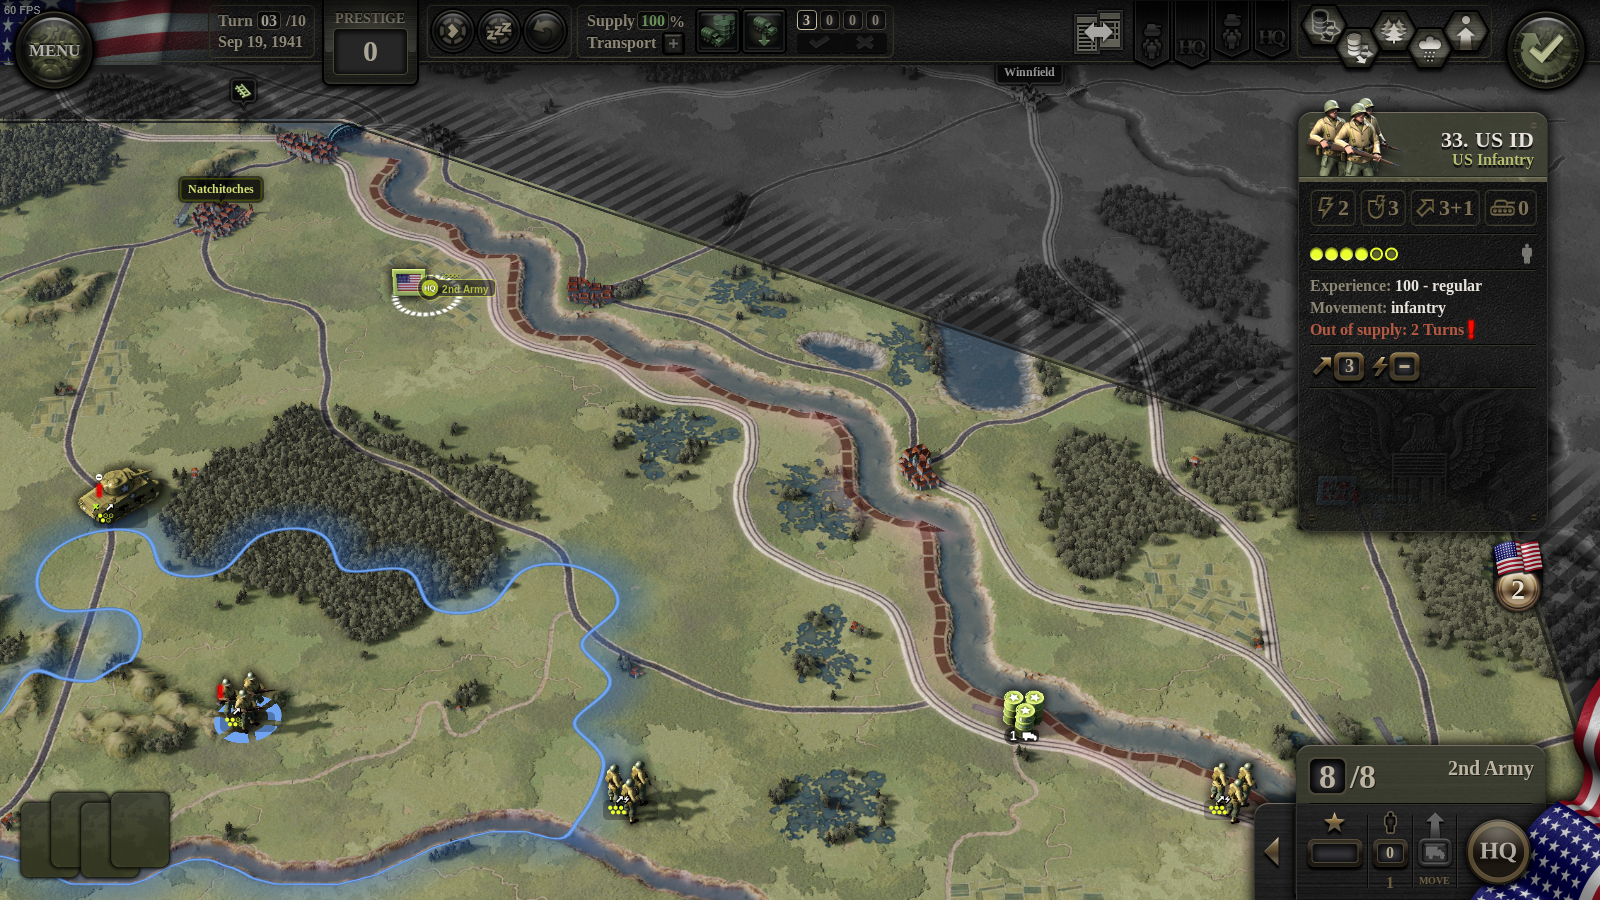
It’s now turn 3, and my armored, and leftmost infantry unit have been out of supply for 2 turns (screen #6). On the first turn a unit is out of supply, the only effect is that it doesn’t recover from suppression like it normally would. On the second turn, two of its steps become suppressed and the unit loses its AP (action point), meaning it cannot attack.
It gets worse from there: a unit on its third turn out of supply becomes fully suppressed, it doesn’t receive full MPs for the turn (meaning it cannot cross rivers) and it doesn’t even capture territory when it moves. Additionally, on all following turns the unit will lose steps and specialists as stragglers. I would like to avoid this happening to my units, so let’s see what can be done.
To supply my leftmost infantry unit, I will extend the range of the new supply hub by adding two more trucks. I press the Supply Network button (truck and barrels), select the supply hub, and use the mouse wheel to add trucks. I then hit ENTER to accept. You can see the result in screen #7: the leftmost infantry unit is now in-supply. Success!
So far so good, yeah? The snag is, we only have 1 truck left. Trucks are a limited resource, just like everything else in war. The game shows us how many we have available to use right now (1, highlighted) and how many are incoming on the next three turns (0, 0, and 0). I will use my last remaining truck on the next turn, so for now let’s just press End Turn and see what happens.
Supply over Roads
Unity of Command II treats roads separately from rail. Both roads and rail allow for quick passage through rough terrain: notice how, when using the road, we’re able to trace through forest hexes for just 1 MP in screen #7.
The roads however, don’t allow supply to spread without restriction like rail does. What you get instead is this: you are allowed to place a supply hub on any road hex within 5 MPs from rail (supplied rail).
This is how I’ll supply my armored unit, which is 3 turns out and sorely in need of supplies. I press Create New Hub again to see (screen #8) that I can place a supply hub on a road pretty close to the unit. I place the hub, and confirm with ENTER. There!
I could go on but I think you may be getting the point by now. My final supply situation is shown in screen #9 below. Between the 3-truck hub near Alexandria, and the new 1-truck road hub, my entire area of operations is neatly supplied.
Teasers
This post has grown long enough, but I hope it was a good read. I will leave you with some teasers:
Supply Disruption: notice how some of the in-supply bars in screen #9 have a little red in them? Placing a supply hub on road (as opposed to rail) introduces some uncertainty as to whether your unit will actually receive supply when the turn starts. Other things introduce disruption too: mud, snow, ruined cities, stragglers, etc.
Emergency Supply: if your units are out of supply, their HQ might be able to re-supply them. HQ supply is usually a bit more robust, so re-supplying units is possible, but it costs the HQ some of its CPs (command points). There are tradeoffs to be had.
Capturing Enemy Supply Hubs: when you capture an enemy supply hub, all friendly units within 1-truck distance become instantly supplied. This can be pretty useful for a supply starved force.
Removing Trucks: not shown in this explainer, but you can remove trucks from supply hubs too. When you do so, they become available on the following turn.
…
We’re real close to release and it’s a little bit crazy right now at 2×2 Games. Encouragement in the comments in encouraged! See you all in a week for the release post.
We’re starting the beta test for UoC II in ten days or so. If you don’t mind spoilers and have a high tolerance for bugs, please apply and help us make it an awesome wargame.
The beta application is open to everybody. We will ask a few questions, and invite a select group of testers based on the replies. Don’t be sad if you’re not invited – the application form is there to weed out the obvious trolls, and apart from that we mostly pick people at random.
How to Apply
The test will run from Oct 21. Before applying, please consider whether you have enough free time during the first week of the test. You’ll be needing several hours to familiarize yourself with the game, and then provide feedback and comment. We need all of this (including feedback) to happen during the first week of the test, otherwise it’s of limited usefulness to the project.
Some technical notes about the beta: we will be testing a Steam version of the game, on Windows. Mac and non-Steam versions are planned, but not being tested right now.
If you plan on testing multiplayer, note that only hotseat will work in this version. Again, online multiplayer is planned, but not being tested this time. The scenario editor is included.
If you still think this is something you want to do, please throw your name in the hat by filling in the form. Steam doesn't allow links to Google forms, but you'll be able to find the copy of this Diary and the link here: https://unityofcommand.net/blog/2019/10/10/developer-diary-24/
We look forward to seeing you in the beta forum!
In Other News
I haven’t posted anything on this blog since July. I guess that’s how you know we’re really working then. 😂
Occasionally we’ve been live-streaming from our Steam page, and if you want to catch yourself up on that, check out this YouTube replay.
Our Steam community posts are worth a read for the little teasers and reveals. Here we show the cards system, with an Opel Blitz pretending to be a GMC. In this other one, we tease out how the in-game upgrades work.
If you’re spoiler averse, or you have a mac, or you just don’t have time to help these people with their game… anyway, you get the point, you don’t have to be in the beta, the game is releasing in November which should be soon enough.
We’re in the home stretch now, thanks for your support and for following these diaries. The next one will have the word release somewhere in the title. Life is good.
Most of our work these days consists of preparing for the beta test and rooting out bugs. We’re not quite there yet, but the game is shaping up nicely. In the meantime, please support our troops by watching the stream and join the war effort by wishlisting and following the game!
We decided to start up our tanks’ engines and stream again. This time we’ll go through the first three missions in the Allied campaign. Our scenario designer and researcher, Daniel Mellbin, will be doing his utmost to explain the new mechanics in Unity of Command II and guide you through the game.
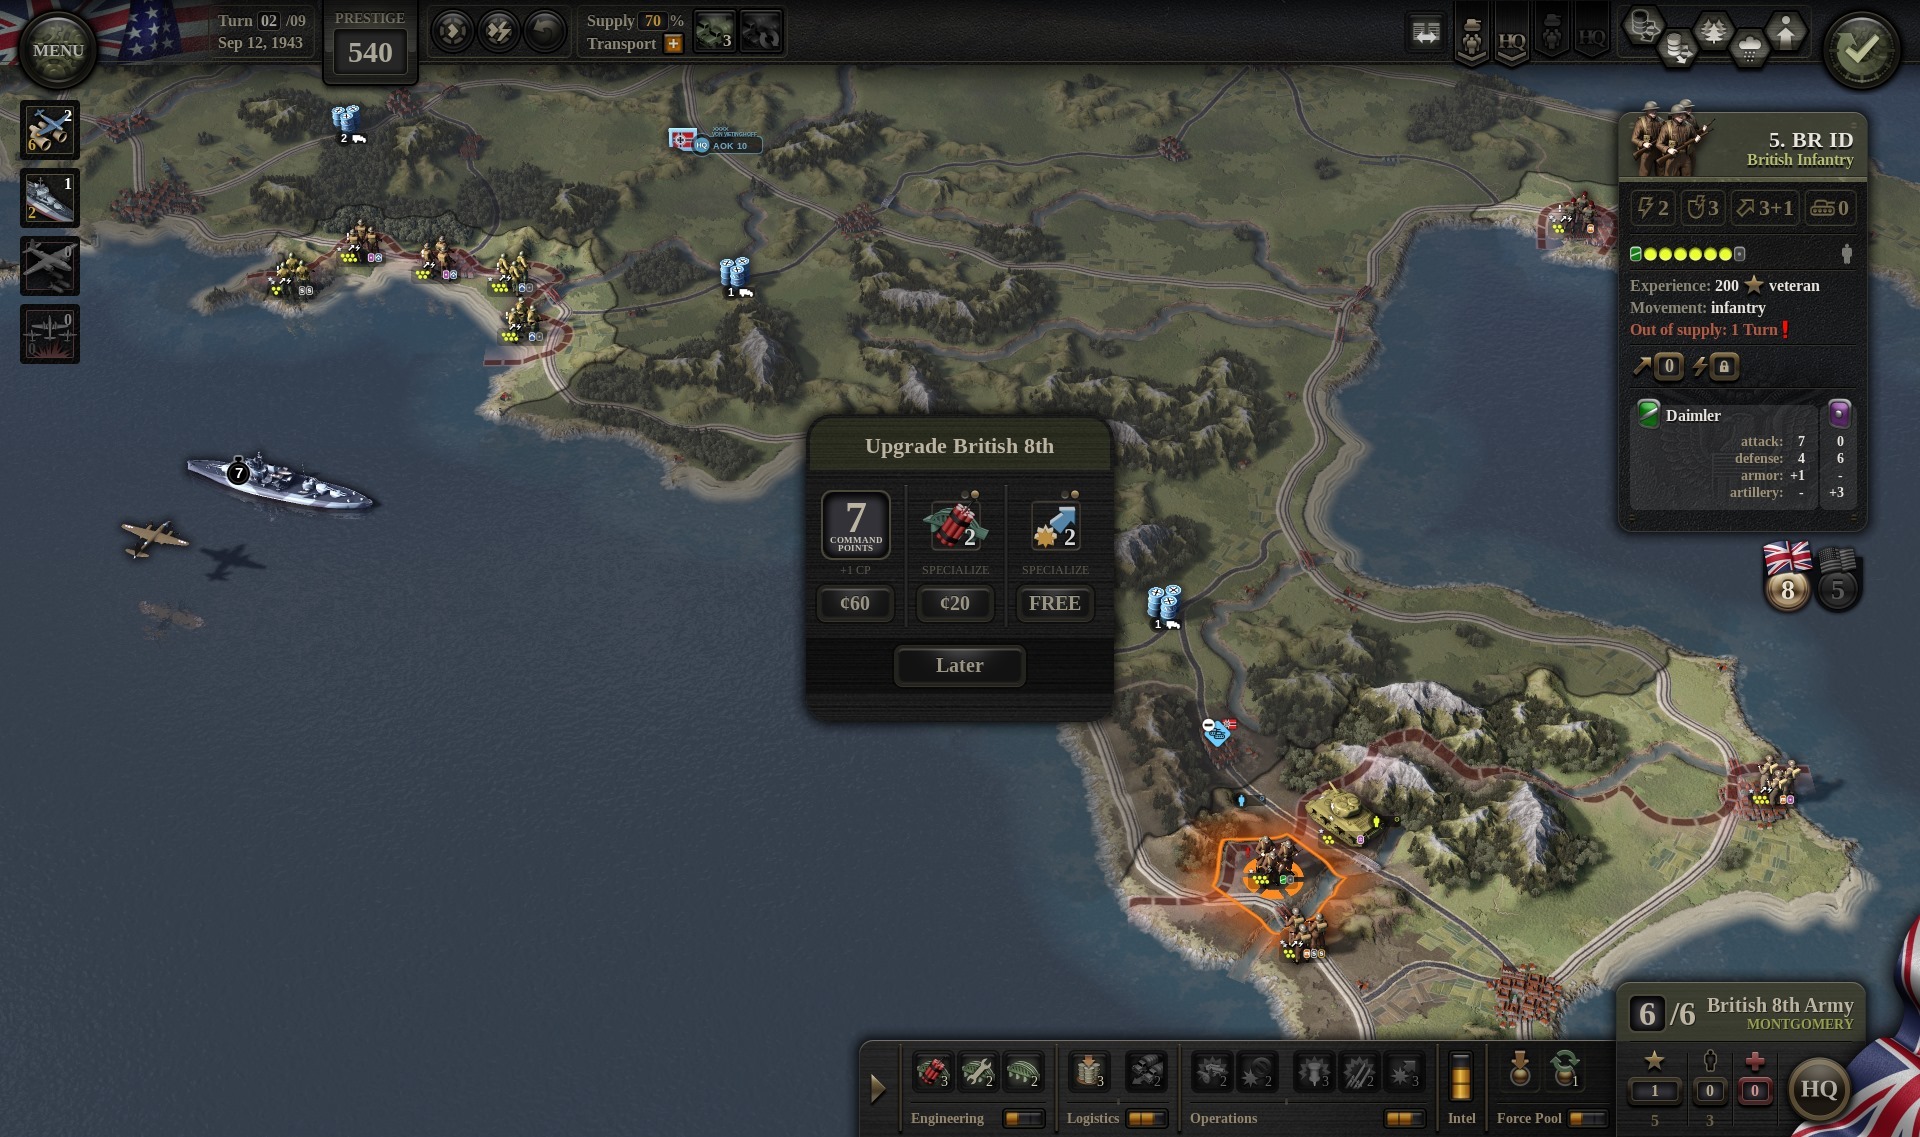
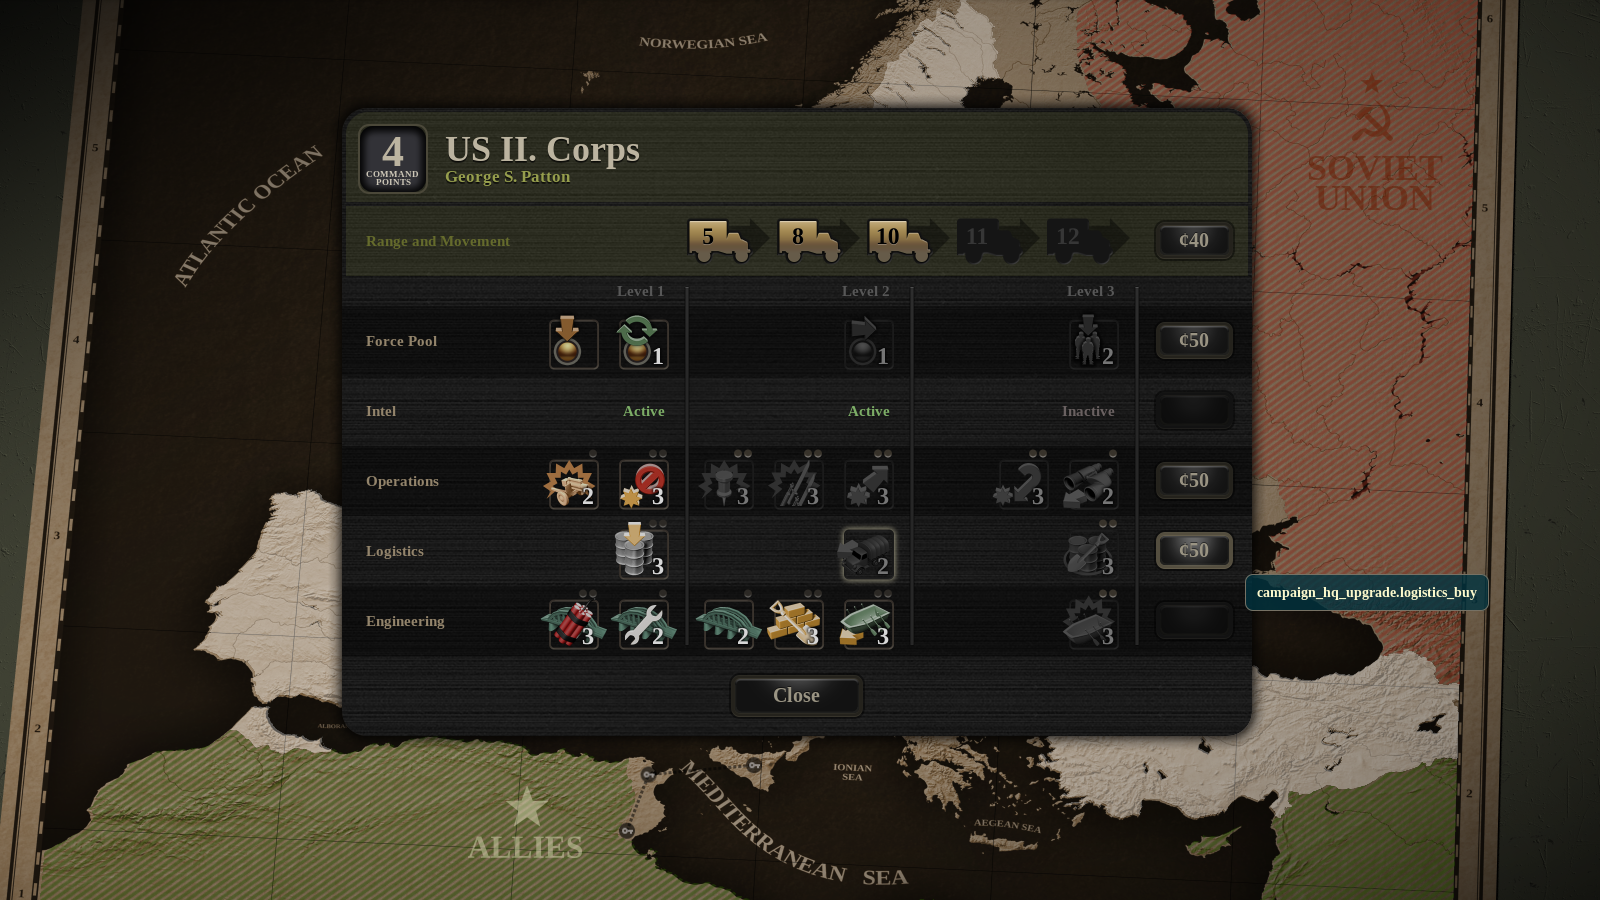
It turns out that we never really showcased the in-game HQ upgrades, which means there’s actually a feature reveal in the stream somewhere. Look for an in-game dialog titled “Upgrade British 8th” or something similar. For those of you requiring instant gratification, here is a screenshot of it in action, this time somewhere around Salerno:
While Damir and Pavol are flying the flag for us at the Tokyo Game Show (we’re at booth 10-E74, drop by and say hi if you’re there), we are honoring their commitment with a brand new set of screenshots which should already be up on our Steam page.
Our Gamescom Unity of Command II gameplay live stream is about to start!
Tonight at 8 pm CEST, Daniel Mellbin, our scenario designer, will be playing live for the first time so tune in and stay on this page if UoC II is your thing.
Gamescom Update - What’s in the Cards?
We are descending on the fair city of Cologne, Germany this week to attend Gamescom, the world's biggest gaming expo. Our chosen screenshot should be appropriate then, as one of the objectives for the Rhine crossings of March 1945 was indeed Cologne and its bridges.
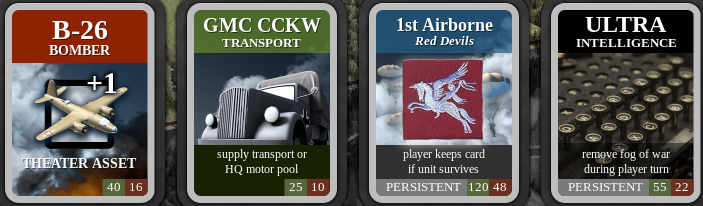
The major reveal here are the support cards. This is a new mechanic for the UoC series, and it lets us show a side of the war that can’t be represented as units on a map. The player can buy the cards with prestige, or receive them as rewards for taking bonus objectives.
Theater asset cards are the simplest, yet very powerful. The B-26 gives you an additional air attack for the duration of a scenario, which can be enough to turn the situation around if played at the right time.
GMC CCKW (truck) card is interesting because it can be used in two ways: to increase the range of your supply network or to motorize the units (of one HQ). This “motor pool” ability simulates the superior transport capabilities of the Allies, but there is a real tradeoff with supply, especially in 1944 France scenarios.
The really cool option is taking control of the Red Devils. Cards like this are the most expensive, and don’t come up often. They let you make divisional para drops about once every three scenarios, providing your unit doesn’t get killed in the drop. This is a quiet nod to what happened in Market Garden so don’t be reckless with your paras there.
Trailer and Release Plans
We have a new trailer, which is up to date with the current state of development. It’s already on our steam page, or you can check it out on youtube right now:
https://youtu.be/S_5VF-hwu_0
Release Update: we have updated our release target to “Fall 2019” (also in the trailer). A full release before the end of Q3 now looks unlikely, but we’re still on track to at least go into beta. The plan, as always, is to make the best game possible. We will continue to keep you updated on our release plans as we go along. Thanks for your patience 🙏.
Live Stream
Our Gamescom live stream will be available here on UoCII Steam page on Wednesday, August 21 at 8 pm CEST.
Daniel Mellbin, our scenario designer, will be playing UoC2 live for the first time ever, so save the date if UoC2 is your thing.
We will be in the trade visitor section at Gamescom, so if you’re lucky enough to be in attendance, be sure to drop by the Croatian booth and say hi! (Booth A-011, Hall 3.2)
Cheers,
Tomislav
Developer Diary 23 – A Seaborne Invasion
In recent weeks, we put a lot of effort into making sure that seaborne invasions play well in the game. This is important because these air/naval operations were such a feature of the Allied campaign. Counting just the historical ones, there’s six: Torch, Husky, Salerno, Anzio, Normandy, and Dragoon.
Granted, we have decided to start the campaign at Wadi Akarit, after the Torch landings, but that still leaves us with five so… invasions aplenty. Speaking of Torch, the period between it and the allied link-up in Tunisia will now feature in the tutorial, not the main campaign. Sadly this leaves Kasserine Pass outside the campaign, but we’ll try to make it up with a standalone scenario.
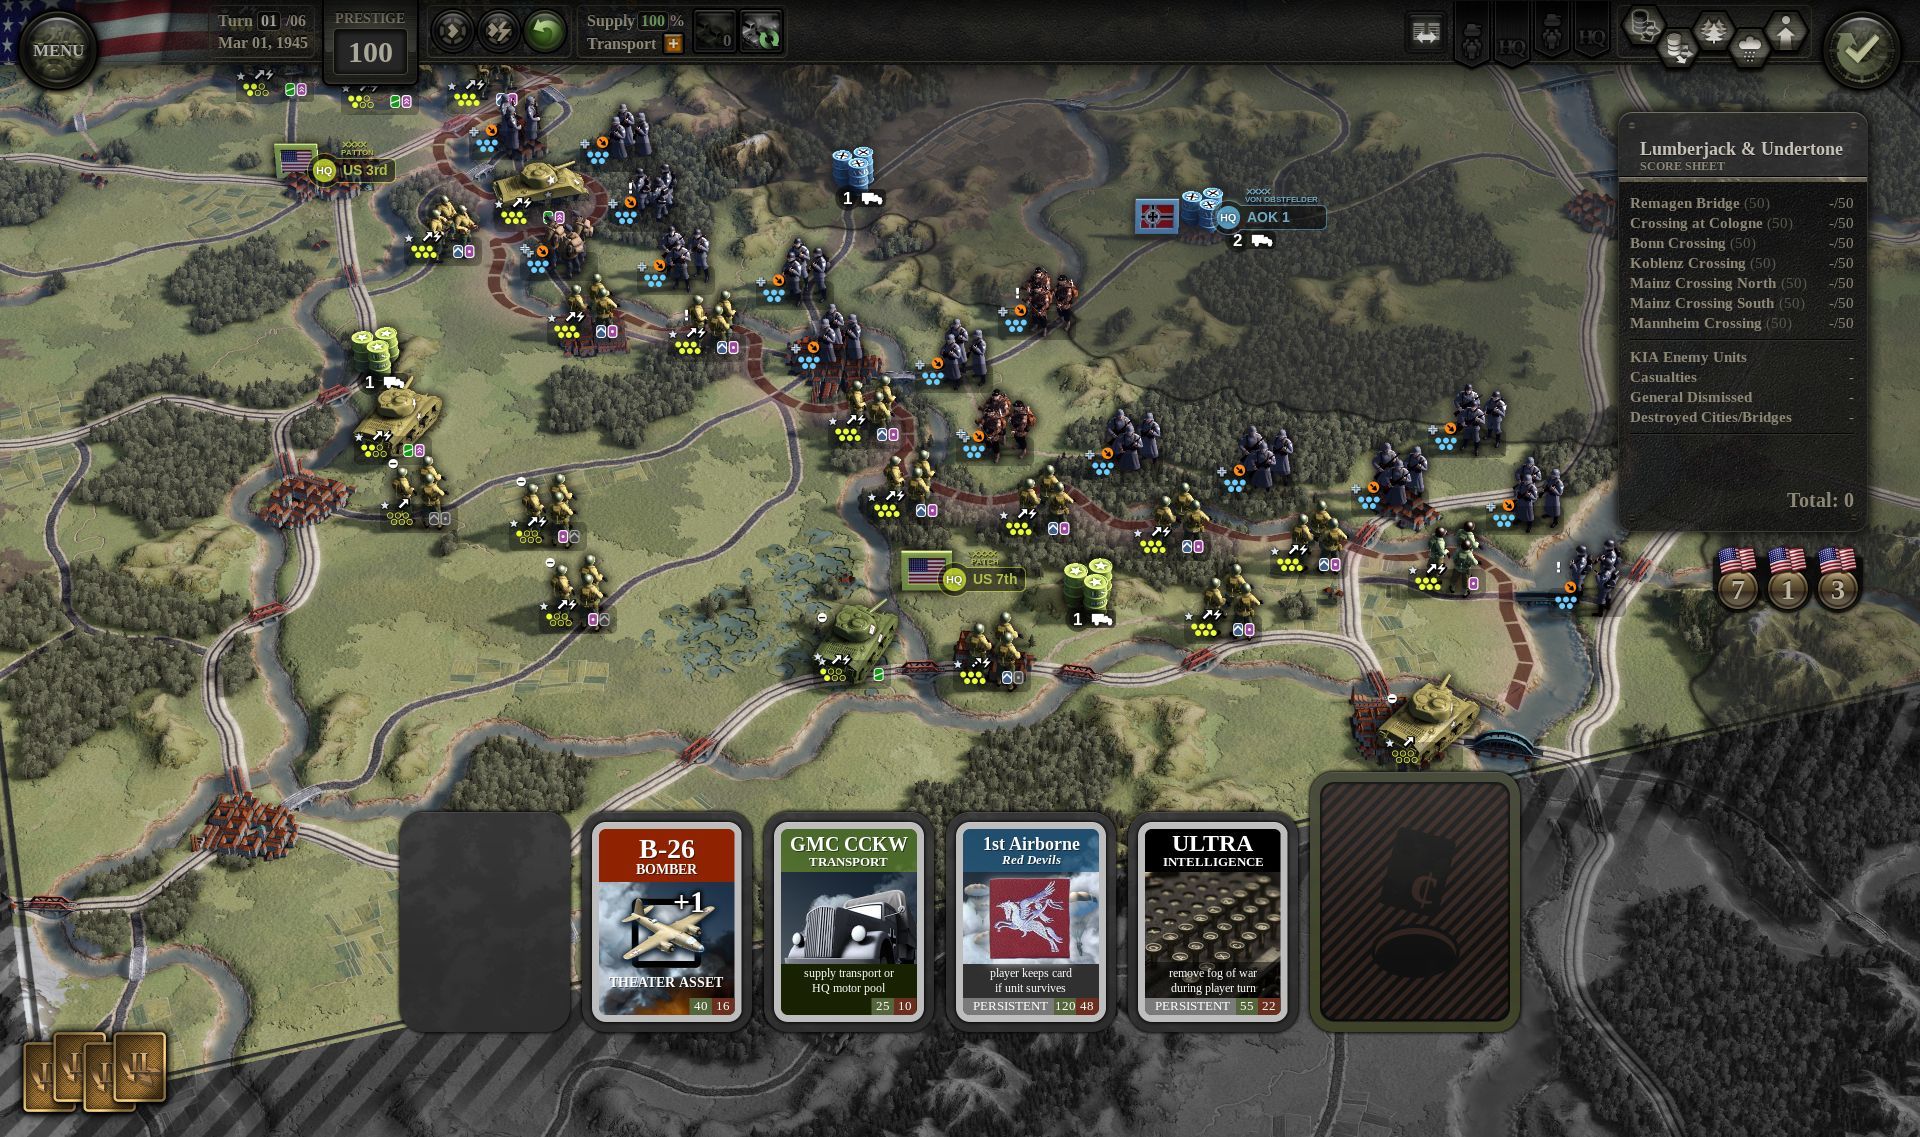
We’ve been working on the campaign quite a lot, and since campaign play revolves around HQ upgrades, I feel that it’s time to do a proper Headquarters deep dive. In fact, the bulk of this post will be about HQs and the campaign, but let’s quickly talk about invasions first because there is a screenshot, and it is a-mazing.
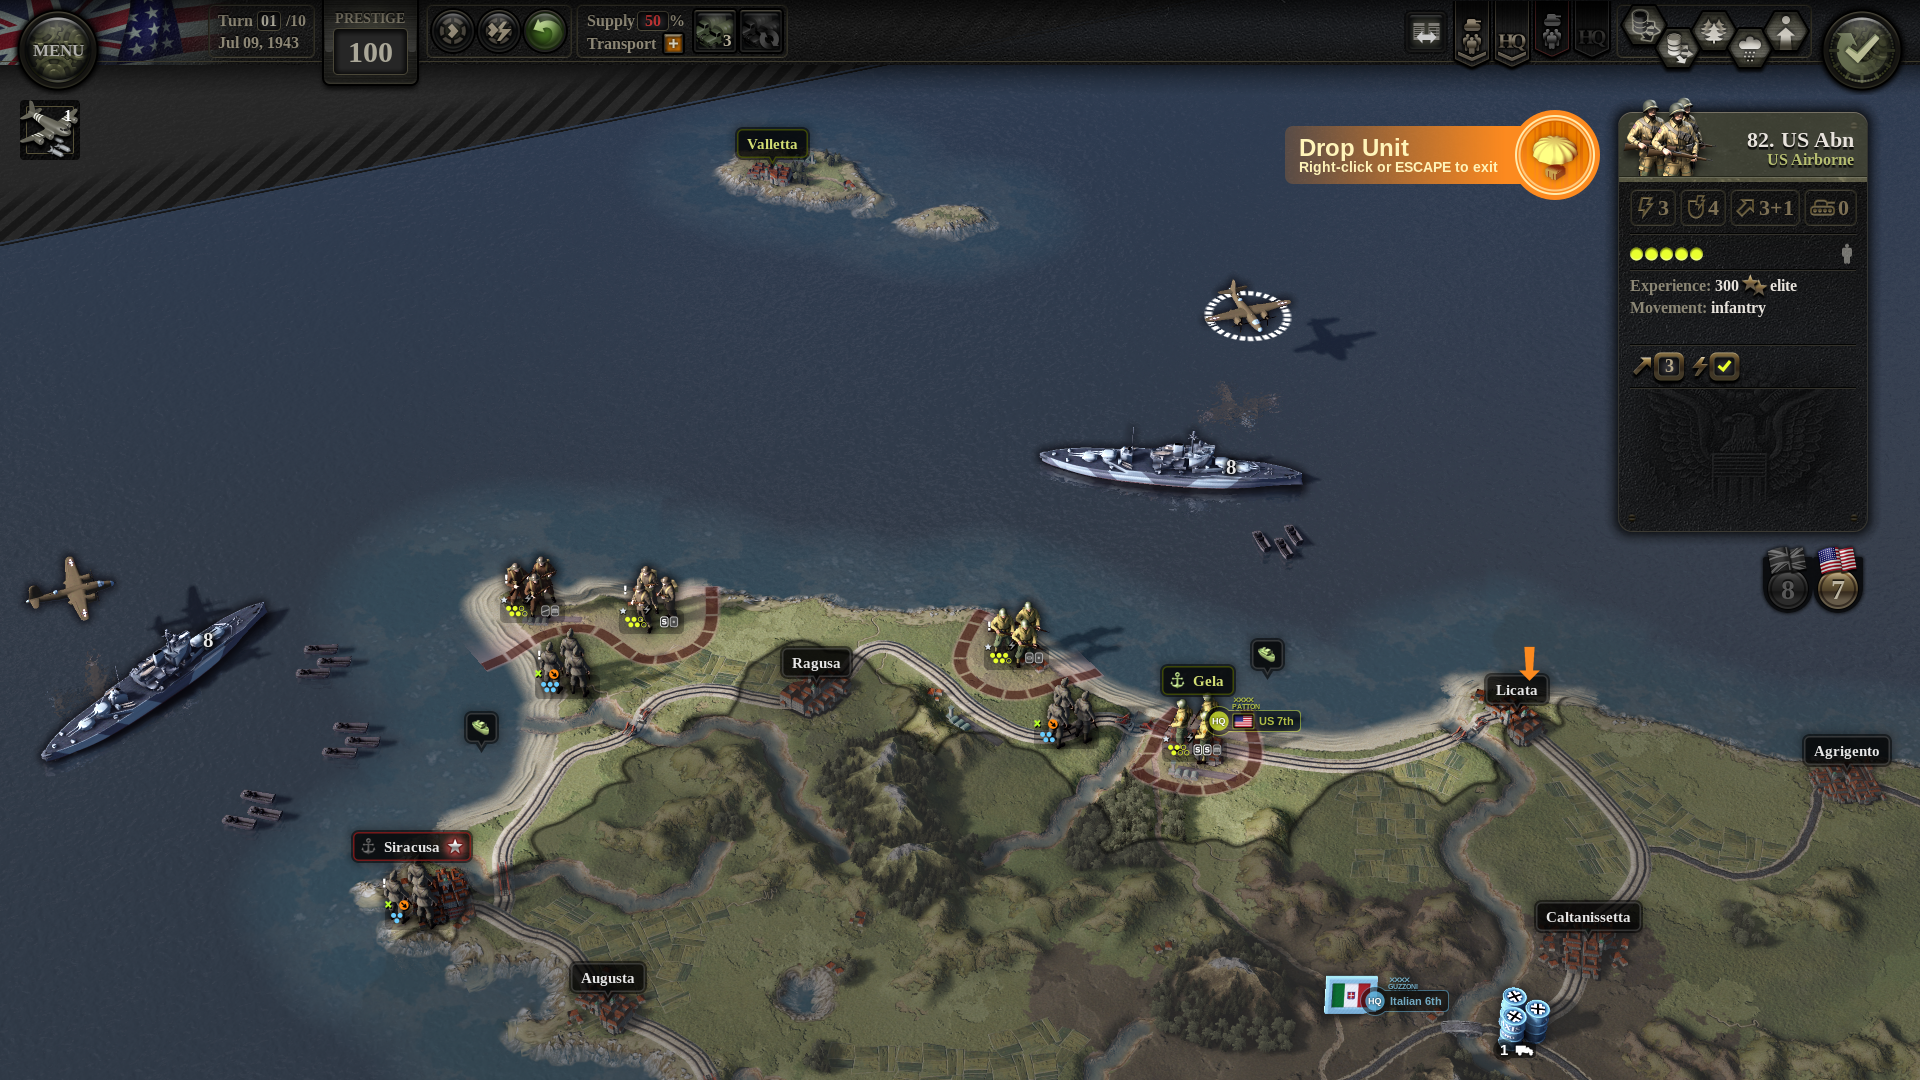
The invasion force in the screenshot below is typical for Allied operations of this kind. It has battleships providing naval defensive fire, LCVP landing craft ferrying the units involved in the naval assault, and a plane carrying paratroopers. It should really be a C-47 but we don’t have them in the game yet (can you tell which plane we’re using instead? Also, which bb?)
Mechanically, naval assaults and para drops basically do “what it says on the tin”. Assuming an assault goes well, the unit lands with no MPs and no AP, or with its AP locked if the landing was unopposed. This is consistent with other game mechanics, such as river crossings.
On the following enemy turn, the battleships will be providing naval defensive fire, covering the landing beach hexes. This works out to a -3 artillery (-like) shift against any enemy units attacking our units on the beach.
HQ Command Points
We already mentioned HQs in earlier diaries, and described how they are used for various command and support actions. The actions include everything from bridge repairs to unit reorganization, and performing each one costs some number of command points (CPs).
The number of command points available per turn represents overall commander and staff proficiency of an HQ – there are only so many things an organization can do at once. While coordinating a set piece attack at the front, the HQ can’t also be building fortifications or doing emergency supply runs.
As the campaign game progresses, the number of CPs per turn can be increased. This represents an improvement in HQ staff skill, and happens at times when its units have earned enough xp to merit an upgrade. At that point, the player may choose to increase the number of CPs per turn (overall skill) or to reduce the CP cost of one specific action (specialize).
HQ Branches
HQs are divided into five branches: Force Pool, Intel, Operations, Logistics, and Engineering. Every action belongs to some branch: for example, bridge repair to engineering. Branches are further divided into three levels, not all of which are always unlocked.
In the screenshot, the US II Corps HQ has Level-1 Force Pool, meaning only deploy and reorg actions are available. The higher levels of this branch are locked, and so transfer step and security unit actions are not available to the player.
The player can unlock higher branch levels at conferences, which are breaks in the campaign game that happen once every six months or so. At a conference the player can, among other things, spend prestige to unlock higher levels of HQ branches.
HQ Movement and Range
In the screenshot, you can see that HQ range for the US II Corps equals 10 movement points (MPs) or 3 trucks. The trucks represent transport assets, which are also used in the supply system. Upgrading to add more trucks is possible, but it increases the MPs less and less (5 – 8 – 10 – 11 – 12). This is because increasing HQ range needs to cover an ever larger area.
When an HQ moves, it generally uses the same number of MPs as its range (10 in this case). It then gets 3 more MPs if it moves via uninterrupted rail movement. This is the case for all the HQs we’re actually using in this campaign, but we’ve built some additional flexibility into the system.
Just to give you a taste: one of the possibilities left open for future development is a “mobile” HQ that has a fixed, smaller range, but whose movement is fully upgradeable. This is something we would want to use for a German panzer corps for example, or maybe a late-war Soviet cavalry mechanized group.
In Other News
We released another mini-trailer last week. You can find it in the announcements section here: Death from Above – AI and Airpower Trailer. We are doing a lot of work on localization, testing with a small group of languages to make sure the translations don’t break UI layouts etc. There’s a lot of tweaking ongoing (tweakage?), many fixes and generally the game starting to look like the real thing.
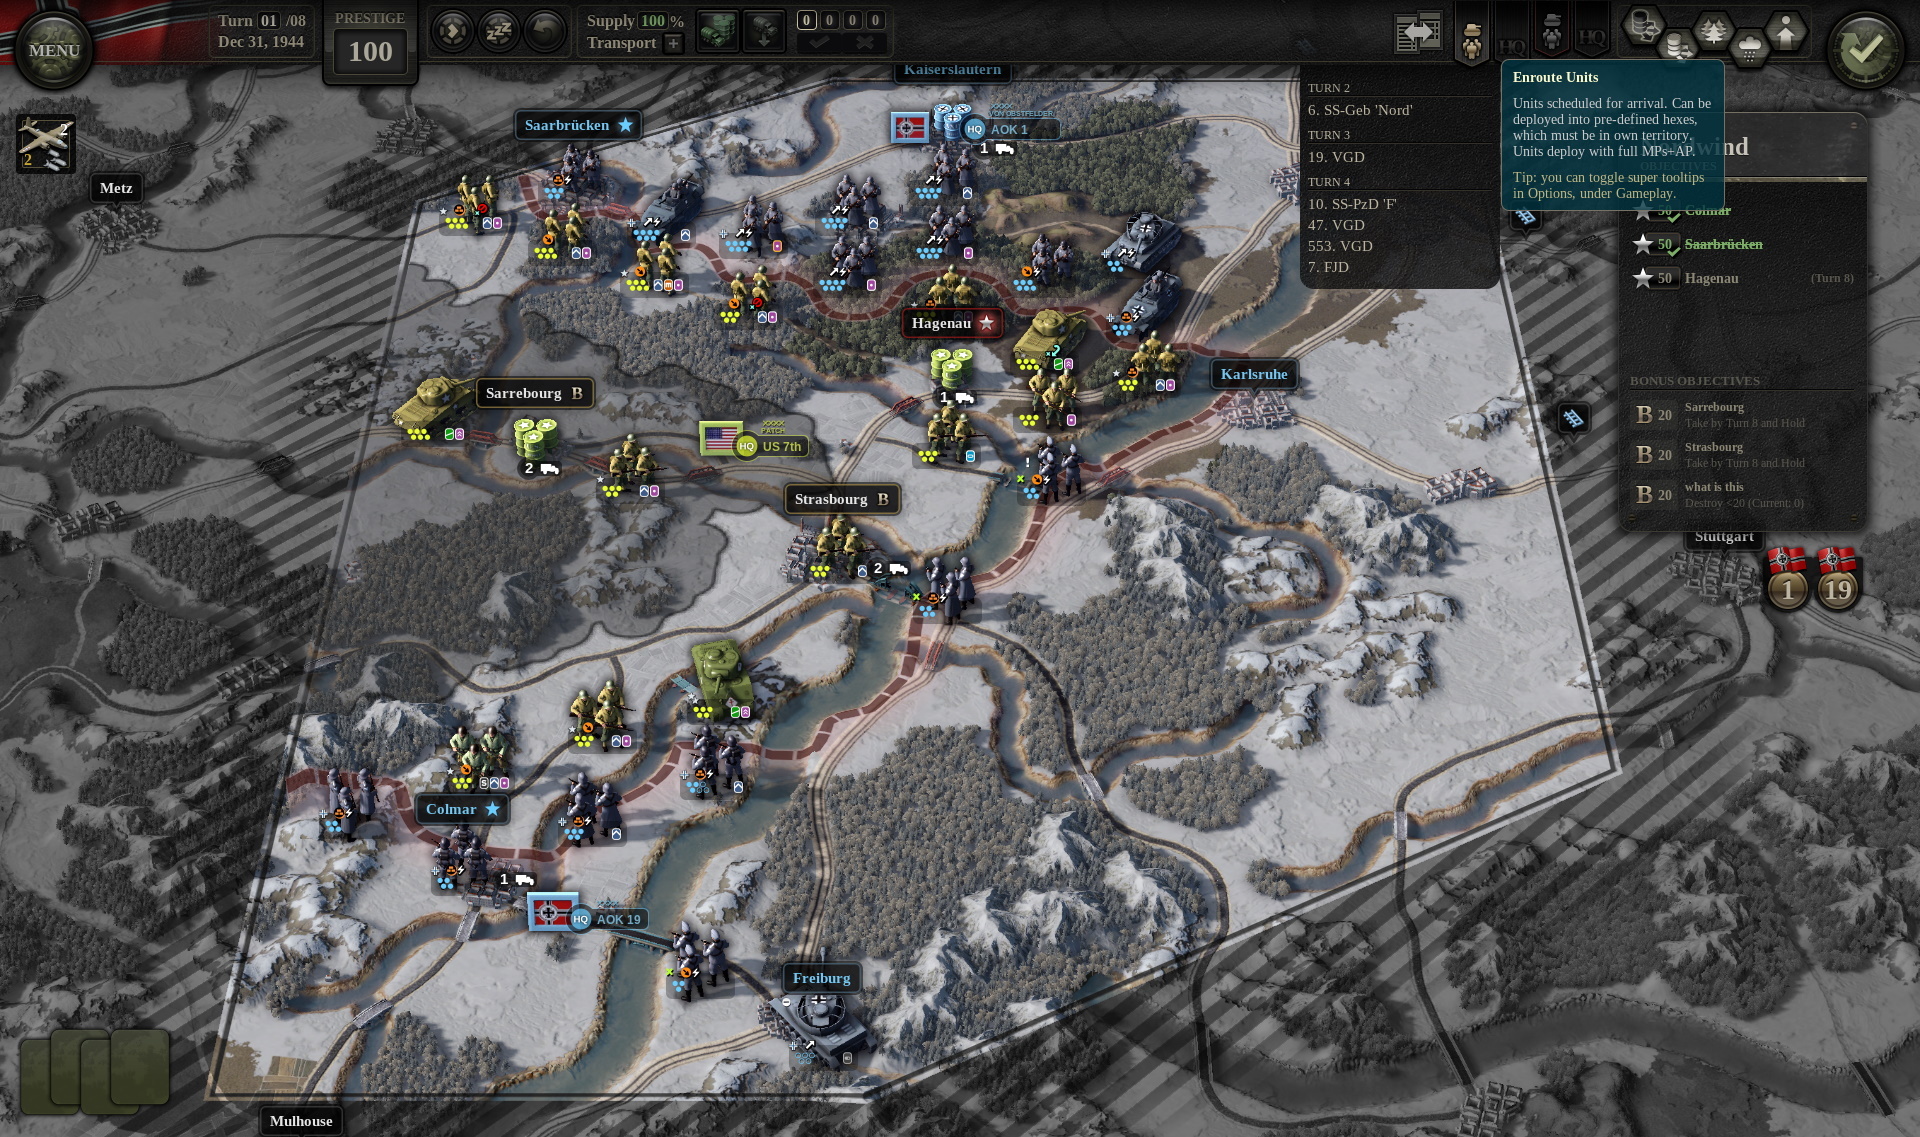
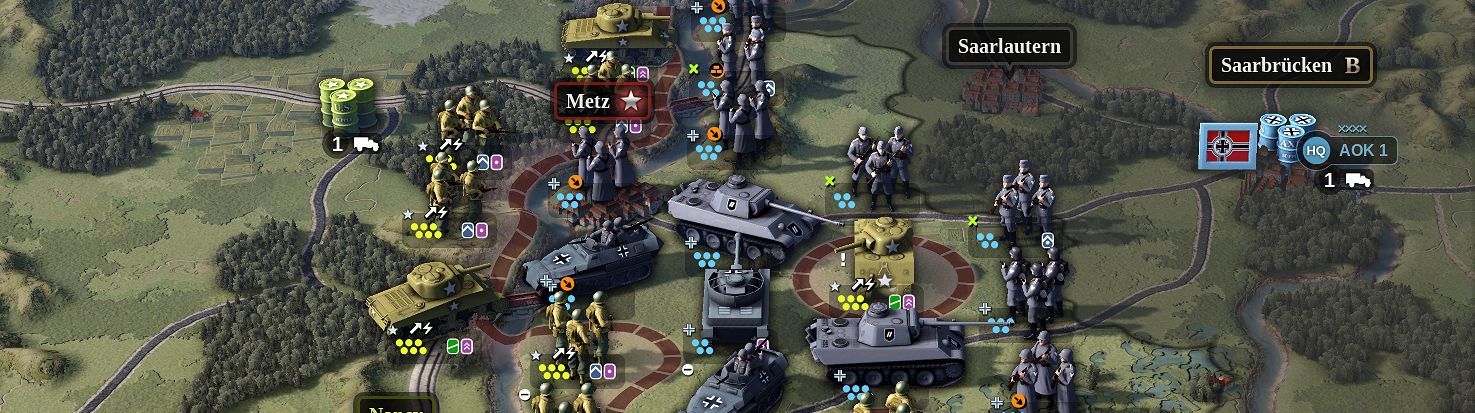
November 1944. The city of Metz, located near the German border, still stands in the way of Allied push across France towards the heart of the Third Reich.
Patton’s Third Army had been fighting fiercely since early September to dislodge the Germans from the heavily fortified city, suffering casualties that approached 50%. Hitler had ordered that the city, and the fortress complex around it, were to “hold at all costs”.
Metz did hold. It was one of the greatest shows of resistance by the Third Reich in World War II.
Eyes on the Sky
That is, of course, until December when the last of the city’s defenders were forced to surrender. To help put things into perspective, Americans had more than 3.500 fighter planes and even more bombers available. Together with the Royal Air Force, the combined Allied air strength on the Western Front was almost 14.000 planes.
Luftflotte 3, protecting the German armies on the Western Front, had less than 600 available aircraft. It’s safe to say that Allied air forces held overwhelming superiority over the Luftwaffe in western Europe. German commanders pleaded with Hitler to allocate at least 700 more planes to the area. There was even talk of Luftwaffe’s secret weapon, one so powerful that it could turn the tide of war: world’s first operational jet fighter!
Messerschmitt 262 jets were real and deadly, but in reality jets were barely operational by the time the Battle of Metz took place and were too few in numbers to make a difference. The rest of the requested planes never arrived.
Even with clear air superiority, the Third Army was still bogged down in the mud, unable to advance. There were several reasons for this:
P–47’s carried 500-pound bombs that had little effect on reinforced concrete and bunkers around Metz
Tactical Air Command that supported the Third Army was too dispersed (flying both Metz and Brest, almost 800 kilometers apart)
Metz would open up a route to Frankfurt and Saar, and the Saar route was a lower priority compared to the lower Rhine and the Ruhr. Ruhr>Saar.
Finally, and most importantly - the bad weather
It is I, AI!
Unity of Command II takes Allied air superiority into account throughout the campaign. Let’s take a look at the trailer:
https://youtu.be/vEpQiXJxp2Y
As soon as the weather clears, the player is given control over thee off-map tactical air force actions that provide recon, air cover and close tactical support for the attacking units on the ground. Bombers are called into action in the video, but Unity of Command II will feature more aerial actions, such as air reconnaissance. Airdrops will also be available, depending on the scenario, date, and your progress in the campaign. As long as there aren’t any large scale ops, attempts to supplement ground transport with the air transport proved effective on the Western Front and the game will mimic these solutions as well.
The trailer ends with the encirclement of Metz, an outcome that wouldn’t be possible without air support. The enemy counter-attack was fierce and, depending on the difficulty settings, a solid show of what the game’s AI is capable of. Or indeed, what the German generals were capable of.
Shield and Sword
The game’s AI takes into account mission objectives, player’s moves and also consults some of the historical moves before taking action. The brutal panzer counterattack that the AI selected as the best option in the trailer mimics the Schild und Schwert (Shield and Sword) tactic mastered by the best defensive commanders of the Third Reich, and is a precursor of what the Allies will have to endure in the Ardennes in December.
Defensive tactics managed to keep the Third Army at Metz for almost three months, which bought time for Hitler to shore up the Siegfried line where many more lives were lost. Still, was Patton’s decision to order a frontal attack on one of the most heavily fortified cities in Western Europe necessary? What would have happened if the fortress was bypassed? Or was there a way to encircle it and take the city in, shall we say, few turns less? Unity of Command II will be out soon - what will be your strategy for Metz?
A full development update is due next week on our blog (will also be re-posted here on Steam). In the meantime, as usual, feel free to AMA in the comments.