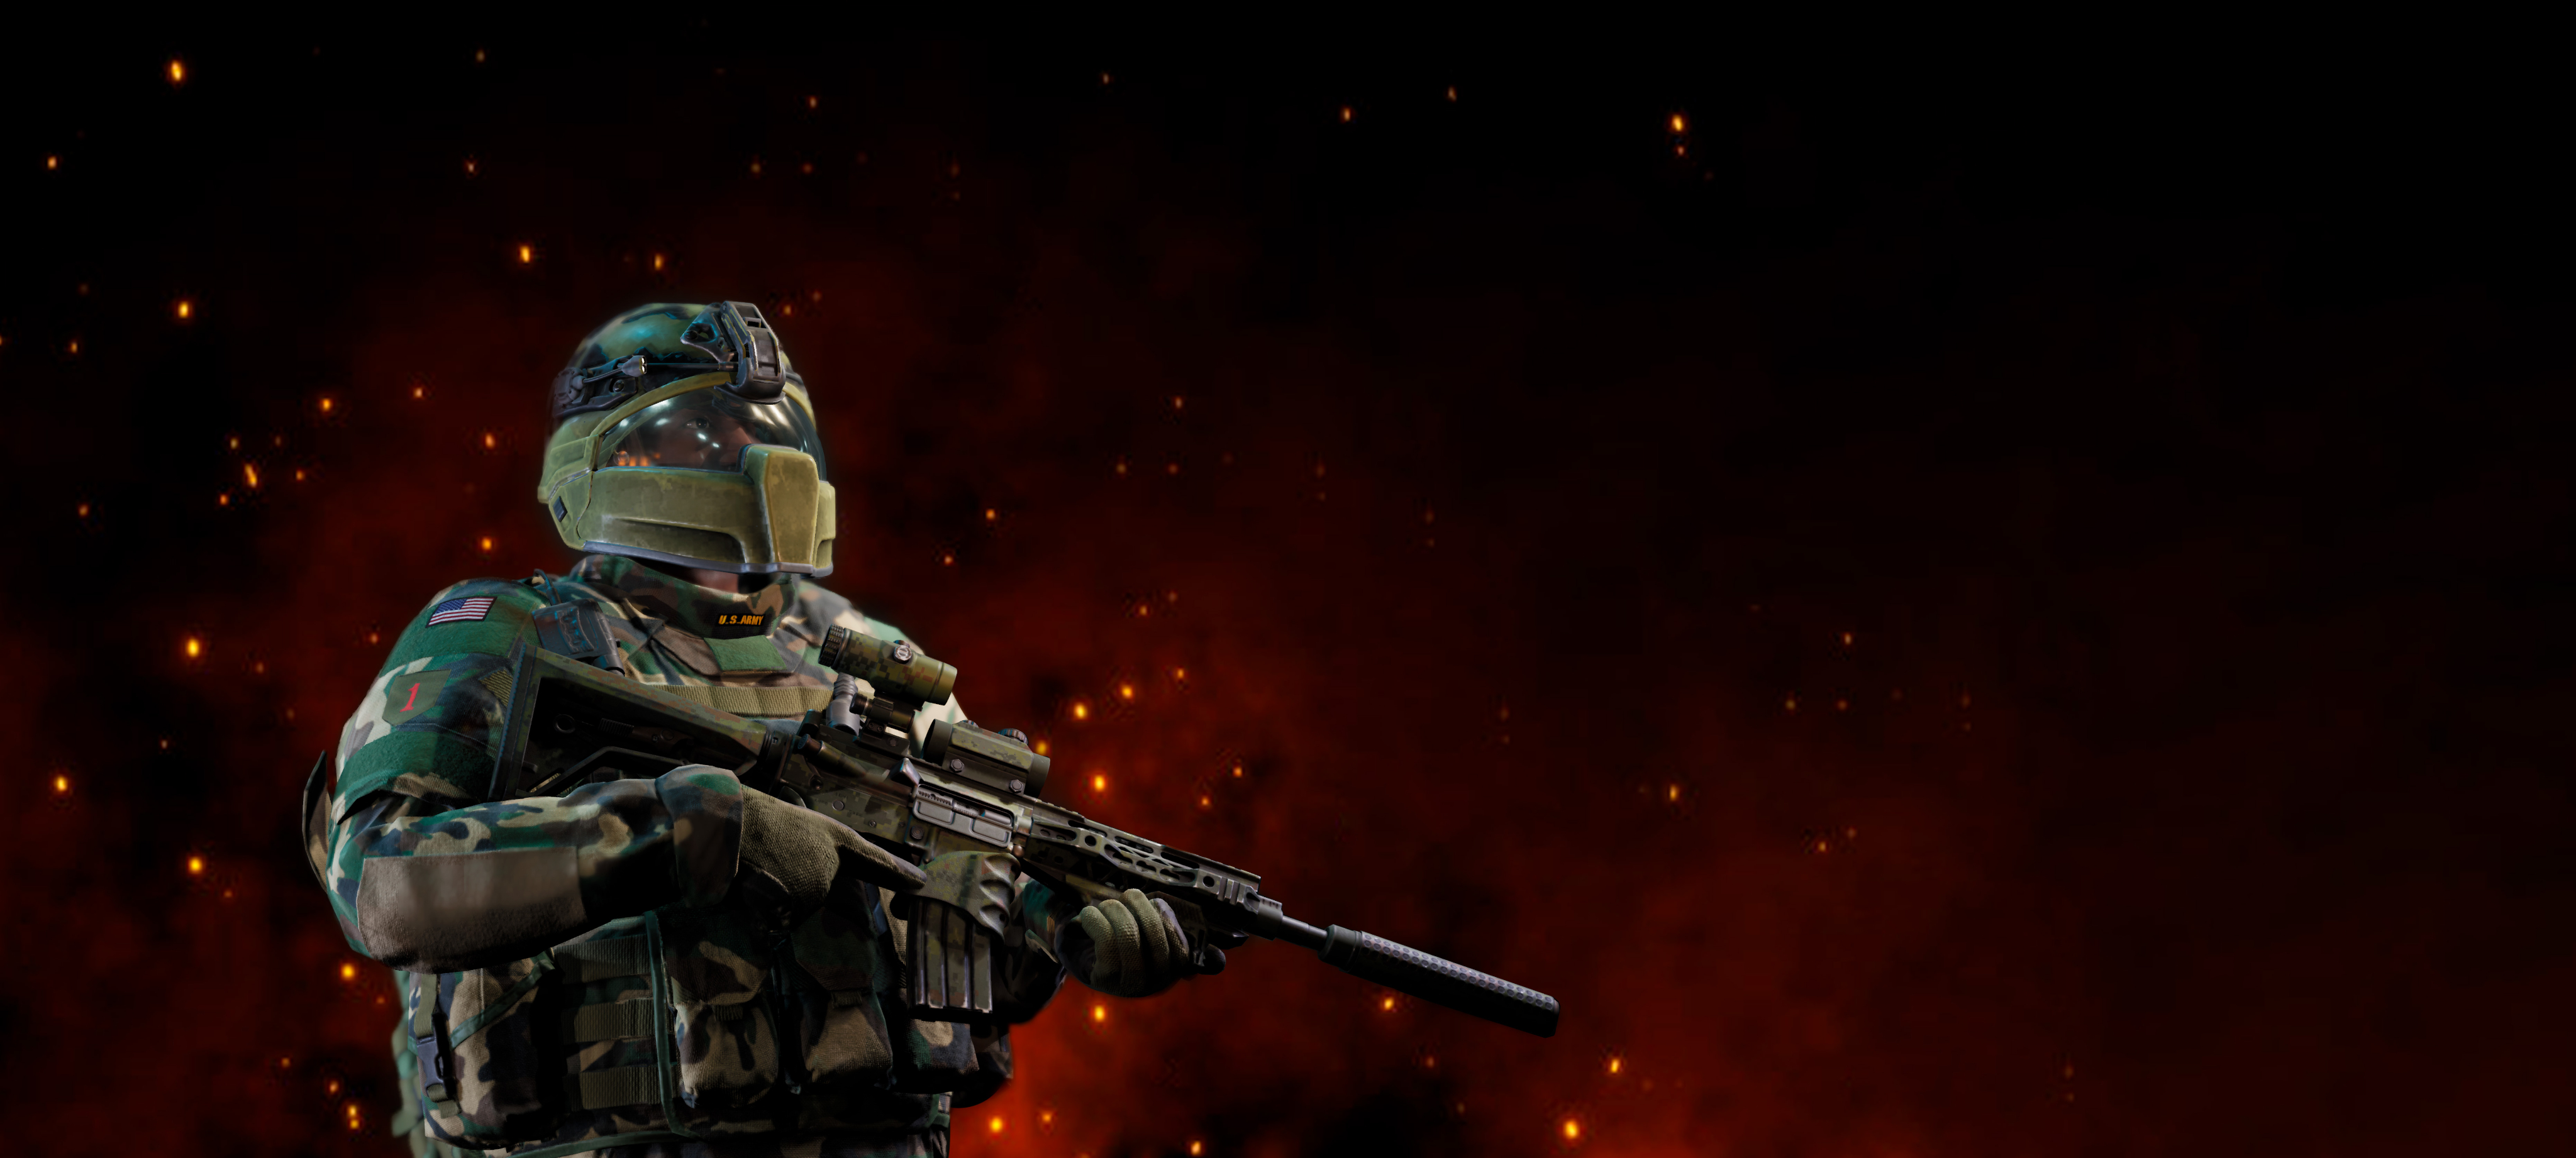
[p]This week, in our Boot Camp series, we will give you guidance on how to play with vehicles, and everything about them.[/p][p] [/p][p] [/p]
Customizing
[p]First, let’s take a look at how to customize your vehicles. In WW3, you can customize your vehicle with hull armor, different turrets or turret armor, a Remote Controlled Weapon Station (RCWS), an Active Protection System (APS), and thermal optics. However, you can only equip 3 of these at once, so make sure to choose a combination that works together. On top of these choices, you can change the type of ammunition your tank and RCWS use, and also change the camouflage of your vehicle.[/p][p] [/p][p]There are many threats to vehicles in WW3. To name a few, there are rocket launchers, C4, anti-tank mines, various drone types, bombing runs, artillery, missiles, other vehicles, anti-tank grenades, and so on. However, don’t be overwhelmed. While there are so many different ways for the enemy to attack you, you can equip an APS to protect you, mostly as a hard counter. An RCIED Jammer will protect you from drones and other remote detonations, like C4. The Radio APS will protect you from being seen in thermals, marked on the map, and will also redirect guided missiles launched against you. Hardkill APS will be able to take down enemy projectiles such as the RPG, Panzerfaust, or Yatagan rockets.
Additionally, there are 3 sets of armors to equip. One will reduce damage from infantry weapons such as the RPG, one will reduce damage from enemy vehicle rounds, and the last one will give you protection from both, however, the protection will be slightly less than the dedicated options.
[/p]
Vehicle Choices
[p]You can choose from IFVs, AFVs, Tank Destroyers, and MBTs. Each category, in this order, increases the armor, caliber of the gun, and the cost of using the vehicle in a match. Additionally, it reduces speed. While playing an IFV, consider moving around constantly, stopping only to support an objective capture. While playing an MBT, consider some careful encouragement for your team to move on and capture objectives. [/p][p] [/p]
Know Your Weakness
[p]The first step to learning vehicle gameplay is to learn your weaknesses. All vehicles have 3 hitboxes. One in the front, one in the middle, and one in the rear. The front one is always the strongest, and the rear is the weakest. Receiving hits on the rear will cause far more damage than the front, so make sure you don’t let people flank you. It’s important to note that the angle of impact does not matter here, so avoid showing your sides in a face-to-face engagement.[/p][p] [/p]
RCWS Gunner
[p]While the driver controls the tank, the first passenger will control the RCWS. It’s an easy job; sit, relax, and click on the enemies. In this position, you can equip a purely anti-personnel weapon such as the 12.7mm HMG, or an anti-tank weapon, such as the AT RCWS, which fires missiles at enemy vehicles. This is a supplement to the tank’s main fighting capability, so when building your tank, consider which gap you want your RCWS gunner to fill.[/p][p] [/p]
The Gameplay
[p]Your vehicle gameplay is going to depend heavily on what kind of enemies you face, and how you prepare. A tank without protection from infantry weapons can easily be swarmed by a dedicated anti-tank team. But a tank without protection from other tanks might find it hard to endure a tank battle. But most importantly, a vehicle with good infantry support will survive much longer than a vehicle without. Know your enemy, and know your friends, as this will help you make better decisions.
[/p][p]Make sure to help your team capture objectives, eliminate enemy tanks, and stay active in the battle. Sitting close to safe spaces such as the base or corners of the map may seem beneficial to you, but it’s the best thing for the team to have a tank supporting their attacks and their defenses. While playing as infantry, it’s important to support your vehicles, and when they request repairs, make sure they receive them.
Your survivability is important, however. If you ever find yourself in a pickle, you can use the ‘G’ key to deploy smoke cover in front of your vehicle. If you pair this with thermal sights, you can use it to see people through the smoke, concealing your position, but revealing your enemies. To repair and rearm your tank, you can return to your base and drive onto the repair pad. Your vehicle will be progressively repaired and rearmed.[/p][p] [/p][p]Thank you for reading! We hope you learned something, and we’d love to see your best vehicle plays in the Discord! And if you wish for us to go into extra detail on any one topic, make sure to tell us, and we’ll be happy to explain. See you next time![/p]
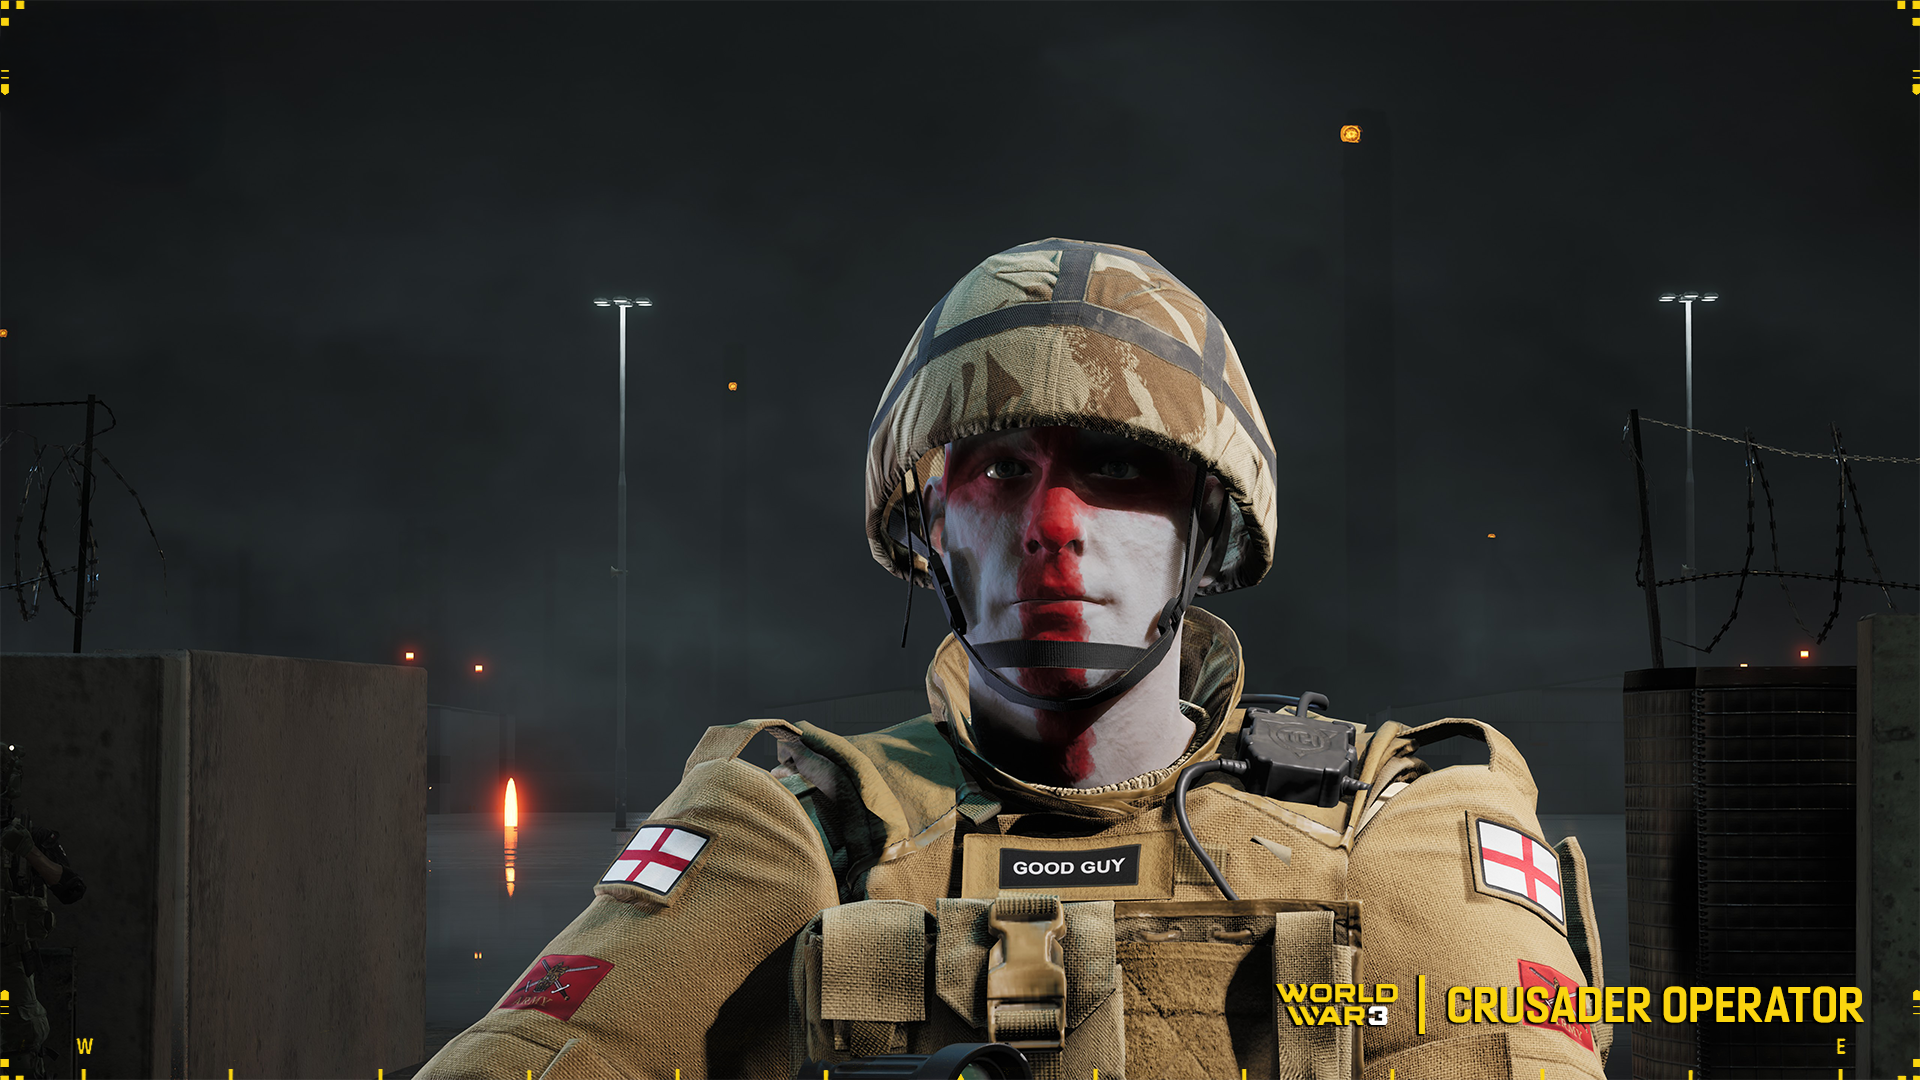
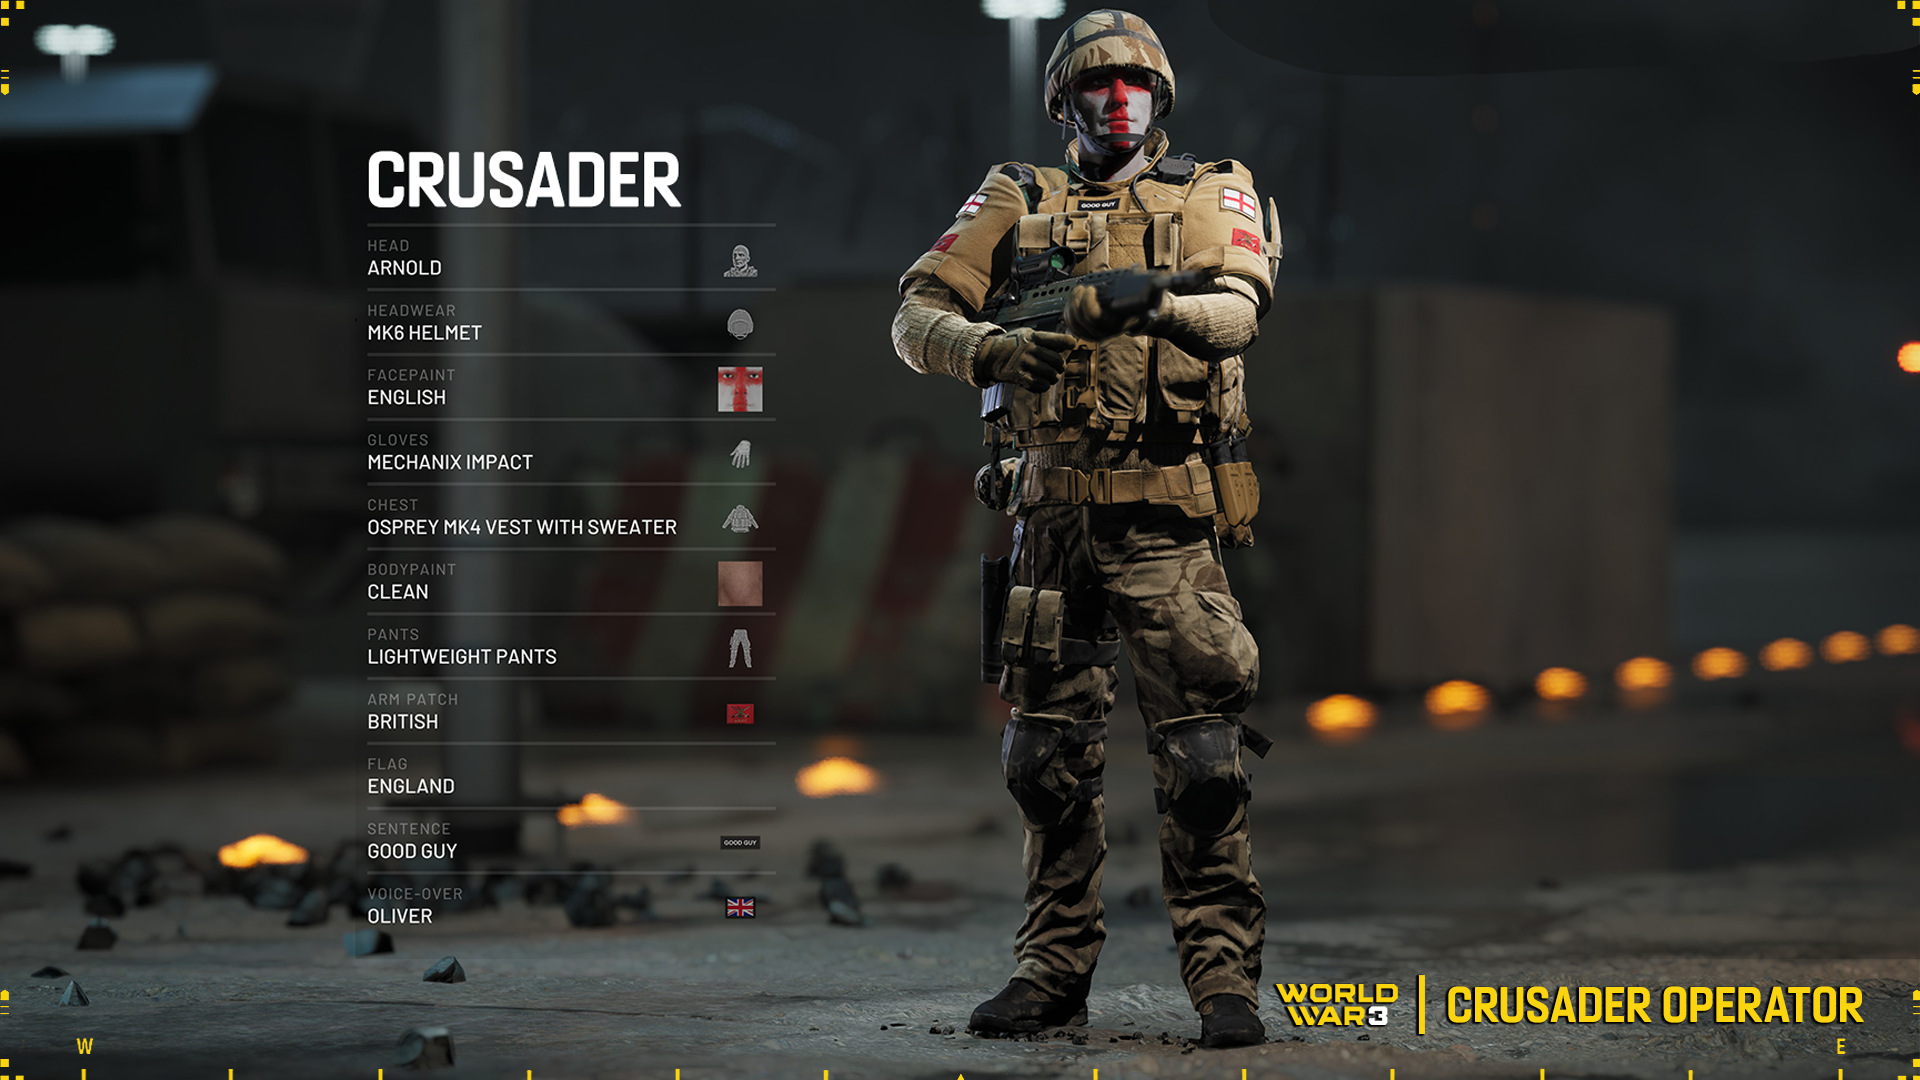
Meet the Crusader operator!
Operators!
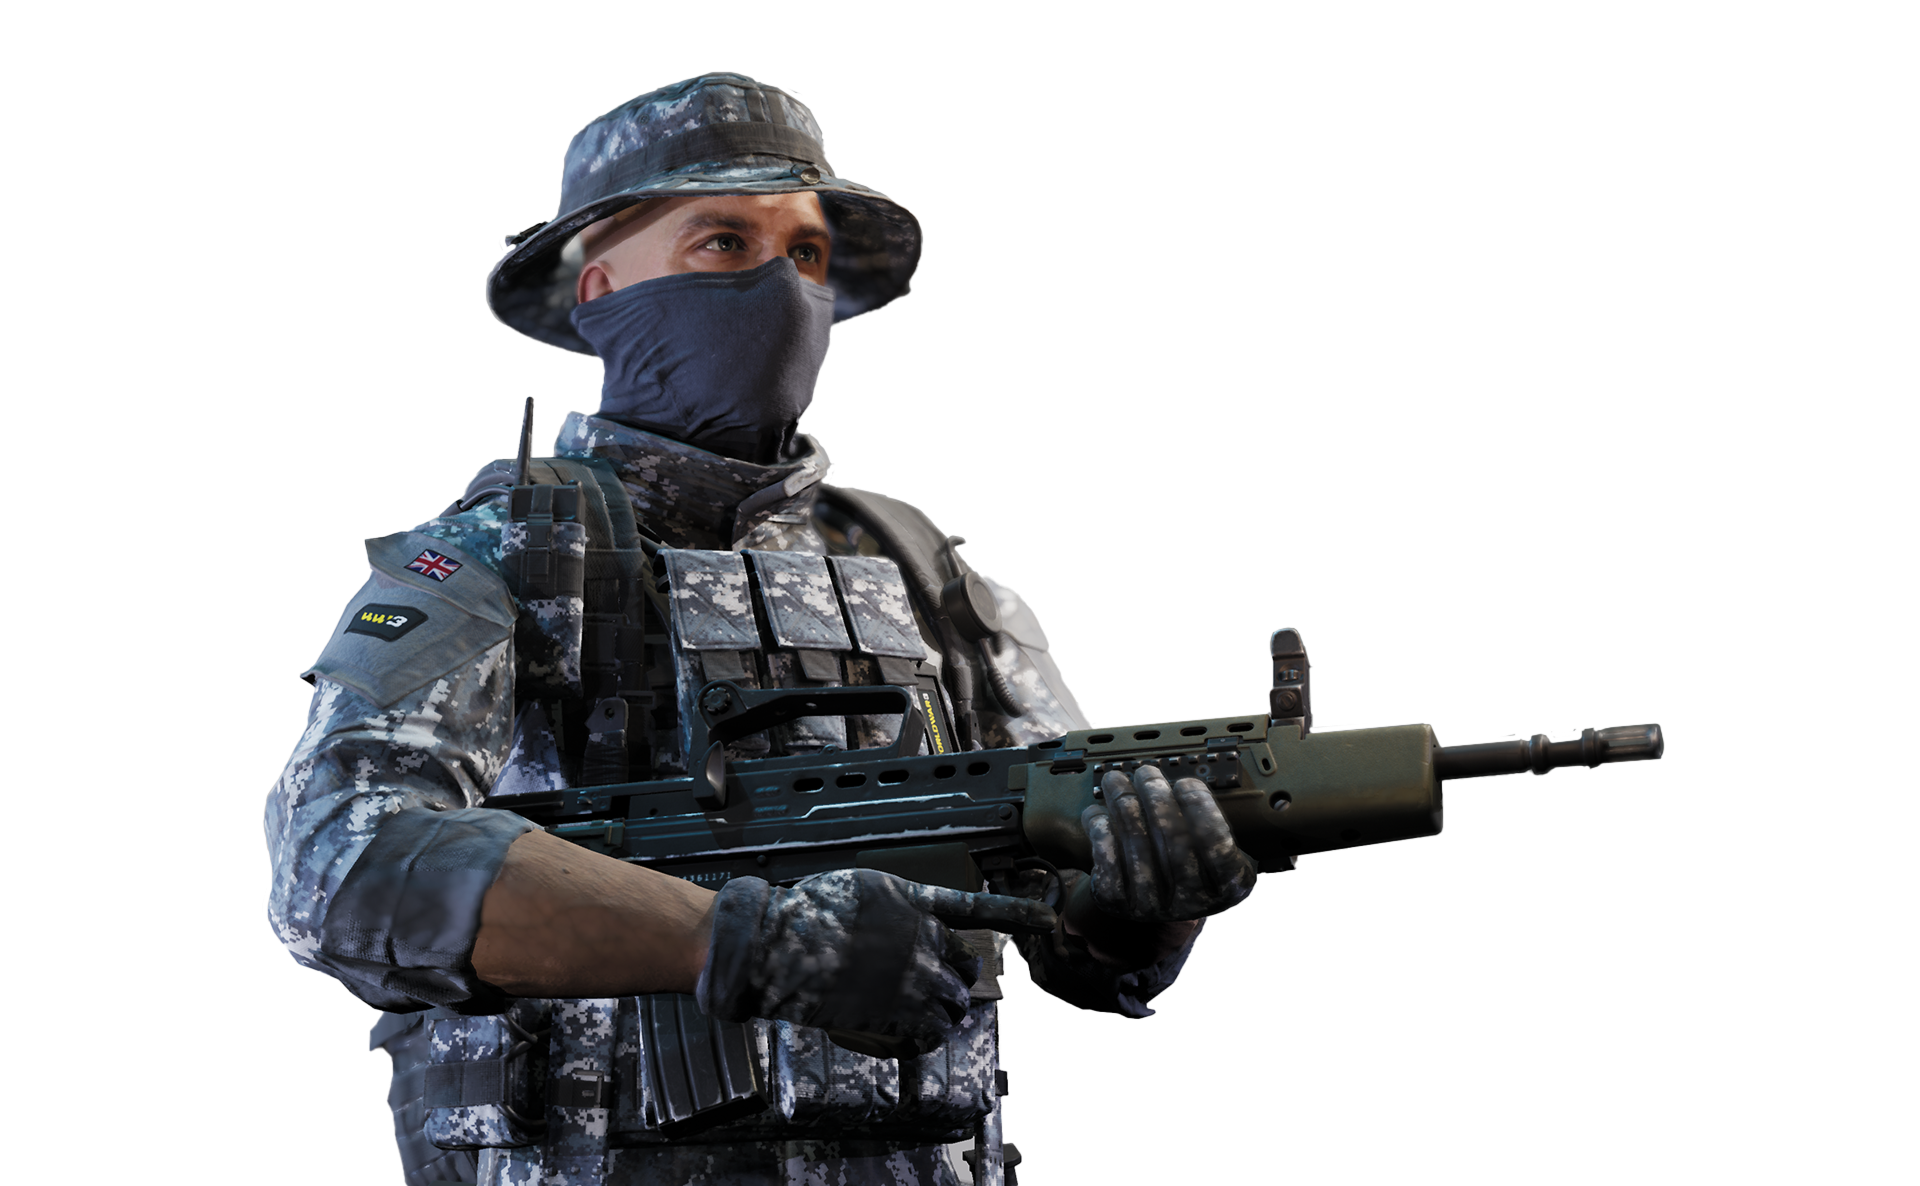
Today we want to introduce you to an operator available in World War 3 hiding under the pseudonym Crusader!
You can purchase the Operator directly in our Launcher shop.
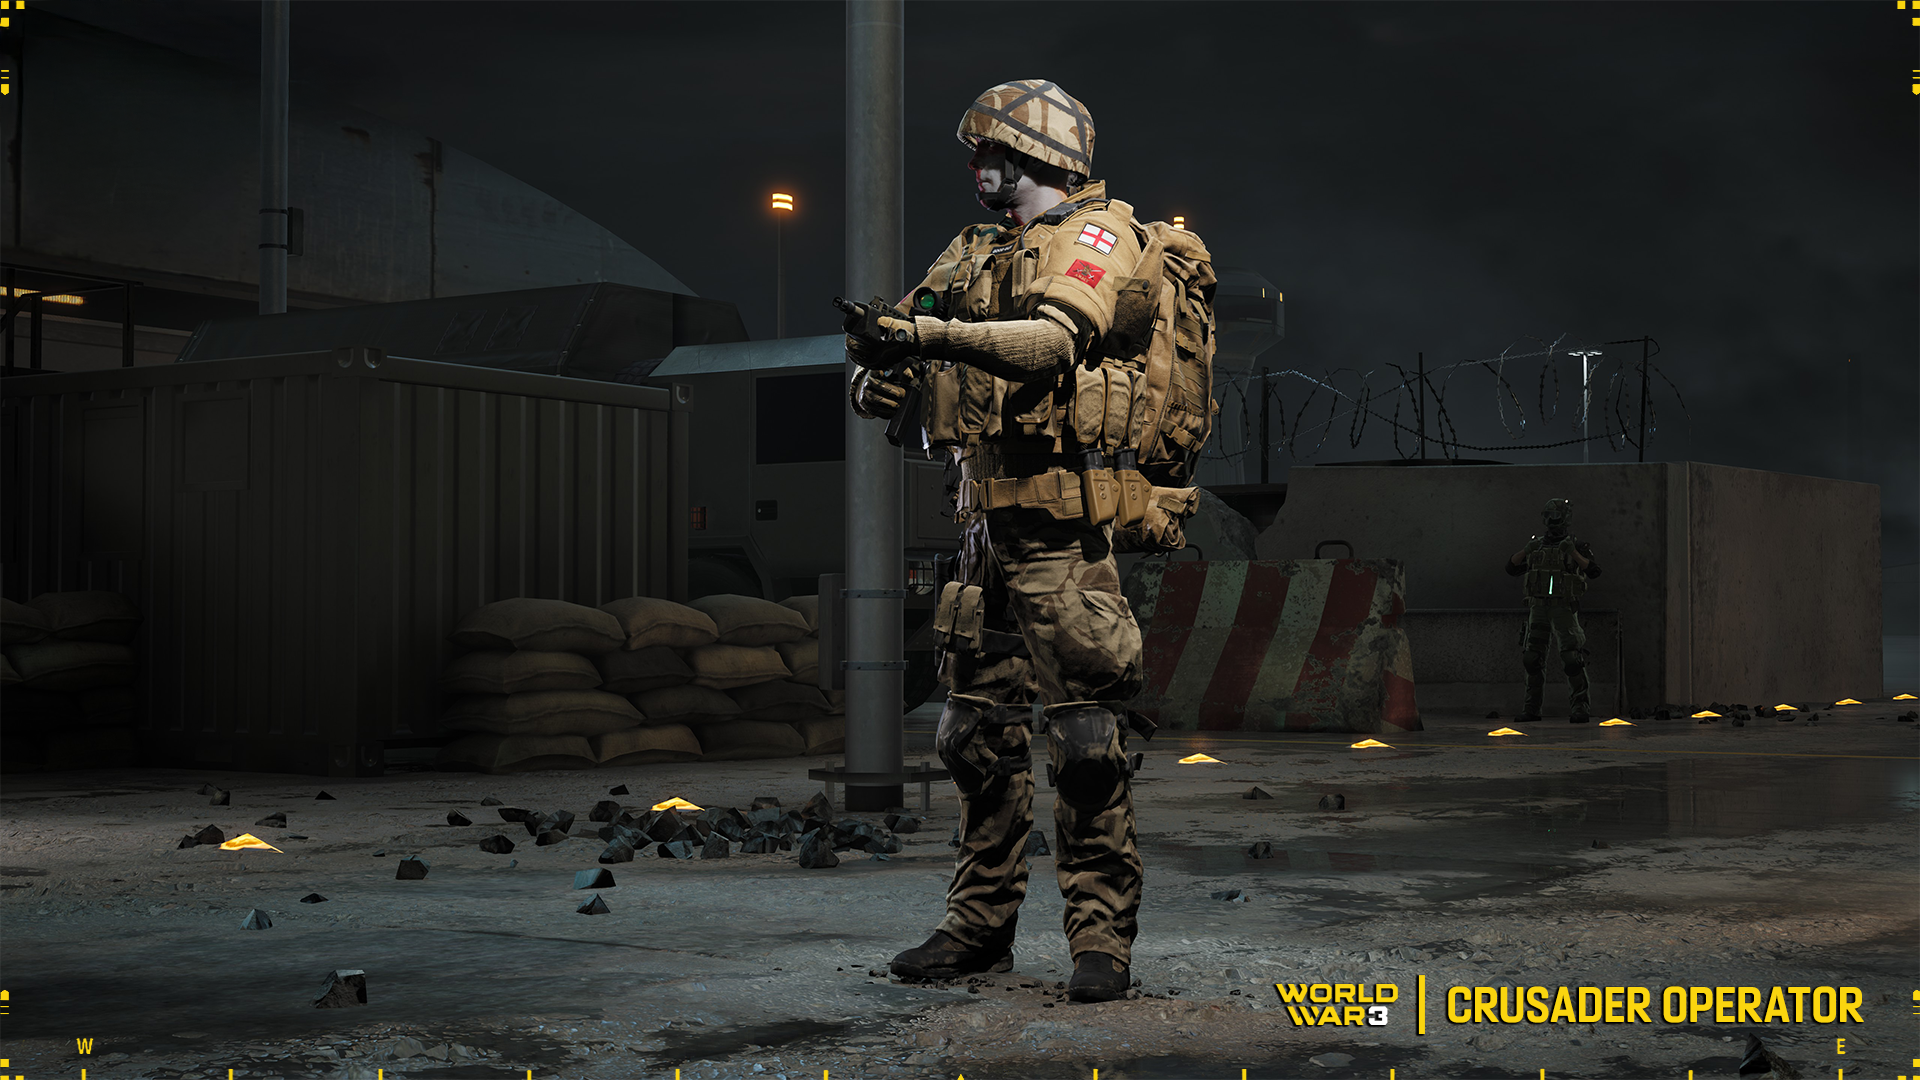
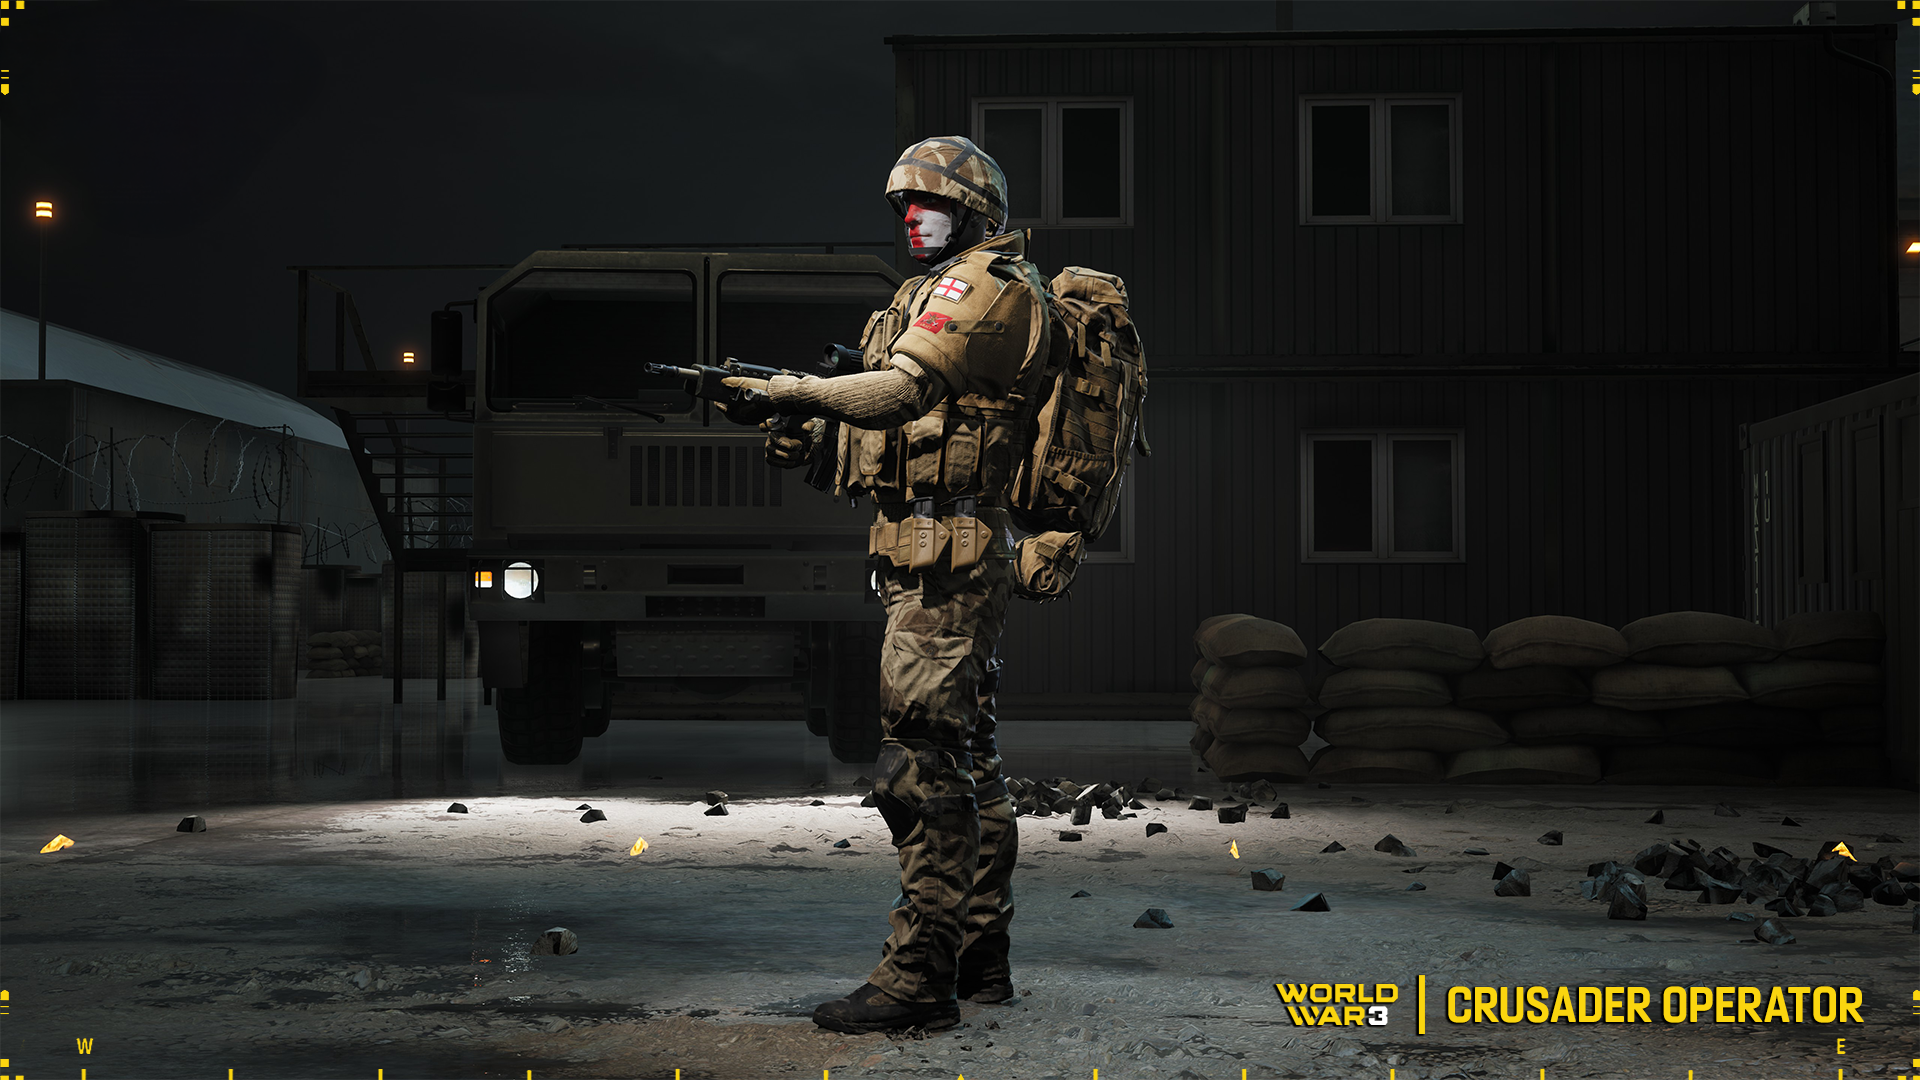
It is fair to say that Crusader has chosen its equipment in keeping with the British spirit of conducting special operations in a desert environment. Which, to the wider public, is known from the Second World War and the adventurous raids by SAS members in North Africa using their heavily armed Willis Jeeps.
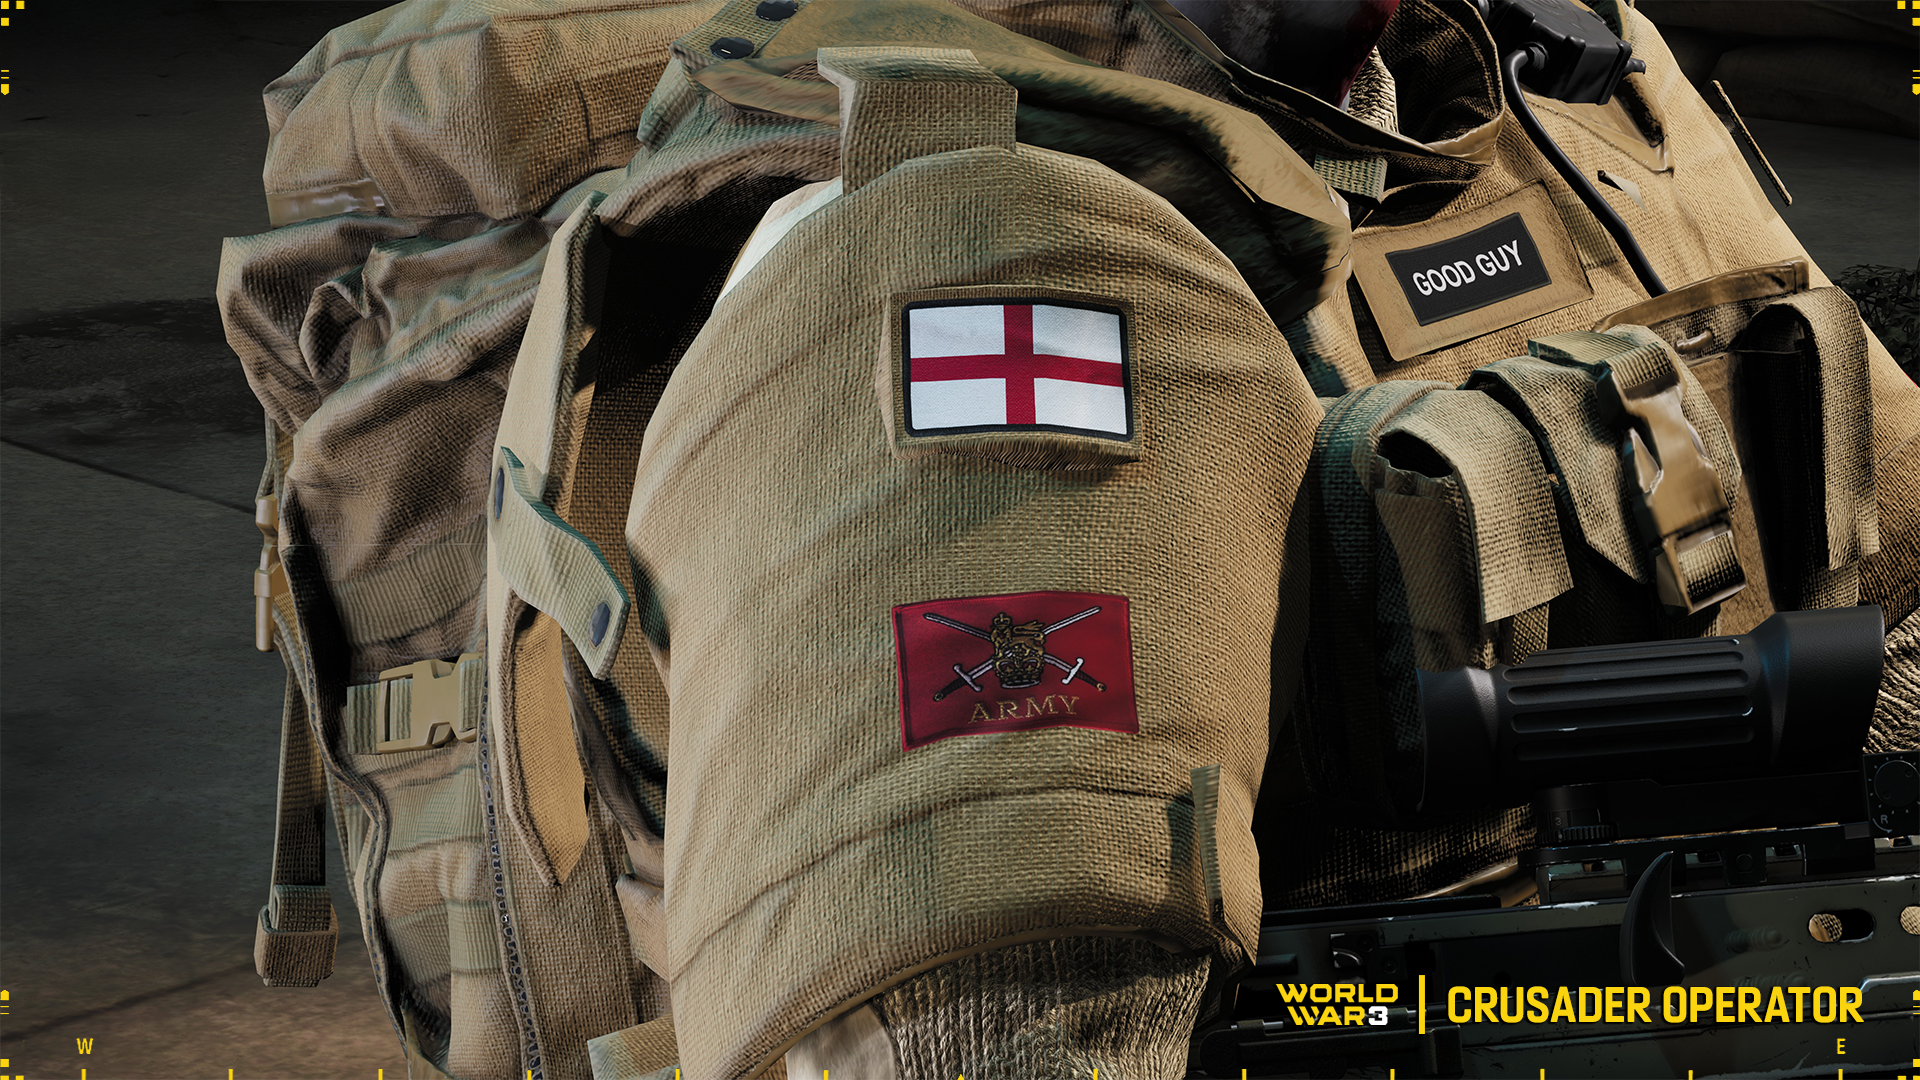
On the head is a standard Mk.6 NATO helmet, underneath which the face has been covered with “camouflage” in the form of the cross familiar from the flag of England. This is a double reference, both to the crusaders roaming the holy land during the crusades, and to the cultivation of the special units' tradition of even skin camouflage (here, however, in a rather ridiculous way). This is also emphasised by the additional patch proclaiming that the operator is a “Good guy”.
The top layer of the operator's torso consists of a tactical waistcoat with multiple pouches and pockets for additional storage. Underneath this is an Osprey Mk.4 bulletproof vest fitted with attachable external shoulder pads with soft inserts to protect additional body parts from shrapnel and potential injuries that may occur during the task. All this in the desert colour known as Coyote.
On both arms of the operator, in addition to the Anglian flag, is the so-called British Army Force Combat Badge. That is, a lion standing on a crown on the front of two swords, where the background colour is blood red.
Underneath the protective gear is a very popular shirt in the British Army most likely in Desert DPM with pullover sleeves. This is important in desert conditions due to the high temperature amplitude. The hands are protected by the reliable Mechanix gloves which are colour-matched to the whole kit.
On the back is an enlarged backpack with an attached pocket, indicating the length of the Operator's mission.
Pants are standard contract lightweight “combat” type trousers in the Desert DPM camouflage variant with further pouches and pockets for the Operator's personal belongings. For additional protection, knee pads have been used, which, incidentally, make the Operator's job easier when shooting from a kneeling position.
The operator most likely belongs to the modern equivalent of the B.E.F (British Expeditionary Force). That is, Her Majesty's best soldiers were sent to various parts of the world with the aim of safeguarding the interests of the Crown.
Historically, B.E.F units were formed during the First World War and were sent to the Western Front to support the French during the war against Germany, with more such units being formed as the conflict escalated. The British Crown called on the countries over which it had control to send their troops. This action resulted in the formation of Indian, Canadian, New Zealand, Australian and even South African corps. After the conflict, the units were sent home and disbanded.
Before the Second World War, the British, preparing for the conflict, re-established the B.E.F in the early 1930s. During the battles of 1940 in France, they were the only fully mechanised army taking part in the battles. After withdrawal from France, units under this name were not re-established.
Operator unlocks:
With the purchase of the Operator, as always, you unlock its elements, which you can confidently use to create your favourite character. Purchasing the Crusader unlocks the following equipment and cosmetic items (if you do not already have them):
Headwear: Mk.6 Helmet
Facepaint: English
Gloves: Mechanix Impact
Chest: Osprey Mk.4 vest with Sweater
Pants: Lightweight Pants
Arm Patch: British
Sentence: Good Guy
Don't know how to choose and customize an Operator to your taste? Check out our Boot Camp video!
That's it for today. Fall out Operators!
Patch 1.4 is live!
[p]Greetings Operators![/p][p][/p][p]Today we have an update for you with a large number of minor fixes, enhancing your enjoyment of World War 3. In addition, many maps have undergone another round of optimisation.[/p][p]Full list of changes below:[/p][p] [/p]
Challenges (missions):
[p]- The old and obsolete daily challenges were removed from the rotation.[/p][p]- The difficulty of some daily challenges was reduced by 30%, and the rewards were increased to 1,000 XP.[/p][p]- The previously removed challenges have returned to the Shibuya map.[/p][p]- Updated the tracking of daily challenges and fixed bugs in the counting process.[/p][p][/p]
Maps:
[p]- Ruins of Gobi: lighting optimization (Part 2), improved bot logic, optimized visual effects.[/p][p]- Berlin: Improved navigation mesh, improved collision models, removed gaps between textures.[/p][p]- Moscow / Polarny / Tokyo / Smolensk: lighting optimization (another iteration), optimization of visible geometry.[/p][p][/p]
Bots:
[p]- New players are now playing their first 5 matches on the Ruins of the Gobi map with bots.[/p][p]- Adjusted the bot respawn system based on the level of the current match.[/p][p]- Fixed behavior when new players are connected.[/p][p]- Added the ability for bots to switch between primary and secondary weapons.[/p][p][/p]
Matchmaking and connection:
[p]- Problems with connecting to Stronghold mode matches and the DMZ map have been localized and fixed.[/p][p]- Backend and log elements have been added to allow us to better understand and more quickly locate connection problems.[/p][p][/p]
Technical improvements:
[p]- Another phase of optimization on the maps: Moscow, Polarnyi, Tokyo, Smolensk.[/p][p] [/p][p]User Interface:[/p][p]- Fixed issues with displaying the progress, icons, and previews of various elements.[/p][p]- Translations of the daily challenges and the new interface elements have been added.[/p]
Maintenance - Patch 1.4
On the 24th of June, starting from 12:30 CEST, the server will not be available for 5 hours due to a planned server maintenance.
[p][/p][p][img src="https://clan.akamai.steamstatic.com/images/32896386/e0d765386af06d9b1df47f94ee85dc944cac1fbd.png"] Please note – that the maintenance can be extended beyond the above mentioned timeframe. Up-to-date server status is always available on our Discord server and Twitter. [/p]
WW3 Boot Camp || Operator Customization
[p]This week, in our Boot Camp series, we will explore everything related to operator customization. We will explain how it works and how to unlock it.[/p][p] [/p]
Customization
[p]Now, let's take a look at how to customize your operator. The process is simple, but we'll walk you through it.[/p][p] [/p][p][/p][p][/p][p]Remember, when customizing your operator, the hitbox remains the same. Thinner operators have no advantages in this regard, and bigger clothing does not slow you down. The helmet shape and size does not matter, the helmet hitbox covers your entire head. As long as you have headgear equipped, your loadout’s armor will protect you. So with this in mind, be free and go wild![/p][p] [/p]
Customizable Items
[p]In WW3, you customize several aspects of your operators. [/p]
[p]Head[/p]
[p]Headgear[/p]
[p]Facewear[/p]
[p]Facepaint[/p]
[p]Chest[/p]
[p]Pants[/p]
[p]Gloves[/p]
[p]Bodypaint[/p]
[p]Arm Patch[/p]
[p]Flag Patch[/p]
[p]Sentence Patch[/p]
[p]Voiceover[/p]
[p]Camouflage for clothing[/p]
[p] [/p]
Obtaining Customization
[p]To start with, you have 3 loadouts. Each of these carries a different set of customization items, which you can mix in any given character slot. However this will be a little limited, so let’s look at how to unlock new items.[/p][p] First, you can obtain some free items via achievements. Upon obtaining 500 kills in Moscow, Berlin, or Warsaw in Tac Ops, you will obtain an operator blueprint, one for each map where you achieved 500 kills. You can find these achievements in Career -> Achievements -> Events -> Local Advancements. In addition to this free option, there are occasional silver currency blueprints being added to the shop. You can obtain this currency by doing weekly challenges or completing achievements. Secondly, you can obtain operator blueprints from the in-game or launcher shops. And of course, by purchasing the Battle Pass and completing the necessary tiers, you will unlock even more operator customization via blueprints.[/p][p]Once you get an operator blueprint, it will become available to use from your list of operators. But more importantly, each item that’s included in the operator blueprint can now be used to create your own new one. You’ll be able to use all of the components that the operator came with, i.e. the helmet, the arm patch, the voiceover, the pants, etc. Obtaining a certain camouflage for a certain piece of clothing will let you color that piece of clothing with that camouflage. In essence, each operator is an expansion to your catalog of customization.[/p][p] Thank you for reading! We hope you learned something, and we’d love to see what you create in our Discordwhere you can also go for some inspiration from fellow tacticool enthusiasts! And if you wish for us to go into extra detail on any one topic, make sure to tell us, and we’ll be happy to explain. See you next time![/p]
WW3 Boot Camp || Loadouts
[p]In this week’s Boot Camp series, we will be exploring all to do with loadouts. [/p][p] [/p]
Loadout Items
[p]In WW3. you carry several items with you into the battle. [/p]
[p]2 Weapons[/p]
[p]Armor plate and helmet[/p]
[p]A gadget or grenade[/p]
[p]A supply pack[/p]
[p]Extra attachments and a gadget in the backpack.[/p]
Loadout Weight
[p]The loadouts you carry are limited by weight. This means that the heavier your gun or armor, the less space you have for other items. In addition, there are 3 weight brackets in the game, light, medium, and heavy. Each weight bracket comes with a set of speed buffs or nerfs. It also determines your HP regeneration. Your HP regenerates in segments, so if a segment is not fully depleted, it will regenerate until it is full. The heavier your loadout, the larger the segments.
These weights are broken down as follows:[/p][p]Light [/p]
[p]10% faster animations and movement speed.[/p]
[p]Longer “tac sprint” duration.[/p]
[p]50/50 HP bar split. [/p]
[p]Medium[/p]
[p]Neutral animation and movement speed.[/p]
[p]33/33/34 HP bar split.[/p]
[p]Heavy[/p]
[p]10% slower animation and movement speed.[/p]
[p]Shorter “tac sprint” duration.[/p]
[p]33/33/34 HP bar split.[/p]
Weapons
[p]Your weapon is the most important part of your loadout. You can choose from a variety of weapons from all categories. Note that you can equip two assault rifles, at the expense of weight, or you can settle for a good old pistol.
Weapon customisation in WW3 is split into performance and cosmetic attachments. Performance attachments are limited to a certain number of slots and affect the statistics of the weapon. Cosmetic attachments on the other hand are purely for your customisation pleasure, and will not impact the weapon’s statistics. They are also not limited by slots, so make your rifle truly your own.
[/p][p] [/p][p]Extra customisation can be earned from the shop or battlepass in the form of a blueprint. Everything contained in a blueprint will be unlocked for that weapon and you may swap out bits and pieces as you please. You can access your blueprints while selecting the weapon for a loadout, as seen below.
[/p][TAG-101]
Armor Plates and Helmets
[p]You can choose from different armor plates, with each having its own HP value, bullet damage reduction, and weight. As the weight of the armor increases, so does its HP and bullet damage reduction. So essentially, lighter armor will not just reduce less damage, they will also take fewer bullets before they are destroyed. In the game, you can restore the armor plates using equipment packages dropped by your teammates.
Helmet materials follow the same principles. Be mindful that not having a visual headgear equipped for your operator will remove this armor when a loadout is selected. It does not matter what kind of headgear you have equipped, this will protect you all the same. The hitbox for the helmet covers the entire head. This way, your friends and enemies have an info-layer informing them of your helmet status, while not impacting customisation or introducing P2W elements into the game.[/p][p] [/p]
Gadget Or Grenade
[p]A vital part of your loadout, your choice of gadget or grenade can add functionality to your in-game role. You can choose from a few types of anti-personnel grenades, an anti-tank mine, anti-tank grenades, or C4. This choice is inconsequential, so choose according to what you wish to do.[/p][p] [/p]
Supply Pack
[p]There are three supply packs available in the loadout. A med pack, ammo pack, or equipment pack. With the first two being self-explanatory, the equipment pack can restore armor, helmets, grenades, and gadgets. Each of these packs is vital to the team, so make sure to choose something that your team needs the most.[/p][p] [/p]
Backpack
[p]Inside the backpack, you will find five slots. Four attachments and a grenade or gadget slot. The backpack contains some special items that are universal to almost all weapons but are not available via the weapon progression tree. These items are unlocked using the account progression, allowing you quick access to attachments before you unlock some for a new weapon. There are a few utility items in the backpack, too. In this slot, you can take gadgets such as a med syringe for your personal use, a mini drone for scouting, or a range of grenades. To access the backpack, you have to press “i” by default.[/p][p] [/p][p]Thank you for reading! We hope you learned something, and that you were inspired to create some new loadouts! As a final tip, we suggest making a loadout for every scenario, and changing them in-game based on your team’s needs. And if you wish for us to go into extra detail on any of these topics, make sure to tell us, we’ll be happy to explain. See you next time![/p]
June specials
[p]Operators![/p][p]We present you new operators available now in the game![/p]
Crusader
[p][img src="https://clan.akamai.steamstatic.com/images/32896386/951dfb0fc4aaba42c68240f65ea08a5fc426de7e.png"][/p][p]Its armor is fortified with faith. A heavy class stormtrooper, it is the first to charge head-on and break through fortified positions. The Crusader's reinforced defense and aggressive silhouette make it a symbol of pressure and decisive offense.[img src="https://clan.akamai.steamstatic.com/images/32896386/d82aaf90dc34bfdcadc4709531381b507ad45e60.png"][/p]
Ronin
[p][img src="https://clan.akamai.steamstatic.com/images/32896386/961704143cd3d56541c54a9947959e9667e76a28.png"]Naval anti-terrorist special forces. Master of boarding operations.[/p]
[p][img src="https://clan.akamai.steamstatic.com/images/32896386/e309f973196c5e980b871a35b0d2b8d63f67f2c9.png"]Japan Self-Defense Force (JSDF) Maritime Unit. Expert in amphibious operations.[/p][p][img src="https://clan.akamai.steamstatic.com/images/32896386/931a2fd321c563c3c1572637f39d6e05f7667c64.png"][TAG-30]These operators are already available in our launcher's shop.[/p][p][/p][p]Fall out Operators![/p]
WW3 Boot Camp || TDM
[p]In this week’s Boot Camp series, we will be exploring the TDM gamemode. It’s a known classic, existing as a mode in almost every shooter ever made. In WW3, this mode is [/p][p][/p][p][img src="https://clan.akamai.steamstatic.com/images/32896386/8606214a1149baa418456e69b35bba0034e36b44.jpg"][/p]
Rules
[p]The Rules of TDM may contain some twists from the basic formula you possibly know.[/p]
[p]10v10.[/p]
[p]3 Rounds.[/p]
[p]7 Minutes Per Round.[/p]
[p]50 Kills to Win a Round.[/p]
[p]Best of 2 Rounds Wins.[/p]
[p]No strikes are allowed.[/p]
[p] [/p]
The Objective
[p]The objective in TDM is to win 2 rounds, of which there are 3. Each round is won by getting 50 kills, or by having more kills than the other team by the end of 7 minutes. There are no strikes allowed, so it is a pure gunplay experience, which can be beneficial for newer users to come in and learn.
Gameplay[/p][p]In TDM, you spawn at random locations that are not within the vicinity of enemies. Spawning on squad members is disabled. From here, it is valuable to identify the hotspots, where players typically play. For example, the 2nd floor of the Warsaw mall, the tower and middle building in Gobi, or the 2nd floor buildings in Berlin. Seeking out players in these areas means getting more kills than looking for them in the map’s outskirts. However, above all else, the key to winning in this gamemode is having superior gun skills. Just don’t forget to have fun with your kills![/p][p][/p][p] [/p][p]Thank you for reading! We hope this article has answered some of your questions and helped you navigate the game mode. It is the last entry in the gamemodes category, for now, so we will be sharing some more in-depth knowledge in the following reports. See you next time![/p]
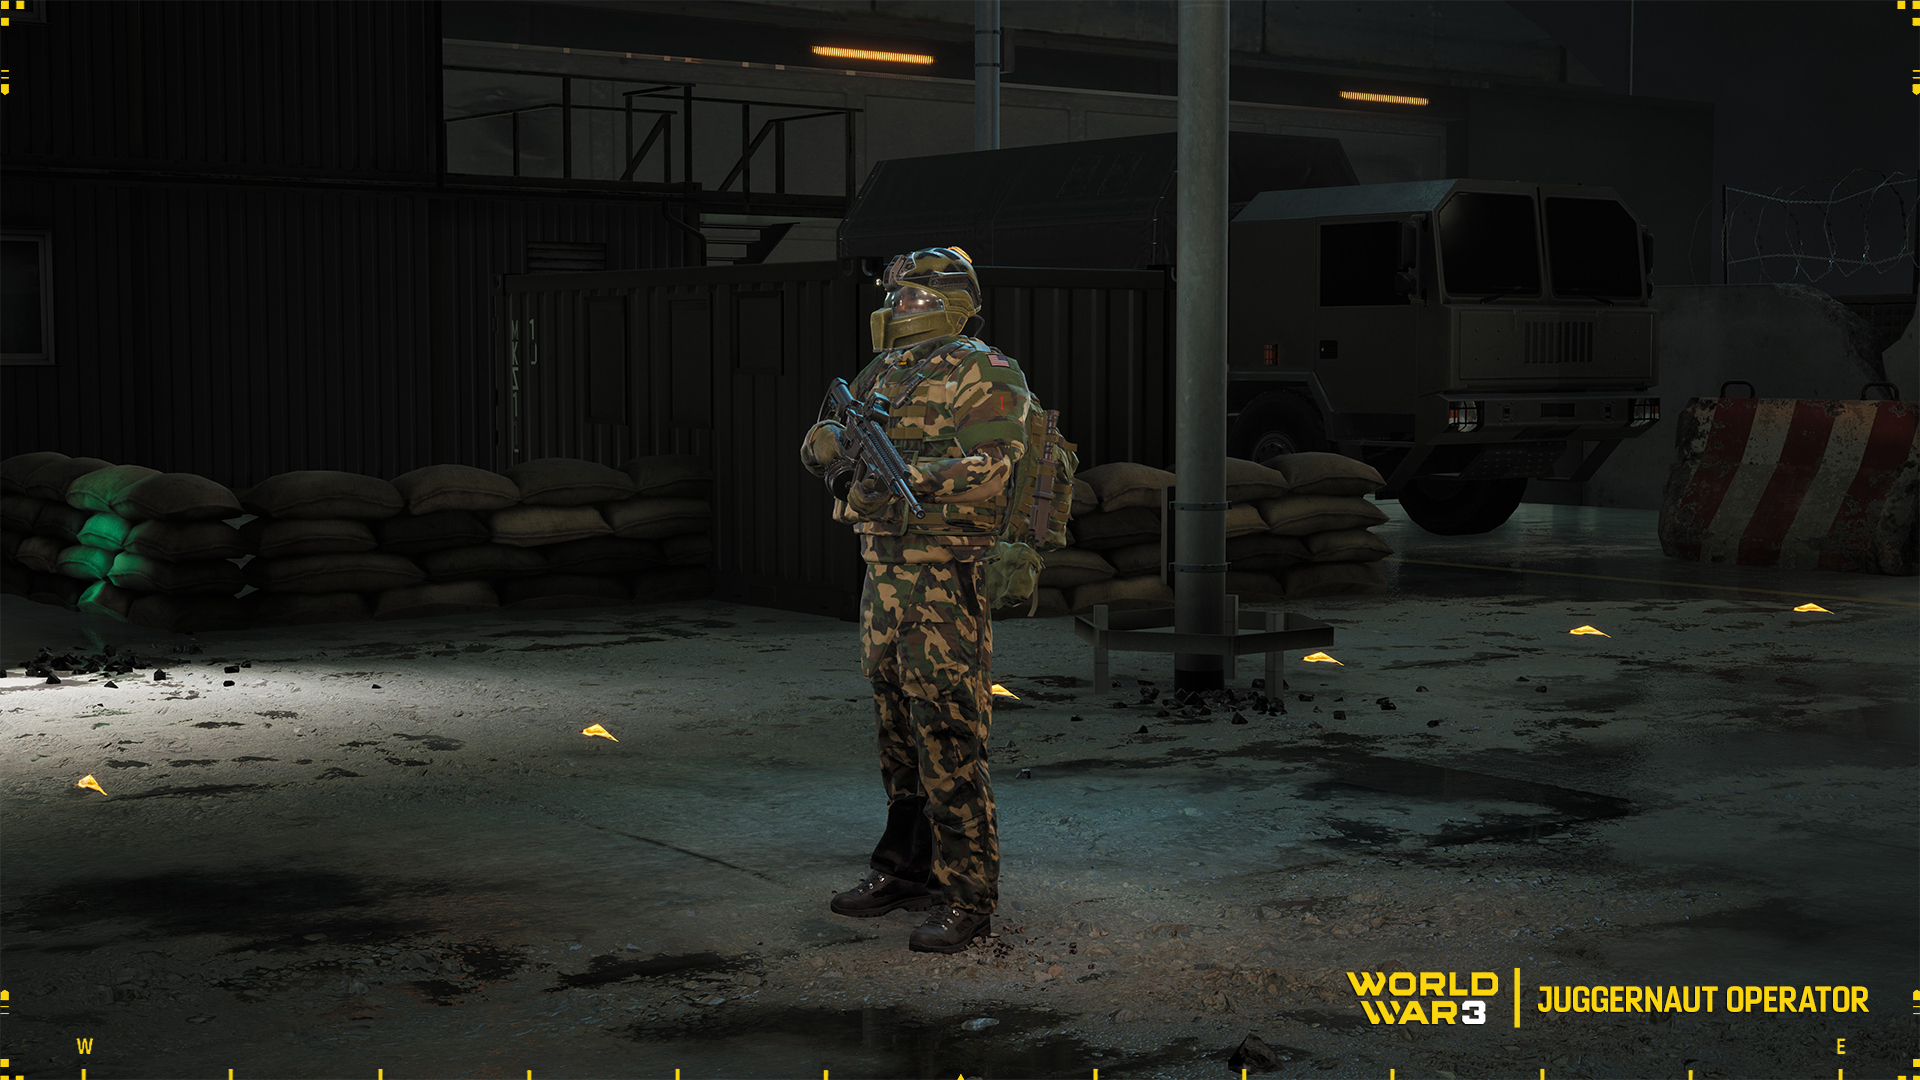
Meet the Juggernaut Operator!
Operators! Today we want to introduce you to an operator available in World War 3 christened with the name Juggernaut!
You can purchase the Operator directly in our launcher after clicking "Shop" button.
The Juggernaut is wearing assault gear that allows him to fight on the front line during combat in buildings or other types of close-quarters combat, where protection is paramount and attacks can come from any direction.
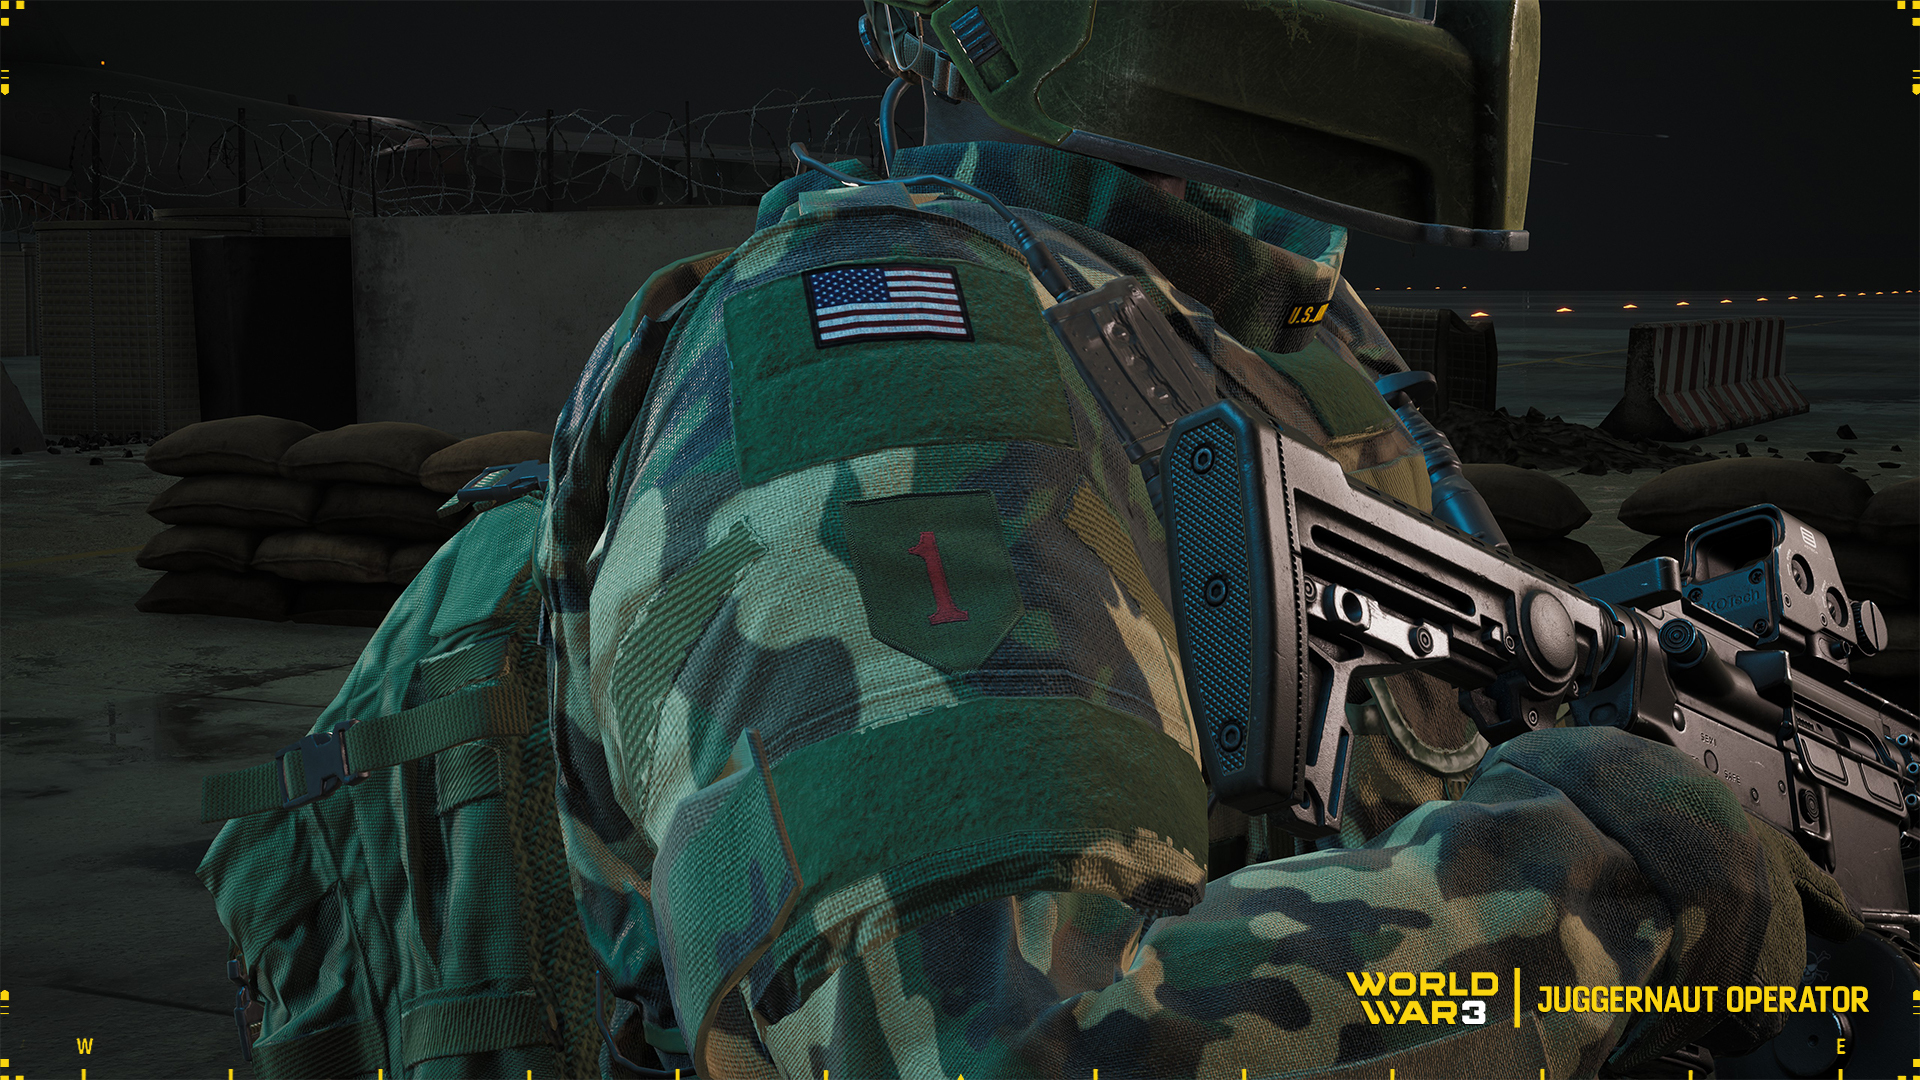
This operator's outfit consists of a helmet with an additional visor that protects the front of the face from shrapnel and improves the ergonomics of communications equipment.
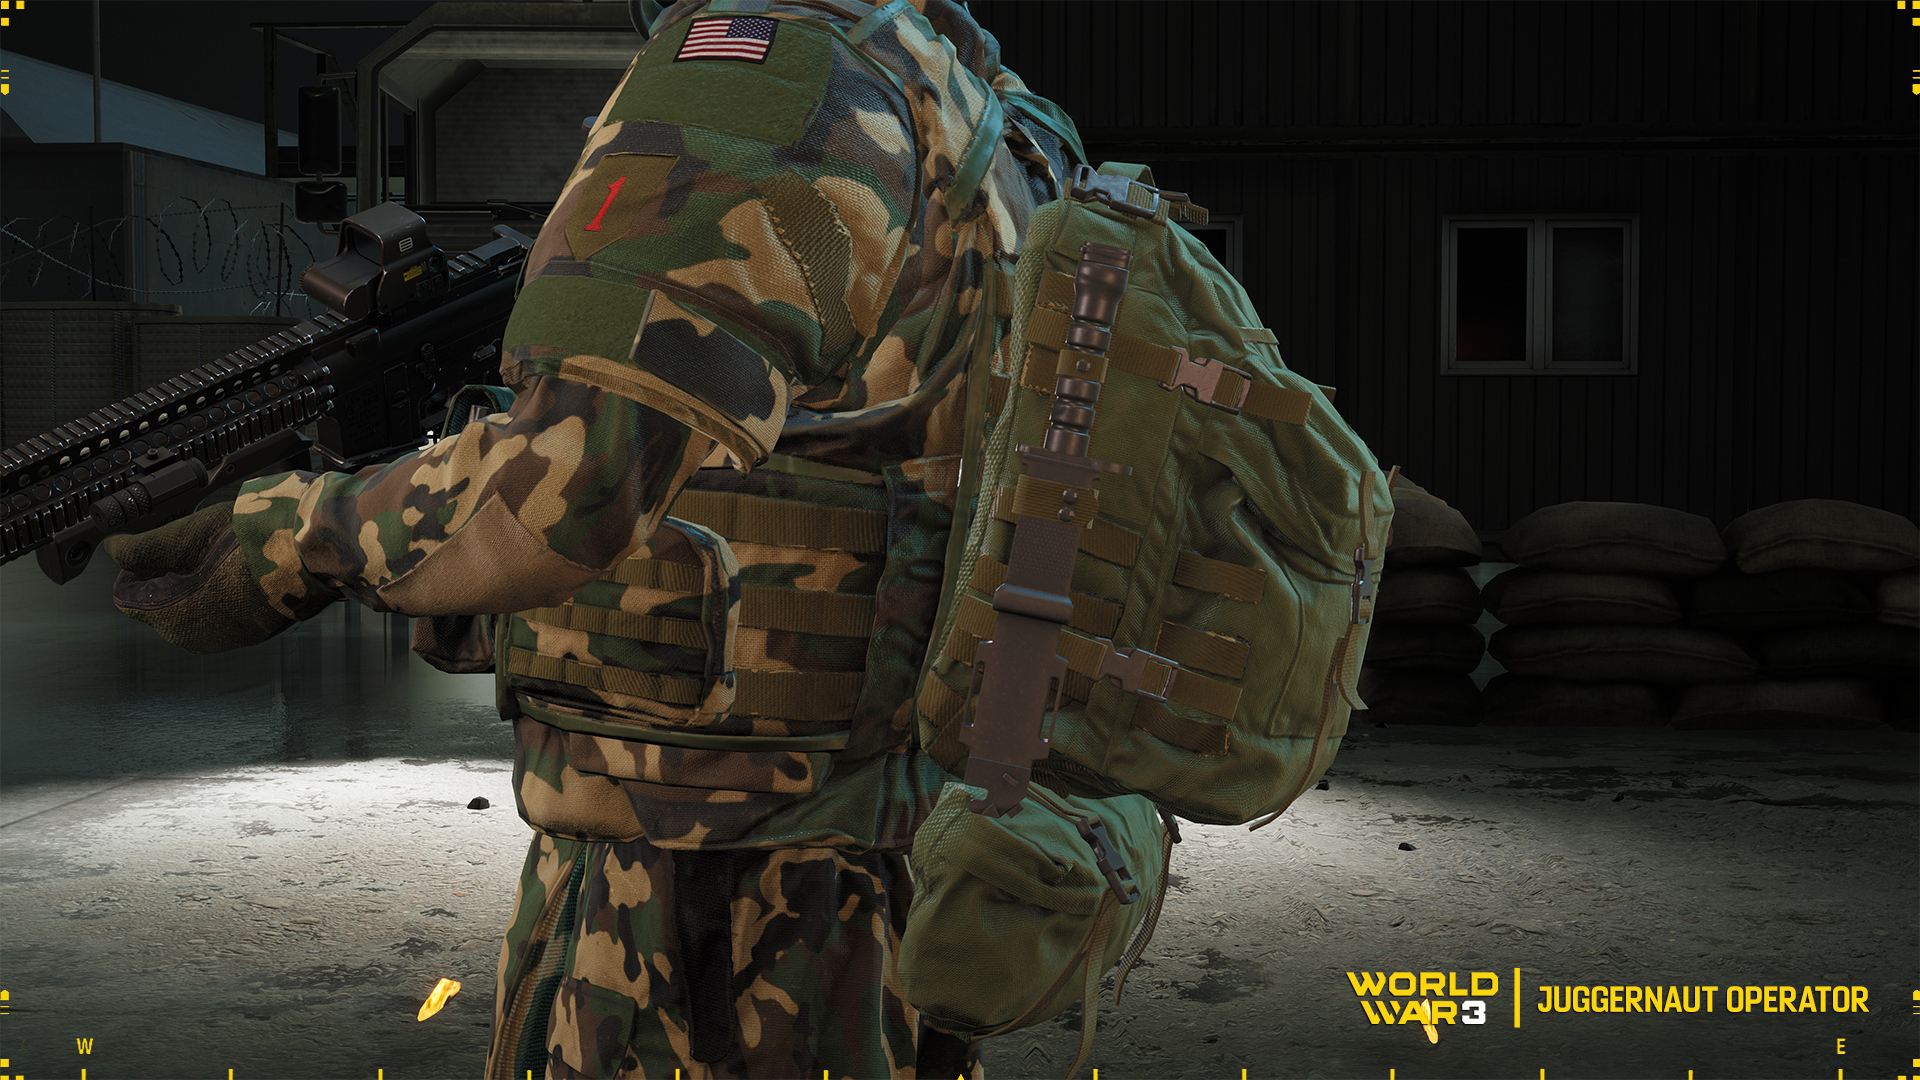
The torso is protected by a heavy vest equipped with a set of armour plates and soft inserts; attention is drawn to the additional soft underbelly cover. On the back is an additional cover in the form of a backpack containing extra equipment.
The camouflage used on this operator's uniform is one of many variations of the currently most popular woodland pattern. Other equipment besides the weapon is the standard green colour generally referred to as 'khaki'.
The operator in its original form belongs to the U.S. infantry, specifically to the well-known and famous “Big Red One”. That is, the 1st Infantry Division. Despite its name, it is a heavy unit with tanks and other AFVs.
It is the oldest infantry division still active in the US Army armed forces. Its history begins with the formation of the Expeditionary Corps, which sailed to fight the Germans in 1917, when World War I was entering its bloodiest period.
After it ended, the Red One also participated in World War II, starting its combat route in Africa and ending it again in Europe, this time in Germany.
The division missed the Korean War because it served as an occupation unit in conquered Germany. The next major conflict it participated in was the Vietnam War. Its last major war was the First Gulf War.
That's it Operators, let us know if you like this type of article. Fall out Operators!
May Specials, Operators
Operators!
Check out this week's special deals related to Operators.
Juggernaut
A living war machine. Pushes through the frontlines without hesitation, withstands heavy fire, and doesn't stop until the objective is reached.
Metro Militia
The streets are safe thanks to him. Even the most dangerous terrorists can’t escape his grasp.
ROK Flotilla
An elite WARFLOT operative. Light, precise, and always one step ahead of the enemy.
S.O.G.
An elite operative from the rapid response unit. Trained for the toughest missions in any conditions. Acts fast, decisively, and silently.
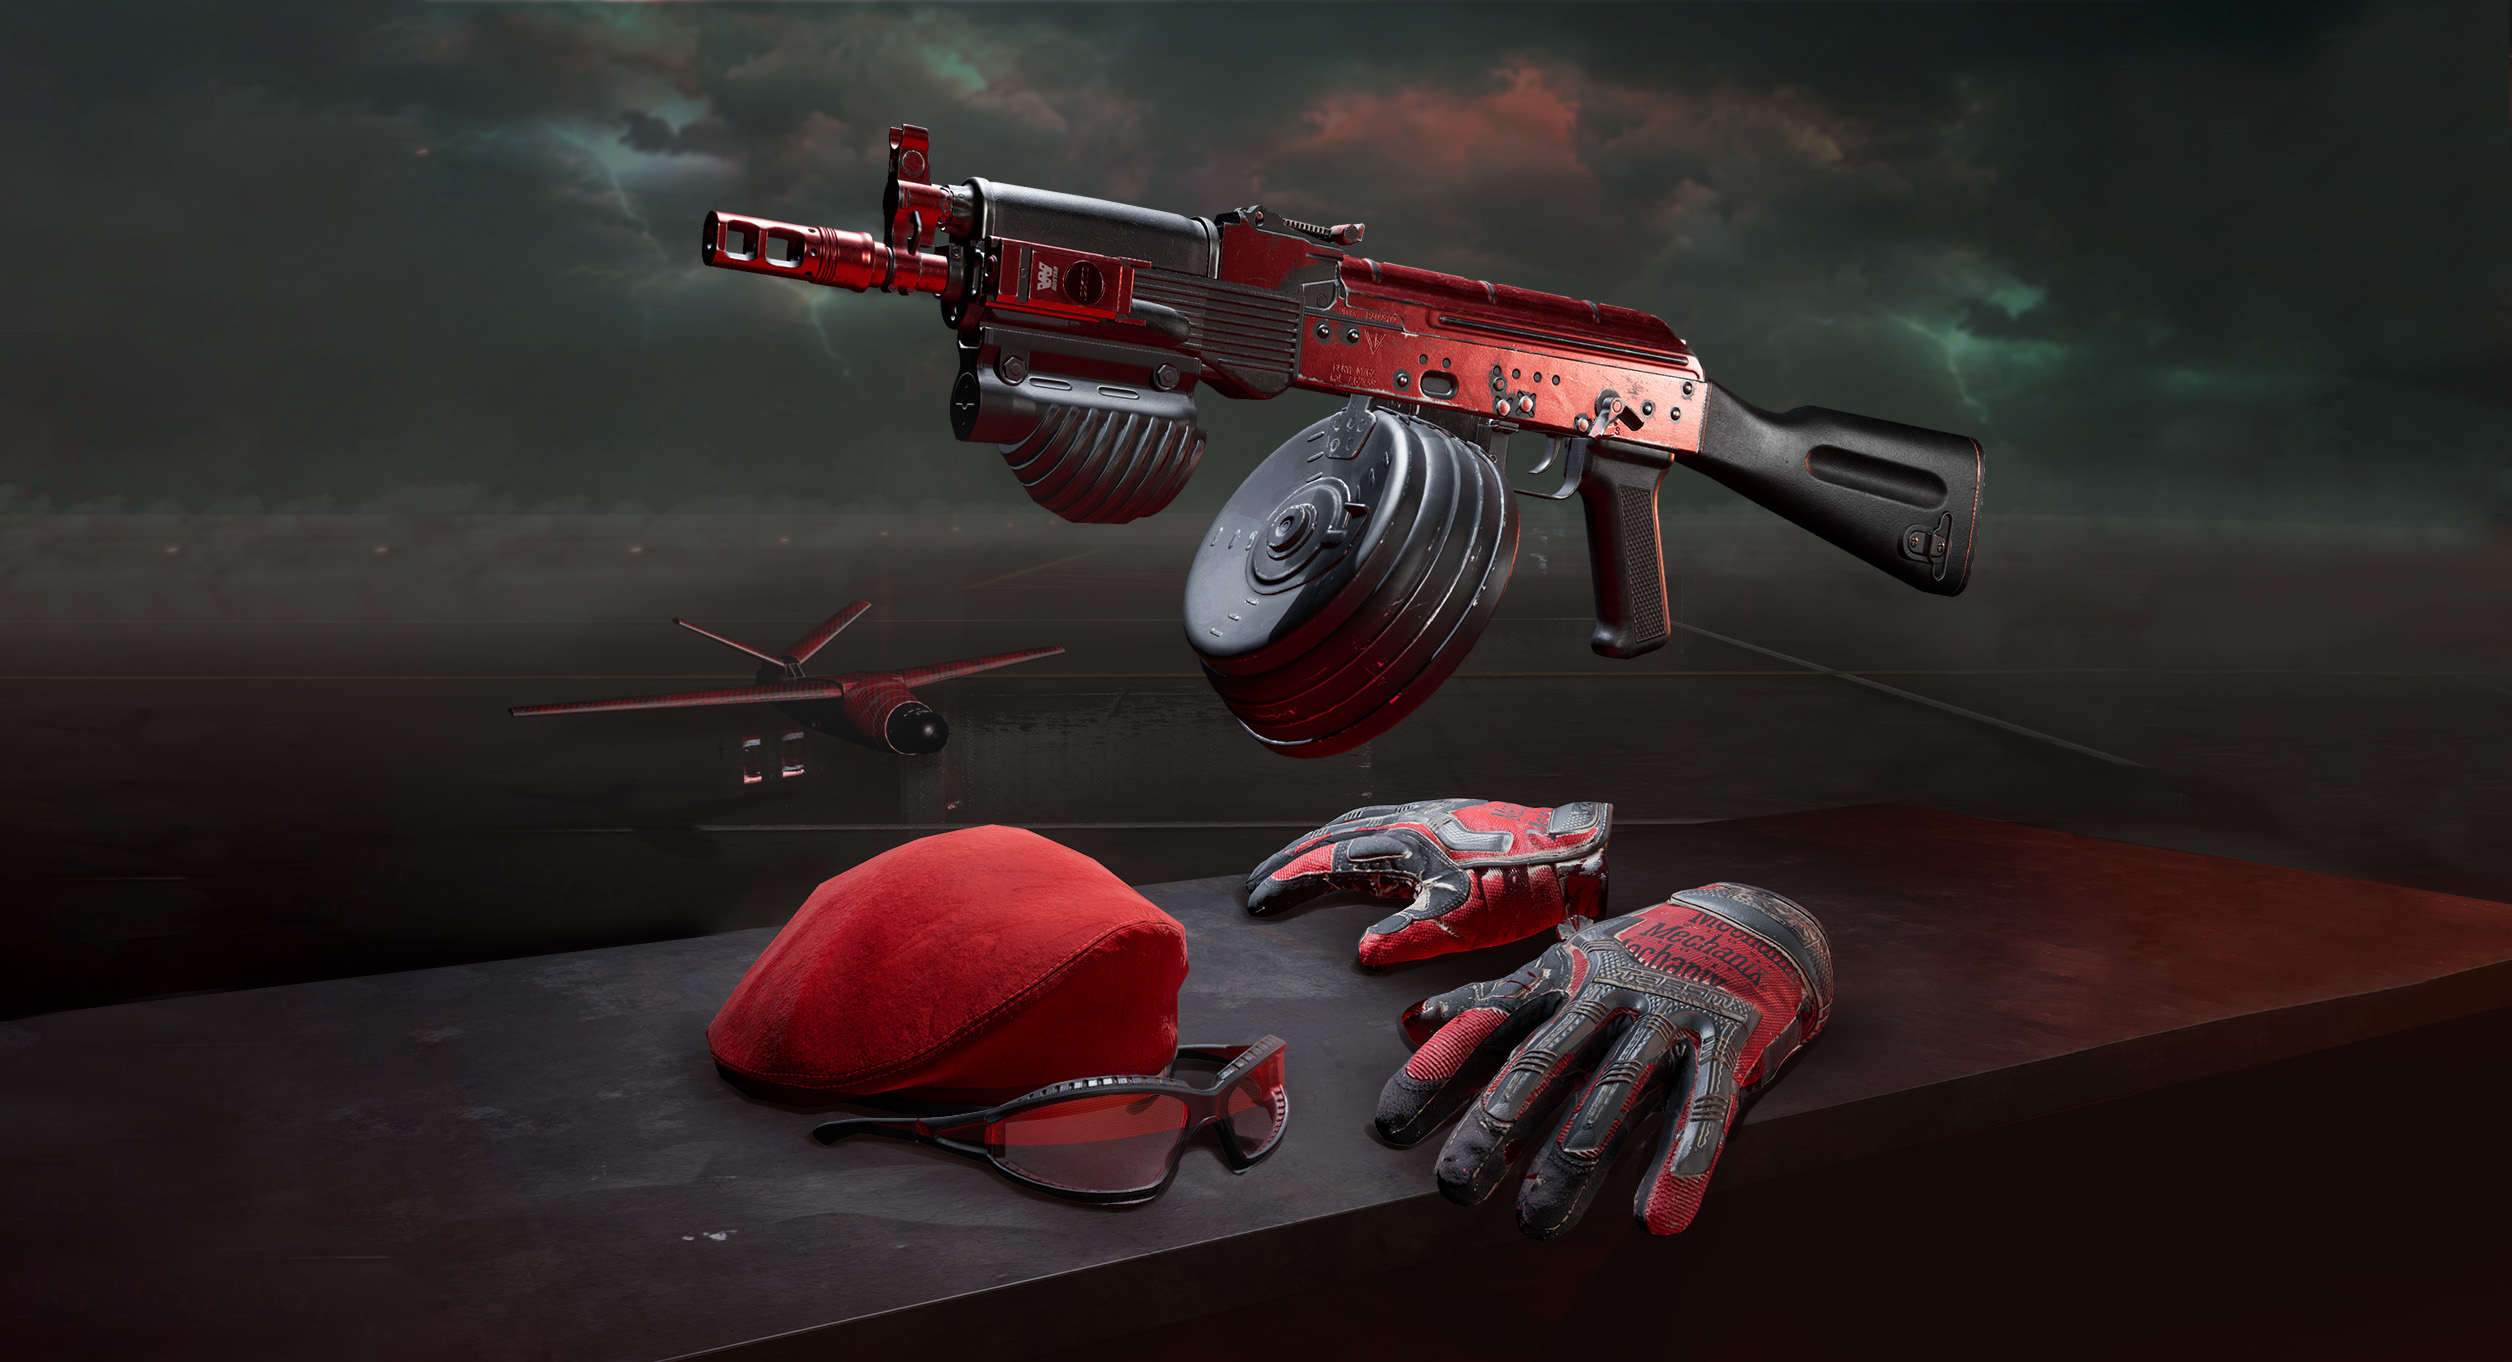
Red Devil Pack
Red beret - a sign of an elite soldier. Tactical gloves - stand out in any situation. Cool glasses show who's the boss. Beryl in unique camouflage - the devil's own scythe.